
The biggest change since then is that wall peeking in at the right. Because it's totally gone! That did wonders for the space and opened the kitchen up to the living and dining area. But we still have a long way to go before the end. We've started planning our kitchen project over a year ago and have since changed the layout to include a peninsula and worked in a dishwasher. And now we've actually started checking things off the to-do list! Here's how it all went down:
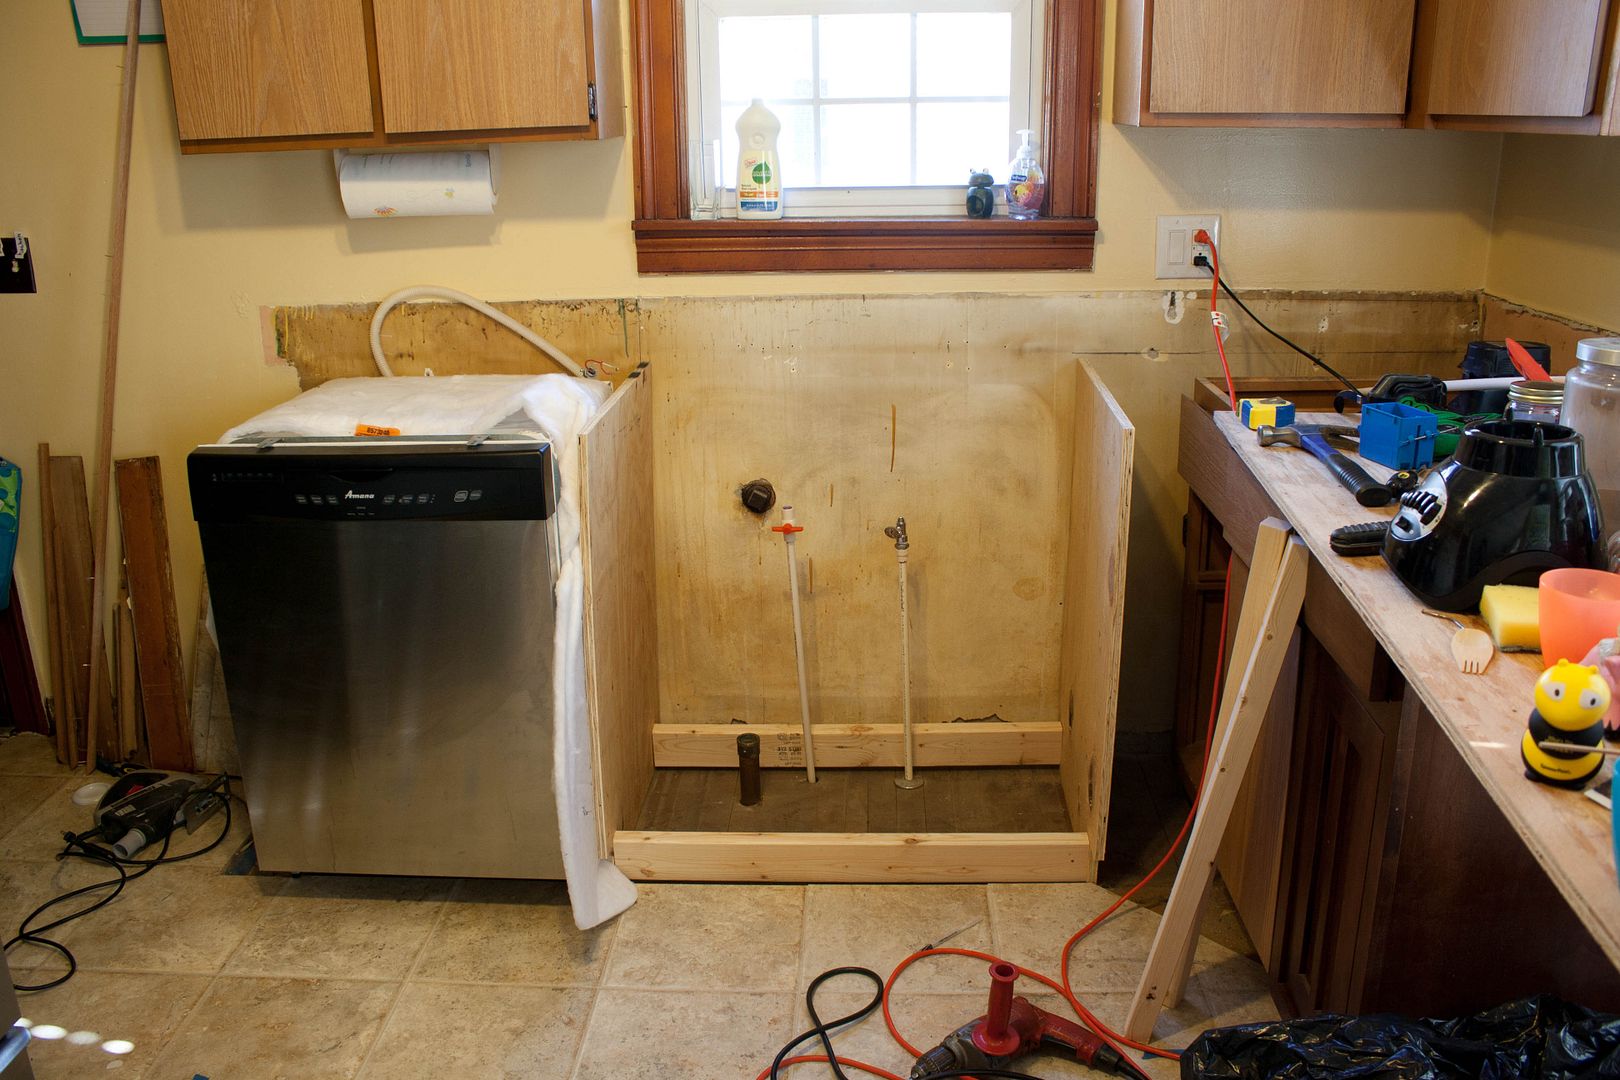
We started by ripping out all the base cabinets. We want to reuse what we have as much as possible to keep costs down, but unfortunately the base cabinets just didn't work with our new layout, and honestly we're so flimsy they weren't really worth trying to save. We did however keep the doors to reuse on new cabinets. My mom (plumber-extraordinaire) ran new piping up for the sink and added shut-offs! This was a big deal because until she installed the shut-offs we had to turn off the water to the whole house. So yeah, they were a pretty big deal. :)

Then we started reworking the space to fit in all our new additions and changes. This involved lots of shifting things around, building, scooching, and slow progress. We did lots of double and triple checking as we went to make sure things were fitting. Our first step was to build the sink cabinet frame and set it into place. We wanted the sink cabinet centered under the window so we lined it up and slid the dishwasher into place to check the fit before anything was installed permanently. It was important to check everything because we knew it would be close to fit in the dishwasher (because the door will open so close to the stove). It was tight with only about 1 1/2" clearance between the dishwasher door and the stove, but it fit!
Next we gave the sink a dry run to make sure it fit into the cabinet frame. Check! Since it is an IKEA sink, it is made to work with IKEA cabinets but I found this video about adapting regular cabinets to work and it was really helpful in the sizing and design of our cabinet.

Baby B wanted to check things out too. But don't worry, this was after the cabinet was reinforced and the sink was installed so there was no chance it would fall!

Then we installed the panel on the left side of the dishwasher, built a cabinet frame in the right corner, and attached plywood all across the top that will be the base for our concrete countertops. We also installed the faucet, connected the water lines, and had a working sink again! The sink will set on top of our future contertop but we didn't want to go that long with no water in the kitchen so we used wood to jack up the sides of the sink to the height it will need to be at later. That allowed us to get the waterlines at the right height and such. When we are ready for countertops we will take out the sink and remove the temporary booster boards, then reinstall the sink after the countertops.


We are still figuring out how we are going to do the corner cabinet so I'll have to fill you in on that later, but we have the frame in place and made it large enough to have functional doors and enough clearance around that huge sink. This made things a little tight for the yard-sale cabinet we wanted to add in to the layout, so my handy husband used a jig saw to notch out the back of the cabinet. This allowed us to overhang the window frame by an inch or two and get all the space we needed. The rest of the cabinets are sitting patiently waiting to be installed as well, but this is as far as we got with them over the weekend.

The other thing we my mom got done was installing several new outlets at countertop level! We went from one outlet back in the corner to four outlets strategically spaced around the the work area. It is SO nice. I can put my crockpot ANYWHERE on the counter and plug it in without an extension cord. Thanks momma!

We feel really good about what we've accomplished so far. The dishwasher and sink were the biggest things we wanted to get done, and we finished that and more! Oh, yeah, did I forget to say the dishwasher is hooked up and works great? And that we bought it on Craigslist almost new for $150? Well it is and we did and we love it! We still have quite a ways to go but plan to have it all done by the end of summer. Here's a quick rundown of what we still have to do:
- install drawer base
- build out corner cabinets
- build peninsula cabinets
- make councrete countertop
- repaint walls green (I know, I just painted them. Everyone was right. Should have done it green in the first place.)
- find a new ceiling fan
- add trim to the cabinet doors
- paint cabinets
- paint inside cabinets (just for fun! any color suggestions? Or maybe a wall paper?)
- find/build bar stools
I'm sure there will be more, but that's all I can think of for now. :) I know I didn't really have any helpful tutorial type advice here, but I don't feel qualified to give any in these areas! Thank goodness my mom was here for electrical and plumbing (please do NOT attempt wiring if you don't know how. A lot of things can go wrong and it can be very dangerous!). If you need help installing a Domsjo sink check out this video and if you want to take a swing at building your own cabinet Ana White has great plans here (we didn't follow them this time because we had to match a few other cabinets we are using, but they are great!). Honestly we are making a lot of this up on the fly and figuring out things as we go. It turns out planning can only do so much. :) Once we make the countertops (we bought concrete this week! excited!) I plan to do a full on tutorial for that since we're having a hard time finding specific instructions.
Anyone else working on a kitchen remodel? Or have you already completed one? Have one planned in the future?
There ARE good reasons why the water line on the left (hot water) does not have a typical undersink shut-off valve and why the cold water line has two different shut-off valves right in a row. I'm saying this for those who know a typical set-up for this situation. :-)
ReplyDeleteAmazing. Just amazing. I'm in love with your sink, btw.
ReplyDeleteThanks Rhetta! Me too! :)
DeleteSo is this going to be an apron sink when all is said and done? That's my DREAM kind of sink :) :)
ReplyDeleteYes! It was my dream too, and I'm soooo excited! :)
Delete