
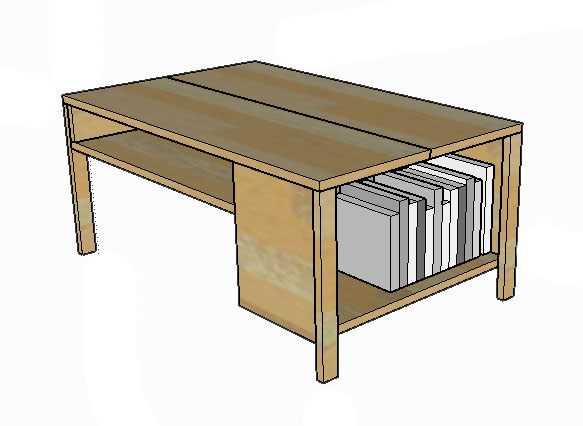
I love that simple style can still have so much function. And it gets bonus points for being a super-easy build that's great for beginners! No drawer, no doors, no special tools required. Read to build your own and get reading? Let's do this!
Measure twice, cut once (seriously, though). Use glue in every step (be careful to clean up any drips, because they can mess up your finish at the end!). Read through all the instructions before you begin. Use 1 1/4"" screws unless otherwise indicated. Pre-drill and countersink all your screws. Be safe, have fun, and let me know if you have any questions! Please note I have not built from these plans myself (you might be the first!), so double check everything as you go.
Shopping List:
1 - 1x10 @ 4'
1 - 1x12 @ 8'
1 - 1x12 @ 6'
1 - 1x2 @ 6'
1 - 1x4 @ 4'
1 1/4" wood screws
wood glue
wood filler
sanding and finishing supplies
optional: Kreg Jig + 1 1/4" pocket hole screws (I'll share Kreg Jig instructions for each step in italics, if you have one!)
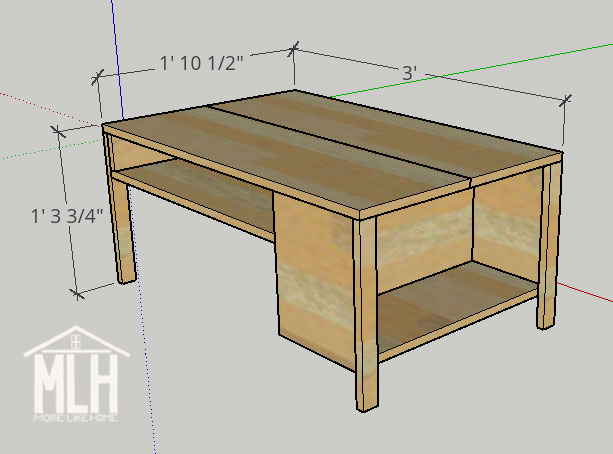
Dimensions: 36" long x 22 1/2" deep x 15 3/4" tall.
You can adjust the height by adjusting the length of the legs.
You can adjust the length by increasing or decreasing the length of the table top, table bottom, and divider boards by the same amount (i.e. add 5" too all those boards for a longer table.
Cut List:
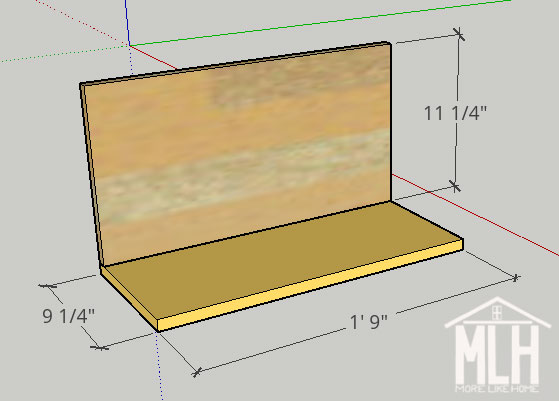
(A) 1 - 1x10 @ 21" (shelf bottom)
(B) 1 - 1x12 @ 21" (shelf back)
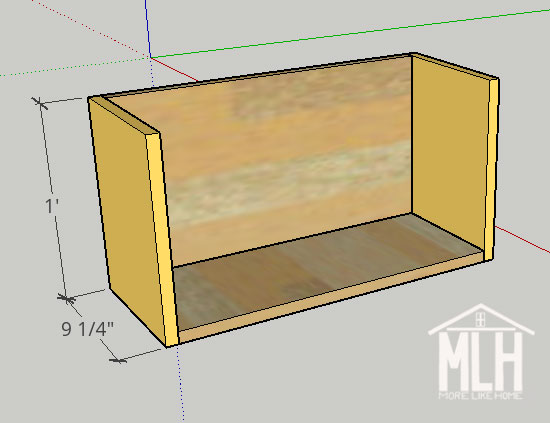
(C) 2 - 1x10 @ 12" (shelf sides)
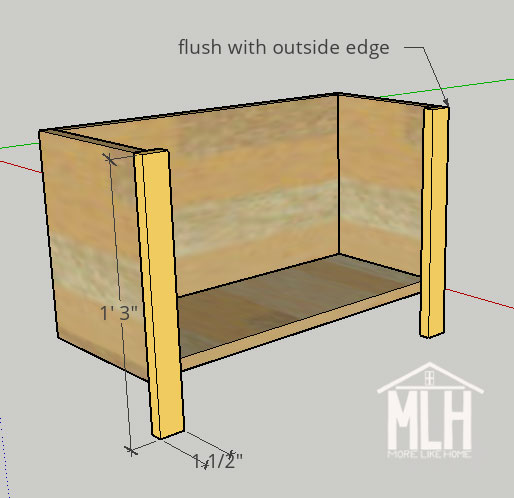
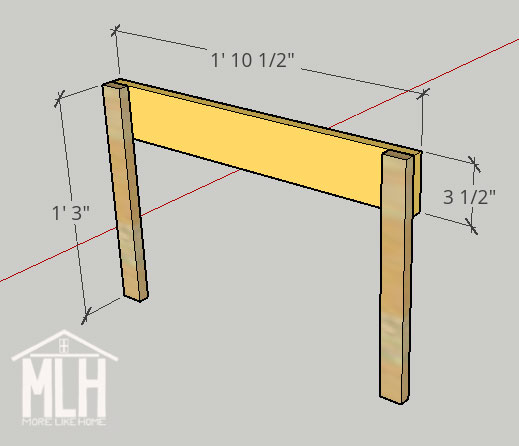
(D) 4 - 1x2 @ 15" (legs)
(E) 1 - 1x4 @ 22 1/2" (side)
(F) 1 - 1x4 @ 24 1/2" (divider)
(G) 2 - 1x12 @ 36" (top)
(H) 2 - 1x12 @ 25 1/4" (bottom)
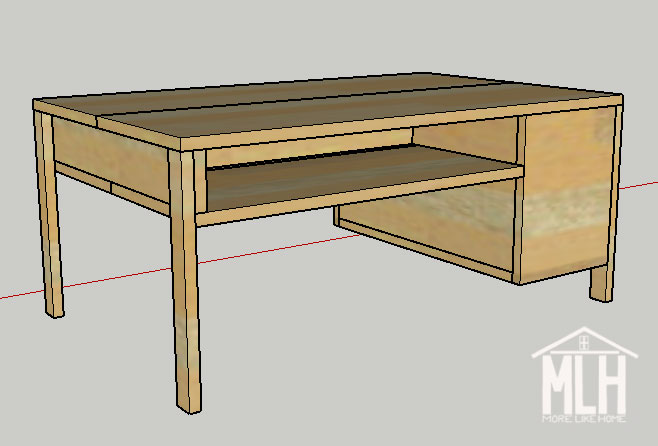
Start by assembling the bookshelf. Attach the shelf bottom (A) to the shelf back (B) by drilling up through the shelf bottom into the bottom edge of the shelf back. If you have a Kreg Jig, you can use pocket holes along the bottom edge of the back board and attach it with pocket hole screws. This step will actually have less visible screw holes if you stick to the regular drill method, because the holes will be underneath the shelf.
Attach the shelf sides (C) by drilling through the side boards into the ends of the shelf bottom and shelf back boards. If you have a Kreg Jig, you can make pocket holes along both sides of the back and bottom boards and use pocket hole screws to attach the side boards.
Attach two legs (D) to the face of the shelf. They should be flush with the top and outside edges of the shelf box. Attach them by drilling through the front of the legs into the front edges of the shelf side boards. Be sure to catch the shelf bottom board with a screw, too, if you can. If you have a Kreg Jig, you can make pocket holes along the front edge of the side boards and one hole on the underside of the bottom board, then use 1 1/4" pocket hole screws to attach the legs.
Attach the remaining two legs to the side table side board (E). Keep the legs flush with the top and outside edges of the side board. If you want to hide the screw holes inside the nook (instead of seeing the holes on the legs), lay it so the side board is on top of the legs and drill down through the side board into the legs with 1 1/4" screws.
Use the divider (F) to connect the shelf section to the other side section. Here's the deal: you can put it wherever you want, as long as it's even. Besides adding stability, the divider also serves to divide the nook into two sections that you can access from either side. So if you have something especially wide you're wanting to hide on the back side (like a big laptop) you'll want to move the divider closer to the front to give you extra space in the back. I've drawn it centered, but you can put it anywhere you like. Just make sure it's the same distance from the front on both the bookshelf side and the other side. Attach the divider by drilling through the side board and shelf back board into the ends of the divider. Make sure you keep it level and flush at the top. If you have a Kreg Jig, make pocket holes in both ends of the divider and attach it with pocket hole screws.

Time for the top (G)! The top should be flush with the outside edges of all four legs. Drill down through the top into the sides and back of the shelf, and into the other side board. Don't forget the glue. If you have a Kreg Jig, start by making pocket holes along one side of one of the top boards and use pocket screws to attach the top boards together, making one solid tabletop. Then make pocket holes along the top of the shelf sides and back, and the other side board. Then use pocket hole screws to attach the tabletop.

Flip that guy over and attach the bottom boards. Make sure you keep them level with 3.5" of space between the bottom boards and the top boards. On the bookshelf end, drill through the back of the bookcase into the ends of the bottom boards. On the other end, drill up through the bottom boards into the bottom edge of the side board. If you have a Kreg Jig, attach the two bottom boards together to create a solid piece just like the top. Then put pocket holes along one end and use them to attach that end to the bookcase with pocket hole screws. Follow the regular instructions above to attach the other end to the side board.

To finish, fill any visible holes with wood filler then sand everything down really well. This is the most important step for a professional finish! Start with a rough sand paper, then go over everything with a medium paper, then again with a fine paper. Once it's super smooth, finish it with whatever paint or stain and sealer you like.

Add your favorite books and you're done!
I love to see your finished projects! Tag me on instagram @more.like.home or share them on our facebook page!
Want more plans? Check out the rest of the coffee table series here and all our other building plans here!
No comments:
Post a Comment