
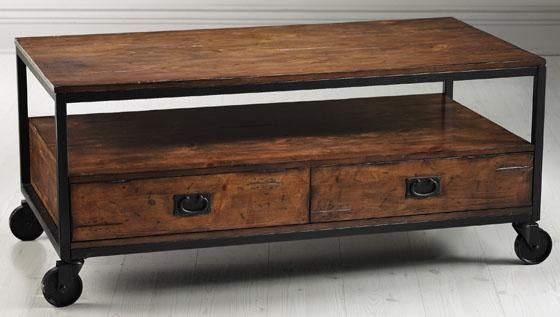
image via pinterest
Then another turned up in an issue of Better of Homes and Gardens. And it suddenly reminded me of something very familiar.

image via Better Homes and Gardens magazine
Our very first building project, my very first plan, and my very first post. Hello, beautiful. Our Rhyan coffee table has been taking a beating for over seven years and is still going strong, and it shares a lot of features with the tables I've been pinning (the same basic layout with an open shelf on top and drawers below).
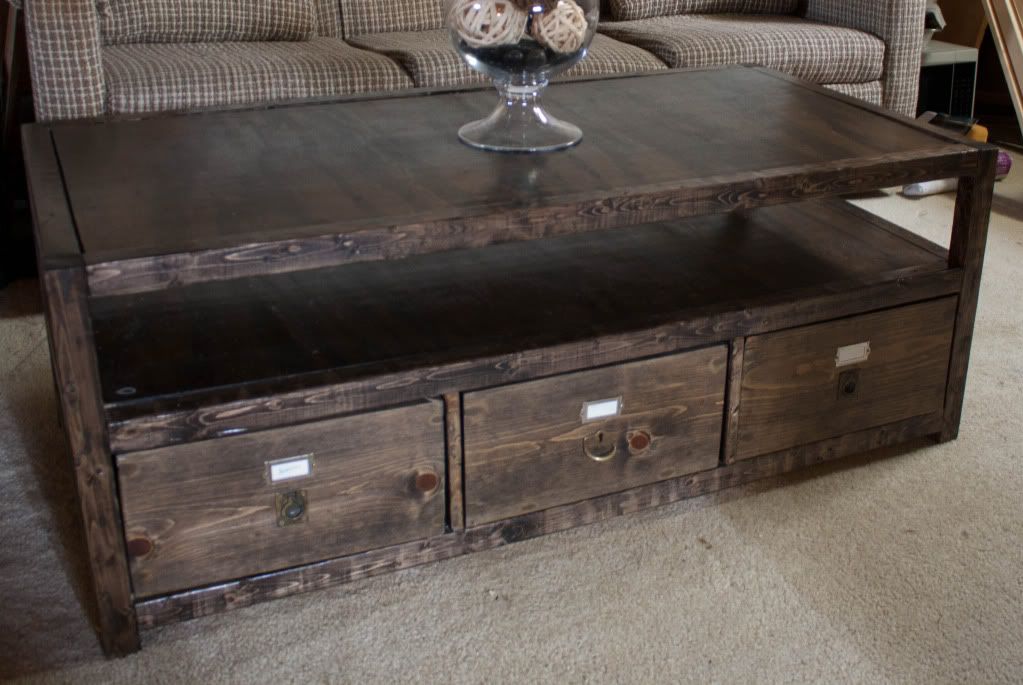
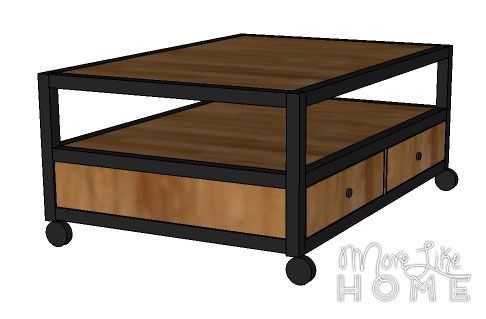
So today we're looking at how you can make a few simple changes to turn a Rhyan table into... let's call it a Bryan table.

The tables are very similar with just a few differences. The Bryan table is wider, the drawers are more shallow, and there are only four drawers instead of six. Plus you can add wheels to finish off the more industrial feel. Sounds easy enough, huh? We'll also look at two options for the drawers - one using drawer slides and one without (our original table and the PB table it was based on did not use slides, but if I did it over I probably would).
Shopping List:
1 or 2 sheets 1/2" plywood (if you're using drawer slides you can skip the bottom shelf and need only one sheet. without drawer slides you will need the second sheet to make a bottom shelf)
6 - 2x2 @ 8'
1 - 1x6 @ 8'
1 - 1x6 @ 6'
1 - 1x2 @ 10'
1 - 1x3 @ 6'
2 - 1x4 @ 10' (if you're not using drawer slides skip the 1x4s and get an extra 8' and 10' 1x6 instead)
4 sets 14" side-mount drawer slides (go for full extension!)
industrial style wheels (big wheels like this are pretty pricey, let me know if you find a good deal!)
wood filler
wood glue1 1/4" screws
2" screws
Kreg Jig with 1 1/4" and 2 1/2" pocket screws (optional. you can also use 1" kreg screws to install the shelves)
finishing nails (optional)
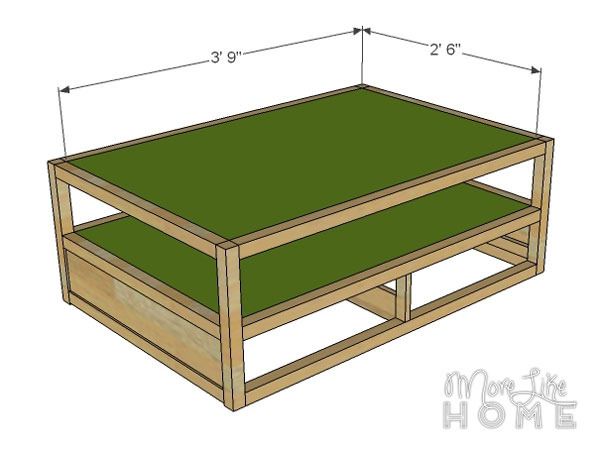
Finished Dimensions: 48" wide x 33" deep x 17 1/4" high (plus wheels)

Please read all instructions before beginning. Use glue in every step! Be careful and have fun.
Cut List:
A) 4 2x2 @ 17 3/4” (legs) *you may want to make the legs a little longer for more clearance if you are not planning to add casters*
B) 6 2x2 @ 30” (side rails)
C) 2 1x6 @ 30" (side panels)
D) 6 2x2 @ 45” (front/back rails)
E) 2 1x2 @ 5 3/4” (stiles)
F) ½” strips of scrap wood OR several small metal L-Brackets OR Kreg Jig (shelf supports)
G) 2-3 ½” plywood @ 45x30”(shelves)
H) 1 1x4 @ 30” (drawer dividers)
I) 2 1x2 @ 22 1/8” (center divider)
Using Drawer Slides:
J) 4 1/2" plywood @ 19 5/8 x 13 3/4” (drawer bottoms)
K) 4 1x6 @ 21 7/8” (drawer fronts)
L) 4 1x4 @ 21 1/8"” (drawer backs)
M) 8 1x4 @ 13 3/4” (drawer sides)
N) 2 1x2 @ 30” (drawer supports)
Without Drawer Slides
J) 4 1/2" plywood @ 20 3/8 x 14 1/4” (drawer bottoms)
K) 4 1x6 @ 21 7/8” (drawer fronts)
L) 4 1x6 @ 21 7/8” (drawer backs)
M) 8 1x6 @ 14 1/4” (drawer sides)
N) 2 1x2 @ 30” (drawer supports)
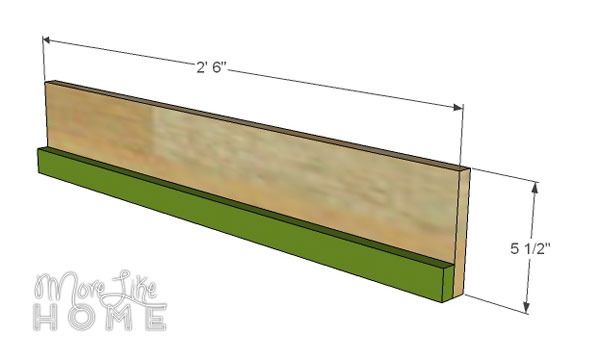
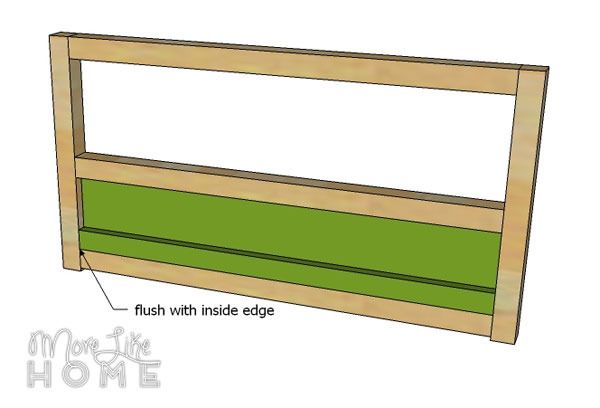
Start by using three side rails (B) to connect two legs (A) as shown below. The first rail should be flush with the top edge of the legs, the second should be spaced down 7" from the top rail, and the third should be spaced down 5 1/2" from the second rail, leaving a 1/4" gap below the bottom rail. Use glue. You can attach the rails with a Kreg Jig & 2 1/2" pocket screws (definitely recommend the Kreg for this one), or drill through the legs into the ends of the rails with 2" wood screws. Repeat with the remaining legs and side rails.

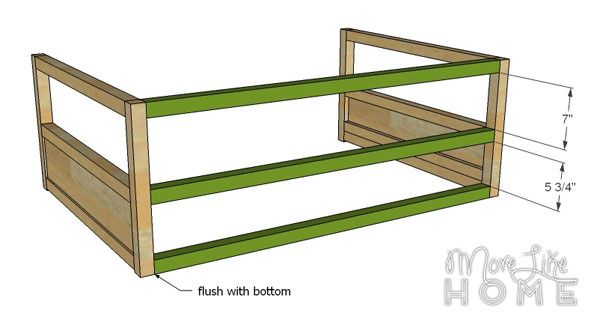
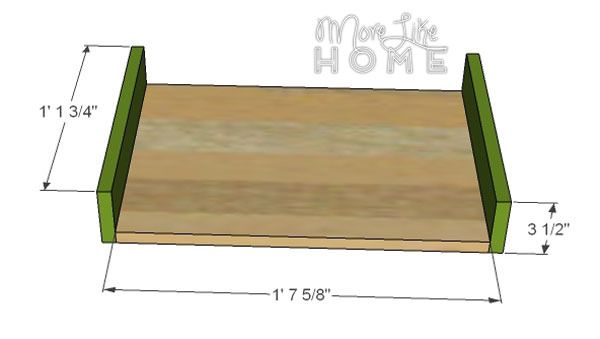
Assemble the side sections by attaching a drawer support (N) to each side panel (C), keeping the bottom and side edges flush. Use glue and drill through the supports into the side panels with 1 1/4" screws.
Install the side panels into each of the side sections you just built. The panel should be flush with the outside face of the legs and the drawer support should be flush with the inside. The best way to attach this is using a Kreg Jig with 1 1/4" pocket screws, but you could also get by drilling through the legs and rails into the sides of the panel.
Now connect the two side sections using the front/back rails (D). On each side, attach one rail flush with the top of the legs, a second spaced down 7", and a third flush with the bottom of the legs (it will be spaced down 5 3/4" from the second rail which is different than what you just did with the side rails. Don't panic!) You can attach the rails with a Kreg Jig & 2 1/2" pocket screws
(definitely recommend the Kreg for this one), or drill through the legs
into the ends of the rails with 2" wood screws. Repeat with the remaining rails on the other side.

Now you need to decide if you are using drawer slides or not. Our thoughts on drawer slides: they are very nice to have, but you don't need them. Our coffee table does not have slides and the drawer still work just fine and slide easily, but they are easily pulled all the way out by our kids. Slides would prevent that, but they can be very tricky to install until you get the hang of it. I have shed many tears over drawer slides. But once you get it, you'll probably be glad you did.
Did that help with your decision? Or just make it worse?
If you ARE using drawer slides, just install the drawer divider (H) between the two stiles. Use a Kreg Jig with 1 1/4" screws and glue, or drill through the stiles into the drawer divider.
If you ARE NOT using drawer slides, you need to install a bottom shelf (G) for the drawers to sit on. If you don't have a Kreg Jig you'll need some small strips of wood or brackets (F) to attach around the bottom rails for your shelf to rest on (you can see how we did that in the Rhyan table plans). But if you have a Kreg (we're on a first name basis now) you can use it with 1 1/4" pocket screws to attach the shelf directly to the side and bottom rails. You want the shelf to sit flush with the top edge of the bottom set of front/back rails. Remember the bottom set of side rails are set 1/4" higher so just worry about the front/back rails.
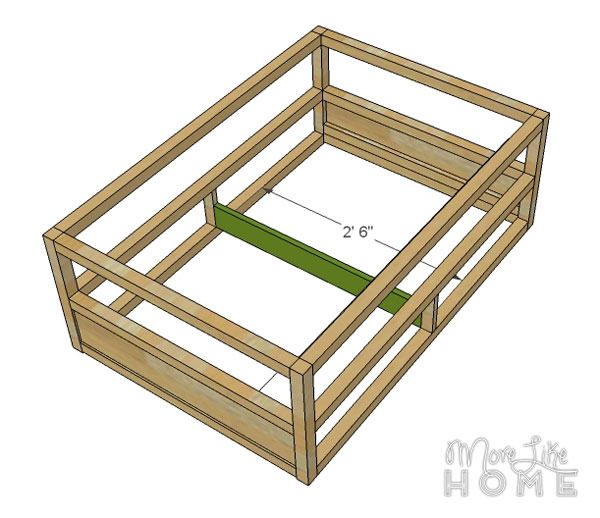
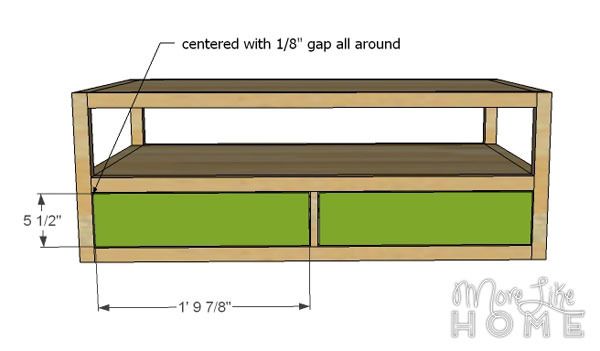
Install the drawer divider (H) between the center stiles using a Kreg Jig and 1 1/4" pocket screws, or by drilling through the stiles into the ends of the divider.
Then install the two center dividers (I) on either side of the drawer divider. These will keep your drawers from sliding all the way through the table. They should be centered with 15 3/4" of space on either side. Attach them by drilling down through the supports into the shelf with 1 1/4" screws. And glue!

Now you can make the drawers.
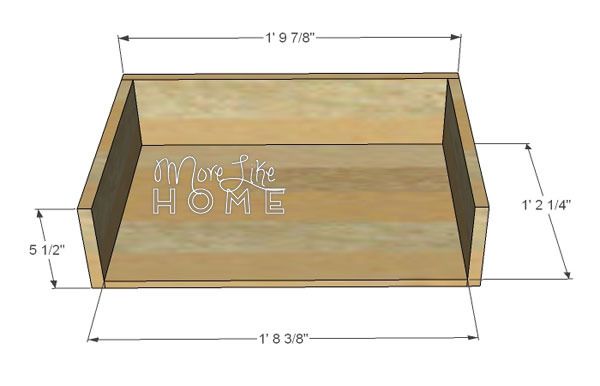
If you ARE using drawer slides, make sure you use the measurements indicated for such. Start by double checking the width of your drawer openings. Your finished drawers should be 1" narrower for most side-mount drawer slides. Attach the drawer sides (M) to the drawer bottom (J). Use a Kreg Jig and 1 1/4" pocket screws, or drill through the sides into the drawer bottom with 1 1/4" wood screws. Don't forget to glue.
Attach the drawer back (L). Using a Kreg Jig or by drilling through the drawer back into the sides and bottom.

Follow the instructions on your drawer slides to install the drawer boxes. You want them to end up recessed 3/4" from the face of the coffee table. *you haven't actually installed the shelves yet (my steps are a little out of order int he pictures) so you should have plenty of room to work*

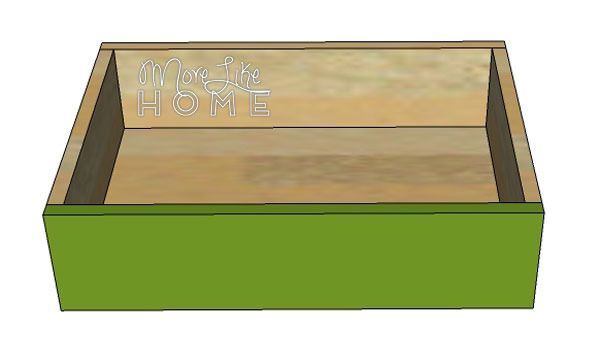
Center a drawer front (K) over each drawer box with a 1/8" gap all around. Use finishing nails and glue to attach the drawer fronts to the drawer boxes. I also like to use my Kreg to attach the drawer fronts! They should end up flush with the face of the table.
Now, if you ARE NOT using drawer slides, use the measurements indicated for that style. Start by attaching the drawer sides (M) and back (L) to the drawer bottoms (J) just like you would for drawer slides.
But now go ahead and attach the drawer front (K) using a Kreg Jig and 1 1/4" pocket screws, or by drilling through the front into the sides and bottom with 1 1/4" screws. Make sure all the edges are flush.
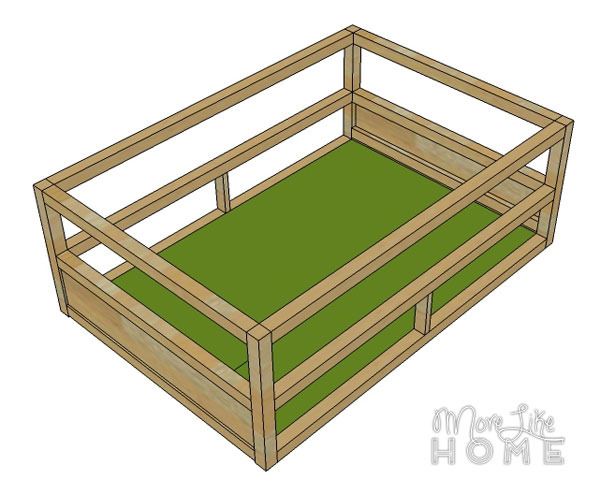
Then just slide the drawers into place.
Next you can install the shelves (G). The shelves are a perfect opportunity to use a Kreg Jig! Use 1 1/4" pocket screws to install one shelf flush with the top edge of the middle set of rails, and one flush with the top of the table. If you don't have a Kreg Jig you can use narrow strips of wood or small brackets (F) like we did in our original coffee table. *we actually didn't glue these shelves so they could be removed for easier transport. It's pretty heavy when it's all together!*
You're almost done! Fill any holes with wood filler, let it dry (repeat if necessary) and sand the whole table smooth. Start with a rougher grit sandpaper and finish with a fine paper. Then paint or stain & polyurethane as desired. To get the look of the inspiration tables try a stain on the shelves and drawers, but paint the legs and rails black or a deep charcoal. And don't forget to add drawer pulls and casters!
Have fun! I'd love to see a picture if you make one!

Like the wood
ReplyDelete