

We've spent seven years of married life keeping our keys in a bowl. Then Baby Brother learned to climb. Nothing is safe. After countless times swiping our keys, losing them for days at a time, and setting off our car alarm (apparently we're slow learners?) we finally decided it was time to move them somewhere higher. We figured hanging them would be the best option to get them out of reach but still easily accessible for us. I looked at a few key holders but nothing felt like a good fit, so I decided to just make our own with a branch straight out of our backyard.

Here's all you need to make your own:
- a branch (any size/thickness. just find one you like..)
- cup hooks (we used white vinyl coated hooks like these because they are a nice contrast to the natural branch. you can use whatever size works well with your branch)
- a way to hang it (we used nails and twine)

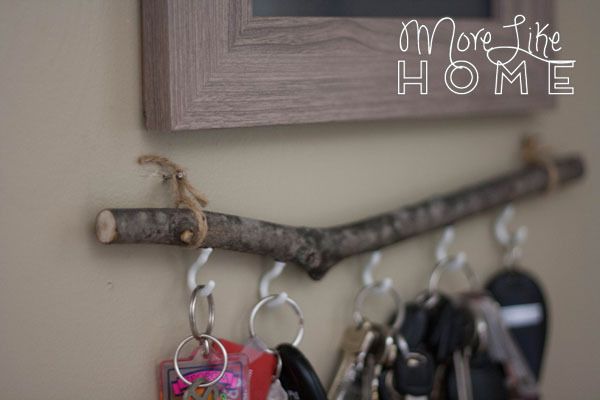
Start by cutting your branch the size you like. I picked a section of the branch that was a little more interesting with a bend and a knot. You can use a handsaw to get nice, clean ends like I did, but if you don't have a saw you could just break the branch instead (watch out for splintery ends if you do).

Walk on the stick if you are so inclined.

Figure out which side of the branch will be the bottom and attach the hooks evenly along the bottom edge. I had to push hard to get them started, but then they twisted in pretty easily (I didn't drill any holes, just twisted them right in by hand). Oh, and make sure all the hooks end up facing forward.

Big Brother could even do it once I got them started.

Then it was time to hang it. I put two finishing nails into the wall, wrapped twine around the ends of the branch, and tied the tails onto the nails. I love the look it ended up with, but I would definitely recommend choosing nails with a bigger head. It will be easier to keep the twine on while you tie it, and we've already had and end slip off the nail when we picked up a set of keys.
That's it! Quick, easy, and most importantly out of reach.


They style fits perfectly plus it's a great reminder everyday.

Here's is the completed entry corner. So far it's working great for our little family, and looking so much neater than before.

And here's one more peek at the tiny helpers. Who are getting a little less tiny every day.


So what do you do - key bowl or key hooks?

No comments:
Post a Comment