
You can find all the "before" photos and the rest of our nesting plans here.
I would have loved to restore it back to the original wood, but that just didn't turn out to be a feasible option for us. There was nick in the corner of the mantle where we could see at least four layers of paint - black, green, brown, and beige - and we still couldn't see the wood!

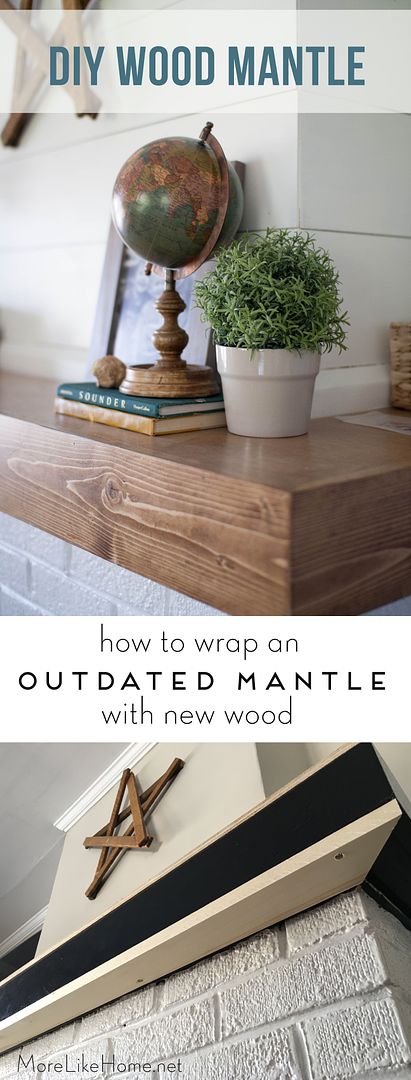
Whether we sanded it or stripped it, we would be looking at a huge mess. So we decided to start with a clean slate and wrap the entire mantle with new wood. It worked out great!

I love how it plays with the new shiplap for a more casual farmhouse vibe. And you can do it, too! This is also a great option if you want to cover a concrete or brick mantle to add a little contrast to you fireplace. Want to give it a try?

This is definitely a custom fit piece, so I'm just going to show you the process and you'll need to work with your own measurements. Here we go.
Step 1: Cover the top of the mantle with wood. You probably already guessed that. Depending on the shape and size of your mantle you can use sturdy plywood or regular 3/4" thick boards. If you're doing a simple straight run I would go with dimensional boards and save time cutting, but I wanted our bump-out to be as seamless as possible so cutting a continuous piece from plywood made the most sense for us. I measured all the sides, drew it up on the plywood, and cut it out. We ran into a problem again with things being so wonky in this old house. Nothing was square or level so it took a lot of tweaking and shims to find just the fit we needed. It paid off in the end. And we still totally love this house, so I can't complain too much. We attached this top piece in place with finishing nails.
Note: We went with a high end plywood with a beautiful, smooth side to get a good finish. It was somewhere between 1/2-3/4" thick.

Oh, and we had to trim down an outlet cover to get the wood flush against the wall.

Step 2: Cover the bottom of the mantle with wood. This was a much smaller area to cover, and since it wouldn't be as visible as the top we went with strips of wood with mitered corners. We attached the bottom boards with a few countersunk wood screws. Just to make sure they wouldn't start to fall off over the years.

Using dimensional lumber for this step didn't end up saving us much time because the mantle was so wonky. Again. This is the board for the short side once we finally got a good fit (it's basically an ice cream cone):

See what I mean? But eventually we had the top and bottom of the mantle covered to make a nice big inside-out oreo.

Step 3: Cover the face of the mantle. Cut strips of wood wide enough to cover your entire oreo sandwich and hide those yucky plywood edges. I 100% recommend dimensional lumber for this step so you won't be left with any plywood edges showing (they don't take stain the same and will stick out like a sore thumb). Just shave down a board to the width you need. You can use a table saw, or get a guide to use with a regular circular saw for around $20.
Once your boards are the right width, cut pieces to the length you need to cover the face of your mantle. We mitered the corners for a nice clean finish and attached these boards with finishing nails.

We ended up with a few small gaps but overall are very happy with it, especially considering what we were working with!


Once the whole mantle is covered you can fill any holes (or cracks, if you'd like) with wood filler, then sand everything down nice and smooth. Starting with a good plywood saved a ton of time and dust during this step.

We stained our mantle with a light coat of Minwax Early America (I still had some leftover from our farmhouse table) then topped it with three coats of Polycrylic in a matte finish.

And that's it!

I am so glad to say "goodbye" to glossy black and "hello" to warm, inviting wood tones.

It's a much better fit for both my style and my goals for our home. Relaxed, comfortable, and ours. I'm always reaching for a space that is family friendly, and the kind of home we're all glad to come back to.

I recently read the book Design Mom (I got it at the library but you can also buy it here) and loved some of the tips for designing a home that works for the whole family. It's a topic near and dear to my heart that I'm always trying to improve on, and while this wasn't a big functional change it still made a big impact in how our living room feels. And I think that's still important.

What's the biggest improvement you've made in your living room? A new paint color? The perfect couch? Ditching the tv? Tell us the best thing about your space and how it works for your family!
We put ceiling fans in our family room, which was a pretty significant update since we don't have central air. :) I would love to put new flooring and a new mantle in there someday, because that room feels 40 years older than the rest of our house and Husband won't let me paint the wood paneling.
ReplyDeleteThat would be beautiful! And don't forget a french door. :D
DeleteThanks for posting your project! I want to do this in my 1928 Spanish-style home.
ReplyDelete