
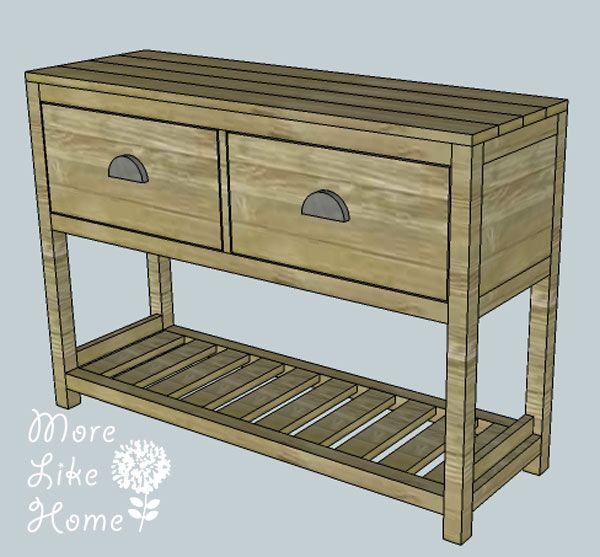
Want to build one of your own? Here's what you need:
Shopping List:
5 - 2x2 @ 8' long
1 - 1x10 @ 8' long
1 - 1x10 @ 4' long
1 - 1x2 @ 4' long
1 - 1x3 @ 4' long
1 - 1x3 @ 10' long
2 - 1x4 @ 8' long
1 - 1x8 @ 10' long
2 sets of 12" drawer slides
2 drawer pulls
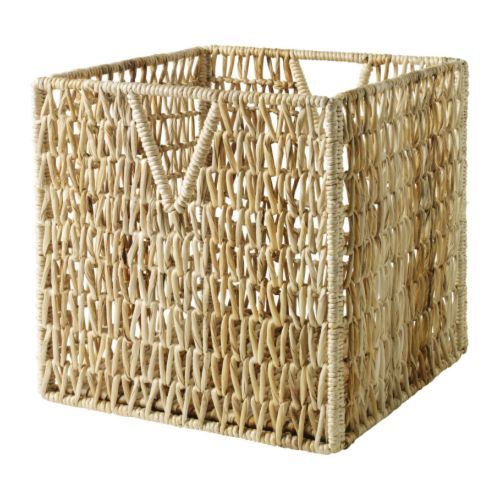
optional - baskets for the shelf
Tools:
saw
drill
2" screws
1 1/4" screws
Kreg Jig & 1 1/4" self tapping screws (**optional)
wood glue
wood filler
finishing supplies
Cut List:
(A) 4 2x2 @ 29 1/4" (legs)
(B) 6 2x2 @ 11" (side rails)
(C) 2 1x10 @ 11" (sides)
(D) 6 2x2 @ 39" (front/back rails)
(E) 1 1x10 @ 39" (back)
(F) 1 1x2 @ 9 1/2" (drawer divider)
(G) 2 1x2 @ 11" (shelf sides)
(H) 10 1x3 @ 11" (bottom slats)
(I) 2 1x3 @ 11" (drawer supports)
(J) 1 1x3 @ 11 3/4" (center drawer support)
(K) 1 2x2 @ 11" (top support)
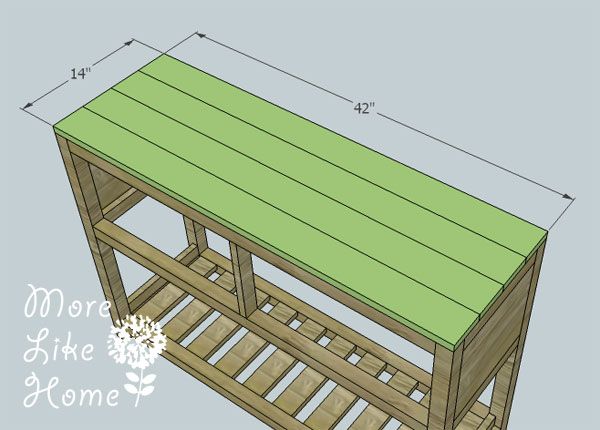
(L) 4 1x4 @ 42" (top)
(M) 2 1x10 @ 16 5/8" (drawer bottom)
(N) 4 1x8 @ 16 5/8" (drawer back)
(O) 4 1x8 @ 10 3/4" (drawer sides)
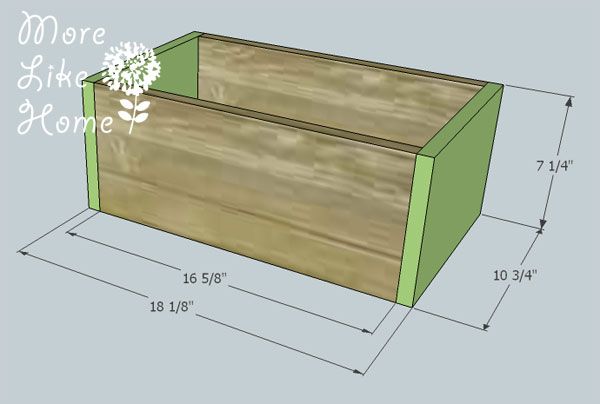
(P) 2 1x10 @ 18 7/8" (drawer front)
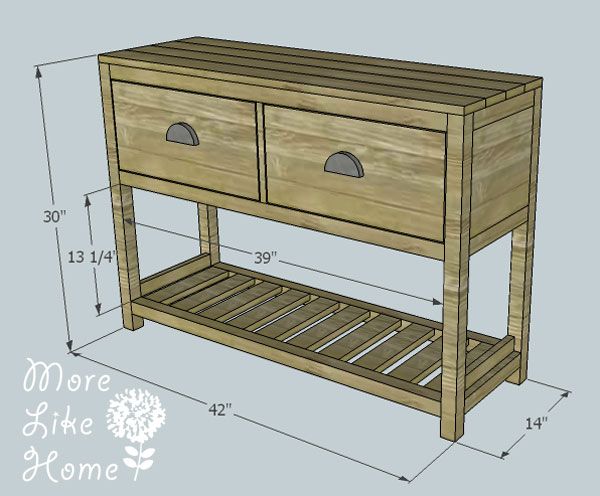
Dimensions: 42" wide x 30" tall x 14" deep
Build the Table
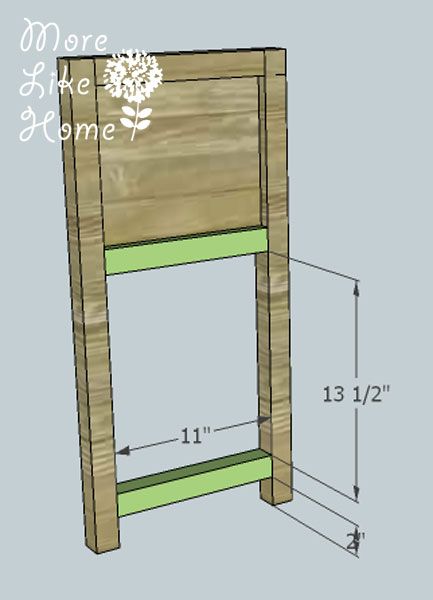
Start by using one side rail (B) to connect two legs (A). You can use a Kreg jig or drill through the legs into the ends of the side rails. Use glue and be sure to keep everything flush across the top and outside edges.
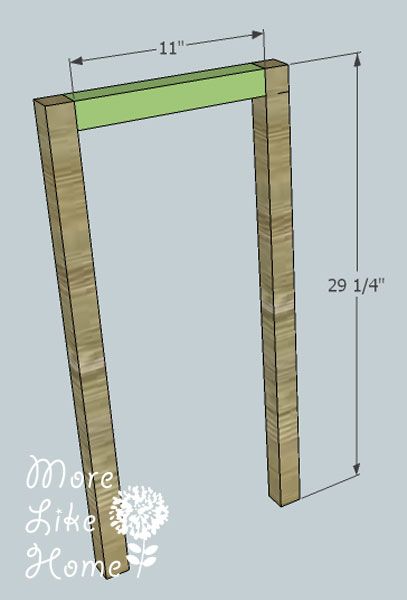
Then install the side panel (C). Slide it right up against the top side rail and keep it flush with the outside edges of the legs (this will make it inset 3/4" on the inside). You can attach it with a Kreg Jig, or by drilling through the legs and side rail into the edges of the side panel.
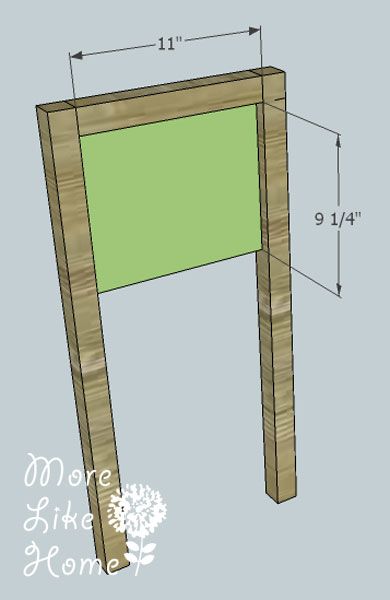
Attach two more side rails (B) as shown below. One should sit against the bottom edge of the side panel and be flush with the inside and outside edges of the legs. The other should be set down 13 1/2" with 2" of space left underneath. You can attach them with a Kreg Jig, or by drilling through the legs into the ends of the side rails. Repeat these steps to build the other side section.
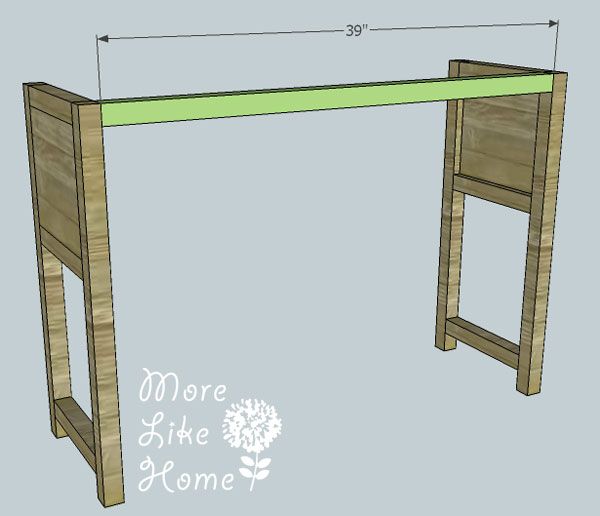
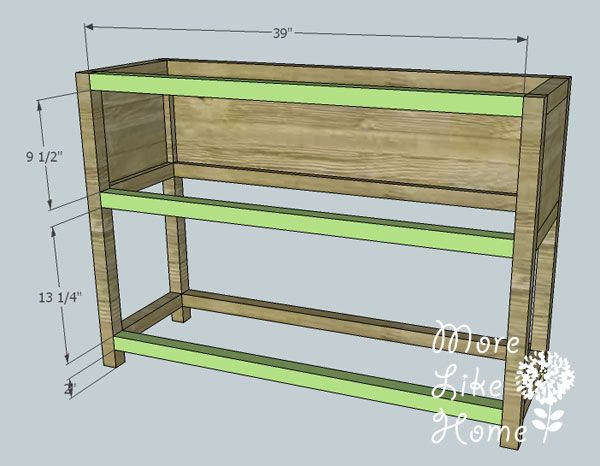
Now we'll start connecting the two side sections. Attach the first front/back rail (D) to the top corners of the side sections like in the pic below. (this will be the back of the table) Keep it flush with the top and back edge of the legs. Attach it using a Kreg Jig or by drilling through the legs into the ends of the back rail, and don't forget to use glue!
Install the back panel (E). It should sit right up against the top back rail and be flush with what will be the back side of the table (this will leave it inset 3/4" on the inside). Attach it using a Kreg Jig or by drilling through the legs and back rail into the edges of the back panel.
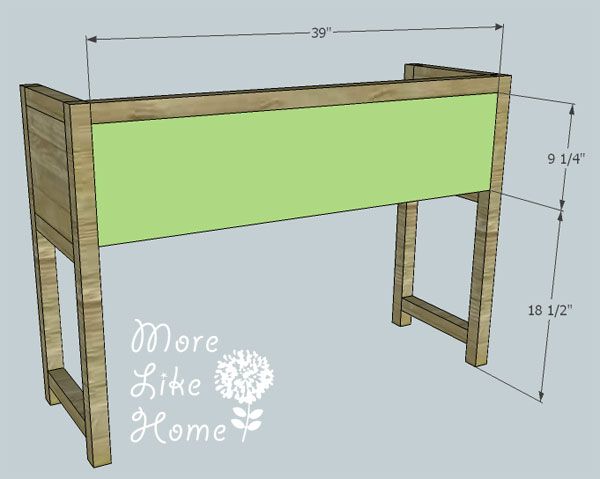
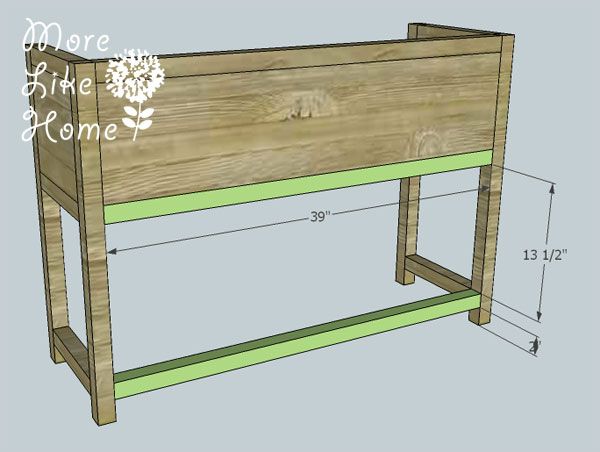
Now install two more back rails (D) as show below. The first should be right up against the bottom of the back panel and flush with the outside edges of the legs. The second should be set down 13 1/2", leaving a 2" space at the bottom of the legs.
Now install the remaining three front rails. (**these measurements differ slightly from the side and back sections, and they are supposed to!! We need a little extra clearance for the drawer fronts.**) The first one should be flush with the top and outside edges of the legs. The second should be set 9 1/2" down from the top rail, and the third should be 13 1/4" down from the second. This will leave 2"of space at the bottom of the legs.
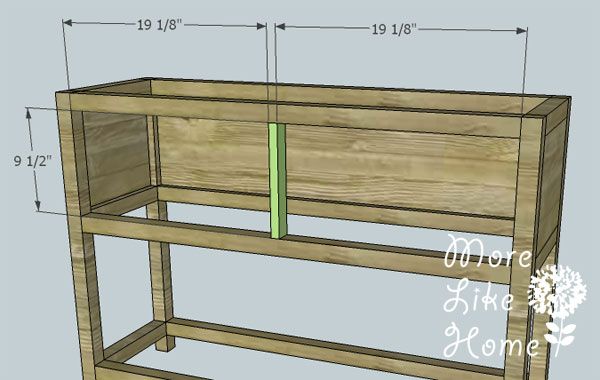
Next install the drawer divider (F). This should be centered in the drawer opening with 19 1/8" on either side. Make sure you measure this distance at both the top and bottom of the divider and make sure it is straight and level! You can attach it with a Kreg Jig or by drilling through the front rails into the ends of the divider. If you haven't checked the table for square yet, go ahead and do it now.
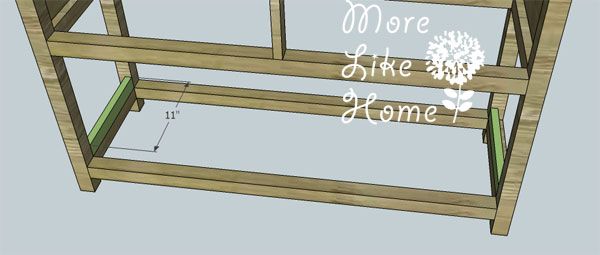
Next you can install the shelf sides (G). You'll put one on each of the bottom side rails. Keep it flush with the inside edge of the rails and legs. You can attach them using a Kreg Jig or by drilling through the legs into the ends of the shelf side boards. These are optional! Since I plan to be sliding baskets in and out all the time I wanted something to keep them in-line so they don't get hung up on the legs. You're welcome to leave these off. :)
Now we'll install the bottom slats (H). Install the first slat at one side with a 1/4" gap between the slat and the side rail. The slat should be flush with the top edge of the front and back rails. You can attach it using a Kreg Jig or by drilling through the front/back rails into the ends of the slat. Now work your way across installing one slat at a time, leaving 1 1/2" gap between each slat (this will leave 1/4" space between the final slat and the side rail).

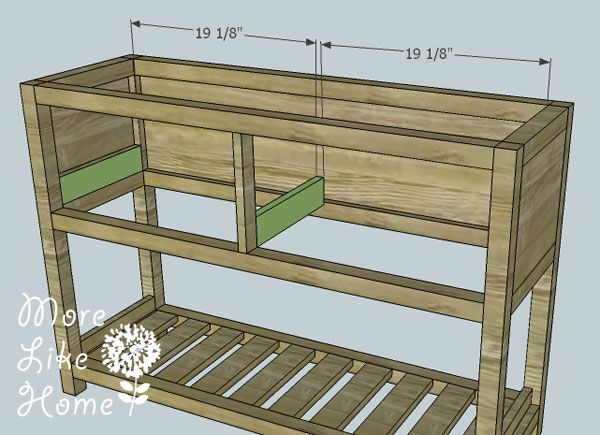
Install the drawer slide supports (I). One will go on each side setting on top of the center side rails. It should set back into the inset of the side panel. You can install them with a Kreg Jig, or by drilling through the supports into the side panels with 1 1/4" screws - but be careful not to poke all the way through! Then install the center drawer support (J). It will run between the two drawers and be centered with 19 1/8" of space on either side (double check the openings between on either side drawer divider and make the distances on the back match these measurements - it's important that this support run straight back or your slides won't work). The back end of the support will sit on top of the back center rail, so the front end will be about 1/4" above the top edge of the front center rail (the pic doesn't show this part totally right, sorry!). Attach the support using a Kreg Jig or by drilling through the drawer divider and back panel into the ends of the support.
Next install the top support (K). This should be flush with the top edge of the top front/back rail. It should be roughly centered with 18 3/4" of space on either side, but don't sweat if it's not exact.

Now we can install the top boards (L). If you have a Kreg Jig, you can start by laying the boards side by side and attaching them to each other, then set the whole top into place. If not, don't worry! Just install the boards one at a time. You can use a Kreg Jig to attach the top boards from underneath, or you can drill down through the top into the side rails and center support (it wouldn't hurt to put a couple screws into the front/back rails too). Make sure you keep all the edges flush.
Now we can work on the drawers! Double check the width of your drawer openings and the space between the drawer slide supports. You want your total drawer box to be 1" smaller than the the space between the supports, so if your spaces are different that 19 1/8" you'll need to adjust you drawer width accordingly. Start by attaching a drawer back board (N) to either side of the drawer bottom (M) as shown below. You can use a Kreg Jig or drill through the back boards into the edges of the drawer bottom. Use glue!
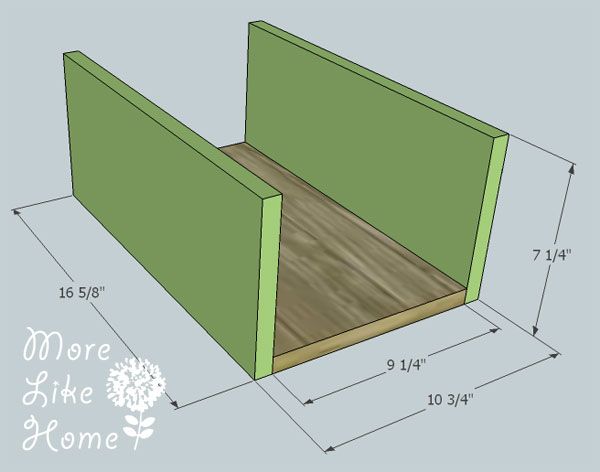
Then attach the drawer sides (O). Again you can use the Kreg Jig or drill through the drawer sides into the drawer bottom and back boards.
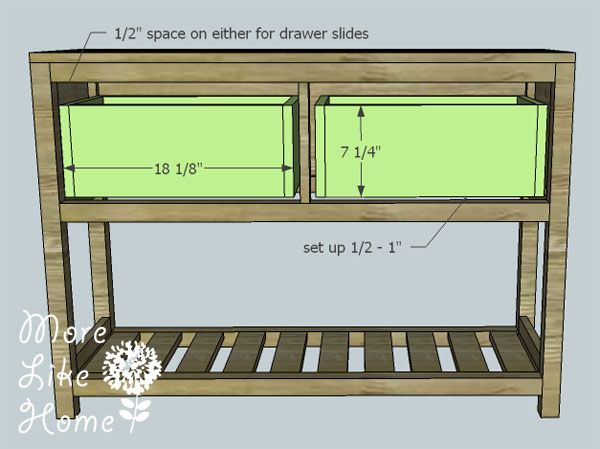
Next you can install the drawer slides. You need to make sure the front face of the drawer boxes are set back 3/4" from the front face of the table so your drawer fronts will sit flush when you install them. Follow the instructions with the slides to install them. **note: these plans are for slides that require 1/2" of space on either side of the drawer, read the instructions ahead of time and make your drawers a different size if you need to. The slides will stick past the back of the drawer box a bit. This is okay and will let your drawer open a bit farther than shorter slides.** If you want more room to work on this, you could wait to install the top after the drawers are in place.
Now attach the drawer fronts (P). Start by double checking the width of your drawer openings and cut your drawer fronts to be 1/4" less than the measurement. With your drawer box in place, center the drawer front in front of it with 1/8" of space all around. Attach the drawer front using glue and a couple finishing nails. This will be easier if someone can help hold it in place, or if you lay the table down on it's back. Once the front is secured enough not to shift anymore you can carefully take the drawer out and set it on a solid surface to add some more nails, or even put a few 1 1/4" screws in from the inside.

Finishing
You're almost done! Start by filling all your nail and screw holes with wood filler. Once it's dry sand everything down nice and smooth - this is important! Good sanding is the difference between pieces that look homemade and store bought. After that you can finish with whatever paint, stain, or poly you like and add drawer pulls.
And don't forget to add some baskets for extra storage! I designed the plans to hold three of these Ikea baskets because they are my favorite right now, but anything that size would work!
And you're done!
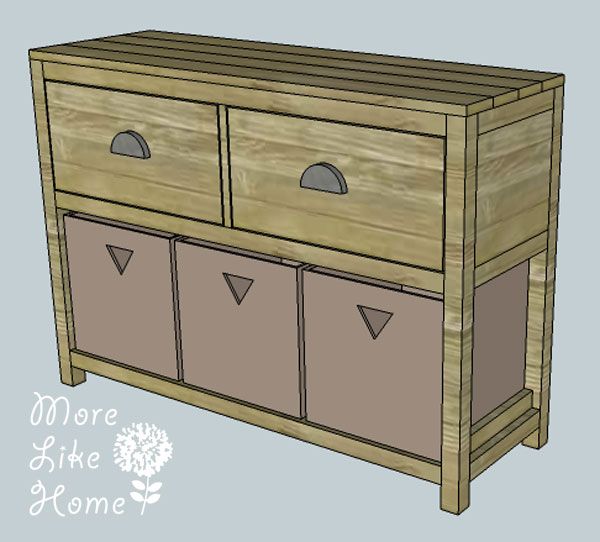
Enjoy your new entry table! Or buffet, or media console, or, you know, whatever you need it to be. :) And don't forget I'll be posting plans for a narrower version soon, too!

Your shopping list is a little off. You only have 1x 1x3 @ 4ft. You'll need a 10ft and a 4ft. Other than that, this build is turning out not too bad!
ReplyDeleteAhhh, thanks so much for pointing that out! It should be good now. :)
DeleteThis is a great looking project. What kind of wood do you use (I am not usually a builder) on this; pressure treated, kiln dried pine, etc.?
ReplyDeleteWe shop at Lowes and the I believe the boards are labeled "whiteboard" or pine. Hope that helps! You could probably use just about anything to get different looks. :)
DeleteHow do you make sure all the wood is flat and square? Do you buy the "select" boards, or do you plane them? If not, how is it that your joints all fit together so nice and square?
ReplyDeleteThank you,
-R.S.
Hi, we don't usually buy "select" boards. We just check each board before purchasing and choose the straightest ones we can find. This Ana White video shows the best way to determine if they are straight: https://www.youtube.com/watch?v=Cek301P-5N0
DeleteI'll put a post together next time we're at the hardware store with some more of our tips and tricks. :)
Can we use a pallet for that kind of project?
ReplyDeleteI've never built with a pallet so I can't say for sure, but I would guess you need something sturdier for the frame, then could use pallet wood for things like the slats and top. :)
DeleteThis build was awesome. Thank you so much. Instructions were perfect. My wife loves it, any chance i can have the link to the narrow version of these? She wants end tables now lol.
ReplyDeleteI'm so glad you like it! Thanks for the feedback. :) Here is a link to the narrower version:
Deletehttp://www.morelikehome.net/2013/08/narrow-entry-table-plans.html
Enjoy!
What are the dementions of the baskets? Ikea doesn't carry them anymore.
ReplyDeleteHi! They were 12.5 x 12.5 x 12.5. Ikea has a few other styles that are similar sizes and should work. :) http://www.ikea.com/us/en/catalog/categories/departments/living_room/16201/
Delete