Thursday, December 27

Two Ways to Save on Christmas Cards

We're wrapping up our 2018 Christmas posts with a few quick tips for saving money on Christmas cards! We love to send a little something to let friends and family know we're thinking about them this time of year, but with all the fancy new photo cards I know it can get expensive. So here are our best tips for saving money on Christmas cards!

The details: We typically print 100 cards a year. This is enough for friends and family plus several extras for anyone else we think of later (because I always seem to forget someone when I make my list!). Postage is usually our biggest Christmas card expense. You can cut this down by hand-delivering as many as possible, but for the rest this is just a reminder to  include postage in your card budget! Here are our two favorite low-budget card tips:

Traditional Card + Photo
The first money-saving method (we did this last year) is totally different than the snapfish/shutterfly cards we used the last few years and actually saved quite a bit of $$. These cards took a little forethought and planning, but they ended up better than ever!

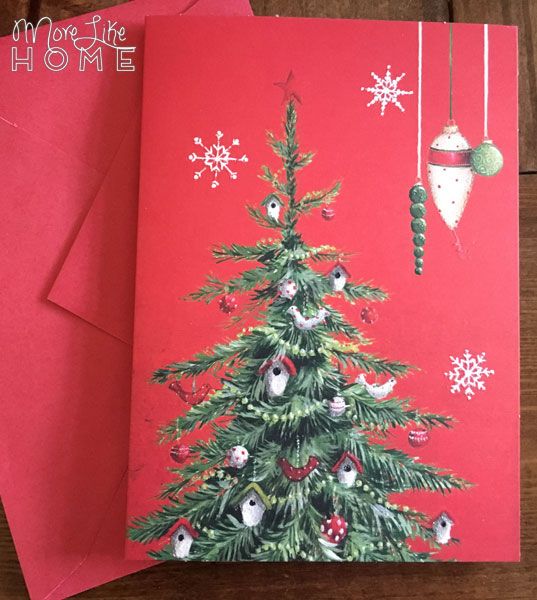
It all started the Christmas before when I found some beautiful cards on clearance after Christmas. I've always been a sucker for a real card, especially with a handwritten note, and these beautiful little fellas caught my eye! And the best part? They came out to about $0.13/card! So, yes, I bought these a year in advance and stashed them in the basement until Thanksgiving rolled around. Like I said, there was a little forethought involved!


But we didn't just send a card (because we all know photos are half the fun). I used Photoshop to add "Merry Christmas" to a regular 4x6 sized photo and printed them during a $0.01 print sale on Black Friday (snapfish and shutterfly both run this sale occasionally). The card + photo brought my total up to under $0.15 per card (well under half the price of most photo cards!).


So we got to include both a beautiful card and a family photo... but guys, that's not even the best part.

Monday, December 24

2018 Christmas Tour

Or should I call it the 2018 Christmas EVE tour? I know. Every year I have these big plans for Christmas projects and Christmas posts to share, but then the season comes and we just... do Christmas instead. I highly recommend this method.

But I do have a few super easy and budget friendly decor tips that are too good to miss for another year! So here we are with a quick Christmas Eve tour!


We'll cut right to the chase with our cheery kitchen window. Easily one of the most cheerful little corners of our home, and it also happens to be one of the easiest and cheapest to decorate! That merry Christmas sign above the sink? It's our sneaky reversible "farmer's market" sign. It only costs a few dollars to make (get the tutorial here) and when Christmas comes you just flip it around to the Christmas side. The window wreathes are from Dollar Tree (so just $1 each!) and I hung them with scraps of red ribbon. Most of our house has the original wood windows, but these ones were updated to double-hung windows which make hanging wreaths so easy. Just loop ribbon through a wreath, slide the top of the window open a crack, and pinch the ends of the ribbon in the window. No nails, no hooks, just easy peasy wreaths.

Sunday, December 9

$5 Christmas Stocking Hack

Our mantle decor got a major upgrade this Christmas with a beautiful new set of stockings! (we also updated the actual mantle earlier this year when we wrapped it with wood and added shiplap) But this big upgrade didn't have a big price tag. Believe it or not, these beautiful, classic stockings started with a set of plain red Amazon stockings that were only $5 each. They just needed a little MLH farmhouse flair!


I like to think I know a thing or two about stockings. I've spent a good amount of time looking at them over the last ten years, because every. single. year. I search again for our perfect fit.

I've found plenty of beautiful stockings over the years, but all the ones I loved failed to fit one important requirement. Budget. As much as I dreamed of perfect stockings, I just didn't feel like I found the right ones for a price I was willing (or able) to pay. I began my stocking saga after baby #2 joined the family. Our budget was strapped pretty tight, so I made handmade stockings with leftover flannel (you can see how I made them here). They were totally free, but I didn't love the fabric (I wont' totally knock that idea, though. I seriously considered making a matching plaid set this year before I found these red ones, and I think that would feel wonderfully cozy!).

A couple years later when we needed to add a fifth stocking, I decided to scrap those guys and start fresh. But wouldn't you know it, I was pregnant and tired and just needed something before the baby got here... so I just got the best Hobby Lobby had to offer for $5 each (you can see them in this post). It did feel like an improvement, but it also felt like a wasted opportunity because deep down I knew I didn't love those moosey stockings. They weren't my style, and for the next couple Christmases I cringed with regret every time I pulled them out. But I couldn't justify replacing them - they were brand new!


Then, earlier this year, we added baby #4. Even last Christmas before he was born I knew - we would need a sixth stocking. I knew this was my chance to get a new set, and this time I was ready. This time I knew what I wanted, and this time I was ready to hunt. it. down.


Sunday, December 2

DIY Wooden Stocking Tags

Christmas decorating is in full swing at the big blue house, and today I wanted to share one of my favorite projects for adding a cute and personal touch to any stockings. And the best part? It's sooo easy and super cheap!

Update: Check out how sweet these tags look with our new stockings (and my $5 stocking hack)!

I love DIY Christmas decor, and a project that's just as useful as it is beautiful? Well that just takes the Christmas cake! These little wooden stocking tags are a perfect way to differentiate matching stockings, add a personal touch without springing for embroidery, or just add a cute wooden accent to your Christmas decor.

Ever since we bought these off-the-shelf stockings a few years ago, I've been craving a personal touch. A way for all the little fellas to know which one is theirs and run right to it Christmas morning. Something to make them unique and ours. And these simple little tags have been the perfect touch!


Here's all you need to make your own:
Subscribe