
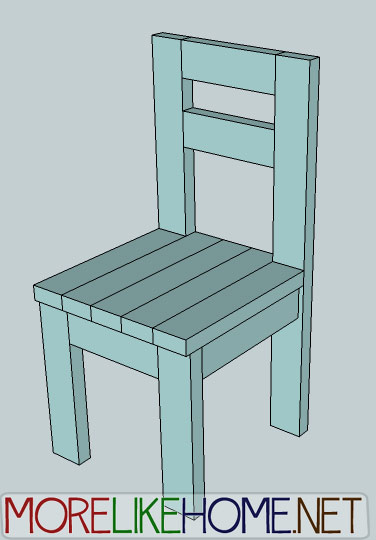
This is one of my smaller projects and is pretty simple to build. It has a chunky, modern style and the 2x4 construction makes it very sturdy. Ready to build one? Or, you know, a whole set?
Shopping List:
2 - 2x4s @ 10'
long
1 - 2x4 @ 8' long
Tools:
Saw
Drill
2 1/2” screws (or Kreg Jig
& 2 1/2" self tapping screws)
4" screws (or Kreg Jig
& 2 1/2" self tapping screws)
Wood glue
Wood filler
2x4 Cut List:
(A) - 2 @ 37 1/4" (back legs)
(B) - 4 @ 10 1/2" (back/front boards)
(C) - 2 @ 16 1/2" (front legs)
(D) - 2 @ 15" (side boards)
(E) - 1 @ 13 1/2" OR 4 scraps cut at 45 degree angles (supports)
(F) - 3 @ 18 1/2" (seat)
(G) - 2 @ 17" (seat sides)
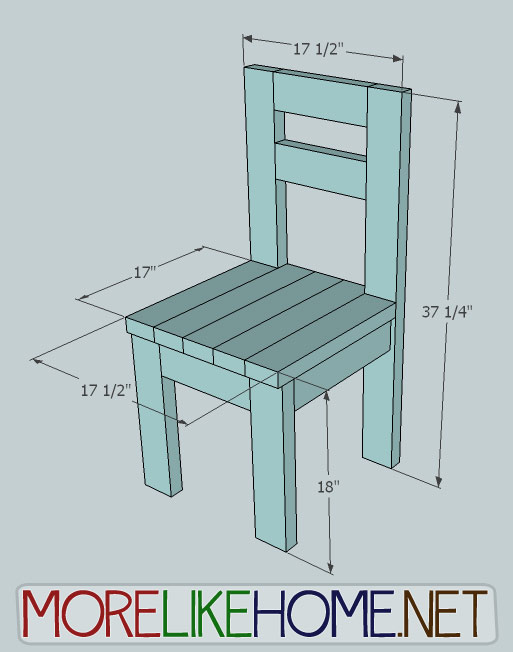
Dimensions: 17 1/2" wide x
37 1/4" tall x 18 1/2" deep
Please read all the directions
before beginning, and cut your pieces as you go, measuring before each cut. Use
2 1/2” screws or pocket holes with 2 1/2" screws unless otherwise
indicated. Always use glue. Pre-drill and countersink your screws. I
have not built from these exact plans, so measure lots to make sure things work
out!
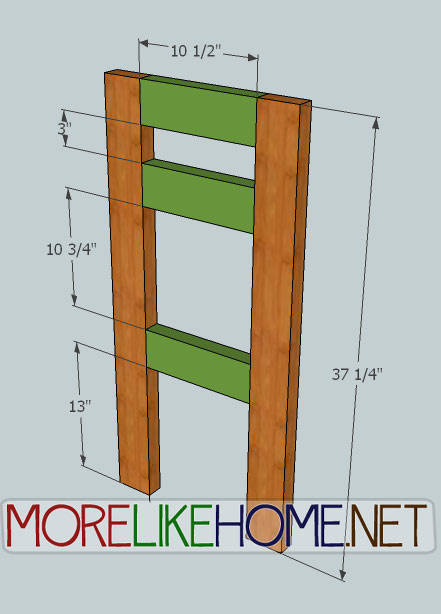
Step 1: Build the Back.
You're going to start by building the back section. Grab the two back legs (A) and three of the front/back boards (B). Assemble them as shown below, with the front/back boards running between the legs. The top board should be flush with the top of the legs, the middle board should be spaced 3" down from the top board, and the bottom board should be spaced 10 3/4" down from the middle board (with 13" left underneath). You can attach these using your Kreg Jig and 2 1/2" pocket screws, or by drilling through the legs with 4" screws. Use glue.
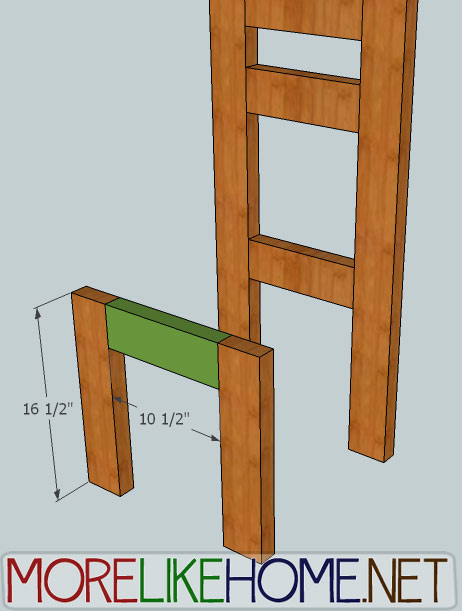
Step 2: Build the Front.
Assemble the front legs (C) and the final front back piece (B) as shown below. The front/back piece should be flush with the top of the legs. Attach the same way you did in step 1.
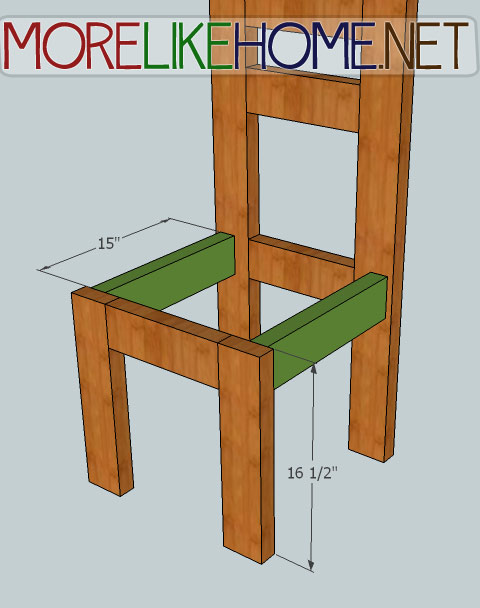
Step 3: Get Connected
Use the side boards (D) to connect the two sections you just built. These boards should be flush with the top of the front section, and line up with the top of the bottom back board. It should be 16 1/2" from the floor to the top of the side boards. I set the side boards in 1/2" from outside edges of the legs (but if you prefer you can leave them flush against the edges). Attach like you did in step 1.
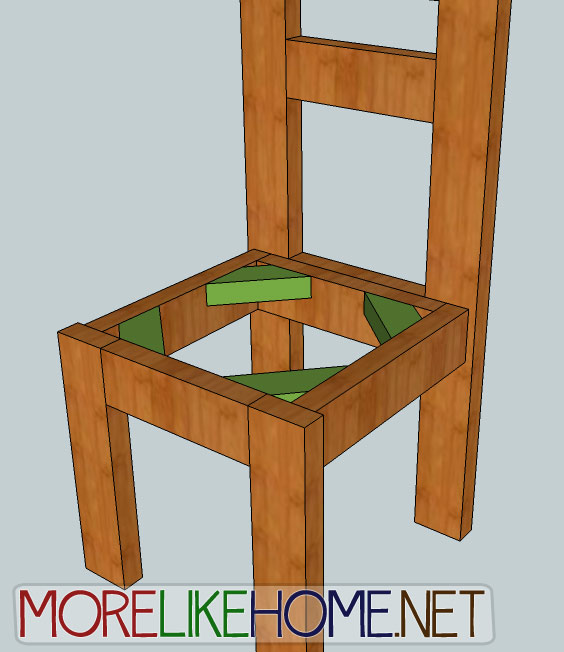
Step 4: Add Supports
There are two ways you can add supports (E) to your chair. The first is to install a board 13 1/2" long across the back of the seat opening. This just gives a little something extra for your seat boards to rest on.

The other option is to cut scrap pieces at 45 degree angles and attach them in all the corners of the seat opening. (This might make the chair a little sturdier, especially if you plan to use thinner boards for seat and want a little more support under them).
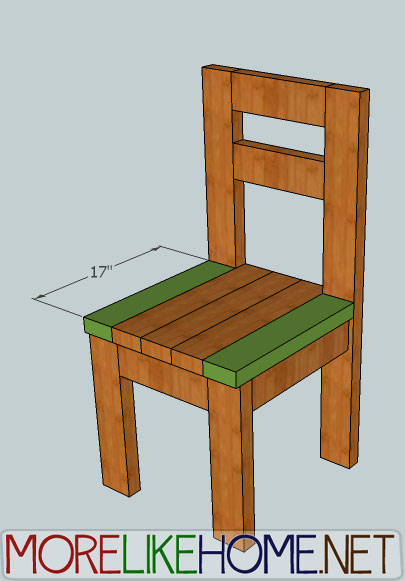
Step 5: The Seat
Now you can put on the seat, starting with seat boards (F). These boards should reach into the back opening on the chair, and be flush with the back side of the chair. Attaching these by drilling down through the seat into the supports and front/back boards with 2 1/2" screws and glue.

Then attach the seat side boards. These should be flush against the center seat boards and the back legs of the chair, with some overhang on the front and sides. Attach the same way as the center seat boards. If you have a Kreg Jig, you can attach all the seat boards together side-to-side first, then install that whole section at once. You can even use your Kreg Jig to attach the seat from below so you won't have any holes to fill on the seat.
Step 6: Finishing
Now you can finish your chair. Start by filling any screw holes, then give the whole thing a good sanding to get it nice and smooth. Sanding is so important to you piece looking neat and professional when you are finished! Don't cut corners here! Then finish with any paint or stain (and polyurethane) you want! Try a nice pop of teal or yellow, or a deep, rich stain. Be creative!
That wasn't too bad, right? :) And you'll end up with a very sturdy chair! And they are cheap enough you can afford to make a whole set for your dining room if you want!
Project 2x4 Cost:
$6.40 - 2 2x4s @ 10' long ($3.20 each)
$2.50 - 1 2x4 @ 8' long ($2.50 each)
$9.10 Total
See giveaway winners here.

Share on Facebook

This would go great with the table from day 2!
ReplyDeleteThis comment has been removed by a blog administrator.
DeleteI just need to make the measurements smaller for my neighbors kids!
ReplyDeletelove this,, I have a chair that is really similar to this,,, I wonder if this could be modified to make taller stool/chairs for my kitchen island.??? Thanks for sharing,, I'm loving all these projects.
ReplyDeleteStay tuned...I have a feeling that may be one of the projects :-) Check out day 1 for a preview of every day. I hope to see you back soon!
DeleteCute chair. When do you sleep?
ReplyDeleteSleep? What? ;)
DeleteNice!
ReplyDeleteThese could definitely handle kids' wear and tear.
ReplyDeleteDefinitely trying my hand at this this weekend. If all goes well, I'll make the desk from day two to match!
ReplyDeleteGood luck! Let me know how it turns out! I'd love to see pictures if you get any. :)
DeleteLove it--so cute!
ReplyDeleteKeep up the good work
ReplyDeleteI just built this chair.
ReplyDeleteIt is ok but I'm still not sure if it will look nice enough for my kitchen.
One note, there are conflicting dimensions for the overall height.
2x4's do tend to have a more rustic look than other lumber. Thanks for pointing out the discrepancy, I'll get it fixed! :)
DeleteBorrowed your design, but had to change it because the dimensions are wrong. I also stained the seat. The counter sunk holes look very rustic with stain. Looks really good, and is comfortable and fits with the table and benches I made (out of 2x4's and 2x6's). I am going to make another one of these but make it a taller chair for my wife's classroom. Love the rustic look!!
ReplyDeleteThis comment has been removed by the author.
ReplyDeleteI just built this chair this past weekend. It was awesome with your directions. The only change I made was putting an extra 2x4 in the main part of the seat (4 instead of 3!) to make it 3 1/2" wider. We thought that would be a good idea given our wide....umm....dimensions. Thanks a ton!!!
ReplyDeleteI'm so glad you like it! Hmm... you just gave me an idea for building a bench. :) If you have any pics you want to share I would love to see!
DeleteWould it be easy to make an x on the back instead of the straight line?
ReplyDeleteI think that would be pretty simple. You'd probably want to make the X with 2x2's instead because there isn't enough room for 2x4's. The easiest way would be to cut one end of the 2x2 at a 45 degree angle, hold it up to the back of the chair, and just mark with a pencil where the other side needs to be cut. Install that board then hold up the next leg of the X and mark where it needs to be cut. Hopefully that makes sense. :)
DeleteJust made this chair and it turned out great! I used 1x4s for the seat to decrease a little of the bulk. Very happy with the simple design, thanks!
ReplyDeleteGood call! It is pretty bulky with the 2x4s. I'd love to see a pic if you don't mind sharing! You can share on my facebook page or email me at morelikehome (at) gmail (dot) com. :)
DeleteDo you have pictures of this chair when complete? I looked on Facebook also and didn't see one - Thanks!
ReplyDeleteI don't have any finished photos yet. Sorry!
DeleteBack legs need to be 37 1/4" not 37 3/4"....think it's a typo on the cut list ....
ReplyDeleteI'll get it fixed. Thank you!! :)
DeleteI actually bought 2 8dt boards and 1 10ft board by mistake but it worked out just fine, AND IT WAS only $9.94!! Score!!! Even cheaper to build and it was fun!
ReplyDeleteHere in Colorado the 10ft boards are $5 each so it was cheaper for me.
DeleteThat's great! Thanks so much for sharing. I get asked about costs quite a bit so it's great to hear an updated cost when someone completes a project! :)
DeleteCould I add arms to this chair?
ReplyDeleteYou sure can! The easiest way would be attaching a 2x2 up from the side of the seat, and another across the top of that and attached to the side of the back. Hopefully that makes sense. :)
DeleteLOVED making this chair! Thanks for the plans!
ReplyDeleteYou're welcome! I'd love to see a photo if you have one. You can email me at morelikehome(at)gmail(dot)com or post pictures on my facebook page!
Deletegood
ReplyDeleteI made a kitchen table for my boyfriend and have been looking for chairs. These will be perfect. Only Im going to chamge the 2x4s for the seat with 1x6s to match the table. I cant wait to see it done! Thanks for the idea
ReplyDeleteSounds like a great plan! I'd love to hear how they turn out! :)
DeleteWhich cuts are from the 10 ft and 8 ft 2x4s?
ReplyDeleteStart with the back legs and two back/front legs from the 8' board, and the rest come from the 10' boards. :)
DeleteI'd love to know where to put the pocket holes so that wood filling is minimal (especially on the back cross pieces).
ReplyDeleteHi! The best way to minimize wood filling is to have your pocket holes facing the inside of the chair whenever possible so the holes aren't visible. That works for the base of the chair, but there's not really a way to minimize wood filling for pocket holes on the cross pieces, unfortunately. You could try skipping the pocket holes and instead use long screws to drill through the sides of the back legs into the ends of the cross pieces. Then you'll only have small holes to fill on the sides instead of larger holes in the cross pieces. Hope that helps! :)
DeleteIs there a way to angle the back?
ReplyDeleteThere's not an easy way to angle the back on this design. It would mess with the stability quite I bit. Sorry!
DeleteI actually bought 2 8dt boards and 1 10ft board by mistake but it worked out just fine, AND IT WAS only $9.94!! Score!!! Even cheaper to build and it was fun!
ReplyDeletebuild smart home
That's awesome! Thanks for the feedback!
DeleteIs there a PDF of this plan? I couldn't find one. I'd love to print it out since I'm making several chairs. Thanks.
ReplyDeleteSorry, I don't have any PDF plans at this time.
DeleteYou wouldn't believe the amount of sawdust I have on my laptop from the last 3 days of making the homestead table and this chair. HA!
DeleteFor the chair, would 2x2s work for the legs, then adjust all the 2x4 measurements for the pieces that span accordingly? These chairs are sturdy, but almost TOO sturdy for my kids (not a bad thing, necessarily!) and aging parents to move around constantly.
Definitely! That would be great! I would also swap the two boards across the top of the chair back for 2x2's, just for better visual balance. :)
DeleteIf you have any photos I'd love to share a few in the post! You can email me at morelikehome (at) gmail (d0t) com, or tag me on instagram! :)
DeleteHow much weight can the chair hold?
ReplyDeleteHi! I know mine has had 200 pounds on it and still felt solid as a rock, but I haven't done any weight testing beyond that. Hope that helps! :)
DeleteBuilt this today with a bored 9 year old. He’s very proud.
ReplyDeleteno way this cost 9.10 with inflation it probliy cost 24-30 bucks
ReplyDelete