We've had some nice, warm days blowing through the Midwest this winter. We even spent one Saturday in January at the zoo when the temp hit almost 60! Then February rolled around. And it's downright chilly around here. Brrrr. So today I'm sharing one of our favorite ways to cozy up and beat the cold... easy homemade heat packs (with bonus handwarmers for when you have to be out and about!).
Just pop the heat pack in the microwave to warm up your hands or feet, or use them to sooth aching muscles (you can also put them in the freezer to make a cold pack in the warmer months). And trust me, once you try these you'll want to make some for all your chilly friends!
The handwarmers are great to slip in your gloves when you're heading out to shovel or play in the snow. You can make a perfect little gift set by bundling together a heat pack with a pair of handwarmers. Try tucking a set in a gift bag with some hot chocolate and go surprise your bestie with some extra warm goodies on a chilly day!
Saturday, February 13
Sunday, December 27
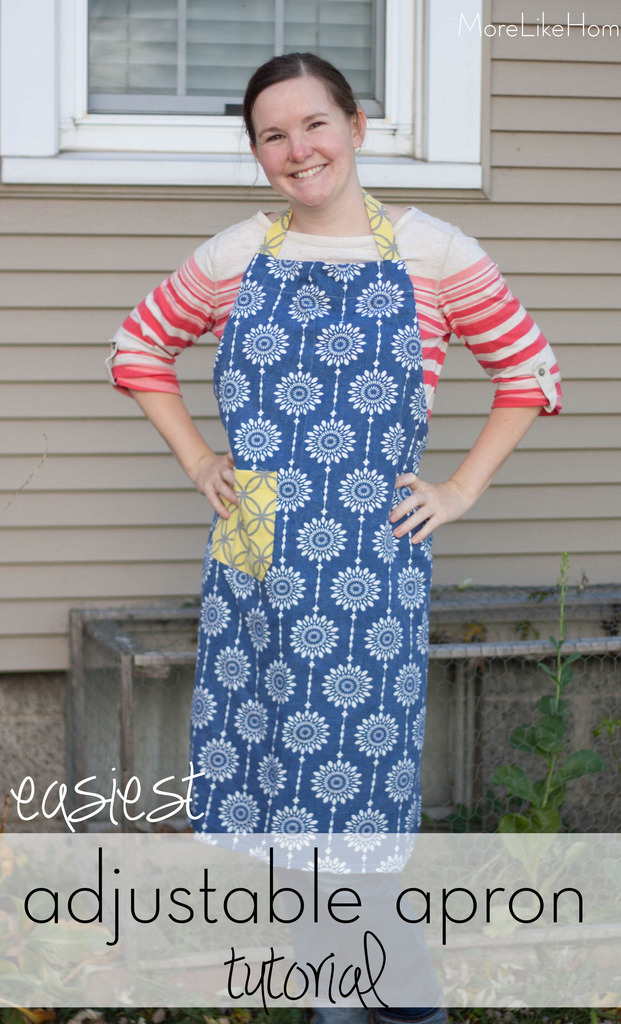
Easiest Adjustable Apron Tutorial
When my sister got married I promised to make her an apron.
Every new wife needs a good apron, right? Unfortunately I always like to make things harder for myself and make up my own pattern. I want it to look just how I want it to look and I don't want to spend time looking through tutorials for one that is perfect. My first attempt totally flopped, so I put off trying again... for... two years. *shame* Sorry, Sister. But I finally got into a nesting flurry a few weeks ago and finished one!
The finished apron gives you full coverage when you're cooking. No more splatters around around a too-narrow bodice (I cook messy, okay? Don't judge.). Plus the generous size will work for most cooks. It also boasts a handy pocket and a hanging loop for when it's not in use. But most importantly, it has my #1 most desired feature in an apron: an adjustable strap. Not one you have to tie or slide through rings (you won't spend more time adjusting your apron than you spend actually cooking the food), all you have to do is pull the ties to make the neck loop shorter. And you guys... all this convenience is still pretty easy to make! This is all you need:
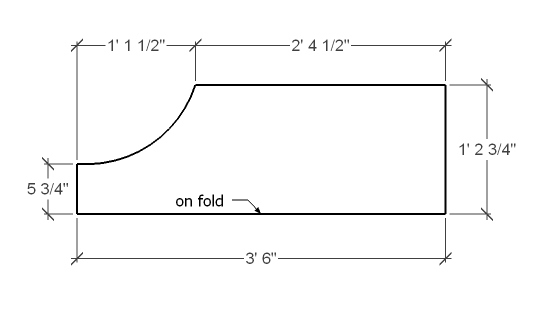
Let's start by cutting your main fabric. Cut a piece 29 1/2 x 42" for the main body. Fold the piece in half length wise and lay it with the fold facing you (see drawing below). On the left edge measure up from the bottom 5 3/4" and make a mark. On the top edge measure in 13.5" from the top left corner and make a mark. Draw a curve connecting the two marks and cut along the curved line. This is your main apron body. If you want to make your apron a little more feminine, you can curve the bottom corners of the apron.
Update: I looove this one I made for my mom with the same pattern. I like to wrap around my waist and tie in the front for a cuter fit.
Every new wife needs a good apron, right? Unfortunately I always like to make things harder for myself and make up my own pattern. I want it to look just how I want it to look and I don't want to spend time looking through tutorials for one that is perfect. My first attempt totally flopped, so I put off trying again... for... two years. *shame* Sorry, Sister. But I finally got into a nesting flurry a few weeks ago and finished one!
The finished apron gives you full coverage when you're cooking. No more splatters around around a too-narrow bodice (I cook messy, okay? Don't judge.). Plus the generous size will work for most cooks. It also boasts a handy pocket and a hanging loop for when it's not in use. But most importantly, it has my #1 most desired feature in an apron: an adjustable strap. Not one you have to tie or slide through rings (you won't spend more time adjusting your apron than you spend actually cooking the food), all you have to do is pull the ties to make the neck loop shorter. And you guys... all this convenience is still pretty easy to make! This is all you need:
- 1.75 yards main fabric (you can get more for a longer apron or less for a shorter apron)
- 1 yard strap/pocket fabric
- thread
Let's start by cutting your main fabric. Cut a piece 29 1/2 x 42" for the main body. Fold the piece in half length wise and lay it with the fold facing you (see drawing below). On the left edge measure up from the bottom 5 3/4" and make a mark. On the top edge measure in 13.5" from the top left corner and make a mark. Draw a curve connecting the two marks and cut along the curved line. This is your main apron body. If you want to make your apron a little more feminine, you can curve the bottom corners of the apron.
Sunday, December 13
Free Printable Christmas Gift Tags
We've almost finished our Christmas shopping and we were about to start wrapping the pile of presents stuffed in our closet when I realized... we didn't have any gift tags! Now, I've been known to do the old Sharpie on the Wrapping Paper technique, but we had such pretty paper this year that I really wanted some nice tags to go with it. Which left me three options: take three children to the store to buy some, send husband to pick some out on his own, or print some at home. I chose door #3.
There are several printables available on pinterest, but in my search for the perfect tags I was a little bit picky and couldn't find exactly what I was looking for. So I decided to make my own printable tags!
There are several printables available on pinterest, but in my search for the perfect tags I was a little bit picky and couldn't find exactly what I was looking for. So I decided to make my own printable tags!
You can print either a color version in a classic red & green scheme (my fave) or an all black version that looks great on brown craft paper.
Tuesday, December 8
Easiest Fleece Bunny Tutorial - Sewing with Kids
A few weeks ago I was picking up some fabric for another project and as we passed the fleece Big Brother said "Oh! Can I get some of this fuzzy blue?" I told him I didn't think we needed any and we should keep moving. But then he said "But I need to make something for our baby!" How can I say no to that? Answer = I can't. So each of the brothers picked out a fleece (both picked blue) and I started brainstorming what we could make with just a quarter of a yard.
Well, it turned out my pregnant brain couldn't come up with anything. Fortunately my sister came to the rescue and sent me a picture of some adorable little fleece bunnies. Whew. These guys were so fast and so easy, and I was even sewing them with a two-year-old and a four-year-old! They are a perfect project to get started sewing with your kids. They get to try hand sewing, machine sewing, stuffing, and even drawing their own pattern. Plus this project is fast enough that mom doesn't get burnt out with all the "help."
Here's what you need to make your own fleece bunny:
Start by drawing a pattern for your bunny (or you can just cut your bunny out free-style). My four year old drew our bunny pattern. He made it like the picture we saw with the top rounded and the bottom more square, but really you can do whatever bunny shape you like! I drew the ears. Just remember that you need to add extra space for seam allowances, so draw everything a little bigger than you want it to be. Our first bunny's ears were cut with the pattern and turned out a little skinny so we cut the second pair bigger. I remember my mom having my sister and I draw patterns to make our own rag dolls when we were little (I still have that doll!) so I really wanted that to be a part of this project too.
Well, it turned out my pregnant brain couldn't come up with anything. Fortunately my sister came to the rescue and sent me a picture of some adorable little fleece bunnies. Whew. These guys were so fast and so easy, and I was even sewing them with a two-year-old and a four-year-old! They are a perfect project to get started sewing with your kids. They get to try hand sewing, machine sewing, stuffing, and even drawing their own pattern. Plus this project is fast enough that mom doesn't get burnt out with all the "help."
Here's what you need to make your own fleece bunny:
- 1/4 yard of fleece
- scraps of quilting cotton for the ears (if you're buying some 1/8 yard is more than enough!)
- buttons for eyes
- embroidery floss for the nose & mouth
- stuffing
- thread
Start by drawing a pattern for your bunny (or you can just cut your bunny out free-style). My four year old drew our bunny pattern. He made it like the picture we saw with the top rounded and the bottom more square, but really you can do whatever bunny shape you like! I drew the ears. Just remember that you need to add extra space for seam allowances, so draw everything a little bigger than you want it to be. Our first bunny's ears were cut with the pattern and turned out a little skinny so we cut the second pair bigger. I remember my mom having my sister and I draw patterns to make our own rag dolls when we were little (I still have that doll!) so I really wanted that to be a part of this project too.
Subscribe to:
Posts (Atom)


