Showing posts with label Thrifty Momma. Show all posts

Friday, April 17

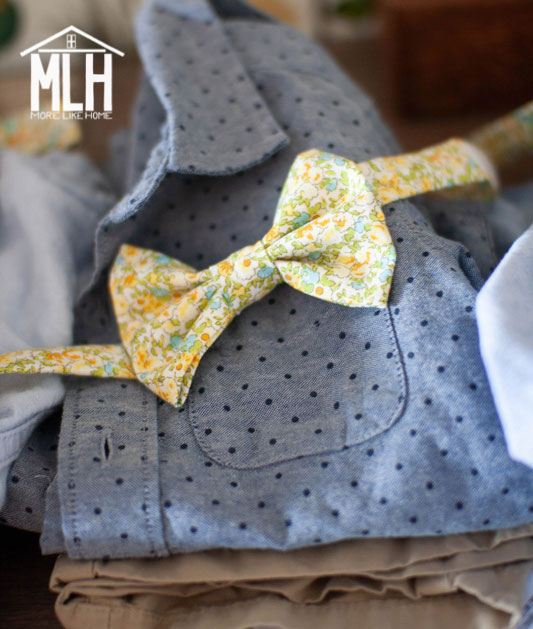
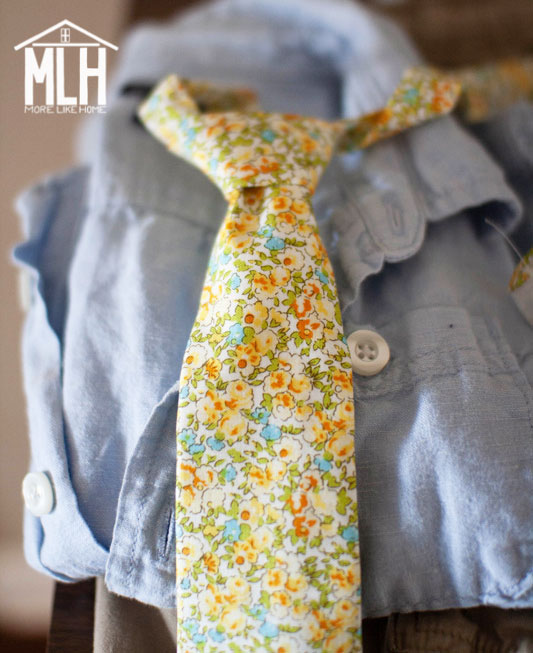
Matching Child-size Ties + Bowties

When it comes to getting a house-full of little boys dressed up, I tend to fall back on my old favorite combo - a simple button up shirt with khaki shorts. It's easy, cute, perfect for summer, and it looks nice without being overly formal (we're not an overly formal bunch). Plus it's cheap - we already have those things in the closet (Dave Ramsey approved!).


But last summer I was putting together outfits for my sister's wedding and I wanted to add a special touch. Something to dress it up just a bit more than usual and add a little matching to the day (I love when they match). 

For little boys, that naturally led to matching ties and bow ties! I found a few ties on Amazon, but the ones I liked were almost $25 each. And the few I didn't totally hate (that would arrive in time) were still $10-15 each... and I would need four. Not how I want to spend my $$ today, thankyouverymuch. It just felt like a lot of money for a little accessory.


Then my sister was like "Duh. Make your own." And she sent me these two links:
And she was totally right. With DIY, I could make ties for all four boys for less than buying one pre-made tie. And I had a whole Hobby Lobby of prints and colors to choose from.


I decided on regular ties for the three bigger boys and a bow tie for little guy (so he wouldn't get tangled up while crawling around). For my 8-year-old, I added a few inches to the tie pattern to make it a little longer. My five- and three-year-olds are wearing it true to the pattern. Hopefully that gives you an idea for any adjustments you need to make for your own sizing! I also copied the velcro strap from the bow tie pattern and used it for the regular ties, too, instead of using the elastic it shows in that pattern.

Yes. I'm the mom that let them wear flip flops and didn't iron their shirts, but I did tuck them in... and you can see how long that lasted. I'm choosing different battles, folks.

My sister's wedding themes were navy + wildflowers and the boys were all going to wear blue shirts (all different shades, just working with what we have) and khaki shorts. So I picked a yellow floral  fabric with a vintage vibe that would work perfectly with all their outfits and fit the wedding theme! It was so perfect, I could hardly believe it.

The fabric was from Hobby Lobby and cost $7/yard regular price, but their fabric is always on sale so it ended up being only $5/yard. One yard was enough to make the set of four. I also bought one pack of  5/8" velcro for $2 and had plenty to split that between all four ties, bringing the grand total to just $7 for all four!


I couldn't believe how cute they turned out! I kept looking at them like "Did I really just make these??" So cute and so professional looking. And under two hours to make the whole set.


Just wanted to share since it's a great little project to tackle while you're cooped up at home (and perfect if you have scrap fabric to use up!). Seriously, I can't recommend these patterns (or little boys with matching ties) enough. What have you been making lately?

Thursday, January 2

The Spending Freeze in 2020

I feel like I owe you a little update on our infamous spending freeze. I know I mention it a lot - but I haven't really talked about it since we kicked it off last January. So here's what's up - how it's going so far, where we're at a solid year into the spending freeze (more like a spending ice age, I guess), where we're headed from here, a few pro tips we've picked up to help you nail your own spending freeze, and even the unexpected benefits we've found in the midst of our freeze.


Friday, December 27

How to Organize + Store Christmas Decor

I think we can all agree on one thing: the worst part of Christmas decorating is taking them down when Christmas is over. Ugh.

But it doesn't have to be so bad. This is your chance to set your self up for success next year! As you pack up, start by re-evaluating what you have, deciding what you truly need and want to keep, and purging the rest. Then, once you've settled on what is staying in your stash, you can organize and store your items in a way that makes them easier to find and use when you're decorating, and easier to pack away when you're done. So today I'm going to share some of my favorite tips for packing and organizing decor that is easy, cheap, and will save you both time and sanity next year.


Monday, December 16

Low-Waste Gift Wrapping Tips

There's nothing like watching the kids open presents on Christmas. I love to see their excitement as they discover the treasures hidden inside each package. But.. have you ever thought about the trash bags full of wrapping paper when Christmas morning is over? It's something that's been in the back of my mind the last few years... but I've never actually done anything about it. In fact, I've already wrapped most of this years presents in traditional wrapping paper. But... I'm ready to do better. To waste less and teach my boys not to waste. It seems like a natural next step after simplifying our Christmas decor and simplifying our gift-buying this year. And now is actually the perfect time to start preparing! 


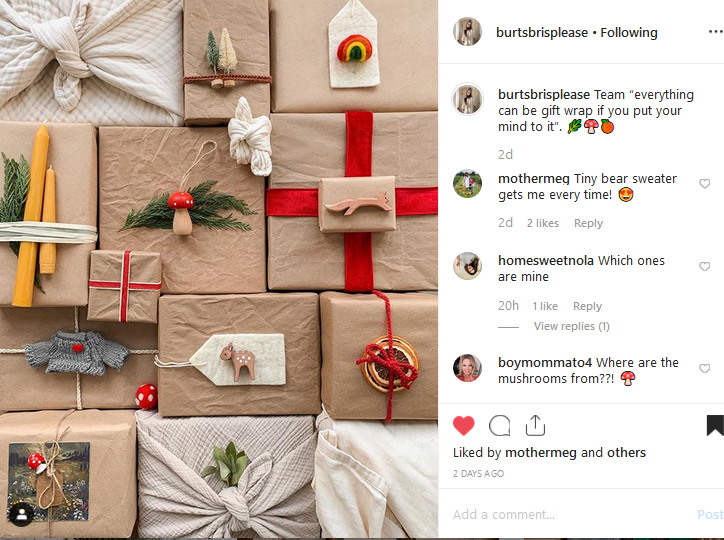
I just learned that Burtsbrisplease, one of my insta-favorites, saves back little bits and pieces all year to use for her Christmas wrapping. Look at the beautiful gifts she creates with them!

https://www.instagram.com/p/B5tOSBWgsEa/

I 100% plan to start my own thrifty gift-hoard immediately. To build-up my stash for next year. Here are a few items I'll be keeping an eye out for:

Monday, November 18

Christmas Budget Printable

Every year we set a Christmas budget.
Every year we go in with good intentions.
And every year we blow it. 

Our track record is pretty abysmal. But not this year. With Dave Ramsey in our back pocket, we've set a budget that's lower than ever. And we are fighting tooth and nail to stick to it. We've talked to family about switching to a secret Santa system so everyone can spend less. We're limiting ourselves to the "Four Gifts" for our own kids (something they want, something they need, something to wear, something to read). And we are so excited to say goodbye to both excess spending and excess stuff.

So I made this handy budget printable to help me keep track of what we have, what we need, what we've spent, and how much is left. And I'm sharing it as a free download today so you guys can join us in kicking Christmas debt to the curb! I also have a few budgeting tips to share, plus a video to walk you through exactly how we use each sheet.


Thursday, November 14

Easiest DIY Pillow Covers

Today we're going to look at a super quick and easy way to refresh a space... that also happens to be a great way to increase your holiday cheer factor. I'm talking about swapping out your pillow covers! And today I'll even show you the easiest way to make your own.


Pillow covers are one of my favorite ways to refresh a room, but did you know they're also one of the best secret weapons in seasonal decor?
  • They take minimal effort to switch out, but make a huge impact.
  • They take almost no space to store in the off-season.
  • They are easy and affordable to make!

Thursday, October 31

Natural Remedy Roundup (plus video tour of our DIY herbal "medicine" cabinet)

It's official. We've reached the time of year when we will have at least one runny nose in the house until spring. So I've been busy this week stocking up a few of our favorite remedies to help keep this bunch in tip-top shape. So today I just wanted to share all those favorites in one place, along with a video tour of my herbal "medicine" cabinet. I'll show you what remedies I make vs. which ones I buy, what herbs I keep on hand, and what I use them all for!

You can check out all my natural living posts here. 


Thursday, October 10

Low-Budget Bathroom Update (during our spending freeze!)

Today I want to share a little inspiration for anyone taking on the Fall Budget Refresh Challenge - so I'm going to show you how we totally refreshed our second bathroom during our spending freeze and spent (almost) nothing. It's a tale of thrifty updates, leftover paint, and a broken toilet seat. You have been warned.

Are you joining the Budget Refresh Challenge this fall? There are still two weeks left to work all kinds of thrifty magic! Let us know in the comments or tag us on Instagram or Facebook!


Thursday, October 3

2019 Fall Budget-Refresh Challenge

When I feel that first hint of fall in the air, I get a craving.

And no, it's not pumpkin spice. I'm Team Apple Cider all the way! But that's not it, either.

I start to crave quiet. And coziness. And snuggling up. My introverted heart looks toward chilly days hunkered down at home. So as fall begins to creep in, I start to quiet the house and get it ready for winter. Not just shutting storm windows and draining hoses and all that other homeowner stuff, but I also start to ready the atmosphere of our home for this cozier half of the year. The home I want our kids to remember - a place that's warm and welcoming and ours.

And so Fall is always the perfect time for our Budget-Refresh Challenge. A last chance before winter to tackle that space or project we've been putting off! Last year was our first challenge and I'm super excited to host it again this year! Ready to join the fun and make your home the best it can be?


The Challenge:
Making space to weather the coming winter and enjoy time together. That's it. Is there a corner of your home that needs a little attention before you're cooped up with it all winter? A dark kitchen that needs painted? Living room that needs freshened up or rearranged? Need to simplify the play room? That's your challenge space! And guys, we're doing it all on a budget. Because a house doesn't have to be expensive to be a home.

Thursday, September 26

Top 10 Things I Buy at Thrift Stores

Have you ever decorated your home with only a small budget? If so, then you’re probably already familiar with your local thrift stores. But whether you’re a seasoned pro or you’re new to the arena, it helps to know what you should be looking for! So today I wanted to share a short list of my very favorite things to hunt for when I’m thrifting, along with what I typically pay for those items. I’ll tell you now, there are some deals to be had out there if you’re willing to search a bit!

That’s why I love thrifting. Sometimes a little too much. It's easy to see those prices and just snatch up everything in sight that you might ever possibly use. I know. I used to do that myself. But trust me - from this side of things, I can tell you that it is so worth it to wait for the thing you really need and will really use. Right now. Don't clutter up your home just because it's a good deal. So, with that in mind, here are my top 10 favorite things to thrift!


Thursday, August 29

How to Cut Your Own Photo Mats

Have you ever had trouble matting a photo? I love how clean and professional frames look with a mat, but it's hard to find mats for large frames or odd-size photos and artwork. And when standard sizes don't fit you're stuck looking at pricey custom mats.

But there's a better way! You can cut your own photo mats right at home, in just a few minutes, for a fraction of the cost. Today I'll show you how!


Thursday, August 1

Guest Room Revamp (during our spending freeze!)

I gave a little teaser of this space when I shared my DIY floor plan art (you can turn your own home into a work of art!) and today I wanted to share the super simple and affordable way I totally refreshed this space... without spending a dime during our spending freeze!


From the day we moved in, I was never crazy about the blue walls in our guest room. For some reason I have never liked blue. Which I realize is ironic since I painted our entire house dark blue and love it with all my heart. I guess I only like a very specific blue? But for whatever reason, these blue walls just rubbed me the wrong way. I'd spent quite a bit of time over the last couple years scheming their demise, but always ran into the age old debate of the MLH household:

How much color do we need on the walls?
Me: "Less."
Husband: "More."


Thursday, June 27

DIY Insulated Camper Van Window Shades

When people find out we use our van as a camper, they typically have the same questions:
  1. Where do you all sleep?
  2. Do you have any privacy with all those windows?
  3. Isn't it hot/cold?
We already answered the first question with our DIY removable bunk system, and we'll address questions 2 + 3 today with DIY insulated window shades that provide both privacy and, well, insulation!

Check out all our camper van posts and tutorials here!


I was amazed the first time we used these shades - camping in 90+ degree weather in direct sun. We put up the shades, put a screen over the door to keep bugs out, and turned on a small portable fan. I napped in there with the baby without breaking a sweat. I couldn't believe it. I had been dreading the trip, afraid the van would be like an oven. But it wasn't!

I pretty closely followed this tutorial and used Reflectix insulation for the base of my window shades, then backed them with pre-quilted fabric. Could you use the Reflectix without the backing? Probably. It still insulates pretty well on its own, and it would save you some time and money for sure. So if funds are tight, give it a try! But the quilted fabric is great for several reasons: it gives more stability to the shades, adds another layer of insulation, and softens the interior of the van. I would use the quilted backing again in a heartbeat for that last reason alone. It helps to dampen sound and feels less stark than the plain Reflectix. It feels so cozy and quiet in there!

It was 90 degrees out in this photo, but we were cool and comfy in front of the fan! You can also see the window shades behind him.

Monday, April 8

DIY Natural Foaming Hand Soap

This is so easy it almost doesn't even deserve to be called DIY. Like, if you can open a bottle you can do it. But if you're looking for an all natural hand soap that's more cost effective with less waste, look no further!

I've tried other DIY hand soaps in the past in the past and I've learned a few things:
  1. Most take a lot of work (grating bar soap, boiling, etc.)
  2. They end up with a weird goopy texture
  3. My kids wash way better with foaming soap anyway
This soap is no work, no weird texture, and allllll foamy goodness. It's a win win win.

Tuesday, March 12

Functional Bathroom Updates (on a low-budget!)

Today we're talking bathrooms! And specifically three functional changes that have made a huge difference in how our bathroom works for us. There isn't a huge reno involved but just a few small, inexpensive updates that can help in just about any bathroom!


But first you need to know: the one big sacrifice we made when we bought this house was a master bathroom. *gasp* And yes, we lived to tell the tale of a shared bathroom. It's fine, guys. But that means this bathroom has a big job since it's the main bathroom for our entire family. All six of us.


Tuesday, March 5

Affordable Magnolia-Style Throw Pillows

The internet has been all a-buzz about Joanna Gaines' sneak peek of her new Spring pillow line for Loloi Rugs. They are stunning. My couch would cry tears of joy to have such pillows. But then I found out... Loloi pillows average around $75 each. Spending freeze or not, that's gonna be a hard pass from me. Even on the Magnolia website a beautiful pillow will set you back anywhere from $40-130! 


There just has to be a better way. So I did a little searching and rounded up a few budget-friendly Magnolia-esque pillows just for you!

Check out my follow-up post with DIY Magnolia-style pillows!


I'm using some of these on my own couch!


My first mega-deal is in-store, but if you keep scrolling I have a few online options and even some DIY options down near the end. If you find a deal too good not to share, let me know in the comments!!

1. Hobby Lobby
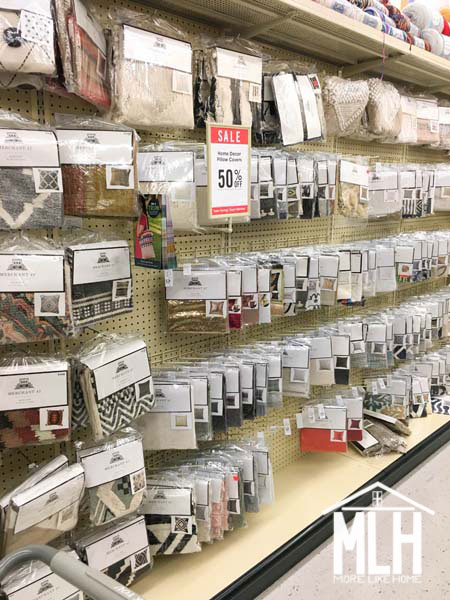
This was by far the best deal and best selection I've found. And it was totally a surprise! I didn't even know they had this pillowcase selection until I stumbled across it (ironically while searching through their upholstery fabrics for something to DIY a magnolia pillow). Hobby Lobby doesn't sell online, but if you have a store nearby you're in for a treat. And nothing beats being able to hold an item in your hand before buying!


At our store this section was right next to the upholstery fabrics and the pillow forms. And the best part? When I went Saturday, the whole section was on sale for 50% off! Hobby Lobby runs a rotating list of sales so, even if you missed it this time, you can keep an eye out for the pillowcases to hit 50% off again. Because they will. And if you don't want to wait, they always have a "40% off one item" coupon on the website that's almost as good.

Enough chit chat, let's get to the pillow goodness. I took pictures of the ones I loved most, but there were dozens more to choose from! Hold on to your hats, folks. You're not going to believe these prices. 

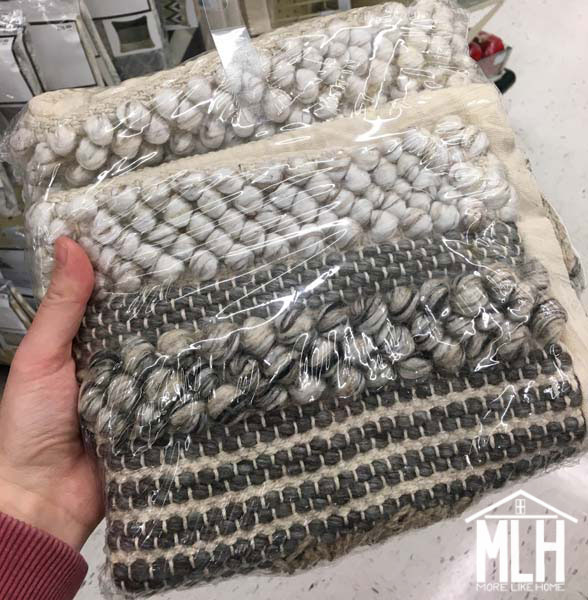
1.  $14.99 ($7.50 on sale!) with tons of thick yarn and beautiful texture (a hallmark of magnolia pillows!)

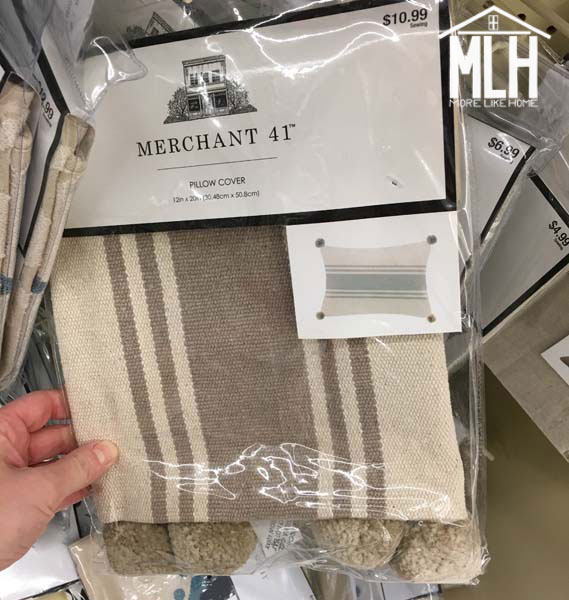
2.  $10.99 ($5.50 on sale!) super-clean farmhouse-style stripes on a medium-weight fabric (higher-end feel than thinner fabrics!) with pom poms to boot. I love this one so much.

Saturday, February 2

7 Thrifting Tips

I'm loving the new #thriftandtell tag on instagram. You guys know how much I love a good second hand find, and I love seeing your finds just as much! So let's talk thrifting!

Thrifting is one of my very favorite ways to turn a house into a home. I firmly believe that any house can be beautiful and welcoming and cozy, and that you don't have to drop big bucks to get there. Thrifting has allowed me to decorate our home even when the budget was tight. Plus here are benefits to second-hand items that you just don't get with new off-the-shelf items:
  • unique and one-of-a-kind pieces
  • real, vintage character
  • sturdy real-wood furniture pieces
  • lower price tags!
Seriously, it's one of the single best ways to furnish and decorate your home on a a budget and with a style that's uniquely yours. But if you're a thrifting novice it can be a bit overwhelming. So today I wanted to share some of my favorite tips for shopping second hand!

$0.25 succulent pot from a garage sale (check out all my thirfty finds here)

1. Look at what you have. This is so important if you want to be a thrifty shopping ninja. You're looking at what you have for two important reasons. First, to see if you already have something that can fill the need. Because there's nothing thriftier than free! When I was looking for a new console table for our living room I brought up an old dresser up from the basement and it fit beautifully without costing a dime! Second, you want to look at what you have so you don't over-buy or buy a duplicate item. You may see some cute cups when you're out shopping but if you already looked at what you have and know you have enough cups, you can save that money up for something spectacular. (In fact, we're doing our best to not buy a single thing in 2019 so we can get out of debt and build our savings. Check out this post for all the details.)

These glass bottles were only $0.25 each at a garage sale.
 
2. Know what you need. This kind of fits with #1, because you also need to take a good look at the space you have. Take the time to study the space you're working on and build a vision of what you want and need. If you know you need a large pot and a 2' painting to create the vignette you imagine, you won't be tempted to buy whatever bowl or candle sticks might work because you already know what you need.


These chairs were $5 each at a garage sale. They just needed a coat of paint.

3. If you want to FIND, you have to SEARCH. Once you're settled on what you have and what you need, it's time to actually look for those items. Whether you prefer garage sales, thrift stores, or online sources like craigslist or fb marketplace, there are new items every time you look. The only way to find what you need is to keep looking. So if you're looking for a specific piece, look often and look as many places as you can. There will days when you'll leave empty handed. But the more you look, the more you find. And one day they will have the perfect thing for an amazing price. It's hit and miss for sure, but you'll never hit if the fear of a miss keeps you at home.

And it often means actually getting in there and digging through piles of dishes or clothes or rugs to see what's hiding underneath. The first time I dug through a mountain of paintings at a thrift store I uncovered this treasure:

Original oil painting I found at a Salvation Army thrift store. One of my all-time favorite finds!

4. Patience, my Padawan. Really, though. Like I said in #3, there are different items every day. Unlike walking into a store and picking what you want off the shelf, you may have to wait days, weeks, or even months to find a good fit. The people who lose faith in thrifting are usually the ones who don't understand that it's a waiting game. Some days you'll come home with nothing. And that's okay. Because if you're patient it will pay off in both the money you save and the fabulous items you find! Because you will find them in time. So don't give up, and don't be afraid to turn down an item that miiiight work but just doesn't feel quiiiite right. Because you are a patient thrifting ninja who knows what items are worth waiting for.

I found these vintage jelly jars at a thrift store for $0.50 each. We love using them as kids' cups! 

5. Focus. Especially if you're making a bigger purchase. Don't buy the first desk (or chair or mirror or whatever you're looking for) just because it's cheap and "it will work." Hold out for one that is affordable and beautiful. If you jump the gun and buy one you don't really love, you'll just end up replacing it later and the money you spent on this one = wasted. I looked at dozens of desks before I found the one for our home office, but by the time I found it I knew what I really, truly wanted and I was able to jump on it with confidence.

Now don't get me wrong - if you move in to a new place and literally don't have a table to eat at, go ahead and buy the first and cheapest thing you can find. Your first priority is a home that works for your family and this is the right time to buy a place-holder piece. But if you're looking to replace a table that you don't like or isn't quite the right size, it's worth waiting for one that fits all your criteria.

The desk, chair, and glove are all second-hand! Check out how we totally updated this space for just $35.

And while we're talking about focus - focus on what you really need. If you're shopping for that new desk, don't buy every candlestick in the store just because they're cute. Go back to #1 and #2 and get your head around what you have and what you still need. Thrifty ninjas don't whittle away money on little extras they don't need. Focus.  We still want to be thoughtful with our purchases and what we truly want to bring into our homes. We don't want to waste money or space on purchases we'll regret later just because they are a good deal. This is a lesson I'm still learning. It's hard not buy all the deals! But I've made leaps of progress since we started our spending freeze/money makeover. As my husband likes to say: the best deal is buying nothing.

6. Don't be afraid of quirks. If something needs a little work, the price often reflects that! Minor repairs, a worn out finish, and unique details are nothing to turn your nose up at. Most people will pass over those items, which helps lower their price even further. And you are a thrifting ninja who can see the potential in the most affordable items.

 This dresser was painted black and one drawer was in pieces... and I got it for FREE! Tutorial coming soon for that mountain silhouette detail at the bottom!

7. Make an offer. This won't apply in, say, a Goodwill, but sellers online, at garage sales, and at privately owned shops are often open to bartering! And some think it's half the fun. If you're kind and respectful, you may just walk away with a bargain! There are a few keys to bartering success:
  • Be kind. Oh, did I say that already? Well it's important so listen up! Don't talk down to them, don't act like you're doing them a favor by buying their item, don't low-ball, etc. Imagine how you would want a buyer to treat your grandma, and treat your seller the same way. Nothing will ruin a deal faster than a bad attitude. If you act like a jerk they will turn down your offer in a second, and might decide not to sell to you at all. Just be kind.
  • You get a better deal if you bundle. If a yard sale is offering dining chairs for $10 each, you could offer $50 for a set of six. But you can try bundling anything that's for sale! Most people will be glad to give you a deal to get rid of more items!
  • Sellers like fast pick-up. Many sellers just want the item out of their house or off their sales floor. Especially for online sales. When I'm dealing with FB marketplace I'll often phrase my offers like this: "Would you take $20? I can pick up tonight!" And then I actually pick it up that night (this goes back to be kind). I've rarely had someone turn down that offer.
  • The longer it's been listed, the lower you can offer. So if something is outside your budget, keep an eye on it for a while. You might get lucky! The timeline depends on where you're shopping - items that have been in a shop for a week, online items (craigslist, etc.) that have been listed for a few days, or garage sale items that are still there the last hour before closing up. Those are your best chances to get a great deal! This tip is more helpful if there is a more expensive item you love. Maybe something that looks just perfect but it's outside your budget. If it's a little more than you'd like to pay go ahead and make an offer right away, but if it's quite a bit out of your budget you can watch it for a week and if it's still for sale, go ahead and make an offer within your budget. They are much more likely to bite at that point! And if they still say no? Say thank you anyway, and let them know you'll still be interested if it doesn't sell and they decide to go that low. Be kind. If they still don't get any bites, they'll have you in the back of their mind when they're ready to be done with it. Shopping at a yard sale? Leave your number and let them know they can contact you if it hasn't sold at the end of the day! However, if you see something you love that's in your budget go ahead and buy that baby before it's gone. Don't risk someone else swooping in with a full-price offer. In your budget means in your budget, and it's okay to just pay what they're asking and lock down the item.
  • Don't take it personally if they turn down your offer. Remember it's their stuff and they can sell it for whatever you want. And you get to decide if you want to pay that price. So chin-up and no grumbling.  
I only paid $2 for this whole box of dirty old jars. They cleaned up beautifully and they've been holding my dry goods in the kitchen for seven years!

You're ready! Go out and find that second-hand goodness. Let me know what you find! And you can check out all my thirfty finds here.

P.S. Don't forget to #prayforramona http://www.prayforramona.com/

Sunday, January 27

Homemade Wood Stain and Sealer

Remember this office space refresh I pulled off for just $35? It's one of my favorite corners of the house, and I still can't get over how little it cost to make this beautiful nook! One way I kept my budget low was by making my own wood stain and wood sealer with household items I already had on hand. So today I'm sharing how you can make your own - and it's easier than you might think!


I went back to my decorating roots for this one. And at my roots... I'm cheap. I come from a low budget use-what-you-have background and I wanted to update this space as inexpensively as possible, while still creating a beautiful space I love to work in. Because, guys, at my core I believe that any house can become not just a home, but a home you love, without spending a fortune. You can stick to a small budget and still do amazing, beautiful things!

So I set my budget at $50 but wanted to stay as far under it as possible - literally not spend a dime more than I had to. I added some DIY budget shelving and a second-hand chair, but the real star of this makeover was a super budget-friendly desk! I started hunting for a desk first because I knew a large piece like that would make or break my budget. If I spend too much on that one item, I wouldn't have budget left for the other upgrades I wanted.

I ended up finding a perfectly-sized desk for a bargain (more on that in a minute) but the finish was in rough shape. That's probably why the price was so low. I wanted to try sprucing it up without spending $$ on new stain or poly, so I took to the interwebs and you know what? Turns out you can make your own wood finish products with everyday items you might already have around the house! I actually had everything I needed!


But let's start with the desk story.

This desk popped up on FB marketplace one day and it seemed like a good fit for this space. Just the right size, plenty of drawer space, and a perfect fit for my simple style (because I "like plain"). I saw it posted for $30, but it had already been listed for a week so I offered $20 (and offered to pick it up that night! - most people want to get rid of things quickly and will give you a deal for fast pick-up!) and they said yes!  


I brought it home and sanded off the old finish. I also tried to remove the laminate top that had been added at some point... and discovered a huge hole cut in the original top. Bummer. So for now it went back on.


The wood looked so pretty sanded down and I wanted to keep the desk light to contrast the dark walls, but I also wanted to warm it up just a bit. But... I didn't have a light enough stain on hand. And I didn't want to spend a good chunk of my budget on stain, so I started looking into DIY options on pinterest. I looked at several recipes and they all said basically the same thing: steel wool + vinegar. But I kept thinking "no, that can't be right." and looking for a different recipe. Why? I have no idea. Maybe it just seemed to simple. Or maybe I didn't want to wait a day for it to soak. But the internet totally agreed that this is the best method. Come on, Georgia. So here's the basic method, followed by a bunch of tips gathered from the interwebs for your convenience:

Homemade Wood Stain
  • very fine steel wool
  • vinegar
  • mason jar
Short instructions: drop steel wool into a mason jar. Cover it with vinegar (make sure you use enough to for your whole project!). Let it sit in a quiet spot like under the sink with the lid vented for 24 hours, then remove the steel wool. BOOM. Stain. Apply it to your wood and let it dry.

It looks almost unchanged, apart from a little rust on the steel wool. It gets more rust-tinged the longer it sits, but it will still stain your wood looking like this! It's crazy.

But there's always a catch:
  • the biggest downfall in this method is that it's unpredictable. You don't know for sure what color you will get until the stain dries. And you probably won't be able to recreate the exact same color twice, so make sure you make enough the first time! I made a first batch of stain and applied it to half of one drawer before m3 tripped on it and spilled the entire thing. I had to sand that whole drawer down because it didn't match my second batch.
  • you can use different vinegar to get slightly different colors (I found some great info in this post), but the biggest change seems to come from these factors:
  • more steel wool = darker color
  • longer soak time = darker color
  • finer grade of steel wool = darker color (you need to let coarser wool soak longer or it won't work)
  • when you first apply the stain you won't notice any change apart from the wood being wet, but as it sits it will begin to get darker. It actually reacts with the wood to change its color and that takes time! According to pinterest it can take up to an hour for it to reach its final color. So if it's not looking as dark as you hoped, be patient and see how it turns out when it's done reacting. 
  • since I wanted such a light color, I used a small piece of steel wool and let it sit for just 18 hours. This worked to make a nice light change for my first batch, but with my second I used a less-fine steel wool and it definitely wasn't long enough. Oops.

Stain applied, waiting for it to dry:


You can see my test spot in the photo below. Just a slightly darker, grayish patch. Plus some splatters from the first batch spill that I didn't realize splashed on this drawer.


I loved the color once it was all stained. And if you want it to stay the color (or at least close to it) you should probably try sealing it with a regular polyurethane. But... I again took the cheap DIY route with a homemade beeswax + olive oil sealer. And it dramatically changed the color of the wood. I don't know how much difference the stain in the final color.

Beeswax + Olive Oil Wood Sealer
  • 1 part beeswax (1/4 cup)
  • 3 parts olive oil (3/4 cup)
Melt the two ingredients together in a double boiler (or glass bowl over a pot of simmering water) until combined. Let it cool slightly before pouring it into a container, then let it cool completely. Once it's cool you can apply it to your wood with a soft rag (or piece of an old tshirt). Fun fact: this is actually the same wood sealer recipe that I use to seal my wooden teething toys! You can read more about the process with photos in my teething ring post.

See how much darker?! And more yellow. I don't know how much of that is from the sealer and how much is the undertone of the wood. I should have done a test spot of poly to compare. My bad, guys.
Honestly, I was pretty disappointed when that beautiful gray tinge disappeared into this darker, more yellowish finish. Ugh. Fortunately once I moved the desk into its new home, the color grew on me pretty quickly. And at the moment I'm very happy not to mess with it anymore. Sometimes that's all we can ask for.

Apart from the color, I've been really happy with how the sealer actually worked and how it has help up so far. It smelled great, went on smoothly, and I haven't had any problems with it! I actually love having this finish in my wheelhouse, especially to use around the kids.

Oh, also keep in mind that I have a laminate top on here that I didn't need to seal. I do wonder if there would be any trouble with the sealer leaving oil stains on papers or fabric left laying on a sealed surface (similar to the problems with that frustrating butcherblock in the kitchen)

With the desk done, we were ready to start moving things into our home office/library.

Those sticky notes on the wall are my high-tech stud markers.

We hung simple shelves using these brackets I made for less than $1 each (more details on that here).


Then slid the desk into place along with an extra chair from our dining set (another FB Marketplace find that I updated with black spray paint).


And that's the rest of the story on our low-budget office refresh!


The only thing I've changed since the big reveal is adding a string of twinkle lights (that's what you call Christmas lights so you can leave them up year-round. you're welcome.) above the bookshelves on the opposite wall. This wall is why we call it a library instead of an office.


Feeling inspired to tackle your own space on a budget? Always remember the best place to start: rearrange and work with what you have first. Then you can see where you really need to spend money to make the space the best it can be. After that, see what you can get second hand for low cost (I'm working on a post with my best thrifty shopping tips to help you out with this step!).

https://www.instagram.com/erikabault/
Love this reminder from erkiabault!

For all the pictures and details of the full office update, check out this post:

http://www.morelikehome.net/2018/10/35-home-office-refresh-fall-budget-reno.html

What space would you love to tackle on a small budget?
Subscribe