Showing posts with label Friday Hacks. Show all posts

Friday, February 3

Rustic Front Porch Console - Friday Hack

Our new house has given us a lot of firsts, and one of my favorites is our first front porch. I have wonderful memories of our front porch growing up - eating breakfast with my dad and sisters, watching it rain, chatting with friends and family - and I can't wait to start making memories like that with my boys. So far our porch is pretty bare, but I'm excited to spruce it up this spring!

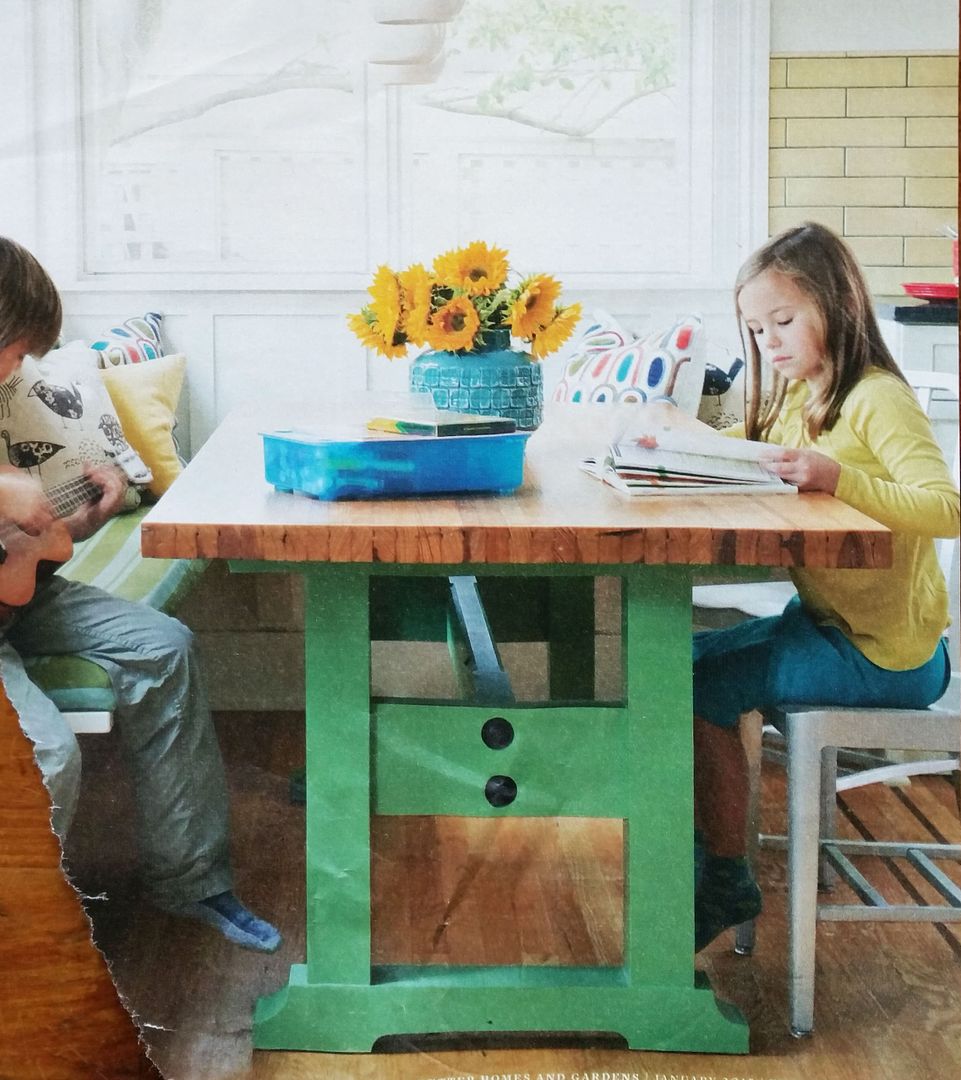
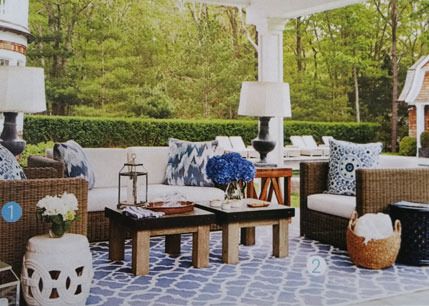
I keep going back to this porch I pulled out of a BHG magazine. I love the fresh mix of white and black that's warmed up with natural elements. And one of my favorite features is that rustic console by the door. I know console tables usually make an appearance in hallways or entertainment centers, but a porch is actually another great place to work in a console!

image via pinterest

Bringing furniture onto your front porch makes it feel more like an extension of your home. It creates a warm welcome for guests and a comfortable space for you to relax. But... this rustic console is great addition for more than just its looks. It's also a functional place to drop your bags or groceries while you unlock the door, and a handy place to keep things like a deck of cards for chilling on the porch or a weeding tool you can grab for the front flower bed!


Here's what you need to build your own:
1  -  1x3  @  10'
2  -  1x2  @  10'
1  -  1x2  @  8'
1  -  1x10  @  6'
3  -  1x8  @8'
1  -  1x12  @  10'
1x2" plywood - two pieces 21.5" x 10.5"
1/2" trim
Kreg Jig
1 1/4" pocket hole screws
1 1/4" wood screws
finishing nails
wood glue

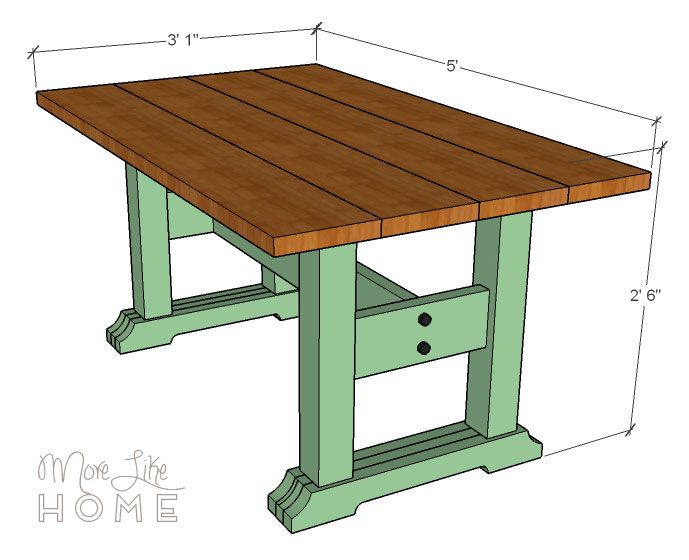
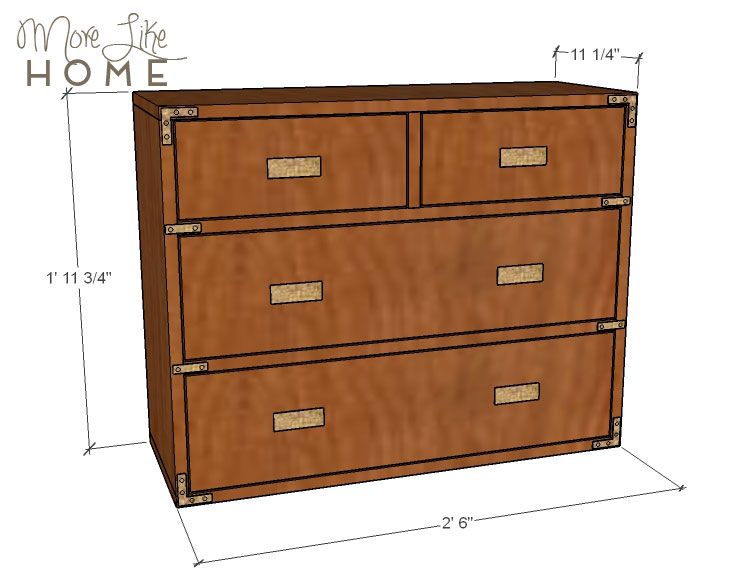
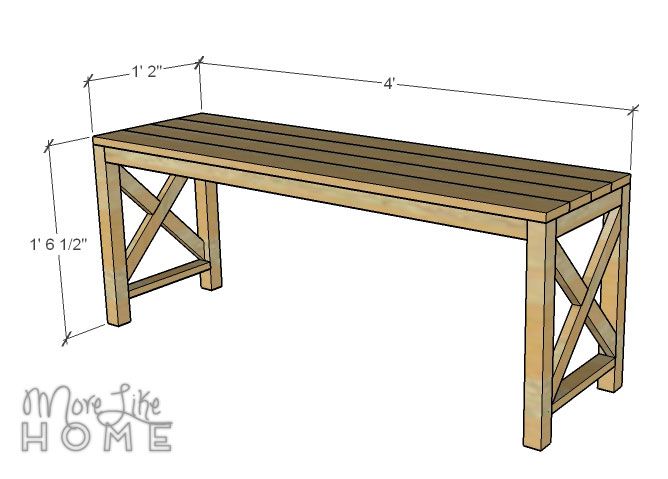
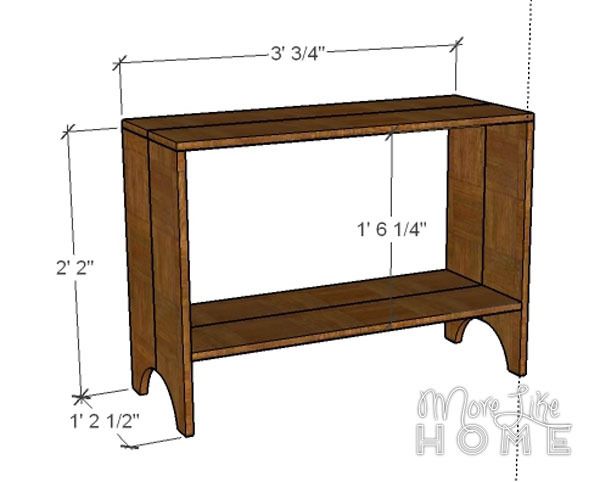
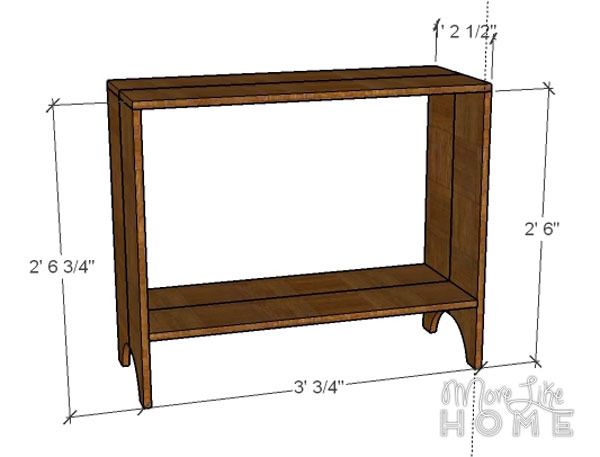
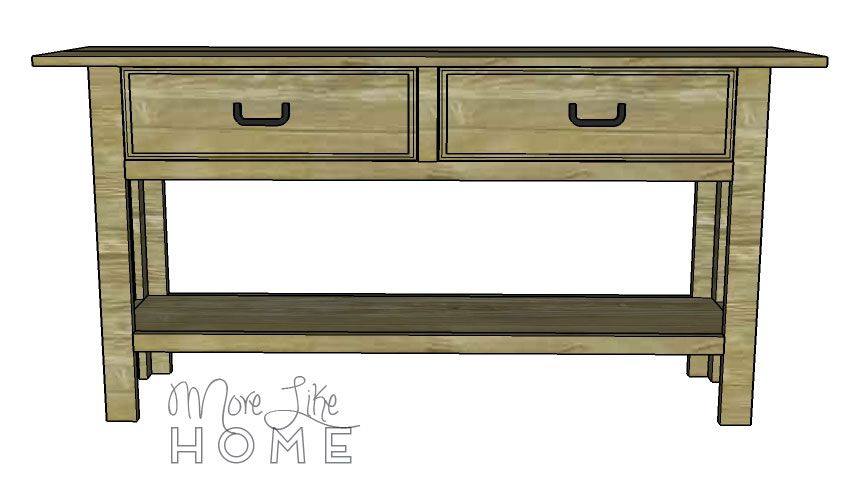
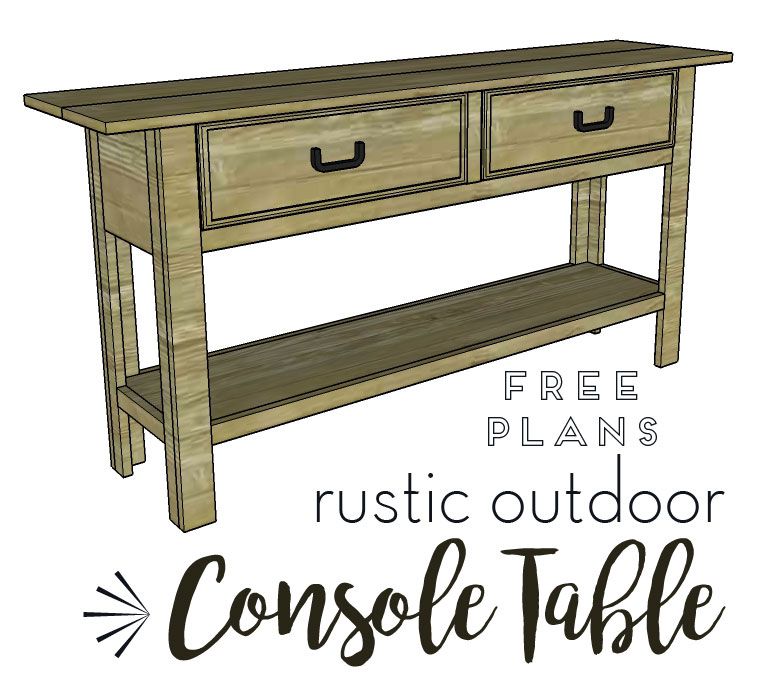
Finished Dimensions: 61" wide x 22.5" wide x 30" tall


Measure twice, cut once (seriously, though). Use glue in every step. Read through all the instructions before you begin. Be safe, have fun, and let me know if you have any questions!

Cut List:
(A)  4  -  1x3  @  29.25"  (leg front)
(B)  4  -  1x2  @  29.25  (leg side)
(C)  2  -  1x10  @  8.25"  (sides)
(D)  1  -  1x10  @  48"  (back)
(E)  3  -  1x2  @  48"  (stretchers)
(F)  1  -  1x2  @  7.5"  (stile)
(G)  2  -  1x2  @  8.25"  (side stretchers)
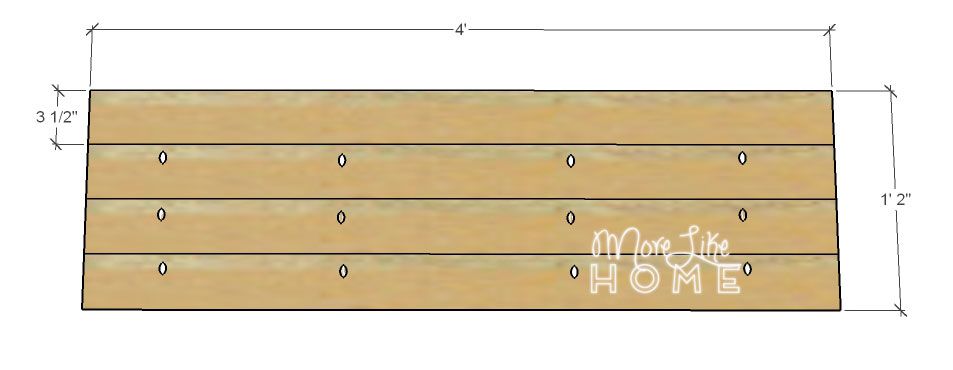
(H)  2  -  1x8  @  65"  (top)
(I)  2  -  1x12  @  51.5"  (shelves)
(J)  3  -  1x2  @  11.25"  (drawer dividers)
(K)  2  -  1/2" plywood  @  21.5 x 10.5"  (drawer bottom)
(L)  4  -  1x8  @  10.5  (drawer sides)
(M)  4  -  1x8  @  23"  (drawer front/back)
(N)  trim

Friday, September 16

Friendly Family Farmhouse Table - Friday Hack

Welcome to our Friday Hack! Today we're tackling a beautiful little farmhouse style dining table. I found this in an issue of Better Homes & Gardens and fell in love with it. The style is simple without being boring, and the bright two-tone finish makes it cute, welcoming, and full of charm. It's the perfect little table for your family to come home to at night!

Image via Better Homes & Gardens magazine

I'm calling it the Friendly Family table because the finish of the original is so bright and friendly. It's the kind of table that will welcome your guests in and invite them to stay. It's relaxed and comfortable so everyone can feel right at home. And what a perfect table for the center of life with your own family! The big work surface is great for homework, crafts, coloring, and of course dinner together. But enough chit chat, let's get started!


Read all the steps before beginning (and the notes on making the tabletop). Work on a level surface. Cut your pieces as you go, double checking measurements before each cut. Pre-drill and countersink your holes, and always use glue. Use necessary safety precautions, and don't forget to have fun!

Shopping List:
1  -  4x4  @  8'
1  -  2x6  @  6'
2  -  2x4  @  10'
4  -  2x10  @  6'
wood glue
2.5" Kreg Jig screws and a Kreg Jig (OR regular 4.5" wood screws)
2.5" wood screws
4 - 3" large bolts with washers (optional)

Finished dimensions are 60" long x 37" wide x 30" tall. You can easily adjust the length by changing the length of your table top & stretcher.


Friday, August 12

Rustic Captain's Chest Nightstand - Friday Hack

Today we're hacking a bedroom I've been going back to for years. I always love this chill, relaxing space and I've gone back and forth between wanting it for our guest room and our boys' room. Well today it can be your room! We'll start with free plans for that fun and functional little captain's chest nightstand, then we'll share a few tips to finish off the look.

https://www.pinterest.com/pin/242279654925921833/

So let's go ahead and get started with our little chest of drawers. I love having drawers in my nightstand to keep things tidy, and this little guy is just perfect for the job. (I also have a whole series of nightstand plans to tickle your bedside fancy) This guy is a workhorse and a key design component in the space. Finished dimensions are for this piece are 30" wide x 23.75" high x 1.25" deep.


Read through all the instructions before you begin. Measure twice before you cut. Use glue in each step. Use appropriate safety gear. Be careful and have fun!
 
Shopping List:
  • 1 - 1x12 @ 6'
  • 1 - 1x12 @ 4'
  • 1 - 1x2 @ 6'
  • 1 - 1x4 @ 6'
  • 2 - 1x6 @ 6'
  • 1 - 1x8 @ 6'
  • 1/2" plywood - you only need half a sheet for this project!
  • 1 1/4" screws AND a couple 2" screws (if you don't have a Kreg Jig)
  • OR a Kreg Jig + 1 1/4" pocket hole screws (optional, but makes a nicer finished project without holes to fill) 
  • finishing nails (optional)
  • wood glue
  • 6 drawer pulls
  • 4 sets 10" full-extension side-mount drawer slides
  • 4 - 2" flat corner brackets
  • 4 - 2" mending plates 
  • finishing supplies

Friday, July 22

X Entry Bench - Friday Hack

Another Friday, another hack! Today we're working on another look for the entryway. A few weeks ago we hacked a rustic entry table, but this time we're working on something with a much more modern vibe. But don't worry, it's still wonderfully warm and inviting.

http://wallsneedlove.com/collections/removable-wallpaper?utm_source=Pinterest&utm_medium=CPC&utm_content=Jones%20Design%20Wallpaper%20Install&utm_campaign=Refresh_Your_Walls_With_Removable_Wallpaper

So first things first, we need to hack this sweet X Bench. Finished dimensions will be 48" long x 18.5" tall x 14" deep. Here's what you need:

2 - 2x2 @ 8' long
1 - 1x2 @ 8' long
1 - 1x2 @ 6' long
2 - 1x4 @ 8' long
1 1/4" pocket hole screws 
2 1/2" pocket hole screws
wood glue
*if you don't have a Kreg Jig, you can get by with regular 1 1/4" and 2" screws and a countersink bit, and some finishing nails.

Measure twice, cut once. Use glue in every step. Read through all the instructions before you begin. Be safe, have fun, and let me know if you have any questions!

Cut List:
A) 4 - 2x2  @  17.75"  (legs)
B) 2 - 2x2  @  11" (side top)
C) 2 - 1x2  @  11  (side bottom)
D) 2 - 1x2  @  17 1/16 (X long)
E) 4 - 1x2  @  7.75"  (X short)
F) 2 - 2x2  @  45"  (front/back trim)
G) 4 - 1x2  @  11"  (seat supports)
H) 4 - 1x4  @  48"  (seat)

You'll actually want to start by cutting your seat boards (H). You'll lose up to 1/8" of length when you cut through your 8' board, so you'll actually end up with boards ever so slightly shorter than a full 48". This will be important later. Go ahead and attach the boards together side by side using the 1 1/4" pocket screws and Kreg Jig. Don't forget the glue. If you don't have a Kreg Jig, just cut the boards and then move to the next step.


Friday, June 10

Modern Wall Vanity - Friday Hack

Today we're hacking a modern vanity that will span the whole wall. It would also make a sweet modern desk in an office or homework space. This is different than things I've hacked before, it's more of a built-in than a piece of furniture, but these vanities have caught my interest a few times so I figured it was worth a hack!

https://www.pinterest.com/pin/23714335515492744/
image via pinterest

This tutorial will work a little differently than the ones I've done in the past because this vanity will be super space-specific. I can't tell you how long to to cut the boards because it will depend on your space. But I can tell you exactly how to figure out what size you need, and how to put it all together (which is easier than you might think). So let's get started!


What you need:
  • 2x4s
  • 1x6
  • plywood OR 1x8s
  • 2"screws
  • 3-4" screws
  • Kreg Jig with 1 1/4" pocket screws OR 1 1/4" screws
  • finishing nails
Before you do any building, you need to measure your space. This vanity needs to run from wall-to-wall (or have a leg at the other end to support it), so it's great to tuck in an alcove. So start by measuring the width where you want it to fit. For this example, its 5' long. So cut two 2x4s 5' long.  This will be the front and back of your frame.


Friday, May 13

Rustic Entry Table - Friday Hack

Today's hack is based on one of my favorite entryway photos from pinterest. I love how it manages to look neat and clean, but still welcoming with a rustic vibe (and it works well with white walls, so it's a great style if you're renting!). The table is a super fast & easy build that can make your home feel warm and inviting the minute guests walk in the door. It's full of rustic charm that can work with almost any style.

https://www.pinterest.com/pin/102175485275157069/

We'll start with the plans for a Rustic Entry Table, but keep reading because we'll also show you how to complete the look with a few key accessories!

Shopping list:
3 -  1x8  @  8'
1 -  1x3  @  4'
1 1/4" kreg jig screws (and a Kreg Jig)
glue (use glue in each step!)
If you don't have a Kreg Jig get regular 1 1/4" screws and a 6' 1x2 board

Finished Dimensions:
26" legs will give you a shorter table with the same proportions as the original photo, with finished dimensions of 36.75" wide x 26.75" tall x 14.5" deep


30" legs will give an average height table but the proportions will look slightly different (there's plenty of room for a second shelf!) with finished dimensions of 36.75" wide x 30.75" tall x 14.5" deep


Friday, May 6

Chunky Modular Coffee Table {Welcome to Friday Hacks!}

As the world goes digital, I'm one of those girls who's still holding on. Holding on with a "you can have it when I'm dead" kind of grip. I still prefer the feel of real paper pages in my hands, and my beloved magazines are no exception. No amount of pinterest can replace the satisfaction of tearing out my favorites and stuffing them in a folder for a rainy day (my folder = pinterest before pinterest cool).

But as my folder fills up, there aren't a lot of ideas I've actually implemented. And the same goes for my Pinterest boards. So I have a fun new idea I'm calling Friday Hacks. The plan is to dedicate any Friday posts to some of my favorite ideas from magazine pages (or pinterest) and ways to DIY hack them on the cheap!


So today we kick of the Friday Hack series with this page pulled from an issue of House Beautiful earlier this year. A fresh, beautiful outdoor living space anchored by some sweet, chunky modular coffee table units. Know what guys? We can totally make those. And it might be the easiest thing you ever build.


Here's all you need to build one coffee table (The modular design makes them super versatile - pair two together for a larger table, or try individual units as end tables!):
  • 1 - 4x4 @ 6'
  • 2 - 2x4 @ 8'
  • 1 - plywood project panel 3/4" thick (or a scrap at least 24 x 24")
  • 1 1/4" screws OR 3/4" Kreg Jig screws (and a Kreg Jig)
  • 2" screws OR finishing nails
  • 4" screws OR 2 1/2" Kreg Jig screws (and a Kreg Jig)
  • wood glue 
  • optional 2" bolts with nuts (check out the table finishing for this option)


Subscribe