
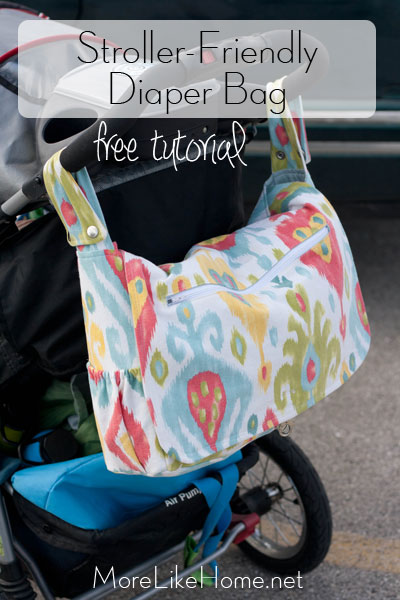
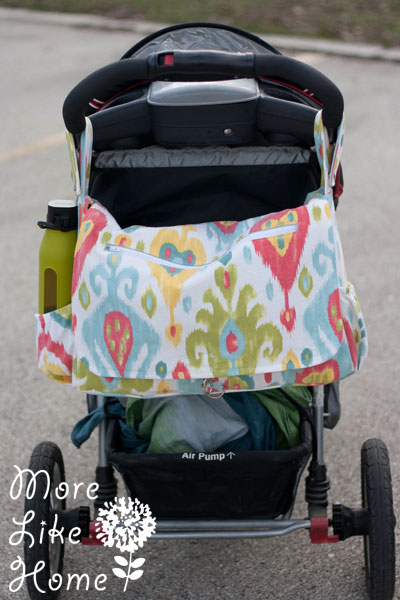
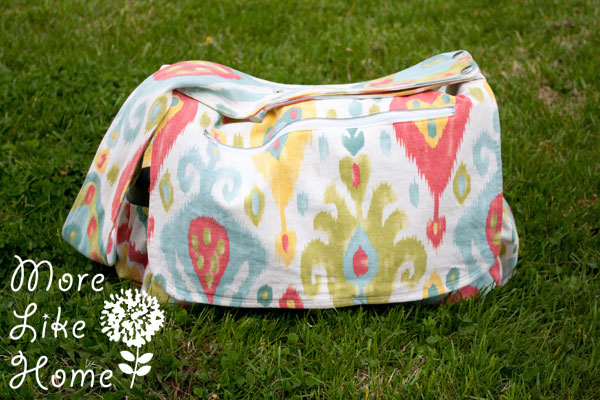
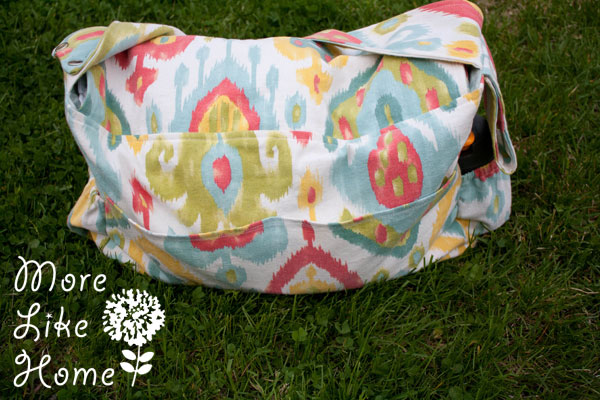
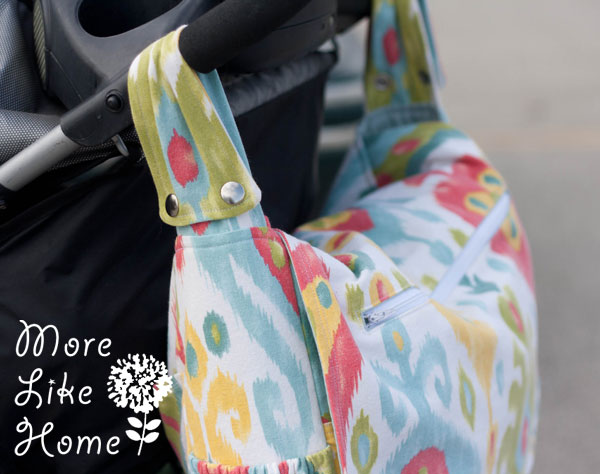
That's right. All the storage & organization you need attaches securely to the handles of a standard stroller.
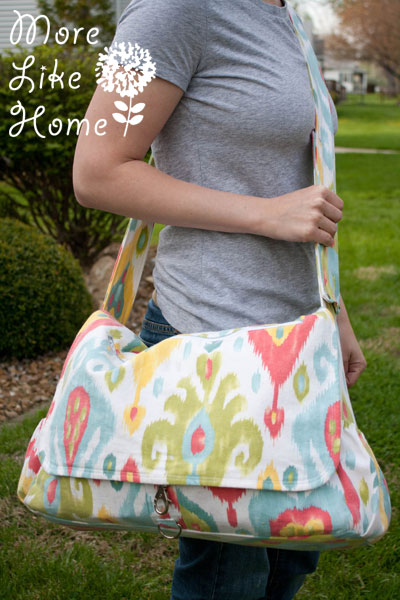
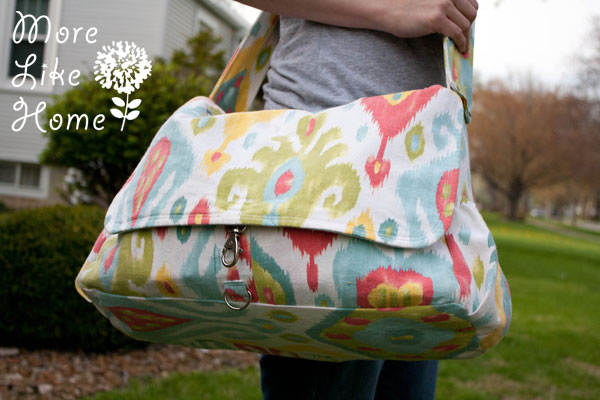
With just a few snaps it converts to a convenient messenger style diaper bag. Haul those baby stuffs in style, mommas!
And back again to a hands-free stroller bag!

If you're planning any summer outings you won't want to leave home without this. It's great for anytime you'll be doing lots of walking and don't want to lug a bag around. In fact these pics are from our trip to the zoo on Big Brother's birthday! Plus with it securely snapped on the handles, the under-stroller basket is open for lunch boxes, jackets, or baby carriers.

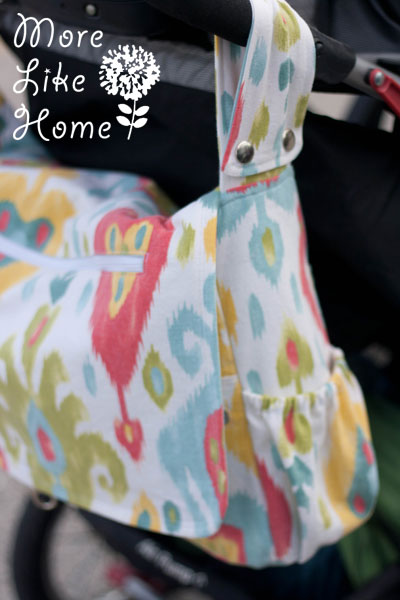
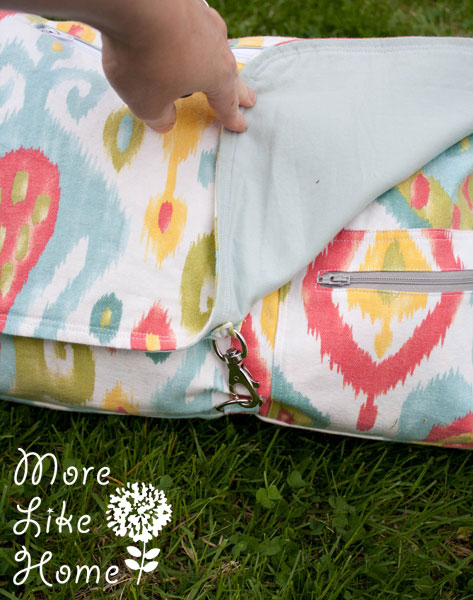
The shoulder strap is permanently attached on one end so you can't lose it. When you're ready to wear your bag, just snap the shoulder strap on at the other end and you're ready to go.

Want to put it back on the stroller? Snap the stroller straps and tuck the shoulder strap inside the bag or into one of the back pockets. It will be there when you need it later!

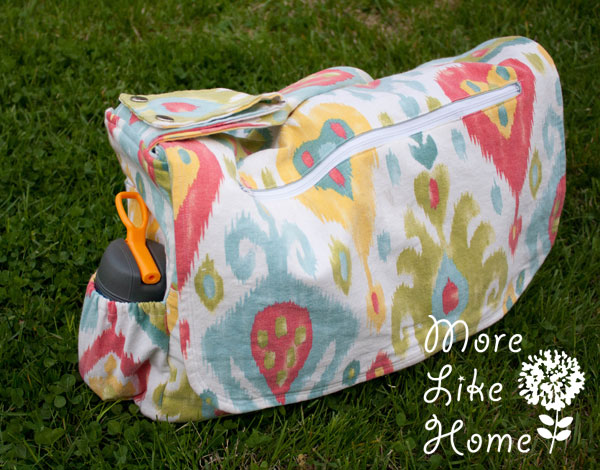
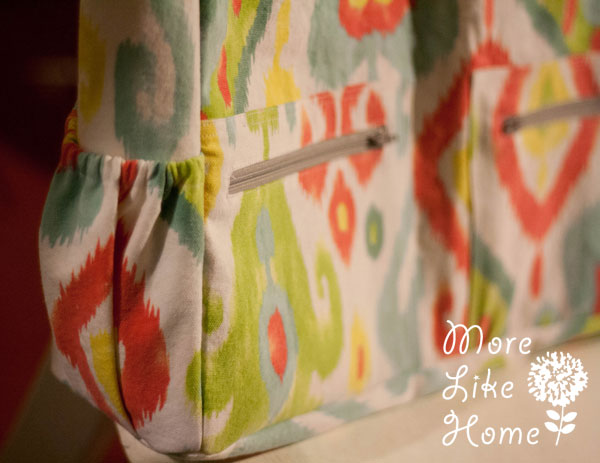
The water bottle pockets on the side are perfect if you don't have cup holders on your stroller.
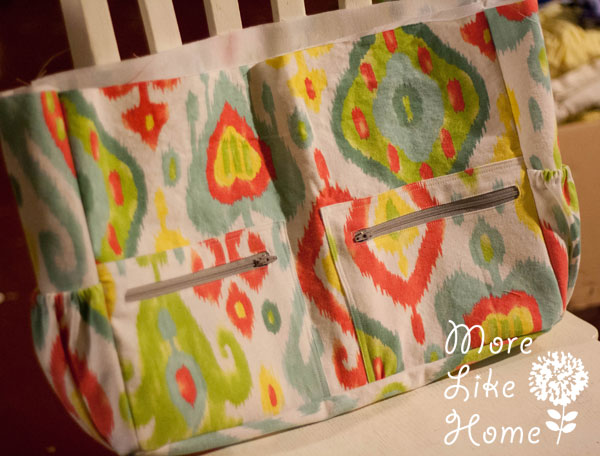
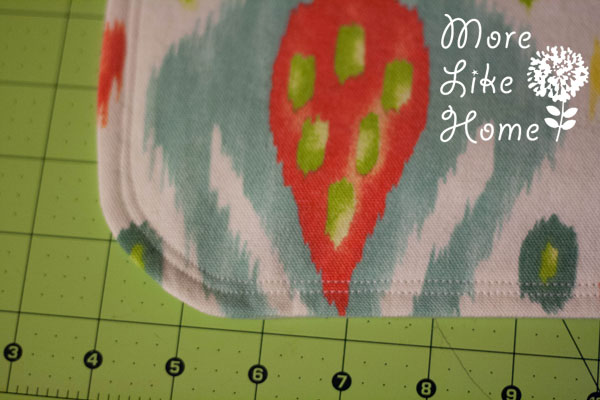
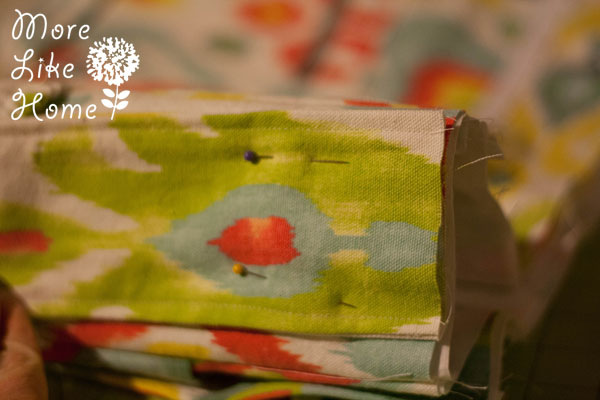
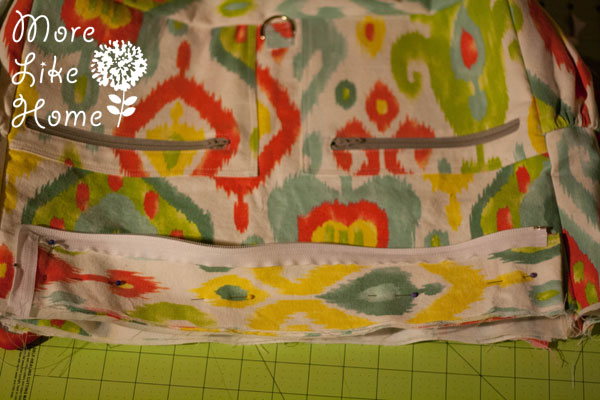
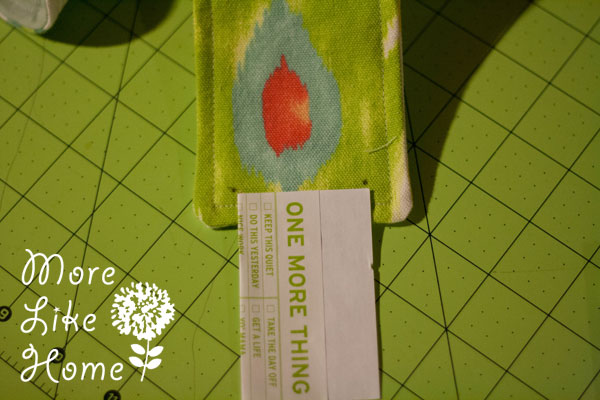
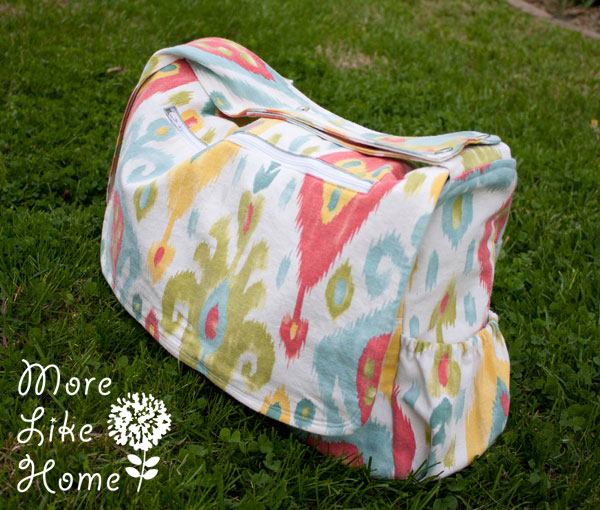
And did I mention tons of storage? The finished size is 16.5" wide, 11.5" tall, and 4" deep with twelve pockets! Let's take a closer look. The front flap has a zipper pocket built in.
The flap also has a clip for when you want it to stay closed. Big Brother has decided his personal mission is to keep it clipped at all times.
There are water bottle pockets on each end (with elastic tops to keep your drinks snug).
When you lift the flap there are two smaller zipper pockets on the front.
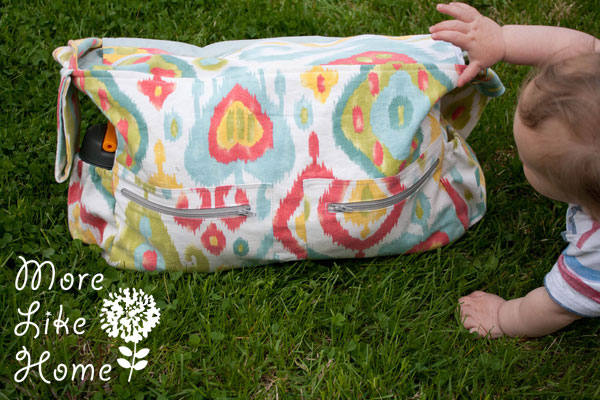
Baby Brother not included.

On the back there are two open pockets - perfect for keeping a burp rag handy!
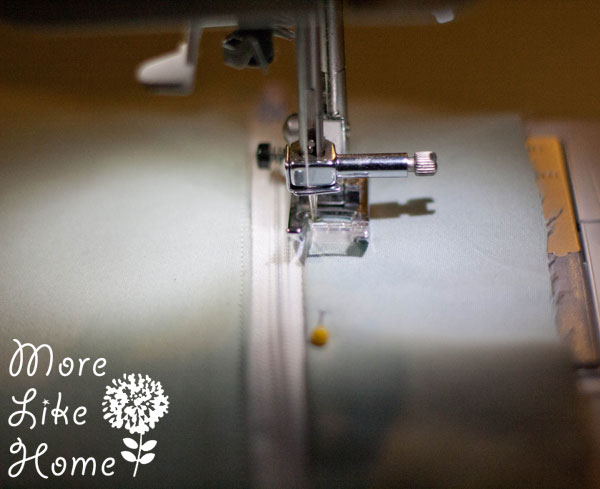
Under the flap there is also a zipper closure. Flaps are super convenient when you need to be in and out (and when it's hanging on the stroller!), but we all know nothing is worse than a diaper bag tipping over and spilling EVERYWHERE. One zip and you know your stuff isn't going anywhere. Problem solved.
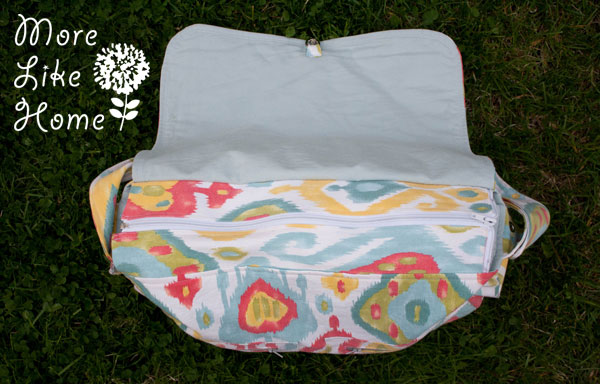
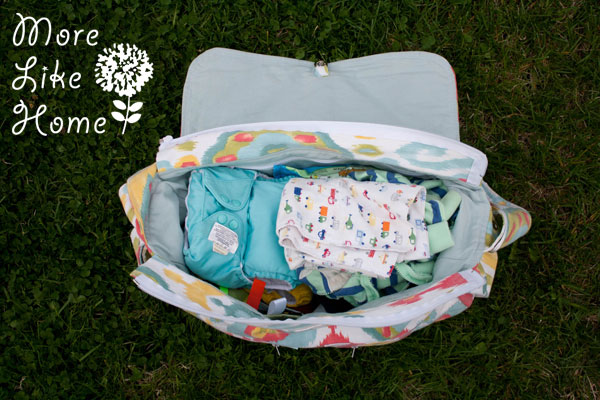
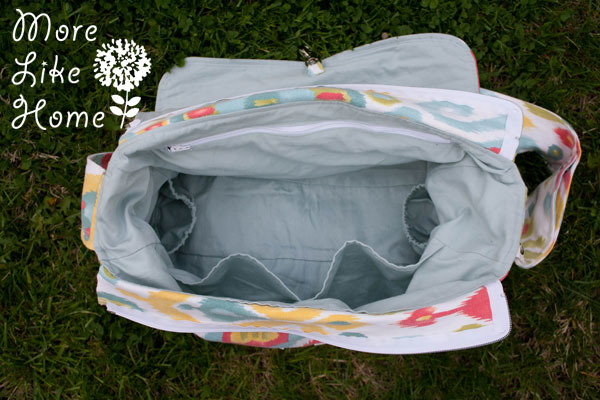
And inside that zipper? So. Much. Room. For all the stuffs. This is a pack-it-in-the-morning-and-go-all-day kind of bag. We fit everything we needed for an entire day at the zoo!
And you can keep it all organized with a whole mess of pockets. Two open pockets on the front, another zipper pocket on the back, and two more elastic water bottle pockets on the sides. Be still my organizing heart.
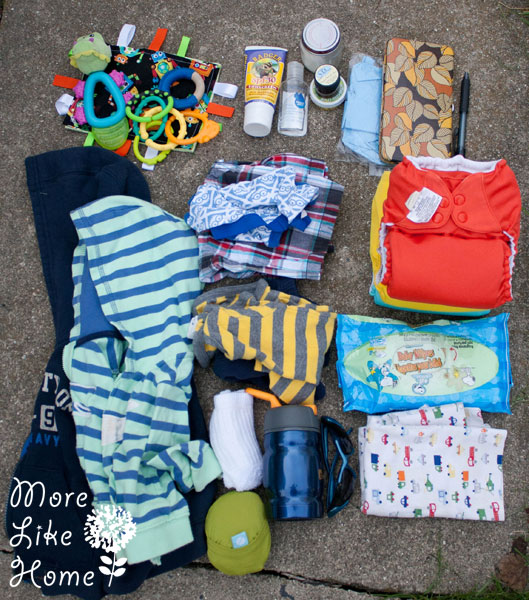
This is what I had in my bag today: baby toys, sunscreen, hand sanitizer, bug repellant, coconut oil (great for diaper rashes!), disposable diaper bags, wallet, pen, jackets for the brothers, back-up pants & undies for big brother, full backup outfit for baby brother, three double-stuffed cloth diapers, wipes, extra socks, roll-up grocery bag, water bottle, sunglasses, and burp rags. For serious, you guys, this bag is in it to win it.
I do have to warn you, before we get started, this project is not for the faint of heart. There are a lot of parts, a lot of steps, and a lot of zippers. HOWEVER there is good news. If you need a stroller diaper bag and aren't up to tackling the full beast, you can still make one! Just skip over any pockets & zippers to make it easier and faster! Really, you can end up doing just four sides, a flap, and the straps and have a totally functional stroller bag (like this bag that inspired my decked-out version). No sweat!
Of course, if you're feeling adventurous, it is totally sweet with all the pockets and compartments and they will make it easier to keep your baby gear organized. You will not be disappointed if you put them in! And of course you can add more pockets or adjust the sizes of these to meet your exact needs. That is the beauty of DIY, after all.
This will be long so I'm going to try to break it into sections - lining, outer body, straps & flaps, and putting it all together. At the beginning of each section I'll list the pieces you'll need to cut out to complete that part, but please read through each section before cutting because I'll have a couple suggestions and options for you to think about before you get started. And make sure you wash and dry your fabrics before you begin. Make sure you always backstitch and use a 1/2" seam allowance unless otherwise noted.
Also please note this pattern is for personal use only. I'm happy to offer all my plans and tutorials for free but this one took a TON of work and planning, so please don't ask others to pay for the work I've done. Thanks! :)
So... deep breath... and lets get started. Here's what you need:
- 2 yards outer fabric (I used duck cloth and wouldn't use anything lighter)
- 2 yards lining (quilting cotton is fine for this. if you use something like duck cloth you could skip the interfacing)
- 2 yards interfacing (I used mid-weight sew-in)
- one 18" separating zipper (or longer and you can cut it down)
- two 12" zippers
- two 6" zippers
- 1/4" elastic (you need about 20" total)
- one D-ring
- one swivel hook clasp
- 6 sets heavy duty metal snaps (make sure they come with the tool you need to attach the snaps)
- thread
Here's a quick list of all the pieces you'll need to complete the whole bag. If you cut them all out at once, MAKE SURE YOU LABEL THEM. It's a lot pieces to keep straight.
Outer Fabric:
2 - 18 x 12" body
2 - 8.5 x 7" front pockets
1 - 18 x 9 back pocket
2 - 5 x 12" sides
2 - 9 x 9" side pockets (I would make them a little taller next time, probably 10 - 11" for taller water bottles)
1 - 18 x 5" bottom
1 - 17.5 x 14.5" flap
2 - 17 x 5" zipper tabs
2 - 44 x 4" strap
4 - 11 x 4 stroller straps
2 - 2 x 2" buckle tabs
Lining:
2 - 18 x 12 body
2 - 5 x 12 sides
1 - 18 x 5" bottom
2 - 8 x 5" side pockets (I would make these the same size as the outside side pockets next time)
1 - 18 x 9" large pocket
2 - 14 x 18" hidden zipper pockets
1 - 17.5 x 14.5" flap
Interfacing:
2 - 18 x 12" body
2 - 5 x 12" sides
1 - 18 x 5" bottom
1 - 17.5 x 14.5" flap

The Lining
Make sure you have all your pieces:
2 - 18 x 12 body
2 - 5 x 12 sides
1 - 18 x 5" bottom
2 - 8 x 5" side pockets (I would make these the same size as the outside side pockets next time)
1 - 18 x 9" large pocket
1 - 14 x 18" hidden zipper pockets
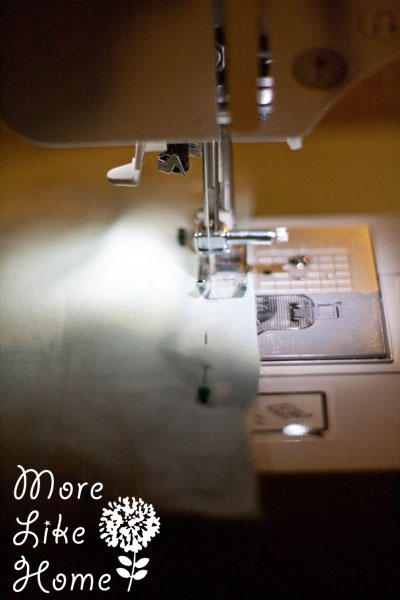
Let's start with the large pocket. Lay it out wrong-side up. On one long side fold the edge under 1/2" and press, then 1/2" again and press. Easy start, right? :)

Sew right along the folded edge.
Lay the pocket right-side up on top of one of the body panels, also right-side up. Line up the side and bottom edges. Pin it in place. Mark a line right down the center of the pocket (9" in from each edge).

Stitch two lines along the center of the pocket, one on either side of your mark. This divides it into two separate pockets. I did two lines of stitching just to reinforce it a bit since we'll be pulling things in & out all the time. (you can easily divide it into more pockets if you need to)

Set your machine to the longest stitch length and baste around the outside edges with a 1/4" seam allowance. SET YOUR MACHINE BACK TO THE NORMAL LENGTH WHEN YOU'RE DONE. I forget and start basting everything I sew. Every time. Every. Time.
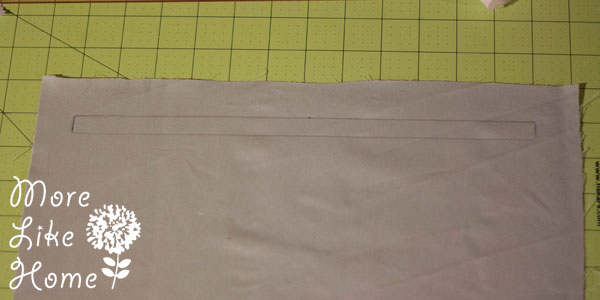
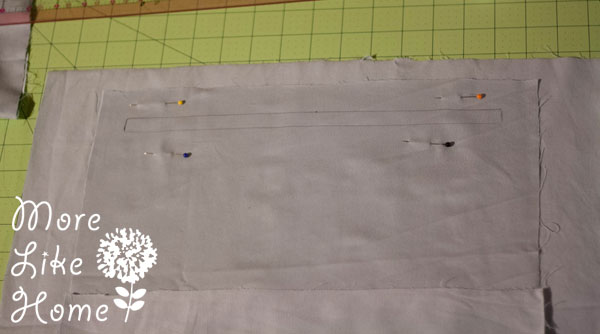
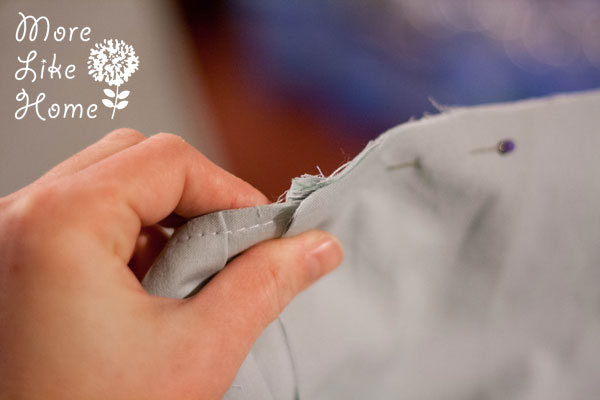
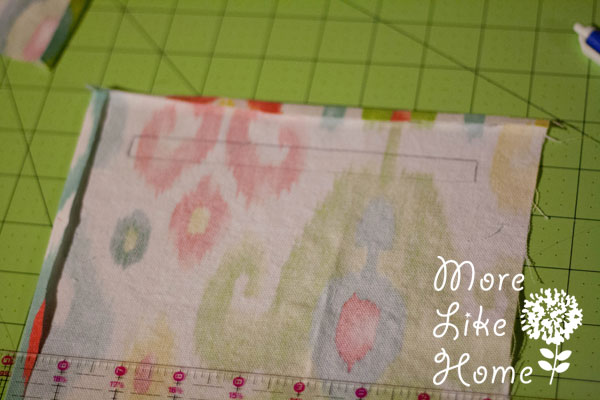
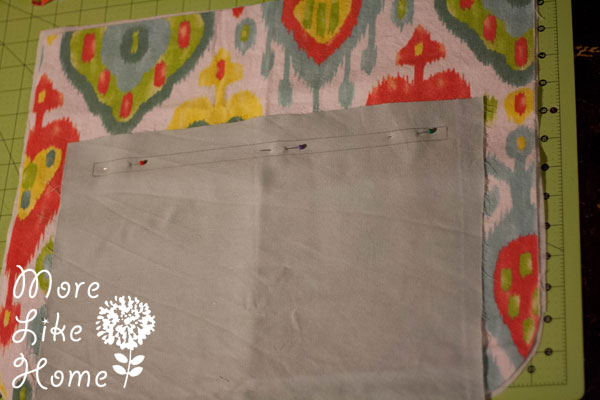
Now we're going to put a hidden pocket on the other panel. Lay the pocket piece wrong-side up so the shorter sides are the top and bottom edges. Use a ruler to mark the zipper location with box like the pic below. The box is 12" wide and 1/2" tall and is set in from the top and sides 1".
Pin the pocket piece onto the right side of the other body panel about 1" down from the top edge (remember long sides are the top and bottom of the body panel) and centered across the width. (right sides are together. Probably should have used a fabric with an actual wrong side for the pics. Sorry!)
Sew all along the lines of the box you drew on the pocket.
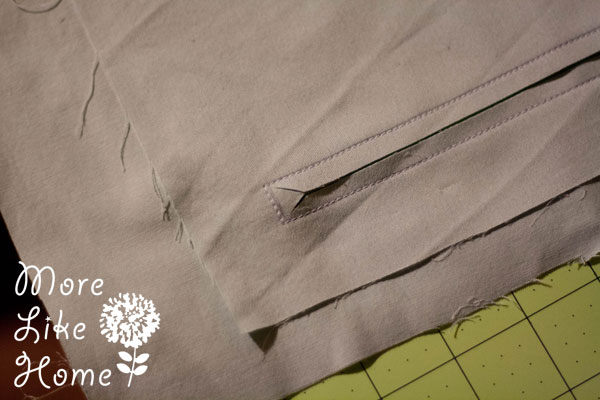
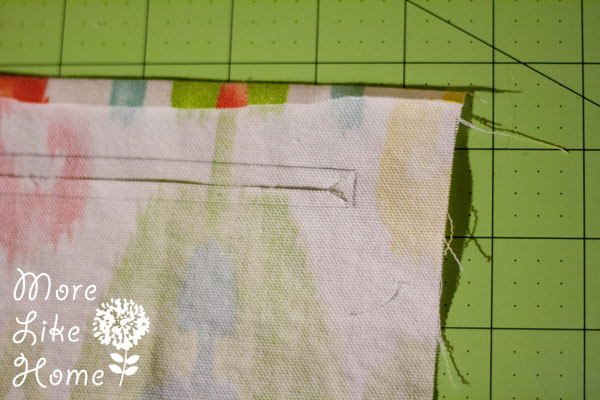
Using a ruler and rotary cutter, cut right along the center of the box, stopping about 1/2" from each end.

Use scissors to clip from the end of that line to each corner, leaving a Y-shape cut at each end like this. Careful not to clip through the stitching!:
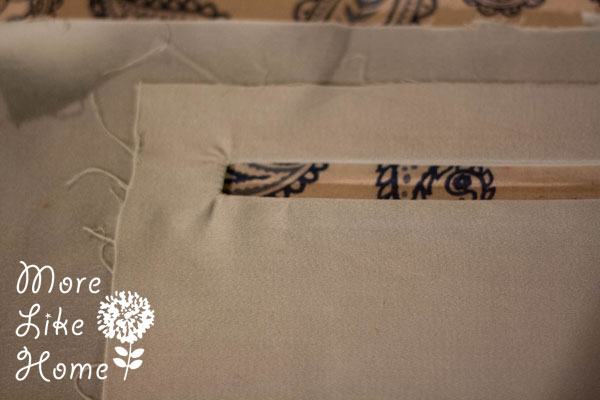
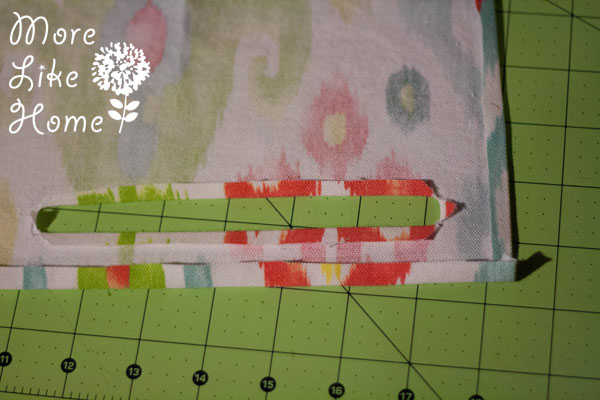
Flip the pocket piece through the opening and press it so the edges are nice and crisp. (wrong sides are together now)
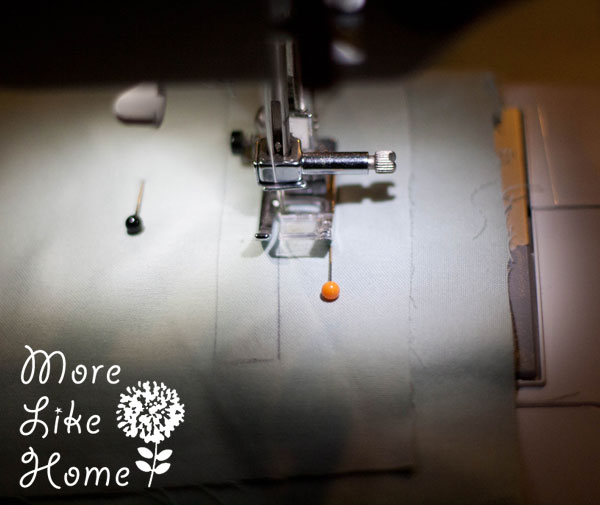
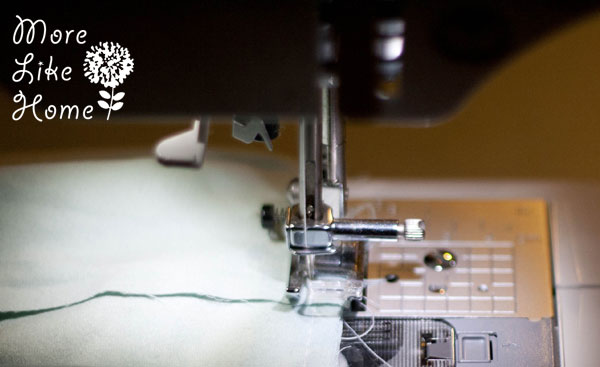
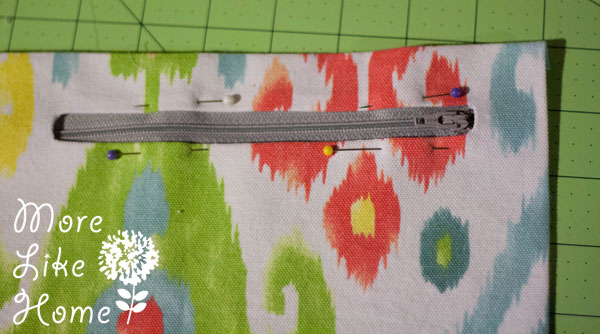
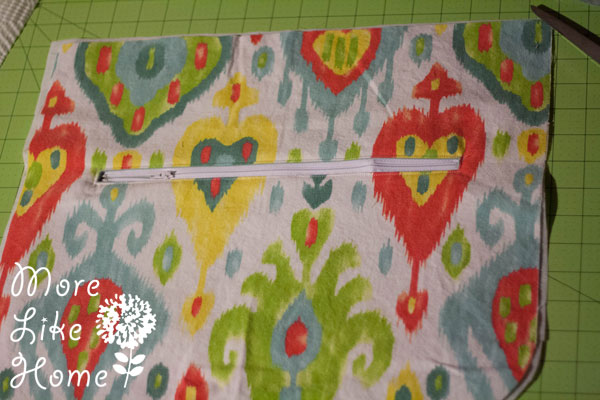
Flip it so the body panel is on top with the pocket underneath. Line up one of the 12" zippers under the opening and pin it in place.

Sew right around the edges of the fabric opening to attach the zipper.
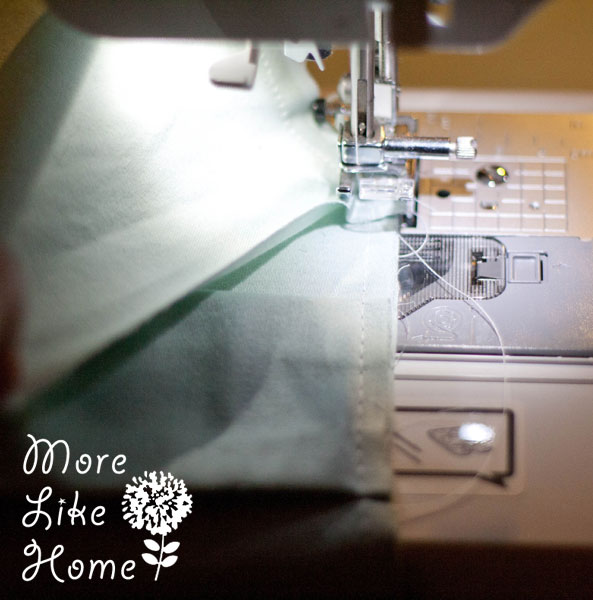
Now flip it over to the back again. Fold the bottom edge of the pocket up and line it up with the top edge of the pocket like the pic below. Pin both layers of the pocket together, but don't pin in the body panel.
Being careful not to catch the body panel, sew along the sides and top edge of the pocket. Fold the body panel back out of the way so you are only sewing the the two layers of the pocket.
That pocket is done! Woohoo!
Next we'll make the water bottle pockets. Start by laying one side pocket wrong-side up and folding the top edge of the pocket (one of the 9" sides) under 1/4" and press, then 1/2" and press.
Stitch right along the folded edge.
I tried two different lengths of elastic for these pockets. This one is 6":
And this one is 5":
The 6" would give you a little more room if you are stashing something huge, but I've found it kind of gapes open in the bag with smaller things and it annoys me. I definitely prefer the 5" elastic myself. Go ahead and cut a piece of elastic whatever length you want and poke a safety pin through the end.
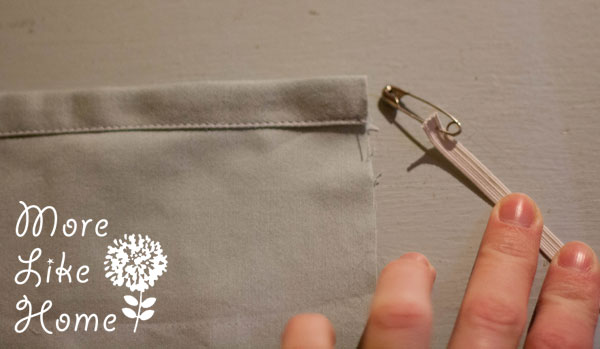
Use the safety pin to wiggle the elastic into the pocket casing

Stop with the end of the elastic just flush with the edge of the pocket.
Stitch across the end of the elastic to hold it in place.

Pull the elastic through the casing until the other end lines up with the other side of the pocket (and take out the safety pin). Stitch along that side to hold the elastic in place.
Lay the pocket right-side up on the right side of one of the side pieces. Line up the the two sides and pin them in place like this:

Fold a pleat in the middle of the pocket (mine is about 2" wide).
Pin it in place and make sure the bottom edges of the pocket is lined up with the bottom edge of the side piece.

Baste along the sides and bottom edge with a 1/4" seam allowance. Repeat to make a water bottle pocket on the other side panel.
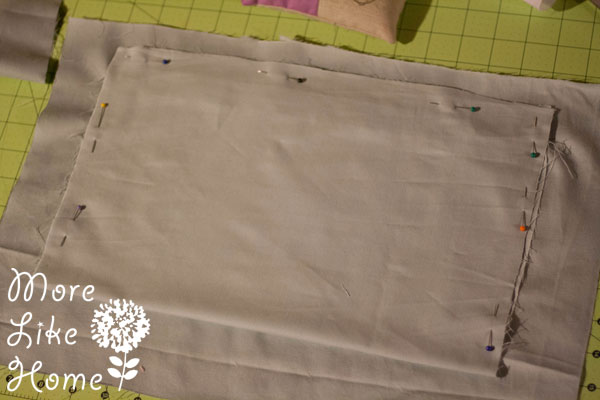
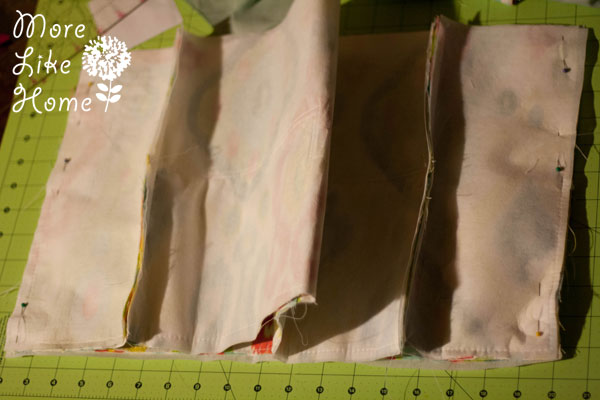
Now we can put the lining together. Make sure the top edges are all facing the same direction as you do this part! Start by laying out one body panel right-side up. Lay the two side pieces on it right-side down, line up the edges, and pin them in place. Stitch along the edges with a 1/2" seam allowance.

I didn't get a great picture of this, but now lay the other body panel right side up, then lay the body section you just assembled face-down on top of it. Line up the edges of the side pieces with the edges of the body and pin them in place. Sew along the edges with a 1/2" seam allowance. Now all four sides are assembled and we just have to add the bottom!
Now you can attach the bottom. I did this the same way Put Up Your Dukes does her beach bag and she has a video that probably shows the steps better than my pics, so if this is to confusing head over there and check it out! Start by centering one of the long sides face-down along the bottom edge of the bag (right-sides together). My bag is upside down in the pic, so the bottom edge is at the top. Pin it in place.

The ends of the bottom pieces should reach all the way to the ends of the body seam allowance. This will help you make sure it is centered:
Starting in the middle of that side, sew down the edge with a 1/2" seam allowance. Stop about 1/4" from the end of the bottom panel, then backstitch to about 1/2" from the end. Put the needle down.
With the needle down, lift the foot and rotate the top layer of fabric (the bottom panel of the bag) toward you. Keep the body of the bag laying right where it is. You want to pull the top layer around so the edge lines up with the edge of the main body section...
... like this.

Sew along the edge with a 1/2" seam allowance. Again stop 1/4" from the end, then backstitch to 1/2" from the end. Repeat the process of putting the needle down, lifting the foot, and rotating the top layer of fabric. Keep doing this until you make it all the way around and the bottom of the bag is completely attached.

Take a deep breath and admire your handy work. The lining is done!

Main Body
Start by making sure you have all of these pieces handy:
Outer Fabric:
2 - 18 x 12" body
2 - 8.5 x 7" front pockets
1 - 18 x 9 back pocket
2 - 5 x 12" sides
2 - 9 x 9" side pockets (I would make them a little taller next time, probably 10 - 11" for taller water bottles)
1 - 18 x 5" bottom
1 - 2 x 2" buckle tab
Interfacing:
2 - 18 x 12" body
2 - 5 x 12" sides
1 - 18 x 5" bottom
Start by applying the interfacing to the back of the body, side, and bottom pieces. If you have iron-on interfacing follow the directions to apply it, if it's sew in baste around the edges of the pieces to hold it in place.
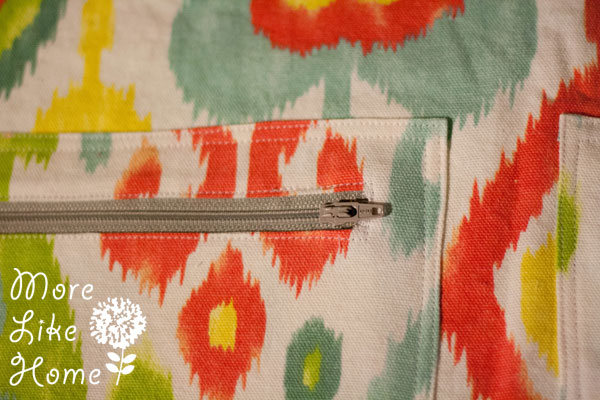
Now let's do the front pockets. Lay them face down. Fold the top edge of each pocket down 1/4" and press. On one pocket fold the right edge in 1/4" and press, and on other fold the left edge in 1/4" and press.
On the back side of each pocket mark the opening for the zipper. Draw a box 6" wide and 1/2" tall. The box should be 1" from the top of the pocket and centered with a little over 1" of space on either side.
Use a rotary cutter to cut down the middle of the box, stopping about 1/2" from each end of the box. Use scissors to snip from the end of the cut to the corners of the box making a y-shape like this:
Fold the flap to the wrong side of the pocket and press.
Flip the pocket right-side up and center a zipper under the opening. You want the tab of the zipper facing the folded edge on each pocket like the pic below. Pin the zippers in place.
Stitch right along the edge of the fabric opening to attach the zipper. (when you get to the zipper tab put the needle down, lift the foot, and slide the zipper tab past the foot to get it out of your way)
Once both pockets have their zippers you can attach them to one of the main body panels. Line them up with the bottom corner of the panel with the folded sided in toward the middle. Line up the raw edges with the sides and bottom of the body panel. Pin the pockets in place.

Stitch right along the folded edges of the pockets to attach them. I added a second line of stitching about 1/4" away from the first line to make it pretty and to help lock down the raw edges inside. If you like you can also baste along the raw edges to help hold them in place during the later steps.
Next up is the back pocket. Lay the pocket face down and fold the top edge (one of the long sides) under 1/4" and press, then 1/2" again and press.

Sew right along the folded edge.
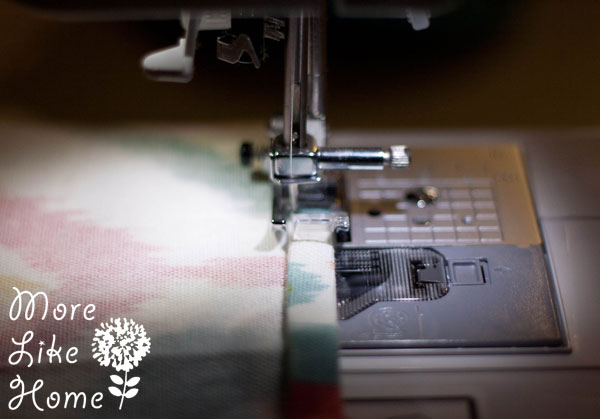
Lay the pocket on the other body panel, lining up the raw edges with the sides and bottom of the body panel.

Mark a line down the center of the pocket (9" in from the sides).

Stitch along both sides of the line to divide it into two pockets (two lines of stitching makes it look pretty and reinforces it). Again baste along the raw edges.

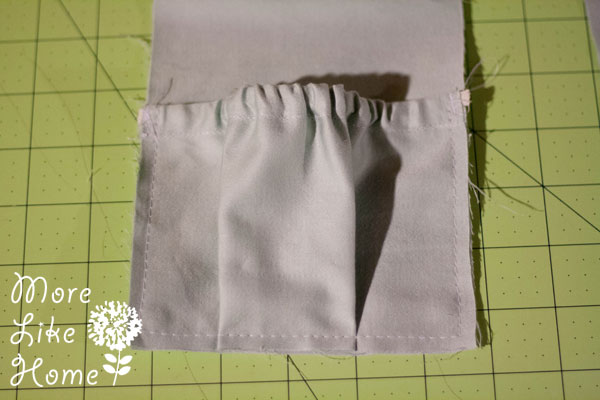
Now for the water bottle pockets. Start by laying each pocket face down and folding the top edge (one of the 9" sides) down 1/4" and pressing, then 1/2" and pressing.

Stitch right along the folded edge to make the elastic casing.
Attach a piece of elastic in the casing just like you did with the lining pockets, making sure to tack down the elastic at each end. I used a 5 1/4" piece of elastic for each of these pockets.

Again line up the sides of the pockets with the sides of the bags (make sure the bottom edges are flush) and pin them in place. Fold a pleat in the middle of each pocket and pin them in place. Then baste around the sides and bottom of the pocket with a 15/64" seam allowance. Jk, 1/4" is fine. :) This time I tried a narrower pleat on one (left) and wider pleat on the other (right). I think I prefer the look of the wider one.

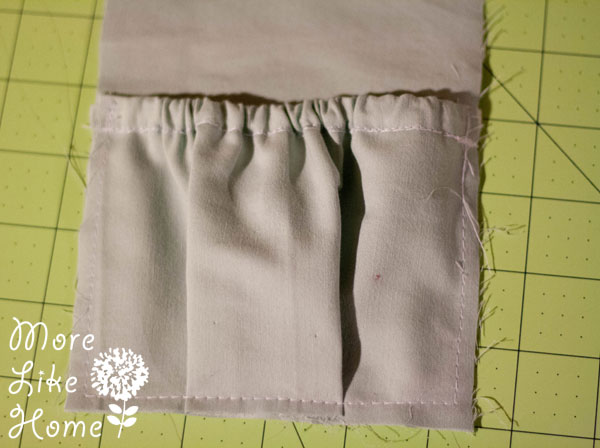
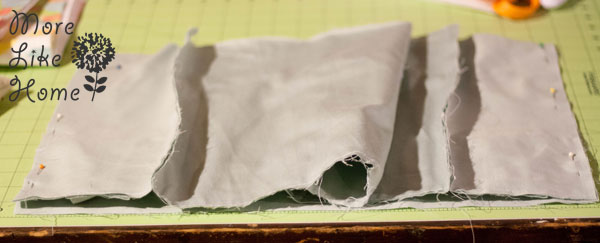
Now we can put these pieces together. Make sure all your pieces are facing the same direction! Start by laying the side pieces face-down on one of the body pieces. Line up the outside edges and pin them in place. Sew along the edges with a 1/2" seam allowance.
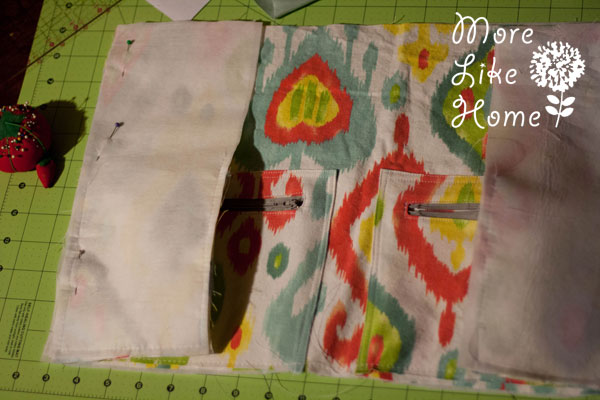
Flip that section you just assembled face-down on the other body panel and line up the edges of the side pieces with the edges of the body panel. You'll have extra fabric folded up in the middle. Pin the sides in place. Sew along the sides with a 1/2" seam allowance.
Follow the steps in the lining section to attach the bottom piece to the body you just assembled. Then flip it right side out. Oooh and Aaahhh at how pretty it's looking already.
Look at those pockets!
Now lay the buckle tab face-down. Fold the top & bottom edges down 1/2" and press. Then fold each side in 1/2" and press. Stitch right along the folded sides to end up with this:
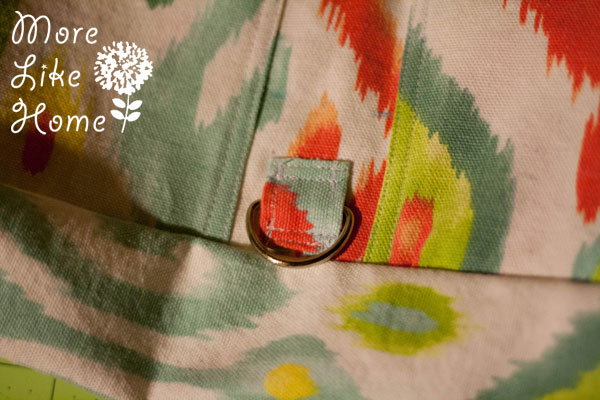
Flip the tab right-side up and lay it on the front of the bag body. It should be right against the bottom edge and centered between the front pockets. Stitch right along the bottom edge to attach it (make sure you are only sewing through the front body piece and not catching any other layers under it), then sew a second line right above that one to reinforce it. Slip the D-ring under the tab. Sew right along the top edge of the tab, then a second line right below that one to reinforce it. You should end up with something like this:
Flaps & Straps
Start by cutting out all these pieces:
Outer Fabric:
1 - 17.5 x 14.5" flap
2 - 17 x 5" zipper tabs
2 - 44 x 4" strap
4 - 11 x 4 stroller straps
Lining:
1 - 14 x 18" hidden zipper pockets
1 - 17.5 x 14.5" flap
Interfacing:
1 - 17.5 x 14.5" flap
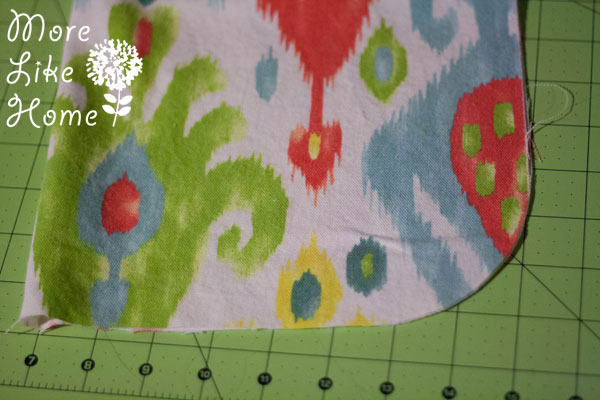
Apply the interfacing to the back of the flap fabric. I like rounded corners on my flaps, so use a bowl to mark one of the bottom corners (on one of the 17.5" sides) like this:

Fold the flap in half to make sure the corners will match exactly, then cut along the marked line through both layers. Use this flap as a template and cut the corners of the flap lining to match.
Now you can attach the hidden pocket following the same steps as the hidden pocket in the lining. Start by drawing a box on the wrong side of the pocket 12" wide by 1/2" tall, set in 1" from the top and sides of the pocket piece (remember one of the 14" edges is the top). Lay the pocket face-down on the flap like the pic below. It should be about 5" down from the top edge of the flap and centered between the sides. Pin it in place.
If you need pictures of all the steps you can scroll back up to the lining section, but in a nutshell here are the steps: Sew around the box, cut down the middle of the box stopping 1/2" from each end, use scissors to snip from the end of the cut to the corners, flip the pocket through to the back of the flap and press, line a zipper up under the opening, stitch around the edges of the opening to attach the zipper, fold the bottom edge of the pocket up, sew around the edges of the pocket being careful not to sew through the flap fabric. Pocket all done!
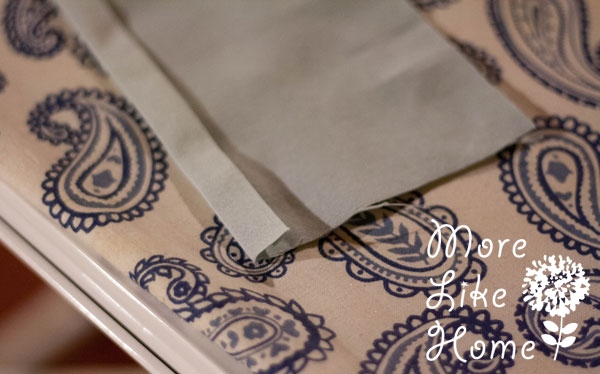
Lay the flap lining face down on top of the flap. Stitch around the sides and bottom of the flap with 1/2" seam allowance. Leave the top edge of the flap open. Clip the curves.

Flip the flap (that cracked me up. Clearly I'm typing too late.) right side out. Push the curved edges out nice and pretty and press it. Stitch around the side and bottom edges with a 1/4" seam allowance. I added a second line just for pretty.
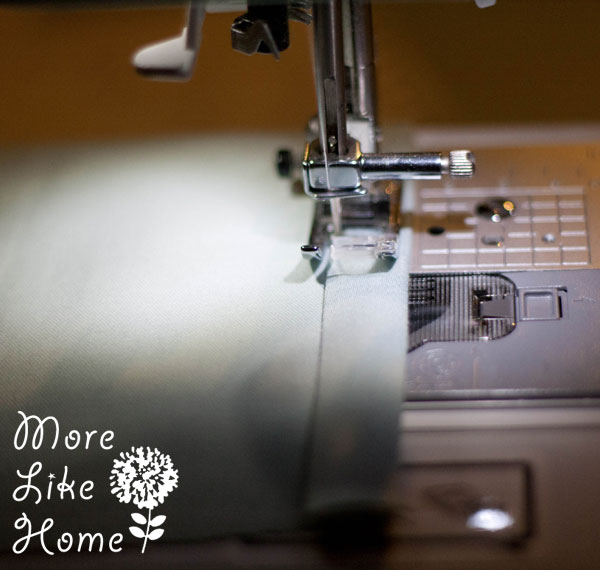
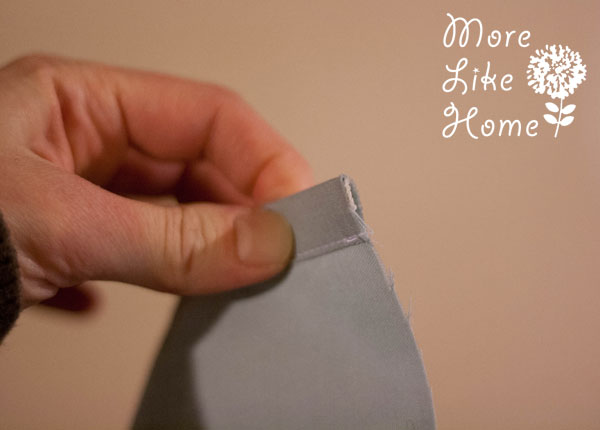
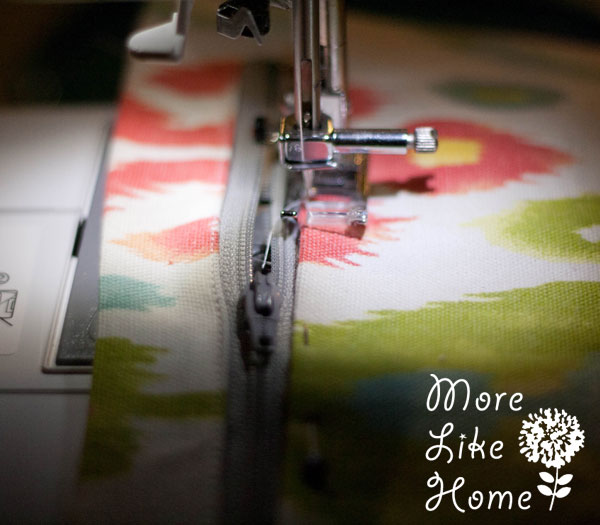
Now we'll do the zipper tabs. Fold each piece in half lengthwise with right sides together. Stitch down the short ends with a 1/2" seam allowance, the clip the corner by the folded edge being careful not to clip through the stitching. Leave the long edges alone.
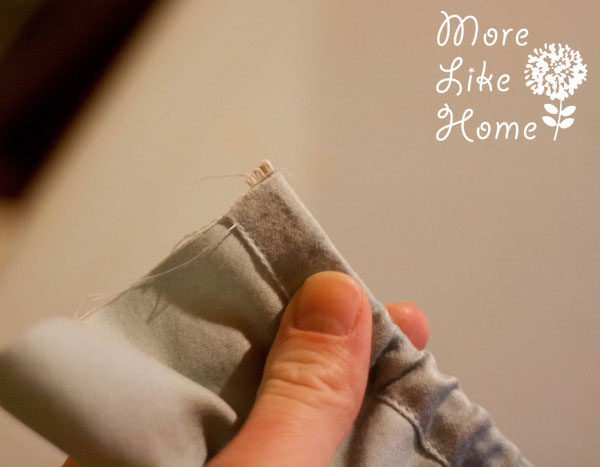
Flip each tab right-side out and push the corners out nice and sharp. Press. Now line the tabs up on top of the 18" zipper. You want the separating end to stop just short of the ends of the tabs like this:
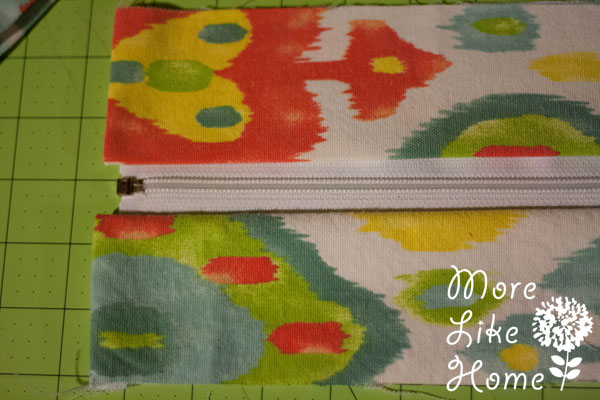
The tab end will stick out a couple inches like this:

Pin the tabs in place then separate the zipper. Wrap the long end of the zipper around the ends of the tabs likes this and pin them in place:
Here's closer look:
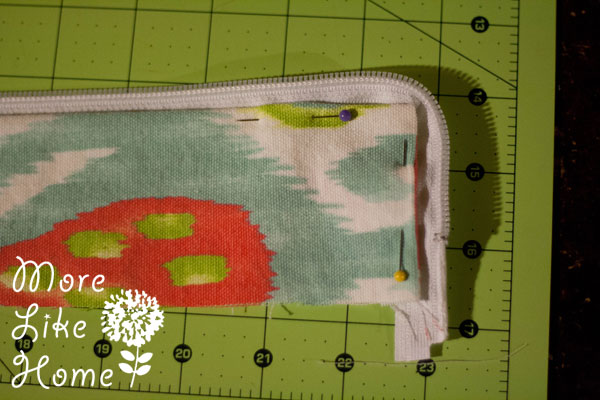
Stitch right along the folded edges to attach the zipper.

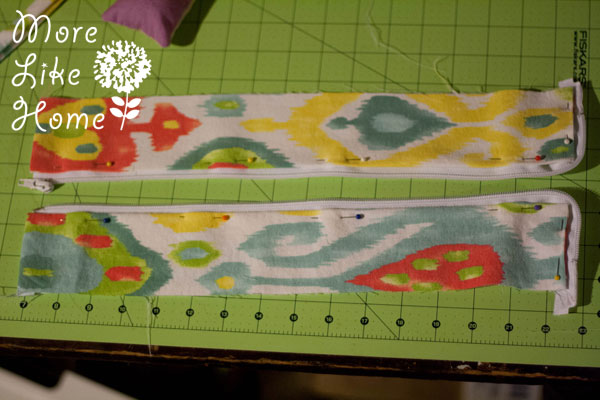
I added a second line... you guessed it... for fancy. In this case the fancy also helps reinforce the zipper.
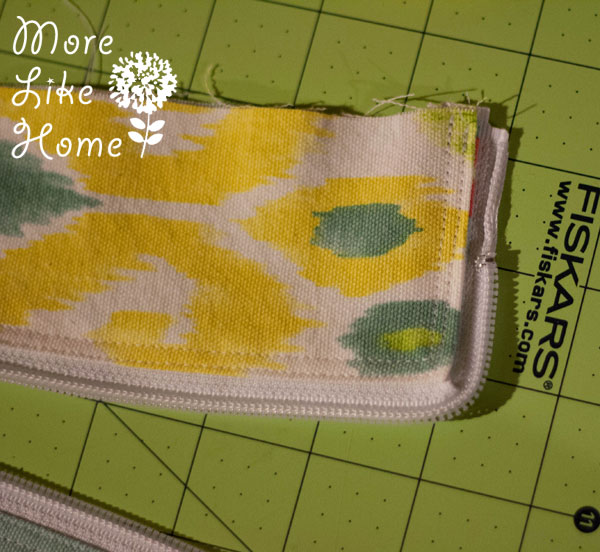
You'll end up with tabs like these:

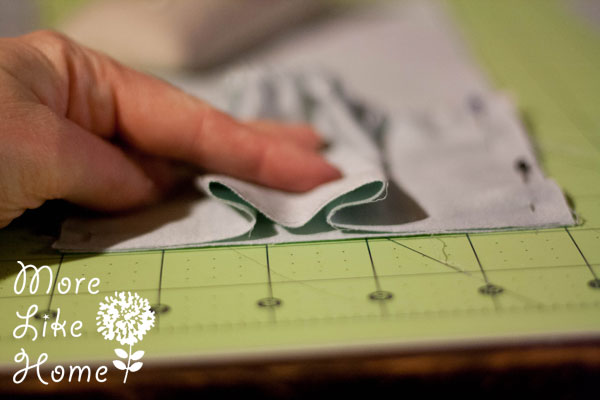
The tabs are done! Now we can move on to the strap and stroller straps. You will make two stroller straps and one shoulder strap that all follow the same steps. Start by pinning two of the strap pieces with right sides together. Stitch around both long sides and one short end (leave the other short end open) with a 1/2" seam allowance. Clip the corners at the sewn end:
Flip the strap right-side out through the open end and push the corners out nice and square then iron the straps.

Top stitch around the finished edges of each strap (leave the open end alone).
Put it All Together
You guys. If you've hung in this far, you are almost at the finish line! You just have to put all the pieces together. So let's finish this thing up! You only need one piece for this section:
1 - 2 x 2" buckle tabs (outer fabric)
Start with the main body right-side out. One one end line up the raw end of one stroller strap with the top edge of the bag, keeping it centered. Then put the shoulder strap right on top of the stroller strap, lining up the raw end with the top edge of the bag. Pin through all the layers to hold both straps in place. **note: as you pin all these pieces in place keep the pins at least 1/2" away from the top edge of the bag to make sure you don't sew through them later** This pic is with both straps pinned on:

On the other end pin the remaining stroller strap with the raw end lined up with top edge of the bag, keeping it centered.
On the back side of the bag body (the side with the two large open pockets) lay the bag flap right-side down, centered and with the raw edge lined up with the top edge of the bag. Pin it in place. On top of the flap lay one of the zipper tabs right-side down with the raw edge lined up with the top edge of the bag. Pin it in place.

On the front of the bag (the side with the two zipper pockets) lay the other zipper tab right-side down and line the raw edge up with the top edge of the bag. Pin it in place
Flip the bag lining inside out. Carefully slip the bag body (with all the pieces pinned in place) inside of the bag lining. Line up the top edges and corners of the main body and lining. Pin around the top of the bag. Stitch around the top of the bag with a 1/2" seam allowance leaving a 6-8" opening in the front for turning.
Flip the bag right side out through the opening. Tuck in the seam allowance at the opening and pin the opening closed. Press the top edge of the bag nice so it's nice and tidy. Then stitch around the top edge of the bag with a 1/4" seam allowance. You can add a second line for fancy... if you want to....

Now you can make that last buckle tab. Start by folding the top & bottom edges in 1/2" and pressing. Then fold the side edges in 1/4" and press. Stitch right along the folded sides.
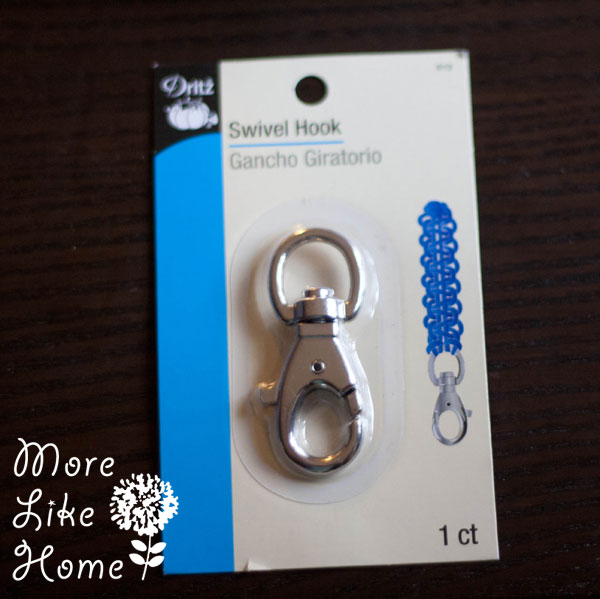
Get out the swivel hook clasp, or what ever kind of clasp you want to use. I used this one from Joanne Fabric:
Lay the tab you just made on the wrong side of the bag flap. It should be centered on the flap and sit just above the flap's top stitching (no more than 1/2" from the edge of the bag). Sew right along the bottom edge of the tab to attach it, then sew a second line right next to the first to reinforce it. Slip the clasp onto the tab, then sew right along the top edge of the tab to attach it, followed by a second line of stitching again.

Now you can add the heavy duty snaps. Starting with one of the stroller tabs, mark a spot near each corner where you want the snaps to go. I used a folded piece of paper as a guide to make sure all my snaps ended up evenly spaced. Then mark snap spots about 1" above the bottom of the strap. Copy those marks onto the other stroller strap so they are matchers. Follow the directions on your snaps to attach the cap/socket pieces at the corners of the straps and the stud/back pieces near the bottom of the straps.
They should be able to snap over on to themselves like this:
Now lay the shoulder strap over the opposite stroller strap where it will attach when you are wearing the bag (the pic below gives a better visual of this) and mark where the snaps from the stroller strap hit the shoulder strap. Follow the directions to attach snaps to the marks - the cap/sockets go near the corners and the stud/backs go farther up the strap. When you wear the bag you will snap the shoulder strap to the opposite stroller strap like this:

YOU ARE DONE. Deep breath, have a milkshake, get a foot rub from the hubs, celebrate however you want! You just just made the sweetest diaper bag in the whole play group!
Strap that baby on your favorite stroller for a victory lap around the neighborhood.
I finished my bag a couple months ago and it has become my full-time diaper bag. I've been putting it through the ringer and have been really happy with how it's performed so far. I use the shoulder strap most of the time when we're out and about, but it's so nice having the stroller straps ready to go at a moment's notice. We keep a small stroller in our trunk for spur of the moment outings and this works with it beautifully. My only concern going into this was the snaps holding up to the weight of a full bag, but let me tell you we have packed that thing to the bring with diaper, snacks, and even water bottles and have never once had a snap fail! The heavy duty snaps are definitely the way to go for a work horse like this.
Let me know if you give it a try. I'd love to hear your thoughts and see pictures of your bag!

And of course I'll end with pictures of my snuggle buggles. Although Big Brother will adamantly say "I not you snuggle buggle! Baby Brovver is you snuggle buggle! Don't squeeze me!"
Riding on momma's back, swiping brother's balloon.
Trying to keep balloon away from tiny swiper.
Ready to make your own diaper bag? It makes a great weekend project, but if you work fast you can have a great new bag in time for your 4th of July festivities! Maybe something red, white & blue?
Need More Ideas?
Check out our stroller bag brag page!

I fell in love with this bag the moment I saw your post. I ran out yesterday and bought what I needed and two nap times and two bedtimes later I love it even more now that it is done!!!
ReplyDeleteOh my goodness, you are amazing!! I can't believe you finished it that fast! If you have any pictures you want to share I would love to see! You can post them on the facebook page or email me at morelikehome(at)gmail(dot)com. Thanks so much for commenting, you just made my day! :)
DeleteI posted a few pics on Facebook under your post for this.
DeleteI had an awesome Labor Day weekend with this labor of love! I enjoyed making it and the result is fantastic. The design of this bag is very intuitive, and I learned a lot of new techniques like adding snaps and the hidden pockets. Great explanations of the process and the pictures were helpful. Can't wait to give it to my friend for her baby shower!
ReplyDeleteWhen I cut my side outer pieces, the post said to make them 9" wide, but I had to cut them down to 5" to fit. Other than that, the instructions were spot-on.
Thank you so much for gifting us with this pattern!
Hooray! I'm so glad you like it. And you are totally right about the side pieces, thanks for pointing that out. I fixed it up in the directions. :)
DeleteAnd I'd love to see pictures if you have any!
DeleteAwesome! Would you like me to e-mail them or post them to your Facebook page?
DeleteWhichever works better for you is fine! If you prefer to email it's morelikehome (at) gmail (dot) com
DeleteCan't wait to see it! :)
Where was this bag when I was pushing a stroller? This is amazing!! I've got a Craft Gossip post scheduled for tomorrow morning that links to your tutorial:
ReplyDeletehttp://sewing.craftgossip.com/tutorial-stroller-friendly-diaper-bag/2014/09/11/
--Anne
Wow, thanks so much for the link up! :)
DeleteLoved it sooo much that I just made a second one! I was thinking about gifting it but now I think I might just keep it for myself!
ReplyDeleteNo one would blame you for that. ;) I'm actually making a second one that I wasn't going to keep... but if I don't I'll have to make another just like it for myself! It's with the retro cars fabric from Hobby Lobby which is PERFECT for little boys. What fabric did you do this time? Is it laminated again like your first one? I'd love to see pics!
DeleteLoving the pattern so far, can't wait until I get it finished and start using it. I'm new to sewing with zippers and I'm having trouble with the seperating zipper. I seem to have a lot of excess hanging off the end. My tab is about 16 iniches long and 2 inches wide so I'm only using about 18 or so inches of the 22 inch zipper. Would it be possible to use a shorter zipper? Or is there an easy way to shorten a seperating zipper? Thanks for the great pattern!
ReplyDeleteYes! You could use a shorter zipper, or just cut off the extra that would hang past the seam allowance. :) I'd love to see it when you're finished!
DeleteI ended up using a shorter zipper and it works great. I emailed you a pic of the finished bag.
DeleteI love this pattern so much! I live in a remote area and can't find snaps. Do you think big buttons with reinforced button holes might work for the straps?
ReplyDeleteHmmm. I would be worried about buttons not holding up to the weight (mine is pretty heavy when it's full). But with that said, I really haven't used buttons for much because I don't like to sew them, so I could be underestimating them. :) Maybe you could order snaps online?
DeleteWhere did you find your heavy duty metal snaps? I have a KAM Snaps table press. Would one of their metal snaps work with this bag? I'm not sure which one to use from their website. I tried looking at a picture of your snaps to compare with the metal snaps they offer, but I can't tell which one would be suitable. I THINK it would be either their Utility Spring #20 or Utility Spring #24. Can you please help on this one? I'm looking forward to making this bag for my little one due in February! :)
DeleteI'm a gramma in waiting and just completed a customized version of your bag for my daughter and grandson-to-be, I used spliced USMC military camouflage fabric in honor of my Marine SIL and a fun chevron print and I engineered an exterior wipe packet pocket, increased the height of the bottle pockets as you recommended, added a key ring clip inside, bias tape trim everywhere just for fun, Velcro closures in all pockets, and a fun "gramma suannie made" tag I ordered from Etsy. I love it so much and have had requests to make custom bags for my daughter's friends....we shall see! That baby (meaning diaper bag) was a labor of love for sure! I am a former home Ec teacher (now elementary school teacher) and have been sewing since age seven. I also teach sewing lessons for fun and I found your tutorial to be perfect :-) Nice work and thanks for sharing your creations! I sent along a few pics for you via e mail!
ReplyDeleteSuanne! It turned out great! I LOVE the wipe pocket you added. Would you mind if I added a picture or two up in the post? :)
DeleteIs there a way I can get this pattern with out the back ground, The back ground makes it hard for me to read it and I really want to make this one. I fell in love with it,
ReplyDeleteHmmm, are you seeing the gray pattern background behind all the words? And could you let me know if you are on mobile or desktop when you see it? There should be white background behind all the text. I'll check with my tech-y husband and see if he can spot anything that would be causing the problem. Thanks!
DeleteHi. Can you clear up the hidden pocket confusion?
ReplyDeleteIn the main inventory it says 2 of 18x14, but it doesn't add up to what comes later:
- For the lining pocket it says 1 of 16x14.
- For the flap pocket it says 2 of 18x14.
But reading through the instructions it sounds like what I really need is:
- 1 16x14 for lining pocket
- 1 18x14 for flap pocket
Both of which would be folded upwards. Am I right?
Sorry about that, thanks for pointing it out! I actually made them both the same size - 18 x 14 (and yes folded up). I'll fix it in the instructions. Thanks again!
DeleteThanks for the clarification :) I have one more question.
DeleteFor the hidden pocket you write: "Pin the pocket piece onto the right side of the other body panel about 1" down from the top edge (remember long sides are the top and bottom of the body panel) and centered across the width. (right sides are together..."
If right sides are together, then this would mean that the hidden pocket would be attached on the visible side of the back panel of the of the interior of the bag. Isn't what we want for the hidden panel to sit between the backpanel of the interior of the bag and the backpanel of the exterior of the bag with the zipper peeking into the interior of the bag?
It is attached to the visible side of the back panel for this beginning step. In the next couple steps (after you cut an opening) you'll flip the pocket fabric through the back back panel so it will end up sandwiched between the interior and exterior of the bag when you are done. This method gives you a nice finished edge around the zipper. :)
DeleteThanks for all your help :). It's my first big project (I'm still learning to sew) and I learned a lot thanks to your pattern. And I got a bag to show for it!
DeleteNo problem, glad I could help! Enjoy your bag! :)
DeleteOHHH, I understand! Thanks :) That makes sense now.
ReplyDeleteHi Georgia,
ReplyDeleteThanks for this beautiful pattern. I just made one :) will email the pics to your email ID as I cannot attach them here.
With regards to the zip part I have a doubt. I am not sure how to seperate them. I used a plastic zip and also tried melting the plastics but it was too hard. Still I dint get it correct as my zip puller comes off from one side. I am planning to use a super glue or manually stitch on one end so the zip puller is in place and is seized.
However, I would like to learn the correct method so can incorporate in my future bags :) My sister is having a baby in a couple of months and mine is due around July end :) so would be great if you could tell me this procedure whenever you find time.
Thanks again for this wonderful pattern. I just loved making it and ENJOYED!!!!
Regards,
Divya
Hmmm, do you mean you used a regular zipper? A separating zipper is a specific kind of zipper, it would say "separating" on the tag. A separating zipper separates on it's own and doesn't require any melting or glue, and the zip puller shouldn't be able to come off. It could also be called a "jacket zipper".
DeleteI'm glad you enjoyed making your bag, and thanks for pictures! :)
Thanks for your response. Yeah, now I get it...........I used a normal zipper. Sure next time will buy a "separating zipper".
DeleteRegards,
Divya
I just finished my bag and the tutorial was very well done, easy to follow, because a seamstress I'm not!! I packaged it up with several other things for my granddaughter and the package was stolen!!! So much hard work!! Of course it didn't help that my husband put it out on top of our mailbox!!! I was so mad!
ReplyDeleteOh my goodness, I'm glad the tutorial worked well for you but I am so sorry to hear it was stolen!! I would probably cry if I put that much work into something only to have this happen. :(
DeleteGeorgia, thanks for your kindness and great pattern. So far it has never shown up!
DeleteI am just getting together the supplies needed to make this bags after a few months of anticipation! I swear though that I saw somewhere that you put wide Velcro on the side of the handle that snaps for extra holding power. Now I don't see that anywhere. Am I imagining it or missing it?
ReplyDeleteThe bag I based the pattern on did use velcro (there's a link near the top where you can see it), but I skipped it and went with an extra row of snaps instead (because I don't like velcro getting stuck to other things, especially when I want to throw my bag in the washer). Mine has held up great without it, but you can always add it for extra security! :)
DeleteThat looks so cute. It looks durable too and that is one of the most important things. A good diaper bag lasts for several children for years. It think this will helps moms and dads to save money. Can be adapted to different strollers.
ReplyDeleteGlad you like it. :) So far it's held up great!
DeleteI was on the hunt of a tutorial I can work with and found your blog through Pinterest. I can't tell you enough... Thank YOU! I literally had your site up for three days. I had this dream of using my husbands old (retired) AirForce uniform and creating cute baby stuff with it. But the tutorials that I had found before were plain in design. Until I found this one. I couldn't follow the steps exactly, otherwise I would have finished it in one or two days. I had to really think creatively and I kept reading your blog over and over thinking about each next step and I FINISHED. Which literally is a great accomplishment in itself. I love it. My husband loves it and when the time comes we will happily and proudly use it. Thanks again. Couldn't have done it without you.
ReplyDeleteP.S. Is there a way to upload our versions of your tutorial?
I'm so glad you like it! If you have a picture you'd like to share you can email it to me at morelikehome (at) gmail (dot) com an I'd be happy to upload it for you. I don't have a way for you to upload things directly, unfortunately!
DeleteHello.... I am almost finished with this bag (just snaps left). The first part of the tutorial that lists all the cuts and pieces for the whole bag has the outer body side panels at 5" wide, but the part of the tutorial where assembly of the outer part of the bag is sewn together has the side panels at 9" wide. This confused me and I ended up recutting my side panels and bottom to 9". I kept the 5" ones, which was good since I ended up seam ripping my outer portion back apart because I realized it wasn't going to work with the 5" wide inner body side panels and bottom at assembly.
ReplyDeleteJust wanted to tell you about the typo.
I'm so sorry about that! Thank you for commenting, I fixed the typo. :)
Deleteis this tutorial written in centimeters?
ReplyDeleteNo, all in inches. :)
DeleteI just wanted to comment on this wonderful bag. Thank you so much for showing a bag that holds all that stuff plus cloth diapers!!! As a cloth diapering mama for 8 plus years I've had to make all my diaper bags since the commercially available ones don't work for cloth diapers especially if you are going to use it as an all day bag. I only just found this site and wish I had found you sooner so I wouldn't have had to make a pattern for my last diaper bag. I was looking for a messenger style bag for my now almost out of diaper needs and I think I will definitely be making this bag with some slight size modifications (but only possibly). Thanks again for making this pattern available.
ReplyDeletePS I never comment on sites but just had to this time since you showed that this will be a cloth diaper friendly bag :)
Thank you for commenting! So nice to hear from another cloth mama. :) I definitely took our diapers into consideration when I made it, and I'd love to see how yours turns out!
DeleteHi,
ReplyDeleteI'd love to make this bag, but I can't find the pattern, is there a link to it?
What a great design, can't wait to make my own!
-Reader from Finland.
Hi! All the pattern measurements are listed in the tutorial. You'll need to measure them all out on your fabric. I haven't made a printable version because I think it would take sooo many sheets of paper to print, but it's something I can look into adding. :)
DeleteHi, I have some lovely fabric waiting to be turned into this beautiful bag! Hopefully it will be finished before the baby arrives… There were a couple of things I was confused about though, so perhaps you can clarify them for me!
ReplyDelete- How many hidden zip pockets made from lining fabric (of 18x14) should I cut out? It says two in the first part of the ‘things to cut out’ section under ‘lining’, but looking through the making the lining instructions, it says only one. Perhaps the second makes an appearance later that I missed?
- I am confused about the dimensions of the lining side pockets. In the cutting out section, you say the OUTER pockets would have been better if they were taller – so I have decided to make mine 9x11 instead of 9x9. When I read the section on the LINING side pockets, you say you would change them next time to be the same size as the outer side pockets. In my case this would mean cutting out 9x11 instead of 8x5 as is written in the instructions (seems like a massive difference, should I go shorter?). Have I got this right so far?
- You then say that the water bottle lining pocket top edge would be one of the 9” sides – I presume this is the equivalent of the 8” side? For my 9x11” pocket I would need my shortest edge (9”) to be the top to orient my fabric properly, for those going with 8x5, it would be their longest edge (8”) that would be the top. Is that right? And then, if the pocket width has increased from 8” to 9”, does this mean I would use the longer piece of elastic (6” as opposed to 5”), or was the pocket you were referring to in the instructions the 9” wide variety and so I’d still use 5” of elastic for a snugger fit?
- Finally… I’d quite like to make the strap adjustable in length, any tips for this?
Sorry for the inane (and confusing) questions. I have a feeling it’s really obvious, but I wanted to be sure! Looking forward to getting on with the project, and thanks so much for posting this!
AH! Just answered my first question myself... I see the second hidden zipper pocket makes an appearance in the flap later on. So I do need two! :-)
ReplyDeleteHi again... I must have been having an off day! I have figured it all out now, but if you have any tips on how much length is good to add to the strap to make it extendable, I'd be grateful. Thanks!
ReplyDeleteHi! Glad you got it figured out. I would use something like a belt or even a piece of yarn and wrap it over your shoulder to get an idea of how long you want the strap to reach to make sure you get a fit you're happy with! :)
DeleteHello! I am a mother of two.
ReplyDeleteI made this bag about 3 years ago and I still have it. I just wanted to thank you for the pattern and for the detailed steps. Sewing is just a hobby and this was my first bag to sew and due to your accurate guiding I felt like a pro. I used velcro instead of the hook clasp but it still worked. Everyday is fully filled and I only regret that I didn't have it sooner (when my first child was born). Very practical and with lots of compartments (I like that I can easily reach inside and outside with one hand to whatever I need). I am in debt to you :)
Sorry, I meant 2 years ago...It felt like 3 :)
DeleteOh, I'm so glad! You're so welcome! Thanks for the kind comment! :)
DeleteIs there any way I can buy this bag from you instead of making it?! I love it so but I'm concerned about tackling such a large project with so much going on! You are a creative genius and this bag looks absolutely amazing. If you happen to have an Etsy store or some other marketplace I am not aware of PLEASE tell me so I can buy this ASAP!
ReplyDeleteI ended up making my own because I couldn't go without this bag. I LOVE it!!! So thankful you decided to share with all of us! Thank you!!
DeleteI'm so glad you like it! :) Sorry I didn't get back to you sooner. I have carried them in my etsy shop but I don't have any at the moment. Sewing has been on hold for a couple months since we moved! So I'm glad you were able to make one of your own!!
DeleteHelp! What do you use to attach your snaps with? I've tried multiple products multiple times and have ruined almost all of them. I would love to make this bag but trying to attach snaps makes me break out in a sweat.
ReplyDeleteJennifer, you either have to buy a heavy duty snaps kit which comes with the tools and then follow the instructions on the back for applying them or you have to buy heavy duty snap tools separately. I bought the dritz heavy duty snaps tool kit at a Super Walmart cause it was $4 cheaper than Joann and used that.
DeleteThanks Brittany! I also bought the heavy duty snaps that came with a tool, buy you'll also need a hammer to use with it.
DeleteHi, thank you for the lovely pattern and the great instructions! I learned a lot about making pockets and adding zippers :-)
ReplyDeleteI made one for my sister and followed your guidelines, but made some adaptations while I was working. The bag turned out a little smaller because I changed the dimensions while converting to cm. Also I couldn't find snaps that I trusted to carry all the weight so I made an adaptable shoulder strap instead (I hope this will also fit on the stroller). As someone mentioned previously, I added a little strap for keys. Last but not least: I reinforced the bottom with placemat-plastic so it would maintain its shape and I added four little "feet" to protect the base fabric.
The fabric I used I bought at IKEA, it's very sturdy and was used for both the outside and the lining so no interfacing was needed.
Thanks again!
L.
Thanks so much for the feedback! If I make another I'll try adding plastic to the bottom. Ikea has some great projects! Which one did you use? I'd love to see a photo if you have one. You can email me at MoreLikeHome (at) gmail (dot) com. :)
DeleteDear Georgia
ReplyDeleteI spent a lot of time looking for the perfect diaper bag pattern and here it is! Thank you so much, I really enjoyed doing it. I wish I could send you a photo of mine, is there a way? Thanks again! Marion (France)
I'm so glad you like it!!! I'd love to see a photo. You can post on my facebook page or email me at MoreLikeHome (at) gmail (dot) com! :)
DeleteI really am hoping you monitor this blog. I'm trying to finish this stroller baby diaper bag and your 22" separating zipper looks different than mine. And mine is way too long and it's 22". I rechecked all my measurements. The zipper tabs are 17 x 5 with 1/2" seam allowance that would make the finished zipper tabs 16" long. That's a 6" difference. And going around the corner will only take up 2 1/2" of that 6". Did you use a nylon zipper that you cut? It certainly looks like a nylon zipper. Mine is a sports one because it's a separating zipper. Can you chime in on what type of zipper you used? This bag is to be a gift for my grand baby who's coming soon. Thanks.
ReplyDeleteAli
Hi! Hopefully this is in time to help. You are right, an 18" zipper would be more appropriate (I changed the tutorial to reflect that). I've used longer ones and cut them down to size if they are the color I want (just cut what would be the "top" of the zipper if it were on a jacket even with the raw edge of the flaps, and the raw ends will hide in the bag body when you attach the flaps). My zipper is a nylon separating zipper. Hopefully that helps. :)
Deletedo you offer a print out of this pattern? I am planning on making this for a friend and I work better when I have papers in front of me rather than on a computer.
ReplyDeleteI don't, sorry!
DeleteI was hoping for the same thing.
DeleteHi there, I have just found your great pattern and tutorial.
ReplyDeleteDo you think it would be possible to make this into a backpack rather than a messenger style bag or is it maybe too wide and not deep enough?
I'm no expert so any suggestions would be gratefully accepted.
I'm going to make it anyway, one way or the other!
I do think it would be too wide as-is, but you could try changing the measurements to get a better backpack shape. I have to tell you, I have never made a backpack before so I don't have much advice to offer. Sorry! :)
DeleteThank you for your response.
DeleteI am making it as you've shown, and, so far, it's looking good!
Great! Can't wait to hear how it turns out! :)
DeleteSoooo I am literally JUST starting out sewing, however I LOVE LOVE LOVE this bag and would benefit with having baby #4 on the way. I don't give up easily and I keep coming back to this bag. In all honesty, do you think I'm getting in over my head even attempting to make this bag? I do better with paper patterns...
ReplyDeleteYou can print out the instructions through the print option on your browser, if that would help. The actual pattern pieces are all rectangles so they are pretty easy to measure and cut out. I bet you can do it. :)
DeleteA million times thank you! I found this tutorial when I was pregnant two summers ago but didn't decide to make it until this summer as I was pregnant with baby number two. Took a while with a little toddler underfoot, but I love it! Appreciated your suggestions to make pockets taller. I modified the bag to be a couple inches wider, have a plastic liner in the bottom between the layers, and a clasp on the inside to hook my keys. So happy to have a great diaper bag while caring for my soon-to-be two kids! Thank you!
ReplyDeleteSo glad you love it!! And congrats on baby #2!!
DeleteDo you have any on your Etsy store now? If so, how do I find your Etsy shop?
ReplyDeleteHi! I don't have any ready in my shop at the moment, unfortunately. My shop is www.etsy.com/shop/sewgeorgia if you'd like to put in a custom order! :)
DeleteI'm a bit late to the party here but THANK YOU, I am going to make this bag for a friend! I'm going to use a barkcloth fabric from Outback Wife, but I must say I love the fabric in your photos, do you remember the name of it?
ReplyDeleteYou are so welcome! I don't know the name, but I found it at Hobby Lobby if that helps. :) It was a few years ago, so I don't know if they still carry it or not.
DeleteThank you! I’m happily cutting out the pieces now!
DeleteHi, I cannot see any picture of your tutorial. I tried to enter from several computers and phones so I guess only you can solve this. Can you please check? Thanks :)
ReplyDeleteSorry to hear that! Can you see them now, by chance? They are showing up for me, so I'm hoping it was just a glitch!
DeleteYour tutorial was/is fantastic!
ReplyDeleteThank you so much for sharing your talent with the rest of us. I finished my new diaper bag yesterday, and couldn't be happier with the way it turned out! :D
I'm so glad you like your diaper bag! Thanks for the feedback! :)
DeleteGreat Tutorial, very scary to start with but following your instructions step by step it all came together beautifully, thank you. Ive made this for my first great grandchild with a co-ordinating changing mat and water proof boxy bag, i have also waterproofed the outside to accommodate our UK weather. photos to follow, which is the preferred method of uploading these?
ReplyDeleteI'm so glad it worked well for you! You can share photos on my facebook page or tag me on instagram. I can't wait to see it! :)
Deletedo you have a pattern i could download or print. so i can make it with out the laptop/tablet in my sewing space, or when i dont have the internet on. i have all but the snaps to make this bag.
ReplyDeleteHi, I don't have printable patterns at this time. Sorry!
DeleteWhen I find a pattern online that I want to make, especially if I plan to use it more than once, I create a Word document by using copy/paste. It takes a little time, but is worth it for me.
DeleteHello! I'm ready to start sewing but wanted to confirm that the lining pieces have interfacing?
ReplyDeleteI haven't really used duck canvas so I'm a little worried on getting started....wish me luck!
The pictures are scaring me, hopefully the actual directions will get me through! Thanks!
I made your diaper bag for my first granddaughter and it turned out great. The only alteration I made was to add a firm plastic base so that I could add bag feet as my daughter prefers bags that have them.
ReplyDeleteI found the step by step instructions easy to follow, and am looking forward to making one for my other daughter soon in the near future
So glad to hear this! And I love that you added feet! :)
DeleteVery useful tutorial.
ReplyDeleteMade 2 bags using this pattern now. Super easy to follow
ReplyDeleteHello Georgia! Thank you for this tutorial. I have a question about the bag separating zipper. I’m not understanding why the zipper is going around the zipper tabs? How does the bag close? Does the start of the zipper tabs sink inside the bag? Please help me to understand. Thank you for your time! Loving this bag.
ReplyDelete