What's that? You want to see a whole bunch of random things from around the house? Well you are in luck. I just happen to be tossing that kind of post together right now. First, I had a baked potato for breakfast. Actually 2 baked potatoes. Is that a weird breakfast? Either way, they were delicious!
#2 - After writing my post about getting started with houseplants, I've been looking for cheap ways to bring more green into the house. Last night I was out trimming our out-of-control-should-have-been-trimmed-last-fall bushes (you know, so everyone will think we have it all together at Baby B's Birthday party this weekend) I realized I had free greens right there! I picked some long pretty branches from my trimmings, stripped the leaves off the bottom half or so, and stuck them in vases of water around the house.
Too big? I'm undecided.
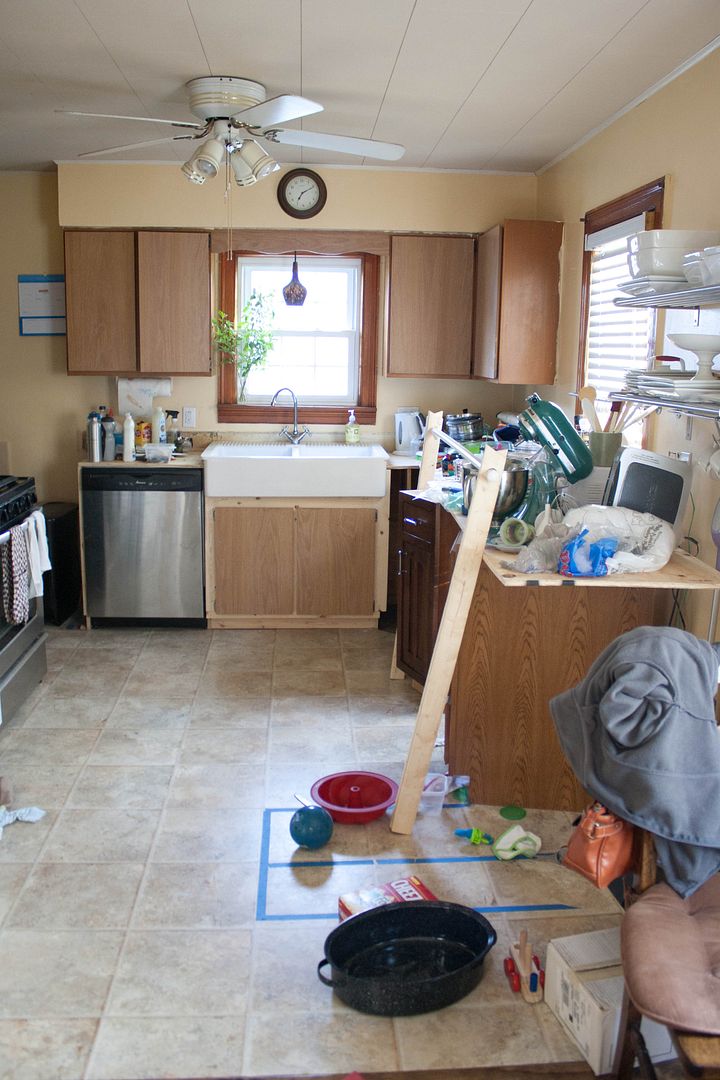
#3 - Scroll back up to that first picture and see how beautiful my sink looks. Then feast your eyes on this. The current state of our kitchen. Turns out when you don't have any cabinets, you don't have anywhere to put all that kitchen stuff. We should probably tackle operation build-new-cabinets soon. But to be fair even the few things that were in a cabinet have been pulled out by Baby B on a daily basis. The good news is that, thanks to our new friend Dish Washer, we are actually keeping that beautiful sink clear and clean most of the time! (here's a big picture shot for you, mom!)
#4 - I'm still planning to repaint the kitchen. And I still plan to paint the cabinets first to make sure the yellow doesn't grow on me. But I'm already picking out my replacement color. I wanted something that would flow really well with the living room so I decided to go with a green that's in the same family but a little lighter. I think it will make the two rooms work better together and keep the kitchen light and airy. Right now my front runner is the middle green on the top card.
#5 - My best friend just got back from a trip to Ecuador. She brought Baby B the. cutest. jacket. to wear this fall. It's made of alpaca and I can't wait to put him in it! She also brought hand painted mugs and Ecuador tea for us grown ups. :)
Speaking of birthdays, we went for a walk on Baby B's birthday and stopped at KFC on the way home. They heard us talking about his birthday and brought out this cake for him. He was pretty excited.
The only other thing going on today is a recovering sick baby and a newly sick husband. Boo. I'm totally having some ice cream tonight. :) What's new with you?
Any Pixar fans out there? Get the title? If not, go rent Bolt and watch it right now (it has been brought to my attention that Bolt is a Disney movie, not Pixar. My bad!). Done? Okay, let's proceed. I'm just so excited that our kitchen remodel has officially begun that I can hardly stand it! My parents came to town over a long Easter weekend and helped us knock out a few big projects in the kitchen. But let's start with a look back to move-in day:
The biggest change since then is that wall peeking in at the right. Because it's totally gone! That did wonders for the space and opened the kitchen up to the living and dining area. But we still have a long way to go before the end. We've started planning our kitchen project over a year ago and have since changed the layout to include a peninsula and worked in a dishwasher. And now we've actually started checking things off the to-do list! Here's how it all went down:
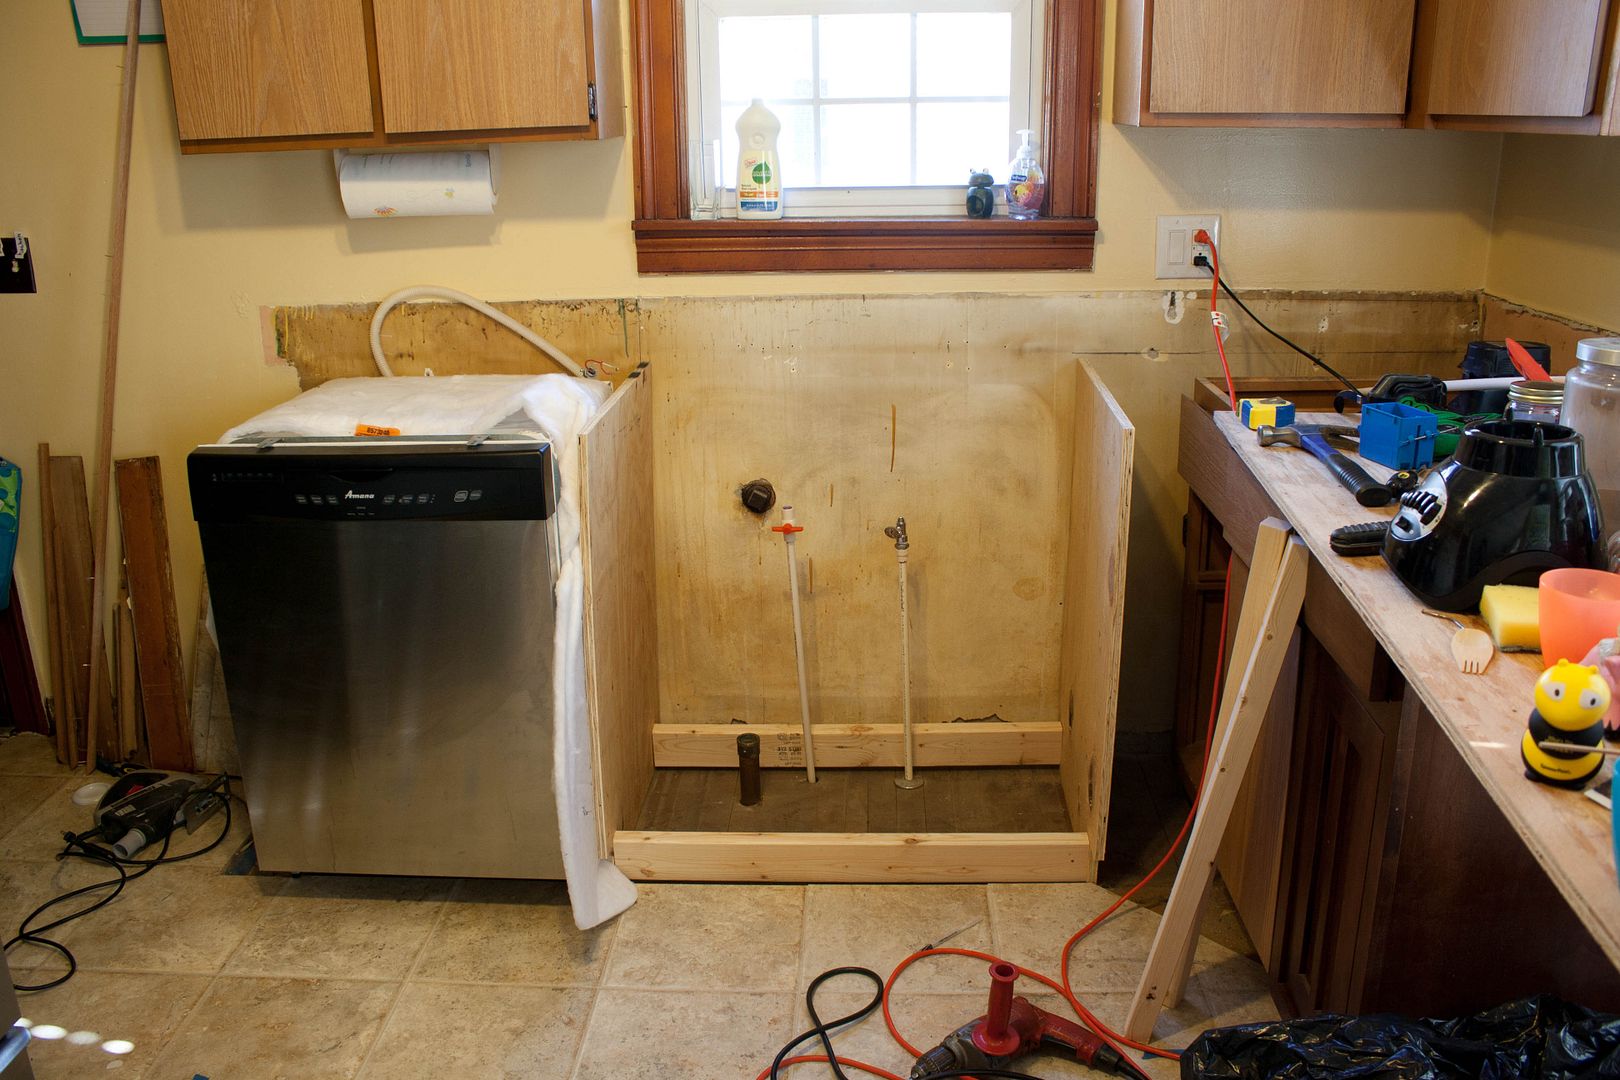
We started by ripping out all the base cabinets. We want to reuse what we have as much as possible to keep costs down, but unfortunately the base cabinets just didn't work with our new layout, and honestly we're so flimsy they weren't really worth trying to save. We did however keep the doors to reuse on new cabinets. My mom (plumber-extraordinaire) ran new piping up for the sink and added shut-offs! This was a big deal because until she installed the shut-offs we had to turn off the water to the whole house. So yeah, they were a pretty big deal. :)
Then we started reworking the space to fit in all our new additions and changes. This involved lots of shifting things around, building, scooching, and slow progress. We did lots of double and triple checking as we went to make sure things were fitting. Our first step was to build the sink cabinet frame and set it into place. We wanted the sink cabinet centered under the window so we lined it up and slid the dishwasher into place to check the fit before anything was installed permanently. It was important to check everything because we knew it would be close to fit in the dishwasher (because the door will open so close to the stove). It was tight with only about 1 1/2" clearance between the dishwasher door and the stove, but it fit!
Next we gave the sink a dry run to make sure it fit into the cabinet frame. Check! Since it is an IKEA sink, it is made to work with IKEA cabinets but I found this video about adapting regular cabinets to work and it was really helpful in the sizing and design of our cabinet.
Baby B wanted to check things out too. But don't worry, this was after the cabinet was reinforced and the sink was installed so there was no chance it would fall!
Then we installed the panel on the left side of the dishwasher, built a cabinet frame in the right corner, and attached plywood all across the top that will be the base for our concrete countertops. We also installed the faucet, connected the water lines, and had a working sink again! The sink will set on top of our future contertop but we didn't want to go that long with no water in the kitchen so we used wood to jack up the sides of the sink to the height it will need to be at later. That allowed us to get the waterlines at the right height and such. When we are ready for countertops we will take out the sink and remove the temporary booster boards, then reinstall the sink after the countertops.
If you remember when we bought this sink on super clearance from the Ikea as-is sections, you probably also remember the big hunk broken off of the back corner. After a little consulting with my grandpa and dad we found a way to fix it. Fortunately it came with the broken pieces and the fit back together almost perfectly. We use a multipurpose epoxy from Lowe's to glue the broken pieces back on. Then with my dad's tip we found out about ceramic repair kits! It was a little bottle of liquid ceramic stuff that filled in and sealed the cracks that were left. It not perfect, but there are only some small hairline marks now and it is totally functional. Plus I put the soap bottle over it so no one has to know. :) Not that anyone would notice anyway because they can't stop looking at how gloriously huge it is. Cracks and all, I'd say that was $40 well spent.
After installing the new sink and fancy gooseneck faucet (this one from IKEA), our old attach-to-the-faucet water filter was really an eye sore. So we decided to swing for an upgrade we'd already been thinking about for a while and installed an in-line filter (attached to the right wall of the cabinet). All the water coming through the cold side runs through it so we still get yummy water without having to look at the filter. That's what you call "win-win."
We are still figuring out how we are going to do the corner cabinet so I'll have to fill you in on that later, but we have the frame in place and made it large enough to have functional doors and enough clearance around that huge sink. This made things a little tight for the yard-sale cabinet we wanted to add in to the layout, so my handy husband used a jig saw to notch out the back of the cabinet. This allowed us to overhang the window frame by an inch or two and get all the space we needed. The rest of the cabinets are sitting patiently waiting to be installed as well, but this is as far as we got with them over the weekend.
The other thing we my mom got done was installing several new outlets at countertop level! We went from one outlet back in the corner to four outlets strategically spaced around the the work area. It is SO nice. I can put my crockpot ANYWHERE on the counter and plug it in without an extension cord. Thanks momma!
We feel really good about what we've accomplished so far. The dishwasher and sink were the biggest things we wanted to get done, and we finished that and more! Oh, yeah, did I forget to say the dishwasher is hooked up and works great? And that we bought it on Craigslist almost new for $150? Well it is and we did and we love it! We still have quite a ways to go but plan to have it all done by the end of summer. Here's a quick rundown of what we still have to do:
install drawer base
build out corner cabinets
build peninsula cabinets
make councrete countertop
repaint walls green (I know, I just painted them. Everyone was right. Should have done it green in the first place.)
find a new ceiling fan
add trim to the cabinet doors
paint cabinets
paint inside cabinets (just for fun! any color suggestions? Or maybe a wall paper?)
find/build bar stools
I'm sure there will be more, but that's all I can think of for now. :) I know I didn't really have any helpful tutorial type advice here, but I don't feel qualified to give any in these areas! Thank goodness my mom was here for electrical and plumbing (please do NOT attempt wiring if you don't know how. A lot of things can go wrong and it can be very dangerous!). If you need help installing a Domsjo sink check out this video and if you want to take a swing at building your own cabinet Ana White has great plans here (we didn't follow them this time because we had to match a few other cabinets we are using, but they are great!). Honestly we are making a lot of this up on the fly and figuring out things as we go. It turns out planning can only do so much. :) Once we make the countertops (we bought concrete this week! excited!) I plan to do a full on tutorial for that since we're having a hard time finding specific instructions.
Anyone else working on a kitchen remodel? Or have you already completed one? Have one planned in the future?
The Nester has been doing a series about using plants in your home, and I am inspired! After reading part 2, I decided to take on the homework. And I am SO happy I did.
The assignment was to go buy one of the Nester's favorite, easy care plants - a succulent. I shopped around a little and the cheapest one's I found were at Lowe's for $3 each. More than I hoped, but went for it anyway and even walked away with two succulents instead of just one! I don't know what that cute little guy is called, but the bigger one is aloe vera. I picked these ones because I knew I wanted to pot them together and thought the colors and shapes complimented each other well while still creating contrast. Doesn't it sound fancy when I say it like that? :) I found a plain white pot in the garage and tucked the little happy guys in with some potting soil.
And I didn't stop there. I also purchased another recommended plant - a snake plant. This one was only $2 (woot!) and I really like the clean shape. Plus the one the Nester has is pretty big, so I'm hopeful this guy will be a long-term plant that will grow into a nice, big, eye catcher. This guy's pot was a hand-me-down from my dad and I'm glad to finally be doing it justice!
My only other plant so far is a small pot of tulips I found at Trader Joe's for $2.50. I planned to re-pot them on the front porch, the the last few days have been pretty chilly so they are living on the table instead. I'm actually glad because I get to enjoy them much more this way. Although I probably should go ahead and put them in a nicer pot. :)
That's the extent of my houseplant adventure so far. I'm already really happy with how they make the whole house seem fresh and alive. And how them make me smile every time I walk by. How have not tried houseplants sooner? I'm keeping my eyes open for cheaper succulents and a few other plants the Nester suggested and hoping to have a plant in every room soon!
The Nester also has me itching to experiment with planters, terrariums, and fairy gardens around the house. I am totally convinced this house needs more plants. Are you a fan of houseplants? What's your favorite kind? Any advice for this newbie?
I am helping with a bathroom design for a local church and as part of that project they needed a vanity/changing table. I sent a few style suggestions to the Renovation Director (I just made that title up, so don't hold me to it :) ) and our favorite was far and away the Shannon Console Table. The two problems we were that 1) we needed the table to fit a very specific space and couldn't find anything just the right size, and 2) this table doesn't even appear to be sold in the US. :) So that left us one choice - building a custom piece! And so the Shirley Console Table was born.
I named it Shirley myself. If you need help naming your children just let me know. I'm obviously a REALLY good namer. And I make my own verbs. Yep, I'm a full package.
Now, down to business!
Please read all the directions before
beginning, and cut your pieces as you go, measuring before each cut. Use
2” screws or pocket holes with 1 1/4" screws unless otherwise indicated. Always use glue. Pre-drill and
countersink your screws.I typed these plans after building my piece and tried to double check all my numbers, but please watch out for typos. Measure lots to make sure things work out!
And don’t forget to
check out Ana White's tip's and suggestions for getting started!
Shopping List:
11 - 1x2's @ 8' long
1 - 1x3 @ 8' long
1 - 1x3 @ 10' long
1 - 1x4 @ 8' long
1 - 1x6 @ 8' long
1 - 1x10 @ 6' long
2x2 scraps
2 scrap plywood @ 10 5/8" x 16 1/4"
2 sets 16" corner-mount drawer slides
2 knobs or pulls
2" screws
1 1/4" pocket screws (optional, only if you have a Kreg Jig)
(like I mentioned, I built this to fit snug-as-a-bug in a specific space. that's why none of my measurements are nice round numbers.)
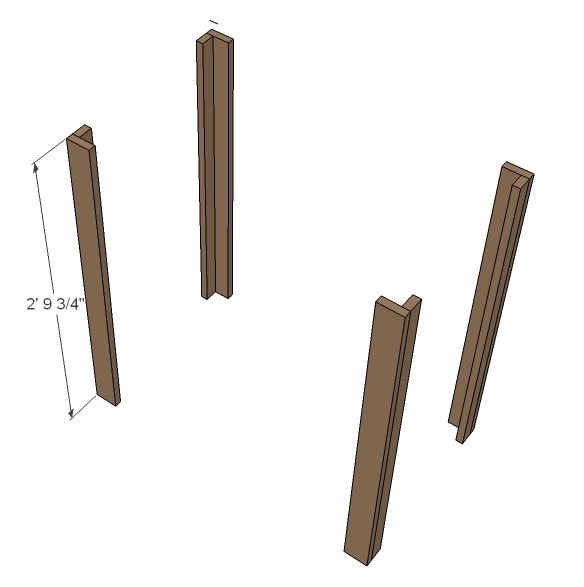
Step 1: Assemble the legs.
Attack the leg fronts (A) to the leg sides (B) to assemble all four legs. I did this by drilling through the leg front into the the leg side and attaching the pieces with 2" nails and glue.
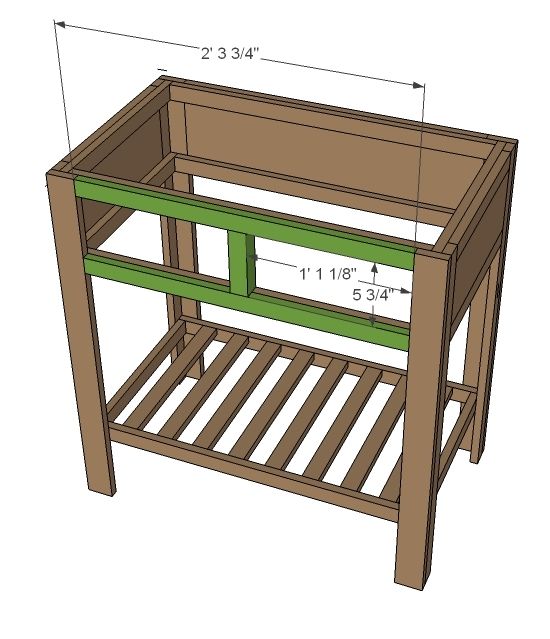
Step 2: Attach the side rails.
Drill through the side rails (C) into the leg sides and attach with 1 1/4" nails & glue. The first rail should be flush with the top edge of the legs, the second should be spaced 5 1/2" down from there, and the last should be 17 3/4" down from there (which leaves 6" underneath).
Step 3: Attach front and back rails.
Drill through the front & back rails (D) into the leg fronts and attach with 1 1/4" screws and glue. Put the top rail flush with the top of the legs. Line up the bottom rails and second back rail with the side rails you attached in step 2. The second rail ON THE FRONT should be down 5 3/4", NOT 5 1/2" like the side rails. This will allow room for your drawer fronts.
Step 4: Shelf slats
Install the shelf slats (E) between the bottom set of front & back rails. You will have about 2" between each slat. Use glue and either screw or nail through the rails and into then ends of each slat, or use a kreg jig to attach the slats from below.
Step 5: Back Panel & Trim
There are two ways you can do the back. The way I did it was to first attach the back panel (F) to the back trim (G) pieces using a Kreg Jig to create one solid back piece. Then I screwed through the back rails into the back piece and attached it with glue & 1 1/4" screws. If you don't have a Kreg Jig, you could instead cut a piece of plywood to 27 34" x 8 1/2" and use the one piece in place of the panel & trim. (note: the back panel is 5 1/2", not the 5 3/4" that is shown)
Step 6: Side panels & trim
Next attach the side panels (H) & trim (I) in the same way as the back panel & trim in step 5. Again, you can use the three pieces as I've drawn or replace it with a single piece of plywood cut to 15 x 8 1/2". Repeat for the other side. (note: the side panel is 5 1/2", not the 5 3/4" that is shown)
Step 7: Front trim & drawer divider
Next attach the front top & bottom trim (J) by drilling through the front rails into the trim. Use glue & 1 1/4" nails. Then attach the drawer divider (K) using a Kreg Jig, or by drilling down through the trim & rails and using glue & 2" nails. The divider should be centered, with 13 1/8" on each side.
Step 8: Drawer supports
Next install your drawer supports. The side supports (L) should be attached flush with the inside edges of the legs in front & back, near the bottom of the drawer opening. Since our drawer boxes are shorter than the opening, you have have a good amount of wiggle room. Just make sure all your supports are at the same height. The middle support (M) should be at the same height and run from the drawer divider to the back of the unit. Measure to make sure the divider runs straight, it should have 13 1/8" on each side. You can attach all the supports using a Kreg Jig, or by drilling through from the outside with 2" nails and glue.
Step 9: Drawer boxes
First measure your drawer openings to be sure they are 13 1/8" wide. It is important that your drawer boxes be 1" narrower than the opening for your drawer slides to fit so adjust the drawer measurements if necessary. To assemble your box, start by attaching the drawer back (N) to the drawer bottom (O) using a kreg jig or screws & glue. Then attach the drawer sides (P) in the same way. Your box will look like this:
Step 10: Drawer slides
These drawers are designed to work with slides that mound on the bottom corners of the drawer box. Follow the package instructions to install them. (it shows the top in this picture, but it's much easier to do this before the top is installed so you can see what you are working with) Once your box is installed properly, you can attach the drawer front (Q). The drawer front should be 12 1/8" wide OR 1/4" smaller than the opening. Double check your opening size and size your drawer front as necessary. I put glue on the front edges of the drawer box, center the drawer front in the opening, and then nail through the front into the box. (you will have 1/8" gap all around the drawer)
Step 11: Install the top
If you have a Kreg Jig, start by connecting your table top boards (R) & (S) as show below to create one solid top piece. If you don't have a Kreg Jig, just set the pieces on as shown below without attaching them together. Align the top on your table - you'll have 1" overhang on each side, 1" in front, and 1/2" in back. Use glue and nail or screw down through the top into the legs and sides of the table.
Step 12 - Finishing
Fill in any holes and let dry, then sand everything smooth. Finish with paint or stain and polyurethane. Add hardware and you are done!
I don't have any pictures of it in place at the church yet, so these will have to do for now....
This was my first time doing drawer slides. It took a few attempts, but they eventually turned out pretty good. :)
This project cost me about $85 including finishing supplies.
Enjoy, and let me know if you give these plans a try!
I can't believe my baby is 1 already. Crazy. And although his actual birthday is past, we aren't have his party until later this month. Apart from the things I made for Baby B's big shindig, I did most of my shopping at Dollar Tree. Here's what I bought:
2 packs of silverware ($1 each)
2 packs of napkins ($1 each)
2 packs of plates ($1 each)
3 packs of cups ($1 each)
1 pack of straws ($1)
1 pack of balloons ($1)
1 roll wrapping paper ($1)
2 packs of cupcakes cups (from the grocery store, $2 each)
Total = $15
I also picked up things to make a few little party favors for Baby B's baby friends. I spent $4 on bubbles, pinwheels, water squirt toys, and bags to put them in. And that's all we bought for the party besides food. And presents, of course. More details on those things later. :)
I just love this picture. See why? You can see Baby B's hand sneaking in to get the plates. He is SO funny. :)
And this was the only picture I have of the dinosaur wrapping paper because Baby B wouldn't put it down! That's it for party business today, but I have more Baby B to share, as usual. :) He loves to "cook." I give him pots and spoons and he has a heyday! Here he is making his specialty "Puff Soup."