Wednesday, October 26

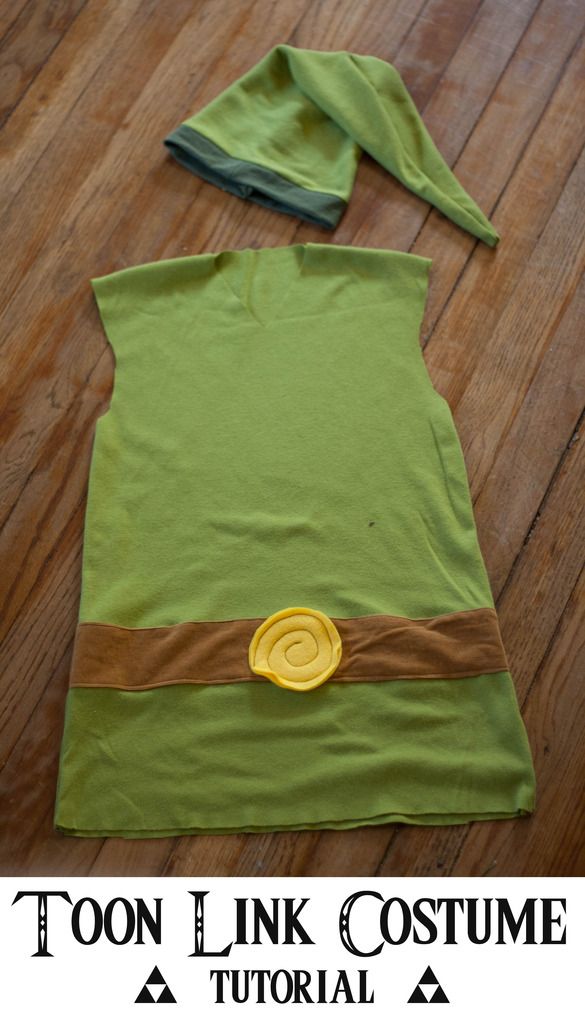
Toon Link Costume Tutorial

We have a little boy who loves Toon Link. And a variety of other super heroes, but good old Toon Link has had a few streaks as the favorite. So last year for Christmas I made up a quick Toon Link costume to stuff in his stocking. Despite being a last minute gift, it was a hit and he's still using it almost a year later! Now with halloween right around the corner, it seems like a perfect time to get this tutorial together. We're operating on Georgia time here, folks. As in me. Not the state. (you can totally pull it off in time for halloween, it's so simple!)


What you need:
  • green knit fabric (I had some sitting in my closet from a yard sale, the amount you need will depend on the size of the child... or adult)
  • a shirt to use as a size template
  • Small amount of dark green knit fabric for the hat trim (I cut up an old tshirt)
  • brown fabric for the belt (I used leftover corduroy, but just about anything would work)
  • yellow felt for the belt buckle
  • thread

To make the top, I folded a piece of light green knit fabric in half and laid one of his shirts on top to to use as a pattern. I cut the costume a couple inches larger so he'll be able to use it for a few years, and cut the sleeves to be a tank-style top. I also cut it several inches longer than his t-shirt (since Toon Link's shirt is a little long) but... it might be a little too long. Oops. I'd go a little shorter than this next time. Use the first piece as a pattern to cut a second piece for the back.


On the front piece I cut the neck down a little more into a V. Then I laid a belt section on top of each shirt piece and lined them up at the same height. Cut strips of brown about 3" wide. If it's a woven fabric (I made the belt with left over brown corduroy), fold the raw edges under about 1/4" and press them to keep them in place. If it's a knit, you don't need to worry about fraying and can just set it in place without folding the edges under.


Monday, October 17

Bringing in Fall (on a Budget!)

We rounded out our fall decorating this week with a few budget-friendly finds I couldn't wait to share! It's still pretty low key (we're Christmas decorators at heart) but we definitely managed to bring in a little fall, and did it without breaking the bank.


The first thing you need to know is Aldi has their pumpkins on sale for $2 this week. $2. For these huge pumpkins. We bought several for inside and outside. We flanked the fireplace and put one pumpkin up in the boys' room.


Up on the mantle we have the DIY "thankful" banner we made for free (tutorial here) and added a few mini pumpkins (a bag of four was $3 at Aldi. They also have the best prices on apple cider. Aldi is the place to be for Fall!).


I was also looking for some kind of greenery that would be a little more fall-ish for the mantle. I was hoping to find cotton stems (like these) but I couldn't find them locally and I didn't want to pay shipping. But I thought leafy branches would be a little more fall-ish than the houseplant I had up there. These were on sale for 50% off at Hobby Lobby and were only $2.50 each. They also had red & orange fall leaf stems if that's more your speed.


Monday, October 10

Fujifilm INSTAX Instant Photo Christmas Ornaments & Visa Gift Card GIVEAWAY!

We have a new favorite Christmas tradition, and I am so excited to share it with you guys today! We're making instant-photo keepsake ornaments that are as easy as they are fun. And the best part? We'll be adding photos year after year while we watch these boys grow!


But first: let's rewind for a second. Last year we shared some really sweet Christmas photos we took of the boys. We turned our favorites into wood-transfer artwork to bring out with our Christmas decorations every year, and toyed with the idea of doing repeat photos every year to watch the boys grow. But realistically, storing that many big wooden photos long term seemed a little daunting. Enter the Fujifilm INSTAX 70 camera. And just like that, the game changed.

http://www.morelikehome.net/2015/11/diy-wood-transfer-chrismtas-photos.html


The Fujifilm INSTAX 70 is an instant photo camera. But unlike your mom's instant camera, this guy offers a handful of great features like multiple photo settings, selfie mode, and a tripod socket. It's lightweight design makes it easy to carry everywhere, which means you can snap the perfect pic on the go - anytime, anywhere. Plus it's easy to use, and easy on the eyes. Just look at that handsome little fella!


All we needed to make these sweet little keepsake ornaments was a handful of INSTAX photos, some twine, and a few mini clothespins (like these).


We loved last year's photo setup so much we decided to recreate it this year (with our newest addition included). We pulled out the cozy coupe and tractor, wrapped a couple empty boxes for gift props, grabbed our 3' Christmas tree, and bribed everyone with cookies. In no time we had a little stack of beautiful pics that are sure to become some of our favorite family heirlooms.


For each ornament we used a mini clothes pint and small piece of twine tied in a loop.

I love this one. Look at that little baby arm hanging out of the car like chill.


Clip the INSTAX photo on the twin and BOOM. Instant ornament. Tradition year #1 = complete.


We ended up with so. many. good shots. My original plan was to add one photo to the tree every year... but I could not pick a favorite. I narrowed it down to six (and even that was hard. I think I deserve a cookie, too). But this is one of the things I loved about using the INSTAX camera for this project - six favorite pictures aren't a big deal. They take almost no space to store, and every one of them will look beautiful on the tree without taking up too much Tree Estate (get it? Real Estate of Christmas trees? Yes?).


Besides our favorite set-up, we also did individual picture of the boys plus a classic by-the-tree shot.


These are so fast and easy to make. Just clip the photo on a loop and hang it on the tree. All the photos we took are a fun addition to mix in with our traditional ornaments...


...but they also look great flying solo on a separate INSTAX instant photo tree. I'm especially loving this look, but I think we're going to need a bigger tree!


If you have extra photos you want to display (these kids are just too cute. It's like photo-gold over here.) try running an extra piece of twine across the mantle for an instant photo garland!


I love that we'll be able to look back year after year to see how our boys have grown and our family has changed. And every Christmas as we decorate the tree we can revisit the sweet little smiles and squishy cheeks that are 2016. I'm already excited to pull these out and add to them next year!


Now hold on to your hats, friends: it's time for a GIVEAWAY! The folks behind the Fujifilm INSTAX 70 are hosting a $100 Visa gift card giveaway just for More Like Home readers! To enter, all you have to do is leave a blog comment answering this question:

What is your favorite Christmas Memory? 


Make sure you leave an email address so I can let you know if you win! Good Luck!

Entry Instructions:

No duplicate comments.

You may receive (2) total entries by selecting from the following entry methods:

1. Leave a comment in response to the sweepstakes prompt on this post

2. Tweet (public message) about this promotion; including exactly the following unique term in your tweet message: “#SweepstakesEntry”; and leave the URL to that tweet in a comment on this post

3. Blog about this promotion, including a disclosure that you are receiving a sweepstakes entry in exchange for writing the blog post, and leave the URL to that post in a comment on this post

4. For those with no Twitter or blog, read the official rules to learn about an alternate form of entry.

This giveaway is open to US Residents age 18 or older (or nineteen (19) years of age or older in Alabama and Nebraska). Winners will be selected via random draw, and will be notified by e-mail. The notification email will come directly from BlogHer via the sweeps@blogher email address. You will have 2 business days to respond; otherwise a new winner will be selected.

The Official Rules are available here.

This sweepstakes runs from 10/8/16 to 12/10/16

Be sure to visit the Fujifilm 2H on BlogHer.com where you can read other bloggers’ posts!

 

Tuesday, October 4

Fall "Thankful" Banner DIY

I don't know about you guys, but that first chilly night of the season threw me into the fall decorating spirit. Which is weird, because I've never put much thought into fall decorations before. We usually grab a couple pumpkins to paint with the kids, call it a day, and wait for Christmas to get the real decorating started. But for whatever ever reason, this year the changing leaves and brisk days have found me feeling the need to welcome the changing season. Maybe I'm trying to make our new place feel a little more like our own, or maybe it's just all the beautiful trees around our house giving me a fresh outlook. Either way, it's time to bring a little bit of this fall beauty inside. We'll leave the chill outside though, m'kay?


Enter Phase 1 Fall Decorating: The Mantle.

This is the first time I've ever had a mantle to decorate, and I have no idea what I'm doing. So I though a simple, cheap little banner might be a good starting point. A good no-commitment starting point. If I hated it, I could trash it guilt-free. This one was so easy to make, and cost almost nothing because I used things I already have. It's so quick you could make one up for every season and holiday in no time!


I'm planning to add a few pumpkins and fall foliage as soon as I get my hands on some, but for now this is a happy little start. And a good reminder that we really do have so much to be thankful for.


Here's how it went down. I started with three sheets of 12x12 brown cardstock. It's actually the backside of some patterned paper left over from another project. I was able to get three pennants out of each sheet (they're 6" wide and 7" long). Then I used a pencil and a ruler to hand-draw the letters on each banner. I just made sure they started and stopped at the same heights so they would be even, and went for it. I did the letters for THANKFUL but you could do anything you like! AUTUMN, GATHER, GRATEFUL, or HARVEST would also be cute for fall.


Subscribe