Friday, January 30

Water Kefir Tips and Our Favorite Recipes {lemonade and pomegranate soda}

Fermented foods. I remember when I first heard about them two years ago. My thoughts were something like "Oh. Fermented? That sounds super gross." But now here they are on our list of just seven healthy goals for this year. Because the more I read, the more I found that fermentation is just the growth of beneficial bacteria and probiotics that is actually really good for your gut health, and that gut health is one of the foundations of good overall health! Hmmm. So we decided a year ago to give this fermentation thing a try, starting with the easiest/least scary thing I could find. Water Kefir.


Turns out it's not hard. Or scary. And we've kept these little kefir guys (called kefir grains, technically) going for over a year now with just a little sugar and water. Water kefir grains are little whitish clear lumps that are made up largely of yeast and bacteria, and when placed in sugar water they ferment it into a probiotic beverage. Easy to use, and affordable since all you need to sustain them is water, a little sugar, and minerals. Plus the grains will grow and reproduce over time so if you can share with friends!


Here's what you need:
  • Water kefir grains (milk kefir grains are not the same). If you have a friend whose grains have grown you may be able to get some for free, or you can order them from cultures for health. If you order them they will include instructions for getting them started the first time. If they came from a friend you can hop right in!
  • sugar (we use organic)
  • mineral drops, molasses, or a clean egg shell
  • a mason jar with a lid (we use a coffee filter over the top)

Thursday, January 22

Goals for 2015

For some reason it always takes me a while to work out my goals for a new year. I think part of it is that I don't really know what kind of goals I want to set. How does a person narrow down all their hopes, dreams, and needs into a simple little "to-do list" for the next year? But I think I've finally decided what to work towards this year. I started by asking myself "what is one most important to me this year?" That answer was super easy - my family and their health & well being (physical, emotional, & spiritual). So I decided the best goals for this year would work toward improving the health of my family. And they had to be doable. So I decided to start with seven. Just seven new, healthy habits I want to start for my family. Less than one per month. Want to join me? Here is the list I came up with for 2015.


1. Family walks. Getting moving as a family will be good for all of us! This will be a much easier goal in the summer, but I'm making a point to get the boys outside to play in the snow or even ride bikes when the winter weather allows. I'm hoping when summer rolls around we'll either strive to walk 5 nights a week, or set a distance like 10 miles a week.


Friday, January 16

Shabby Chic Dollhouse {free plans}

Last year a friend asked me to build a large, shabby chic dollhouse for her daughter for Christmas. Something with cottage charm, a picket fence, and birdhouse on top. She sent me some inspiration photos and I worked up a design. And now I finally have plans ready to share so you can build one too! If you're looking for something for the boys, check out our wooden animal treehouse plans.


This is the only photo I have of the finished dollhouse and the fence isn't on yet (she wanted to paint it herself so I sent the fence separately so it could be more easily painted, then glued on) but you get the gist. Its big, cute, and ready for hours of fun! I made this one pretty detailed, but if you want something simple just skip all the extra like the birdhouse and fence. As always, use glue, predrill your holes, and be safe! Work on a flat surface and it's better to cut the pieces as you go and double check the measurements on each step.


Overall dimensions are 40" wide x 13.5" deep x 45" tall.

Shopping List:
2  -  1x12  @  8'
1  -  1x10  @  8'
1  -  1x6  @  10'
2  -  1x6  @  8'
1  -  1x2  @  10'
1  -  1x3  @  8'
1  -  4x4  (you only need about 9")
1  -  scallop molding  @  8'
1/2 x 1/4" balsam wood strips  -  you need 147" total for the fence but account for scraps too, depending on the length of your strips. Shorter strips = more scrap.
thin plywood scraps
1/4" dowel
wood filler
sandpaper
wood glue
1 1/4" screws (A Kreg Jig & self tapping screws are also helpful!)
finishing nails

Wednesday, January 7

DIY Essential Oil Diffusing Necklaces

Essential Oils. I've heard a lot about them lately, and I'm guessing you have too. I can't go online without seeing a post about them somewhere. I've bought several oils myself but actually haven't used them much at this point. I'm still reading up on safety, especially when it comes 
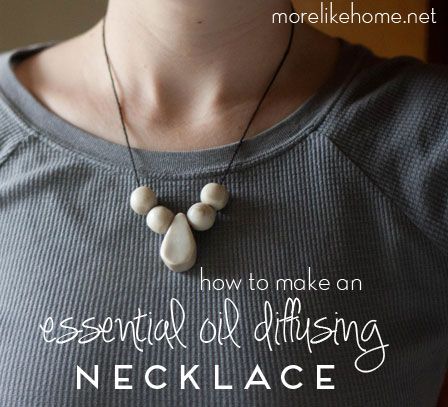
to use around small children, before I dive in. But there are a few I already feel comfortable using so when a friend taught me how to make these essential oil diffusing necklaces I had to give it a try! They are easy and cheap to make, plus you can make any style you can dream up.


I love the idea of a diffusing necklace because, from what I've read, diffusing is one of the safest ways to utilize essential oils and through inhalation your body still gets most of the benefits of the oil! And since it's a small, personalized diffuser I can use a minimal amount and get the benefits without having to diffuse into the whole house. This is a great benefit as well because I don't feel good about using oils in any way around children under age two, and very minimally for a few years after that. If you're looking for more info on EO safety for children, Learning About EOs has done third-party testing (not sponsored by an oil manufacturer) and offers conservative recommendations for use around children. They also have an age-appropriate anti-germ and anti-congestion recipe for children that could be used with older children on their own diffusing necklace when they are under the weather!


Here's all you need to make your own EO diffusing necklaces:
  • polymer clay like Sculpeys (I used pearl and got two necklaces from one small block)
  • necklace cording
  • necklace clasp
  • a toothpick
  • essential oils (remember to reasearch your oils and their safety, especially when using them around children)

This is going to be easy and fun! Ready? Just shape your clay into whatever shape you like for your beads. I did simple balls, plus one teardrop bead. I tried to keep everything 1/4 - 1/2" thick. For the balls I used a paring knife to cut cubes from the block of clay then rolled them into balls. Cutting the cubes made it easy to make sure my balls ended up the same size. For the teardrop I cut a slice of clay about 3/8" thick, then used my pairing knife to cut out a teardrop freestyle. Use a toothpick to poke a hole through each bead (make sure the hole will be big enough for your cord!). Place them on a cookie sheet and bake according to your clay's directions. I had to cook mine a little longer than suggested to get them nice and hard since they were kind of thick. Just keep an eye on it so you don't burn the clay.

Big Brother used the left over clay to make a few figurines. One is three guys on a sled. For the other he was smooshing pieces together and declared it was a zerba. Then he added "a guy" and some wheels and said "Oh! It's a tractor!" He was so surprised that it turned out to be a tractor.

Once the beads have cooled you can string them onto your cord. Cut the cord to the desired length, plus a couple inches for tying off the ends. Then tie the ends onto your necklace clasp.


Now you all that's left is adding some essential oils! Add a few drops of whatever oil you choose directly onto the beads. I drop mine onto the front or sides of the beads so they don't contact my skin (I like to be cautious, okay?). Since they are so porous they will absorb the oil and diffuse it into the air. I've just been using mine a short time, but what I've been told is that the scent of the oil will linger from a few days up to a couple weeks. At that point you can reapply, or choose a new oil! Or you can make a second necklace if you want to switch oils sooner. :)


I'll say it one more time, check the safety of your oils especially around kids and decide what's best for your family. For me personally, some of the oils I feel safest using are citrus oils like lemon, orange, and bergamot (even around my kids, I put them in my cleaning solutions too). Plus citrus is supposed to be a great mood booster and who doesn't need that during a cold, cloudy winter? They are great to diffuse when you need a pick-me-up. I also plan to make this blend of sweet orange, cinnamon leaf or lavender, and fir when I get sick (a child-friendly version of Thieves or OnGuard oil).


If you're really looking to further your education about essential oils, Vintage Remedies is another third party source. They offers multiple courses and emphasize an evidence based look at potential interactions and cotnraindications. A few months ago I got free enrollment in the entry level short course (it came with an ebook bundle I purchased) that looked closely at 12 common essential oils along with practical uses and safety for home use. While I did really enjoy it and learned quite a bit, it was definitely entry level and left me wishing there had been more information about more oils. There are some intermediate and advanced courses that sound really good but all are a far cry from our budget so for now I'll make do on my own. In fact I just ordered this book that was recommended by several friends and is much more affordable.


What are your favorite essential oils and how do you use them? If you know any great books or resources for learning about EO safety and use I'd love to hear about it! And I would love to see pictures if you make your own diffusing necklace! You can post pictures to our facebook page or email them to me at  morelikehome (at) gmail (dot) com. 

Monday, January 5

Funny Boy Books & Custom Moleskine Journals with Steel Letter Stamps

My kids do and say the funniest things I have ever seen. Also, I have a terrible memory. I will without fail forget every single one of these funnies if I rely on my tired brain alone. So Husband came up with a super easy way to record these funny moments through the years. Thank you, Husband!!! I call them the Funny Boy Books. You know, because it's where I write all the things the funny boys do.


We wanted to make them a little nicer than just a plain notebook since we're hoping to keep them around a long time, so we ordered some Moleskine notebooks to use. Then we used our steel letter stamps to customize the cover of each book. It's a fast and easy way to make their books a little more special! Plus it's great for making customized gifts for new parents.


We used our letter stamps to imprint "funny boy book" on the cover of each book (and added their names so we know who they belong to). I keep them on my nightstand so every night before bed I can jot down any favorite funny moments or milestones from the day. I also have a note app on my phone where I write down anything I want to remember to put in the book later.


You need just a few simple supplies to make custom journals for your own funny boys (or whatever else you need a journal for!):

Thursday, January 1

Hello 2015 {and the best of 2014}

Happy 2015, friends! We enter this new year full of thankfulness. Thankful for dear friends, wonderful family, our sweet boys, food on our table, and so much more. So we want to kick off 2015 with a great big THANK YOU. Thank you for hanging with us through the past year. Thank you for sharing our planning and trying, our success and our major fails. Seriously. Thank you.

We can't wait to see what 2015 has in store, and we have a few new projects planned for you guys! But before we start the new, we took at look at our top posts from the last year. Some of the most popular posts really surprised us! Here's a peek at our top posts of 2014, followed by most popular of all time. If you're looking for a new project in 2015, this is a great place to start!


So let's start with the top new posts of 2014:

#1 - The time I dyed our favorite baby wrap. It won as the most popular post, and as the most surprising underdog! We never would have guessed! 

#2 -The tutorial for how we hacked our Ikea Kura bed tent during the boys' room makeover.

#3 - The wooden animal treehouse we made for Big Brother.

#4 - My easy baby doll ring sling tutorial.

#5 - Our favorite, oversize, cozy fleece blanket tutorial.

#6 - The stroller-friendly diaper bag pattern and tutorial.

#7 - Our easy and affordable faux brick backsplash tutorial.


#8 - The 2x4 garden fence we built to keep the bunnies at bay.

#9 - My tutorial for turning a regular slip into a pretty lace skirt-extending slip.

#10 - And finally one of our favorite DIY new baby gifts - taggie teething toys.


And these are the top ranked posts of all time:

#1 - The intro to our series 31 Day of 2x4 Projects is our most popular post to date. It's full of great, affordable projects!


#2 - The outdoor sectional we built entirely from 2x4s.

#3 - Our plans for a 2x4 casual desk that's super easy to build. Check out the great project photos submitted by readers!

#4 - The Rhyan coffee table. It was our very first furniture plan and first building project. There are some amazing photos that have been submitted by readers who built variations of this table! Check it out! And thanks to everyone who has sent in pictures! :)

#5 - The plans for a simple chair made from 2x4s.

#6 - Our concrete countertop tutorial - we still love it!

#7 - Another 2x4 project! This time the simple modern bed featuring an oversize headboard and built-in nightstands.

#8 - Plans for an outdoor storage bench (plus planters and a regular bench to make a full set).

#9 - This 2x4 chunky bar stool is great for an eat-in kitchen!

#10 - Last but not least, a DIY shoe rack that is probably the fastest, easiest plan we've made.

Thanks for reading, and we hope you had a great year with lots of DIY! What was your favorite post or DIY project in 2014? What would you love to see this year?
Subscribe