Wednesday, June 22

What a Girl Needs

You may remember back when I wrote this post daydreaming about what our kitchen will look like some day. Well, lately I've been ironing out the details of what exactly we need to do to make the dream come true! We haven't started any construction, or even painting yet, but I have a much more specific plan to share with you. You can go back to my original post to see actual pictures of the kitchen (it's messy. no judging.) and here is a drawing of the current floor plan:


We're starting with white walls, honey colored cabinets, a warped laminate countertop, and not enough storage or counter space. Because we need to keep costs down as much as possible, we are avoiding major construction and working with the existing kitchen as much as we can.  This means we will be keeping the current layout of the appliances and sink so we don't have to move any electrical or plumbing, keeping the flooring (which is pretty new) and giving the existing cabinets a coat of paint. Here are the changes we plan to make that will transform our existing kitchen into the kitchen of our dreams:


It's not even going to look like the same room, is it? Here are the specifics:

1. Concrete countertops - We plan to DIY our own! I am SO excited about this. I was hoping for a nice, durable countertop and we should be able to pull this off for even less than a laminate top would be. My inspiration from the top and rough directions came from this blog post by Kelly Moore. Based on the size and cost of their project, I'm hoping our tops will end up in the $150-200 range.

2 & 3. Paint cabinets & walls - We'll be painting the cabinets semi gloss white (and possibly adding some trim detail to the doors) and painting the walls a pale yellow semi gloss (I picked out "Pear" by Valspar). For a gallon of primer and a gallon of each color, we're looking at around $60 for paint.

4. Replace ceiling fan - The white/brass ceiling fan has to go, and will be replaced by...a new ceiling fan. I know there are plenty of ceiling fan haters out there, but there is no better way to keep a house cool in the summer and I will not give it up! I have my eye on a much prettier one at Lowe's that's around $70.

5. New sink & faucet - Saying goodbye to the old cast iron sink we have now. Ideally I would LOVE to have this farmhouse sink from Ikea, but it runs over $300. Boo. So it will probably end up being a standard stainless steel sink. Hopefully a super cheap one from a yard sale. :) As for a faucet, I'm thinking maybe something with a gooseneck, but it will largely depend on what I can get for a good price. Hoping to keep it under $50, and hopefully even find something at a yard sale!

6. Tile backsplash -Tile is so hard to choose! There are so many options! I'm thinking about maybe a small white subway tile like this one from Overstock.com. But we'll see if I stick with it. :) Of course I'll also check local stores to see if I can get something around here. If I go with something like this from Overstock, it will be about $65 for a case, which should be plenty for our small kitchen.

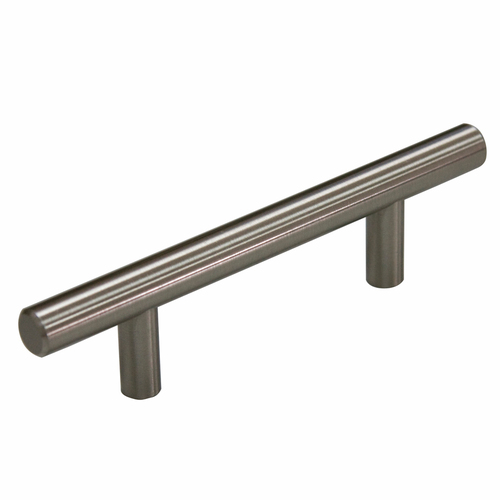
7. New hardware - I like the look of pulls more than knobs. I'm thinking about maybe something like this little guy from Lowe's. I haven't decided for sure if this is the style I want to go with and I'll look around more locally and online before making any final decisions. I'm hoping to find something a little cheaper, too, which could take some work. This one is on the lower end of the prices I've seen at $3.50 each. Since I'll need 21 pieces, that puts us around $75 for hardware! Yikes! I'm hoping to find something that would put us more around $50 total. Wish me luck. :)

8 & 9. Add cabinets, extend countertop -If you recall, I already picked up these two cabinets at yard sales to put on either side of the window. Since everything will be painted white, the color of the cabinets didn't matter. I'm thinking about trying to mimic the detail on the left one onto the rest of the cabinets using some kind of trim. I'll let you know what I come up with. These cabinets will allow us to extend the countertop all the way past the window giving us tons more counter space! (the window dips below the countertop so we won't be putting any cabinets in that space, but the open space could house a bar stool) Cost for additional cabinets was a mere $12!

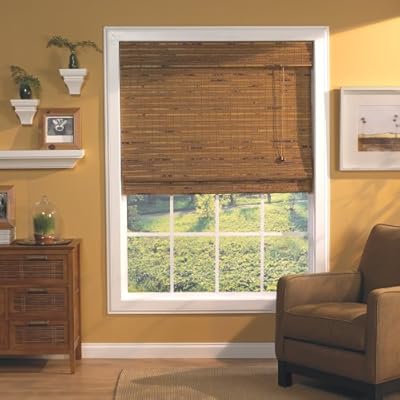
10. Bamboo or Roman shades - I would love to have something like this made of jute or bamboo, but those babies are expensive! So unless I find some amazing deal, I'll probably end up DIYing some fabric roman shades. Here are a few tutorials I'm considering for Roman Shades from mini blinds, Roman Shades from scratch, and Custom Roller Blinds. Hoping to DIY something for both windows for under $20.
 

11. Drop-down bar with stools - I want to have space to move my dining table in to the kitchen sometimes (like during Christmas when my giant Christmas tree takes priority) and a drop down bar is the perfect solution. I can have it up with a couple bar stools most of the time for extra seating and counter space, then fold it away at Christmas  to accommodate my decorating fetish dining table. I'm planning to build the bar using this tutorial from Martha Stewart Living. As for bar stools, I want saddle style but they are WAY expensive, so I'm going to take a swing at building my own by modifying this plan by Ana White. I think I have enough wood in my basement for the stools already, and I'm hoping the bar will come in under $20.

12. Metal shelving -I'll be putting two of these metal shelves from Ikea above the drop-down bar. I think a little metal will add some nice texture to the room and go well with the stainless appliances on the opposite wall. I have some beautiful white dishes that I plan to store on these shelves, which will open up hidden storage in the cabinet for some of the less pretty things I need in the kitchen. :) Two shelves will run us about $30.


So that's the plan so far. Total cost estimate (optimistically) so far is $560 (not counting the super expensive sink of my dreams), but I'm sure it will end up being more than that. Things always are. :) We don't have a date to start construction yet, but at least now we have and idea of how much we'll have to save up to make it happen!

Tuesday, June 21

Good Night, Stand

I love Baby B's nursery, but one thing I was never quite happy with in there was the nightstand (in the picture below). It looked so cluttered with the toys underneath and felt too small next to the oversize chair. Plus it wasn't that interesting to look at, just one more brown thing in a brown room. I'd been looking around at yard sales for a new nightstand and some sort of small book case for toys for his room, when I suddenly realized I already had the perfect thing! I just had it in the wrong place!


I had my printer sitting on top of this little guy in the office/guest room with hardly anything else on the shelves, so it definitely wasn't meeting its full potential in there. (I actually got it for free from a professor during college so this was a zero investment project!) It was painted black, but I forgot to take a before picture so you'll just have to take my word for it. :) I had some light blue semi-gloss paint in the basement that I pulled out for the job, so I just rolled on a few coats to make it perfect for Baby B's room. (Then I let it dry for several days before putting anything on it to make sure things wouldn't stick.)


Then we just put it in place of the old night stand and organized the toys into a couple fabric bins I had around the house. The other change we made was swapping out the green lampshade for the new red drum shade I picked up at a yard sale last weekend. This area is so much tidier now, and I love that the table, bins, and shade add a little more color to the room.


Since this table is bigger, I had room to fit a basket on top (it was a shower gift) that I filled with Baby B's board books. Very handy next to the reading chair!


Here is a closer look at the toy storage underneath. (p.s. I got all the blocks & the Noah's Ark set for $5.00 total at a yard sale earlier this summer! Score!)


And one final look with the lamp on. So cozy! If that doesn't make you want to curl up with a cuddly little baby and read board books, I don't know what will!


So our total cost for this project was the $0.25 I spent on the lamp shade because I was able to re-purpose things I already had around the house. I always try to work with something I already have before buying something new because it is absolutely the cheapest way to make this house feel like home. It feels so good to save money while making a better home for my family.

Sunday, June 19

The Deals Keep Coming!

This was a good week for me in the yard sale department. I had a couple sisters in town this week (and my dad who was happy to babysit Baby B for a while) so we were able to hit a couple yard sales Thursday, Friday, and Saturday (including a dollar-per-bag sale)! I snagged several items I've been on the lookout for and got some great deals in the process. Not to mention the fun time I had with my sisters. Here are my finds for this week:

$2.00 - Rolling fabric bin storage. Planning to use this to organize our closet!

$0.25 Basket - for bathroom organization.

$0.75 Picture frame. I'm collecting frames for a photo collage wall and usually don't pay more than $0.50 for one, but I really like that this one is square! Plus I got it at a youth group fundraiser sale, so I didn't mind giving them extra. :)

$0.25 - Small drum shade.

$0.50 - Large drum shade

$0.50 - Pool sink toys, baseball bases, and inflatable chair for the pool. This is all for my sisters. I actually paid $0.50 for the sink toys, and the rest was part of a dollar-per-bag sale, which I'll talk about in a minute.

$1.25 - White binder, small hole punch, and a movie.


$3.00 - New light for our front porch.

$0.50 - White binder and book for Baby B.


$8.00 - 2 floating shelves for Baby B's room. I was planning to build some, but for $4 each this was a much better option!


$7.00 - Cabinets! I actually paid $7 for the one on the right, and the one on the left was free because it's pretty wonky. But for free we'll happily try to fix it! This gives us all the cabinets we need to make over our kitchen, so we just have to find some more for the basement.


$2.00 - .....I can't say! It's a birthday surprise for my sister and I don't want to spoil it! But let's just say it's awesome, and if it weren't for this next thing it would probably be my tuck & run!

Tuck & Run! This week had more of a tuck and run event instead of a single item. Our church had a rummage sale starting on Thursday, and on Saturday they had a half price/dollar-per-bag sale! Imagine two hours of people tucking things in bags and running! Fun! Here is what I managed to snag for a mere $5.50:
10 picture frames.
 White dish, small shadow box, towel ring, travel rummikub, and hole punch reinforcements.
 Books for Baby B. My sister actually found these for him. Thanks sister!
 Wallet, small tote, and weekend travel bag. They're not purses so it's okay, right? :)
 A curtain rod for my room, and a paper lantern (I actually only got it because I want the light cord for another project)
 3 pairs of pants and 4 shirts for me.
 And a small mountain of clothes for Baby B.

The one that got away: I don't have anything spectacular that I missed out on this week, just a coffee table I wish I had bought for our patio. It was only $5 and I passed it up. Then I had non-buyers remorse and tried to go back for it, but it was already gone. Oops! So I'll just keep my eyes open for something else that can do the job. :)

I'd say overall I didn't do too bad for just over $30. And did I mention my sisters were here? Yard sales are SO much more fun when you have someone to go with. Anybody else have some good finds this week?

Tuesday, June 14

$28.75 - Confessions of a Yard-sale-aholic

I'm what you could call a yard-sale-aholic. There are few things I enjoy more than hunting down great stuff at great prices, then bargaining for an even better price. And there is no better place to do that than at a yard sale! I decided to start posting my yard sale finds because it's the main way I make my house feel like home without spending a fortune. The title will be the total amount I spent, and I'll break down the individual prices as well. I'm hoping to add a feature down the road where others can link in their yard sale finds so we can all see each others' great deals! (If you want some link fun this week, you can join the fun with The Nesting Place) For my first post I'm including the things I've found in the last 3 weeks. Here we go!

$0.25 - white serving dish. Our future kitchen remodel will include some shelving to display our white dishes on, and I though this would fit perfectly into that display.
 
 $2.00 - metal basket, serving tray, cork boards. Love some cheap storage!
 
$1.00 - 2 rolls of shelf liner and a bundle of wall paper. I plan to use this to line drawers and the back of book cases for some unexpected color.


 $5.00 - baby wrap. I've been wanting a Moby baby carrier, but couldn't fork over the $40 for one, so when I found this knock off I snatched it up! I've already used it a few times and Baby B loves it!

 $0.50 - small folding table. This will be getting a makeover. Then it will be a handy nightstand for the guest room.

$1.00 - big picture frame. I love finding picture frames at yard sales, and it's rare to find one that so big with glass and a matte for so cheap! A coat of paint and a new picture will turn this into a beautiful piece for our living room. 
 
$1.00 - salt & pepper shakers. I loved the great shape of these and I think a bright coat of paint will bring them up to date.

$0.25 - jammies for Baby B. He'll have to grow into them, but I can't resist stripes and plaids for the boy!

$1.00 - two floor cushions. We don't have room for a lot of seating in our living room, and tend to have a lot of guests when my family comes to town to visit Baby B. I plan to slip cover them and then I can pull them out when we have guests.


$7.00 - folding picnic table, laser level, and hammer. I've been wanting a folding table for camping and couldn't believe I found one so cheap! The stud finder will be super handy for our upcoming kitchen project, and the hammer was just so we can have one in the house and one in the garage because we're tired of going back and forth looking for the only one we have!

$1.50 - two flower pots. I'm planning to put the small one in the kitchen to hold measuring spoons. After a good washing, of course. 

$0.25 - new shoes for me

$3.00 - plastic salad bowl set for the patio, purple tote, and...be still my heart...a beautiful green purse. I'm definitely a purse girl, but after finding this baby I think I can get rid of all my other purses. That's how much I love it. 

 Tuck-and-run find of the day: (This is an item you feel like you got an outrageously good deal on. Something so good you instantly grab it, pay for it, and run before the seller realizes they could have made way more on it! You don't always find an item like that, but it sure is fun when you do!) Here's mine for this week:
$5.00 - brand new kitchen cabinet! I mentioned remodeling our kitchen in the future, and we need to do it as cheap as possible so we're planning to paint the existing cabinets and add a few more painted to match (so color of the new cabinets doesn't matter). Buying new cabinets would run over $100 each, so when I saw this for $5 I grabbed it and didn't let go! New kitchen, here I come! :)

And the one that got away: $130 for a whole set of kitchen cabinets. I passed because I only wanted to buy a few out of the set, but I'm totally kicking myself. I should have bought it and then put the ones I didn't want in my own yard sale! Oops.

That's it so far this summer.As for the rest of the summer, there are certain things I always keep my eyes open for at yard sales. For me they are camping supplies, tools, baskets & other storage, fabric, furniture that can be painted or refinished, and picture frames. I also have a few things I'm specifically looking for this year:
-cabinets (for the kitchen & a basement bar)
-bar stools for the kitchen remodel (I found the perfect ones last weekend, but they were $25 each and the sellers wouldn't come down. Too steep for me, so I'll keep hunting!)
-shower curtain
-lamp shades (really want some drum shades!)
-weed eater
-cast iron skillet
-area rugs (for living room, guest room, and bedroom...I dreamed I found them the other night. Yes, I dream about going to yard sales)
-garbage can (the kind with a pedal to open the lid)
-outdoor cushions (I may end up getting them at IKEA instead)

I'm doing things a little different this year and trying really hard not to buy anything unless I know I have a place and a use for it. So hard! But I know it will pay off because it will keep my house from being over cluttered. And of course I can  have yard sales of my own to make room for new things, too! I'm working on a big purge and planning a yard sale later this summer. I'll fill you in on that later.

For anyone interested in getting in on the yard sale action (whether as a shopper or a seller) I recommend this post by The Nester full of helpful tips and advice. And you're welcome to share your spoils (and the ones that got away) here! I'd love to see! Special thanks to Finding My Feet for inspiration for this post.

Saturday, June 11

Framed...Jewelry?

Who says art can't be functional? I was really needing something colorful and interesting to dress up the bedroom, when I came across the idea of using jewelry as an art piece. Genius! So I whipped up this framed jewelry organizer which not only looks fun & beautiful, but also keeps my jewelry so tidy and organized.


Here is my dresser before my little jewelry storage makeover. Pretty dark and boring. And I don't know what on earth is even in there! I'm not sure how long it's been since I ventured into the back recesses of that jewelry box. The framed organizer is a huge improvement!


Want to make your own framed jewelry organizer? Here's how I did it. What you need:
-An old picture frame, any size you want
-A piece of foam board cut to fit the frame
-Pretty paper or fabric to cover the foam board
-Tacks
-Glue
-Staple Gun

*If you have heavier jewelry you may want to use thin wood instead of foam board to make sure it can support the weight. If you do you could use screws or nails instead of tacks.


Step 1: If you don't like the color of your frame, now is the time to paint it! I painted  mine with left over semi-gloss white. I planned to do a second coat, but after the first coat I decided I like the rough antique look so I went with it!


Step 2: Attach paper or fabric to foam board. I used scrapbook paper and put it on with a thin layer of Elmer's glue. I picked a neutral color because I really wanted my jewelry to stand out!

Step 3: Decide how far apart the tacks need to be to fit your jewelry, and poke them in to the foam board. I put a small dot of Elmer's glue down before inserting my tacks to make sure they wouldn't wiggle & tear my foam board. Be careful, because they will probably reach through the back!


Step 4: After the tacks dry, I put a small dab of hot glue on the back of each tack. Just to protect my fingers when I move the foam board around. :)


Step 5: Put the foam board into the frame and use a staple gun to attach it from behind.


Step 6: Thank your helper.


That's it. Now you just have to hang it up and add your jewelry.


I actually just set my frame on the dresser and leaned it against the wall instead of mounting it. (And don't worry about all that wood paneling. There is paint in its future!)


Now my jewelry is a beautiful focal feature instead of being hidden in a box. It adds some much needed color and fun to my dresser.


I also added some small bowls to catch things like bracelets and post earrings.

I love that something can be so pretty and so functional all at the same time. That's what I call making the most of your space! :)

Pin It
Subscribe