
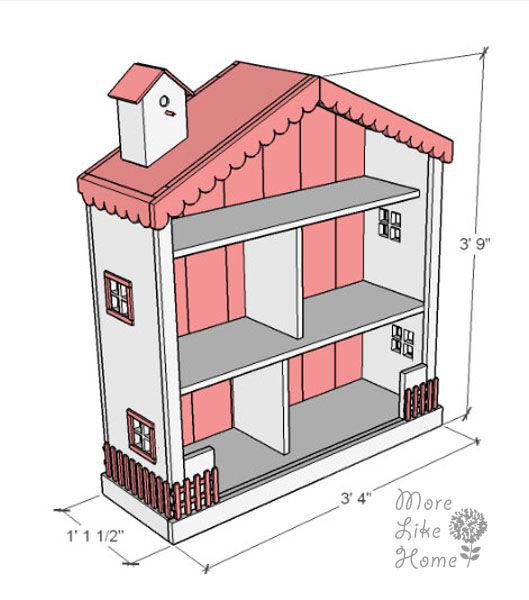
This is the only photo I have of the finished dollhouse and the fence isn't on yet (she wanted to paint it herself so I sent the fence separately so it could be more easily painted, then glued on) but you get the gist. Its big, cute, and ready for hours of fun! I made this one pretty detailed, but if you want something simple just skip all the extra like the birdhouse and fence. As always, use glue, predrill your holes, and be safe! Work on a flat surface and it's better to cut the pieces as you go and double check the measurements on each step.

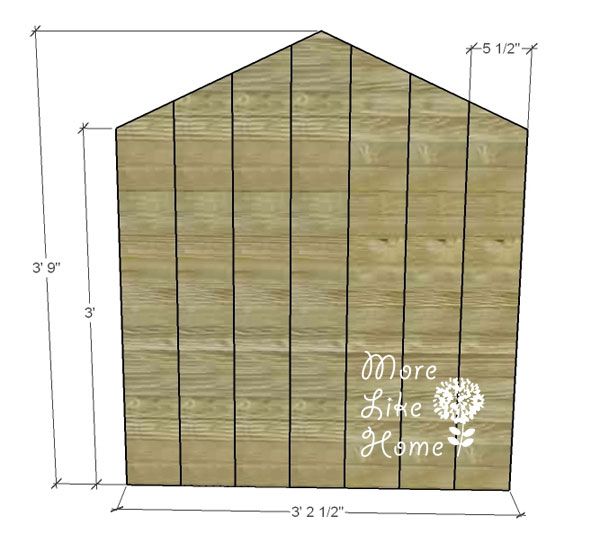
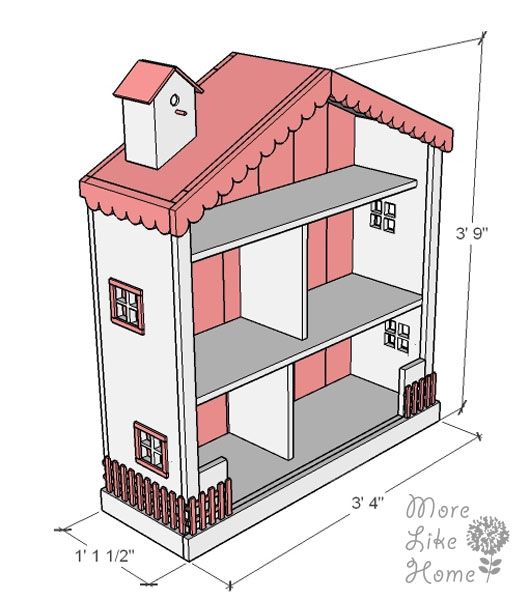
Overall dimensions are 40" wide x 13.5" deep x 45" tall.
Shopping List:
2 - 1x12 @ 8'
1 - 1x10 @ 8'
1 - 1x6 @ 10'
2 - 1x6 @ 8'
1 - 1x2 @ 10'
1 - 1x3 @ 8'
1 - 4x4 (you only need about 9")
1 - scallop molding @ 8'
1/2 x 1/4" balsam wood strips - you need 147" total for the fence but account for scraps too, depending on the length of your strips. Shorter strips = more scrap.
thin plywood scraps
1/4" dowel
wood filler
sandpaper
wood glue
1 1/4" screws (A Kreg Jig & self tapping screws are also helpful!)
finishing nails
Cut List:
(A) 2 - 1x12 @ 2' 11 1/2" sides
(B) 1 - 1x12 @ 3' 1" bottom
(C) 2 - 1x12 @ 1' 9 9/16" roof
(D) 1 - 1x12 @ 3' 1" bottom shelf
(E) 2 - 1x10 @ 1' 3/4" dividers
(F) 1 - 1x10 @ 3' 1" top shelf
(G) 2 - 1x6 @ 3' 2 9/16" back
(H) 2 - 1x6 @ 3' 5 1/8" back
(I) 2 - 1x6 @ 3' 7 11/16" back
(J) 2 - 1x6 @ 3' 9" back
(K) 2 - 1x2@ 1' 8 5/16" top trim
(L) 2 - 1x2 @ 2' 10 3/16" side trim
(M) 1 - 1x3 @ 3' 2 1/2" bottom trim
(N) 2 - 1x6 @ 4" corner walls
(O) 2 - 1x3 @ 1' 3/4" side base trim
(P) 1 - 1x3 @ 3' 4" base trim
(Q) 2 - scallop molding @ 1' 3/4" side molding
(R) 2 - scallop molding @ ~2' front molding
(S) 1 - 4x4 @ 8 8/16" birdhouse
(T) 2 - pieces thin plywood @ 5 x 4 1/8" birdhouse roof
(U) 4 - balsam @ 1' 3/4" fence
(V) 4 - balsam @ 5 1/2" fence
(W) 30 - balsam @ 4" fence
1/4" dowel birdhouse perch
balsam window trim
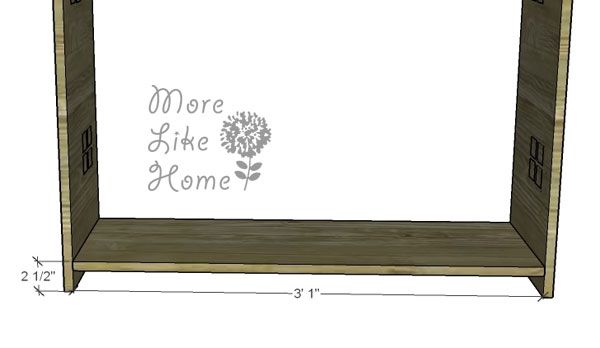
Start by cutting the top edge of each board at a 25 degree angle using a compound miter saw. Then attach the bottom (B) to the sides (A). Set the bottom board up 2 1/2" from the bottom edge of the sides. Use glue. You can use a Kreg Jig to attach the shelf from underneath, or drill through the sides.
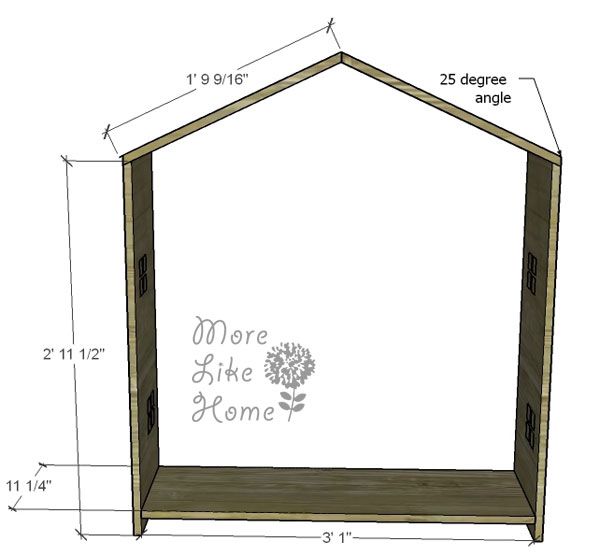
Now cut the two roof pieces (C). Then cut each end of these boards at a 25 degree angle. Cut carefully and make sure the edges on each board end up parallel - like this //, not this / \. Use glue and attach the roof pieces as shown below. I used finishing nails for this part.
Now attach the bottom shelf (D). It should be set up 1' 3/4" from the bottom of the dollhouse and flush with the front and back edges. Attach it with a kreg jig or by drilling through the sides into the ends of the shelf. Then attach the first divider (E) between the dollhouse bottom and bottom shelf. It should be flush with the back edge of the dollhouse (but won't reach all the way to the front).You can space it however you like, just make sure it's straight (measure to the side at the top and bottom of the divider and make sure the measurements are the same). I put this one in the middle of the shelf. Attach with a kreg jig or by drilling through the shelf and bottom boards into the ends of the divider.
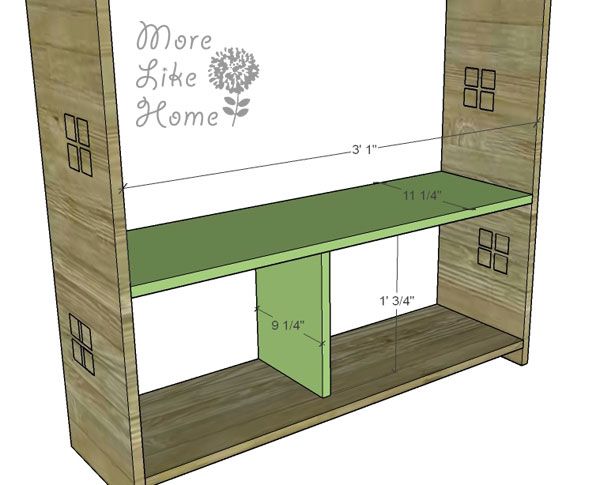
Attach the top shelf (F) just like the bottom one. It should be spaced 1' 3/4" from the bottom shelf, but this time should only be flush with the back edge of the dollhouse (the board is narrower and won't reach all the way to the front). Attach the second divider between the two shelves. I offset this one so the room on side would be bigger.

Now lay the dollhouse down on it's front so you can attach the back boards. Cut the top edge of each board (G, H, I, J) at a 25 degree angle. I listed the exact measurements mine came out too, but start with the outside boards (the shortest ones) and measure for an exact fit. Go ahead and attach them by drilling through the back into the shelves. Then work your way in measuring each board as you go.
Now attach the front trim. Start with the bottom trim (M) and attach it flush with the bottom and outside edges. Drill through the trim into the edges of the sides and bottom. Then cut the top edges of the side trim (L) at a 25 degree angle and attach them flush along the outside edges. I attached these with finishing nails (and glue!). Then cut both ends of the top trim (K) at a 25 degree angle, again making sure the ends are parallel (//, not / \). Attach them flush with the top edge by drilling or nailing through the trim into the edge of the roof.

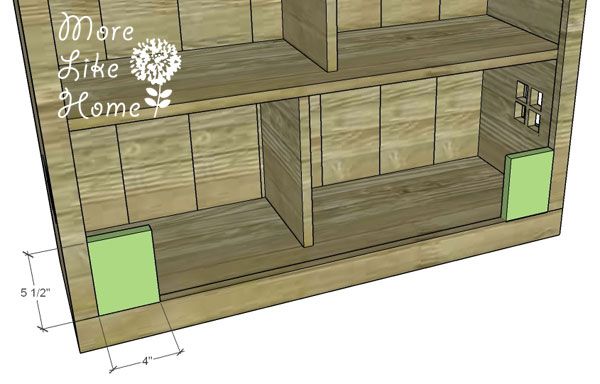
Attach the corner walls (N) using a Kreg Jig. One sits in each corner of the house, flush with the front of the trim pieces.
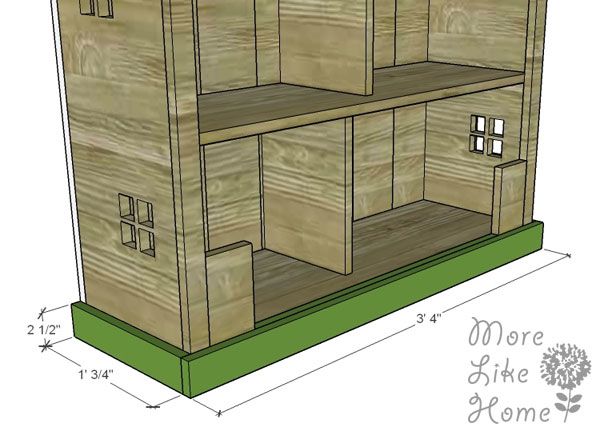
Now attach the base trim, starting with the side pieces (O). They should be flush with the front, back, and bottom of of the dollhouse. Attach it with finishing nails and glue. Attach the front base trim (P) in the same way, making sure it's flush along the bottom and sides, and even with the floor of the dollhouse.
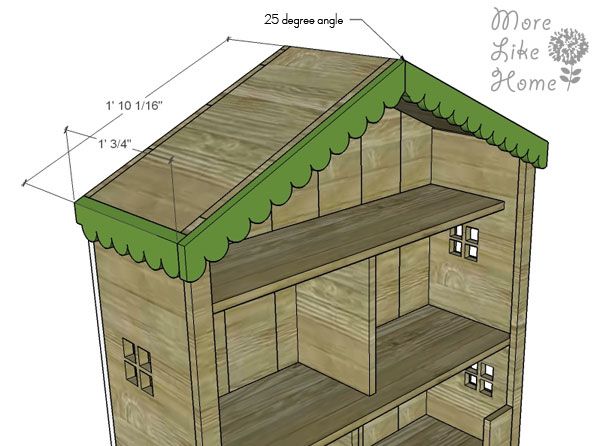
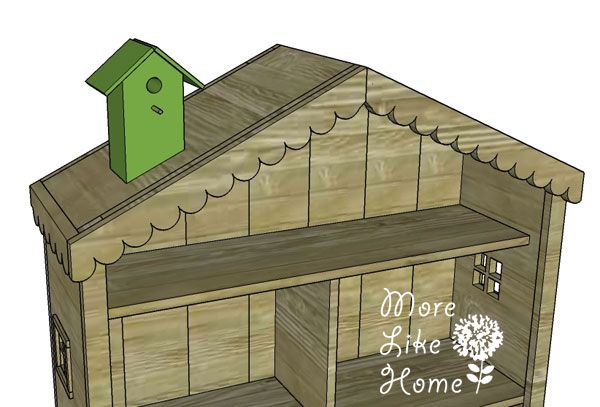
Next up is the scallop trim around the roof of the dollhouse. Start by attaching the side pieces (Q) keeping them flush with the front and back of the dollhouse, along with the top edge of the roof. Use finishing nails and glue. Now cut the front molding (R) to size. The length will depend on the thickness of the molding you are using, so measure from the peak of the roof to the outside edge of the molding you just attached on the sides. Cut your front moldings to length, keeping in mind that the ends need to be cut at a 25 degree angle. Attach the molding with glue and finishing nails.
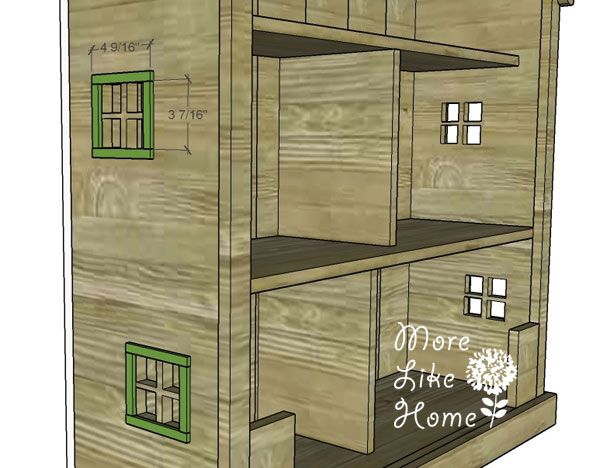
Now you can lay the house on it's side and use a reciprocating saw to cut out windows. If you want to. :) You can get fancy and cut out paned windows like we did (see the pic below I just drew them on and winged it, no measuring for me) or just cut out a single large opening. Or you can skip cutting it out all together and just glue trim on for a faux-window.

The window trim is cut from balsam wood strips that are super easy to cut and work with (we found them at Hobby Lobby). Measure the height of your window, cut two strips that length and attach them along each side of the window. Then measure across the window to the outside edges of the trim and cut two strips that length to attach along the top and bottom of the window. Use glue and a couple finishing nails
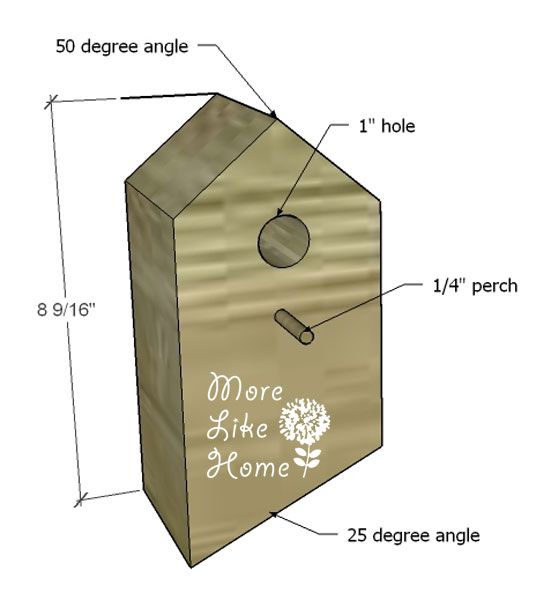
Now you can make the birdhouse (S) for the top. I like using a 4x4 for this because it means small toys can't get dropped inside! Cut the bottom edge a t a 25 degree angle. Mark the center point at the top and cut the roof at a 50 degree angle along each side of the center point. Use a 1" drill bit to create the birdhouse "door" (don't go all the way through, just an inch or two). Then drill a 1/4" hole and glue in a small piece of 1/4" dowel rod for the perch.
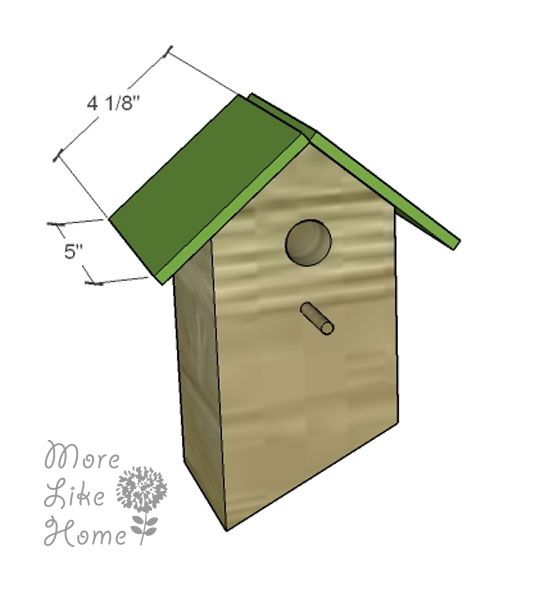
Cut two small scraps of thin plywood for the birdhouse roof (T). Attach them with glue and finishing nails.
Attach the birdhouse to the top of the dollhouse. Use glue and drill up through the roof into the bottom of the birdhouse.
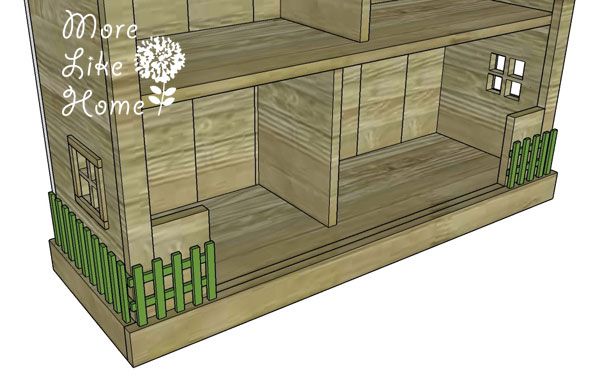
Now you're ready to make the fence! I made the fence separately so that it would be easier to paint. It would definitely be easier to assemble if you attach it directly to the dollhouse, though, so choose your battle. :) I started by laying out two long rails (U) spaced 1 1/4" apart. Then I used glue and tiny finishing nails (which are also a pain, you could first attach the rails to the dollhouse then use regular sized nails to attach the stiles. Or just glue this and use nails when you attach it the house. Whatevs.) to attach stiles. Start with a 3/4" gap at one end (on the left below), then attach a stile (W) every 3/4". Use the other long rails to make a set that mirrors this one (so start with a space on the right instead of the left and work from there). For the small rails (V) start with a stile flush against one end (on the right below) and attach a stile ever 3/4" from there. Use the other short rails to make a fence that mirrors this one.

After it's painted you can attach the fence to the bottom of the dollhouse, above the base trim. The pic above gives you a guide of where the pieces should go (those pieces are for the left side of the dollhouse). If you're attaching it before you paint you may want to at least do the sanding before attaching it.
Fill any holes with wood filler, let it dry, and sand everything nice and smooth. No splinters allowed. Then you can paint or finish however you like!
This is the only (terrible) picture I have of the complete dollhouse before it moved out. The fences are just propped in place along the bottom.

And one more time this is my only after pic, minus the fence. Not my best picture work. Sorry.
What kinds of toys have you made? I'd love to see pics if you give this one a try!

No comments:
Post a Comment