

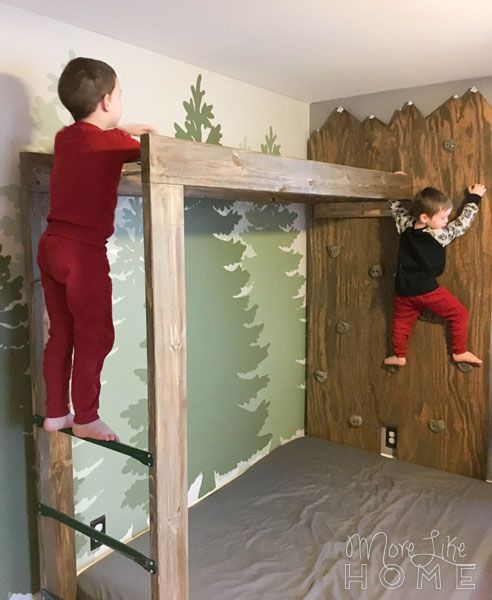
Our main goals were to keep it simple, fun and affordable. Without building ourselves into something too big that would be awful to un-do later (who knows how we'll need this space as they grow!). I knew they would love a rock wall and monkey bars, but we also thought about different forts, bunk beds, and even bridges. In the end decided on a super simple rockwall/monkey bar combo. It doesn't take up too much space, and if we ever need to take it down it won't be a big deal. And bonus - it was by far the cheapest of our ideas.
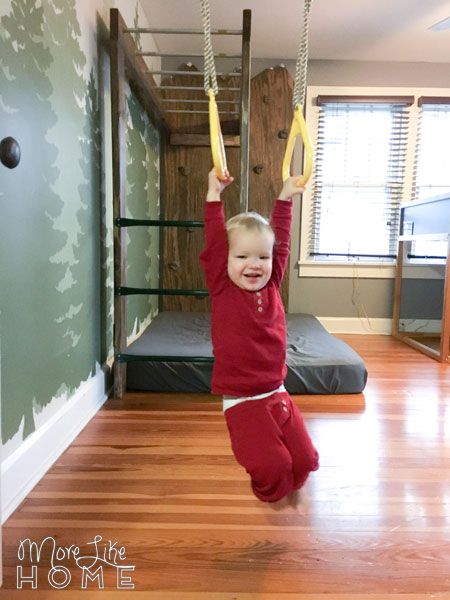
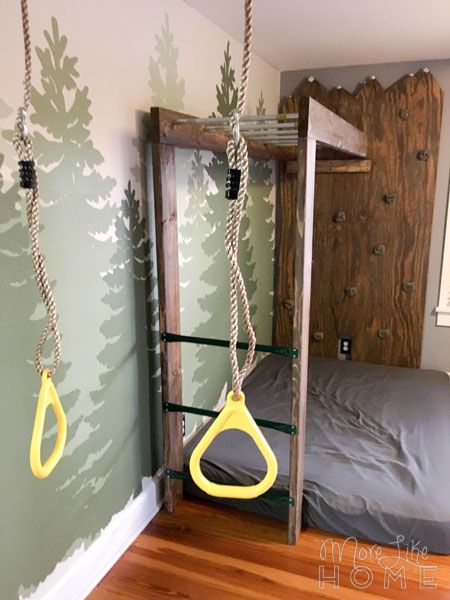
We also added a set of gymnast rings.
And a swing.

We have a lot of winter energy to burn around here.
I love how something as simple as painting a forest mural on the wall added so much fun an interest to the space, without taking up any room! You can see how we did it here (it's easier than you might think!).

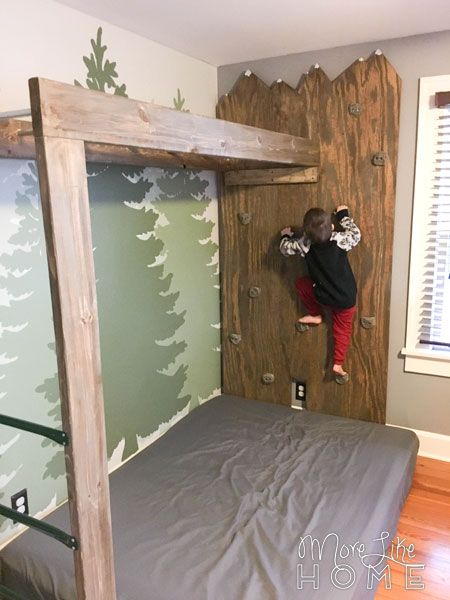
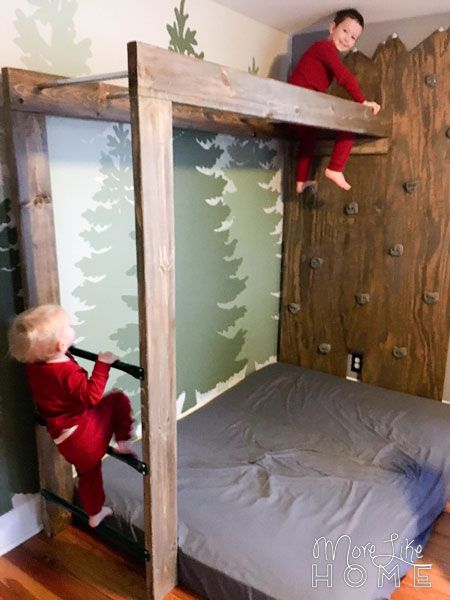
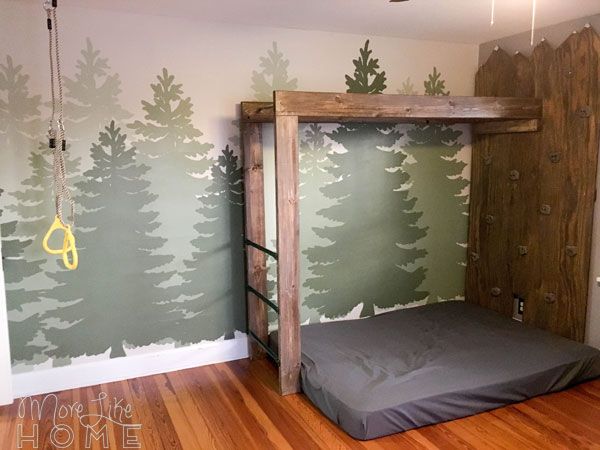
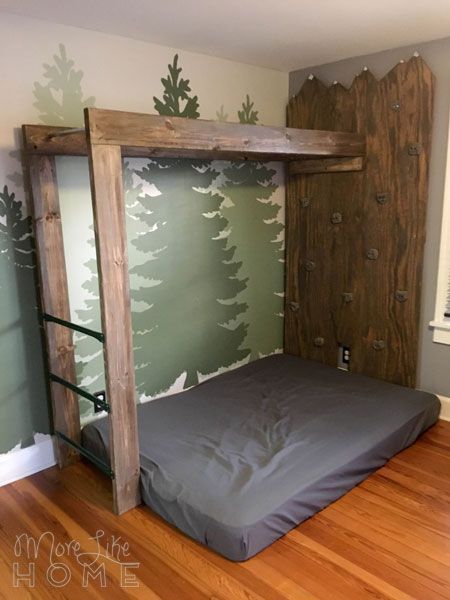
And the top of the climbing wall is cut to look like mountain peaks - which is a perfect accent to their forest wall!
There is a full-size mattress underneath for a soft landing. Most nights, all three of them end up piled-up down there to sleep. It's like camping in a forest.
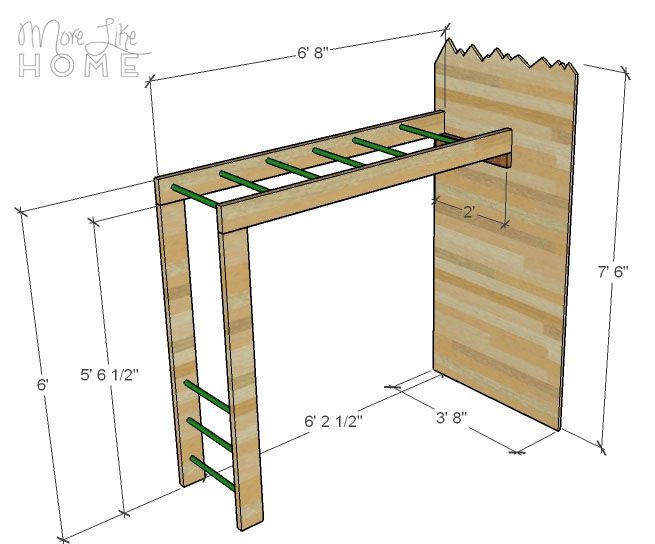
Ready to make your own? Well, let's start with a plan! You can easily modify this to fit your own space, just adjust the measurements as necessary. Here's what you need to make a playground the size of ours:
- 1 - sheet 3/4" plywood
- 2 - 2x4 @ 8' long
- 4 - 2x6 @ 8' long
- 9 - monkey bars with screws (any size you want)
- 12 - rockwall holds with hardware (more on that later)
- Kreg Jig with screws
- long wood screws
- wood stain (I always vote water-based, especially around the kids, because oil-based stinks)
- white acrylic paint for the mountain peaks
- water-based polyurethane

These measurements changed. Do not trust this high quality rendering.
Here's what we actually ended up with:
Let's start with the rock wall.
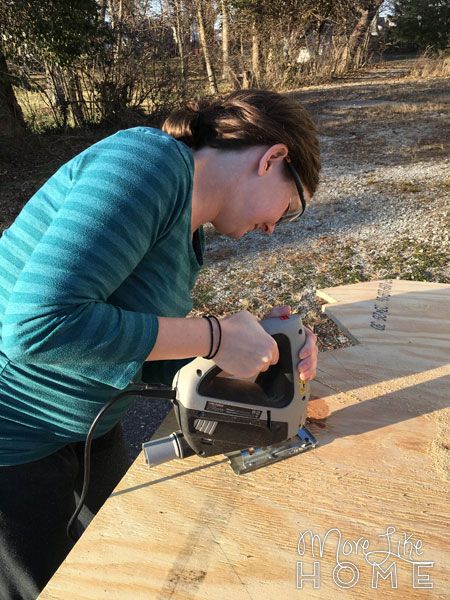
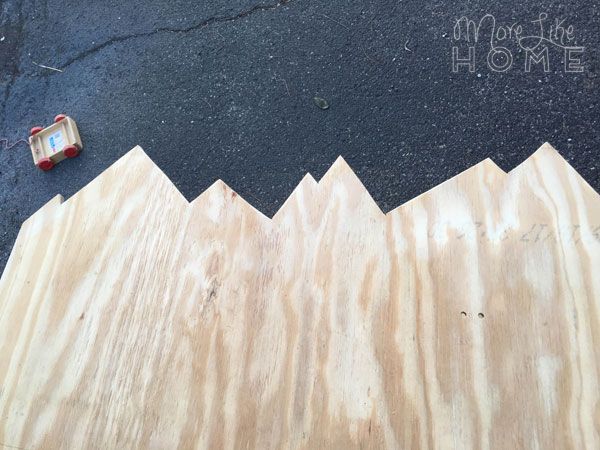
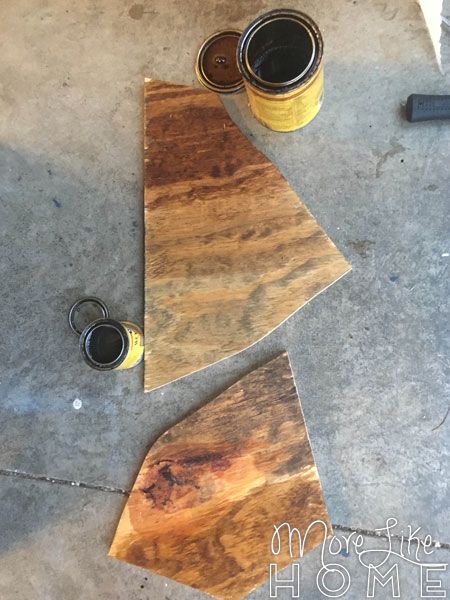
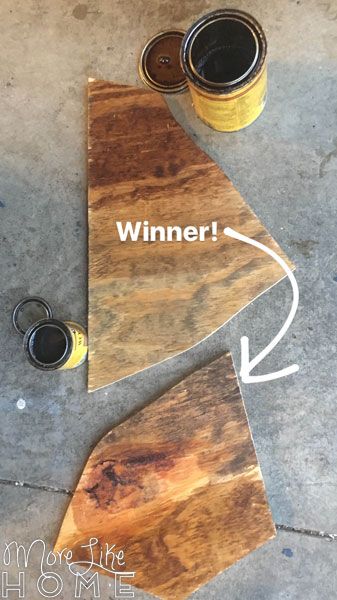
I started by measuring the size of our plywood and cutting the sheet down to fit our space. I measured from the floor to the ceiling and took a couple inches off the top (to give it visual breathing room) for a total height of 90", then did the same with the space next to the window to get a width of 44". They were able to make these cuts for us at Lowe's. At home I used a ruler to draw some free-style mountain peaks across the top edge. I just tried to make them different sizes and heights - some went all the way to the top and some were shorter. Then I cut them out with a jigsaw. You can make this any size you like, even add a second sheet of plywood if you have space!
Ta-da! Mountains! We also cut a notch in the bottom edge where there is an outlet in the wall.
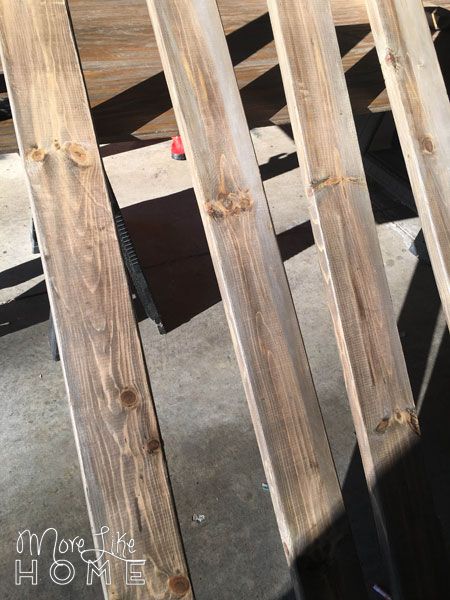
Then we needed to stain the board. I originally planned to leave them natural, but thanks to husbands suggestion and you encouragement on instagram, I stained them a rich earthy brown instead. And it is so. much. better. Thanks guys. I tried a few different stains on a mountain scrap (from top to bottom):
Early American
1/2 Early American + 1/2 Weathered Gray
Weathered Gray
Coffee (one of the custom mix colors at Home Depot)
Mission Oak plus Poly
These were all the stains I had in my possession and I was not about to go back to the store. But funny thing - Coffee ended up being just perfect. Which is ironic because I had bought it for our DIY farmhouse table months ago, tested it, and then immediately shot it down. And miiiiiight have called it "poop brown." I almost didn't even open it for this project, but there was a full can just sitting there so what the heck. And you know what? It ended up being my favorite. It just felt more mountainous than the rest. (P.S. I almost have table regret now.)
And thank goodness because I used over half the can and would have had to go to the store if I'd chosen any of the emptier cans. Is this how people feel when they actually dodge a bullet? Anyway... I stained the plywood.
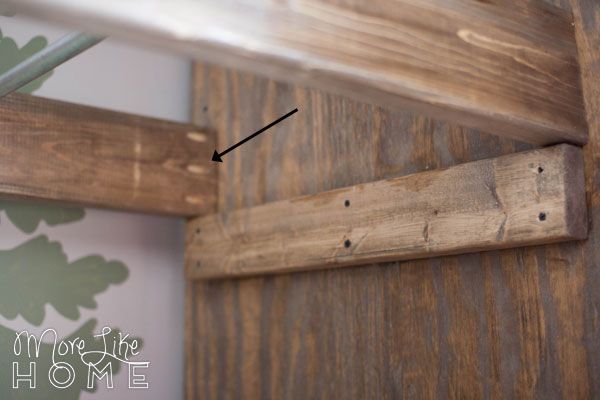
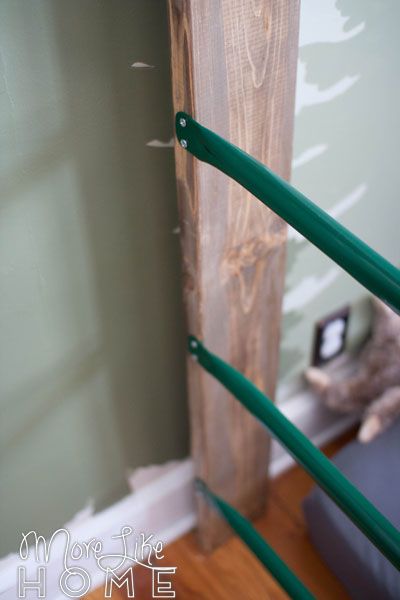
I also cut a piece of 2x4 24" long and stained it to match. This will help support one end of the monkey bars later. We planned on 24" wide monkey bars so cut yours to match whatever bars you use.

Once it dried, I painted little white snowy peaks on the mountains. Then I sealed everything with a coat of water-based polyurethane.
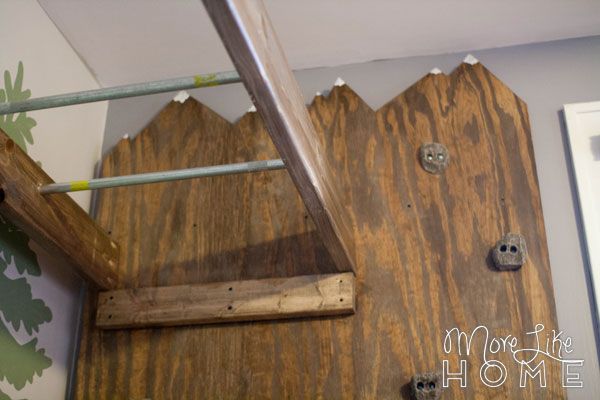
snowy peaks!
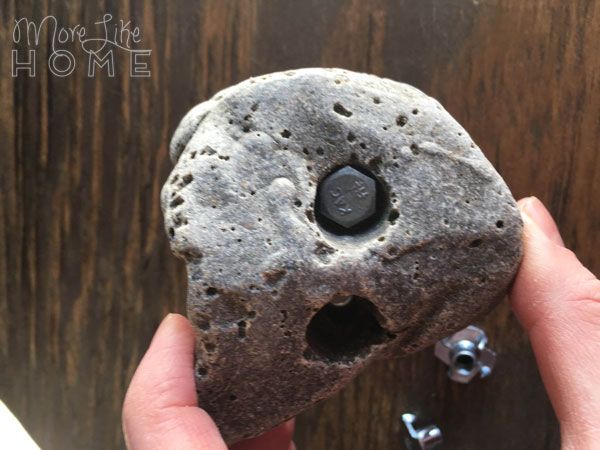
A note on the rockwall holds - I love the ones that look like real rocks. But we bought these on ebay and they were all kinds of wonky. The holes were spaced differently so we had to match each hold back up with the spot we marked, and I expect better quality holds would all be the same so you could interchange them anywhere. Plus some were thicker than others so our screws were too short. So be sure to check those things on whatever you buy so you're not having to redrill or run back to the store for more screws.
We marked the holes for each hold and drilled holes with a 1/4" bit.
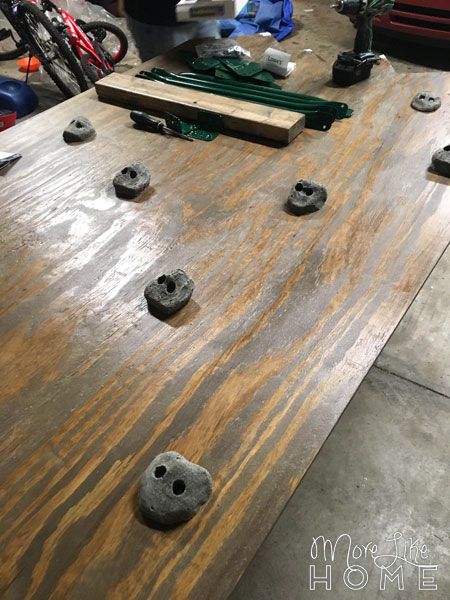
Now for the hardware... our rock holds didn't come with any. *facepalm* Ebay win. Hopefully yours do. But if not, this is what we ended up with after some google searching. 1/4" T-nuts and 1/4" bolts that were 1 1/4" long.


Your holds may be sized differently, so here's how we knew what to buy. We took one of the rock holds to the store and found a bolt that fit the hole (1/4" wide). IMPORTANT: You may notice that while this bolt head fits, there is, in fact, no way to tighten it because there is no space for a wrench. We did not notice this, and had to go back to the store and trade these for the kind you can tighten with a screwdriver. Get the screwdriver kind the first time!
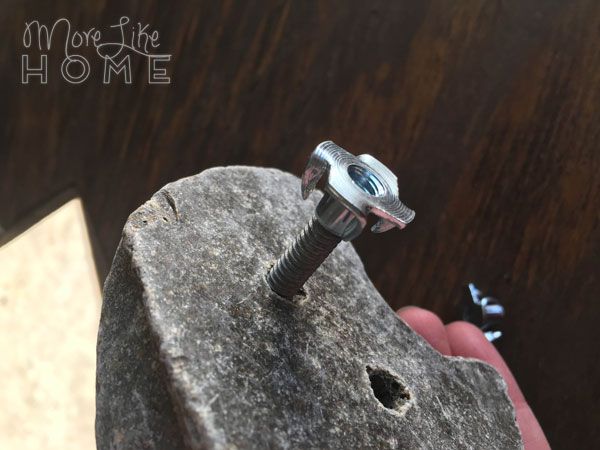
Then measured how much it stuck out the back to make sure it would reach through our plywood (we went with 1 1/4" long).

Then we found T-nuts that fit our bolts. That's all you need!
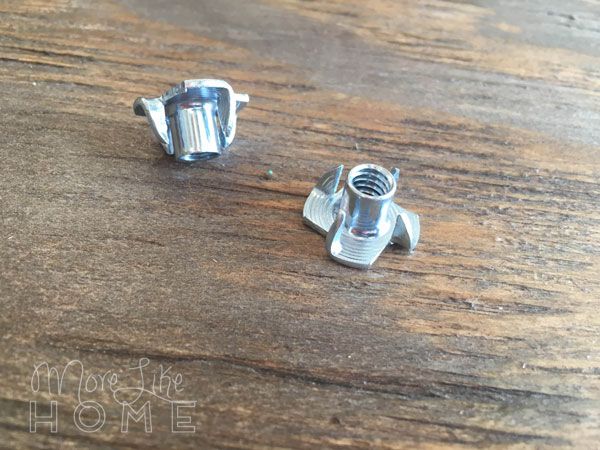
These are T-nuts. You pound the spiky side into the back of the plywood to lock them in place.
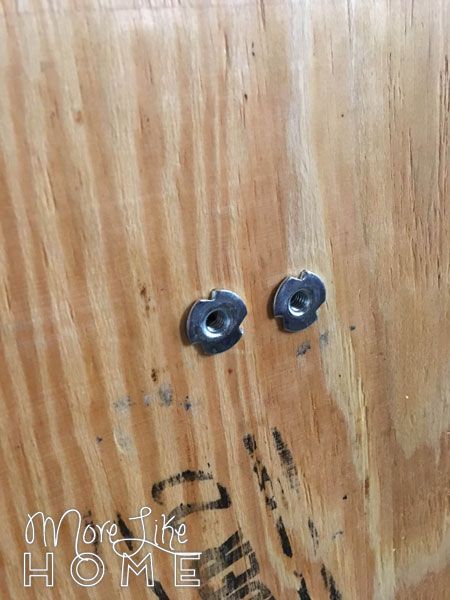
We pounded the T-nuts into the back of each hole.
Then used the nuts (with a screwdriver head!) to attach the holds.
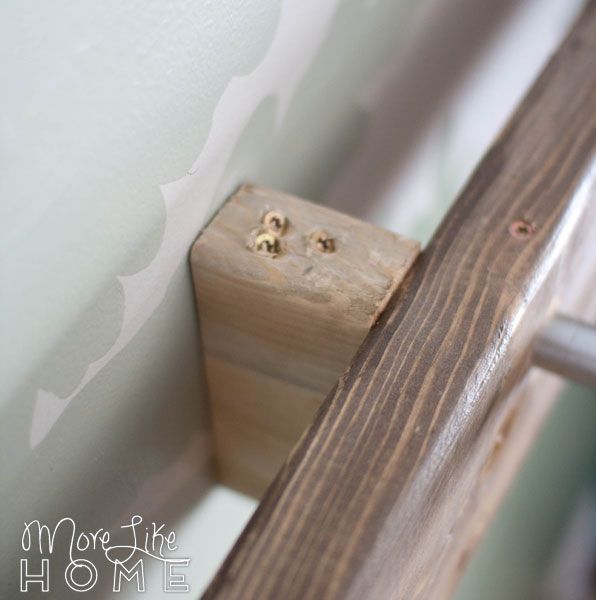
Then the wall is ready to install! We cut three pieces of 2x4 to fit behind the plywood (about 42" wide) and anchored them to as many studs as we could hit with long screws. Make sure they don't land behind any of the rock-holds - if the bolts hit the 2x4 it won't sit flat.
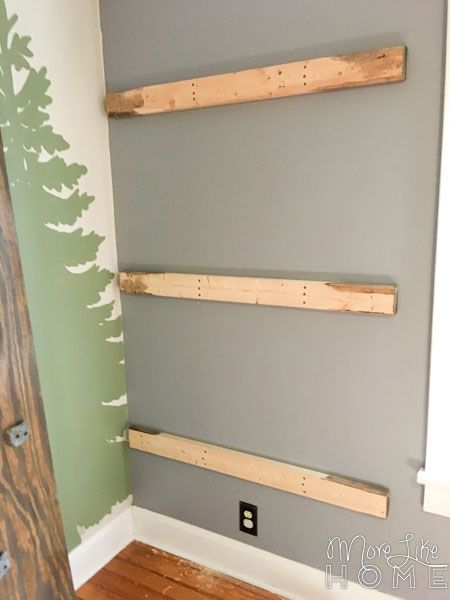
Then we stood the plywood up and attached it to the 2x4s with long wood screws.
We also attached the shorter 2x4 (the one we stained) so the top edge was 66 1/2" above the floor.

NOW I'll go over the money bars, but let me tell you... try to do these things as you go. Like cut all the wood first so you can stain everything at once. No need to wait for things to dry twice!
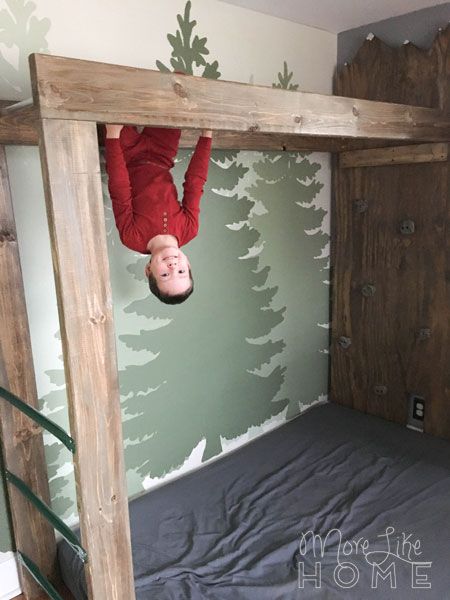
So, I started by cutting my 2x6's to size. Two were cut 66 1/2" to be the legs (so our monkey bars will end up 6' from the floor). The other two are 80" long (the length of their mattress plus the width of the legs). I stained and polyurethaned them to match. You can go ahead and drill pocket holes with the Kreg Jig now if you want - you'll need them in the top end of the legs and one end of the top boards (the end that will attach to the plywood).
Our next plan was to attach six monkey bars across the top... but we did this.

Turns out we bought a set, decided later it wasn't enough, and bought more that were a different size. Poor Husband ran to every hardware store in town and no-one carries any monkey bars this time of year. And it was two days until Christmas with no time to order replacements. So we came up with a Plan B. Which added a ton of time and difficulty, so make sure you buy matching monkey bars and skip the headache, okay? Then you can just attach them across the top and move on.
So Plan B! Husband found some 24" long metal pipes and drilled holes halfway through each of the top boards where we wanted the monkey bars to be.

Then he spent a good amount of time pounding them in with a mallet.

He put a screw through the top of the boards into each bar to keep them from rotating when the boys are climbing.
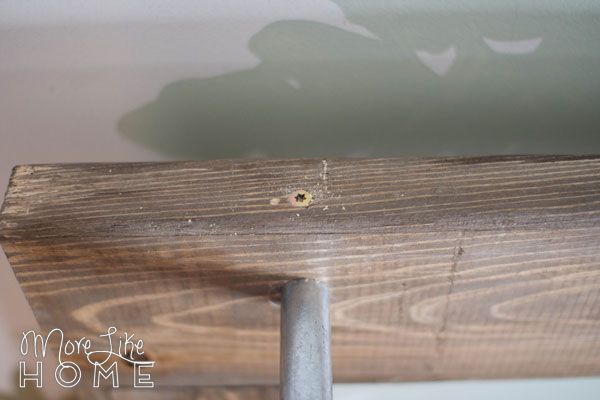
We set one end of the monkey bars on the support board attached to the plywood, and anchored it to the plywood with the kreg Jig and pocket hole screws.
Then we attached the legs to the other end also with the Kreg Jig and pocket hole screws.

Next we needed to make a ladder up the legs. There were only six pipes in the store (BECAUSE HOW MANY THINGS CAN GO WRONG??) but luckily one set of monkey bars worked with that width so we were able to use them to make the ladder. Whew.
We didn't measure how far apart to put these. We eye-balled it and moved on.

So that's the gist of how we made it but there were so many things to consider! You may need to make adjustments for this to work in your space. Mostly to avoid obstacles like kicking windows climbing too close to the ceiling fan or bumping the corner of the dresser.
After this big guy was done, all that was left was to hang the swing and rings. For both we bought large eye hooks and heavy duty locking carabiners.
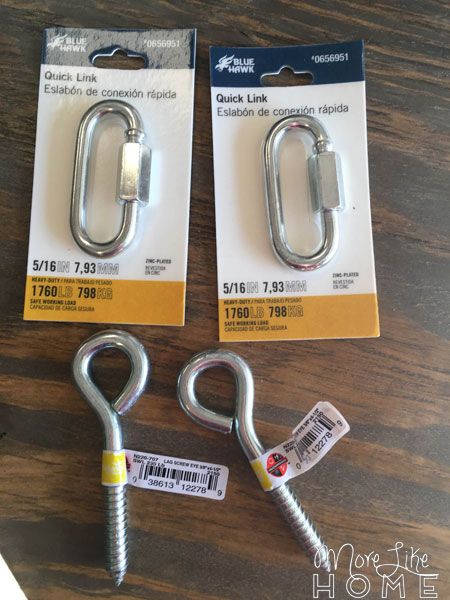
Husband attached each eye hook into a ceiling joist (make sure you hit a joist! Not just drywall!), then we used the carabiners to lock in the swing and rings.

We put rings by the door.
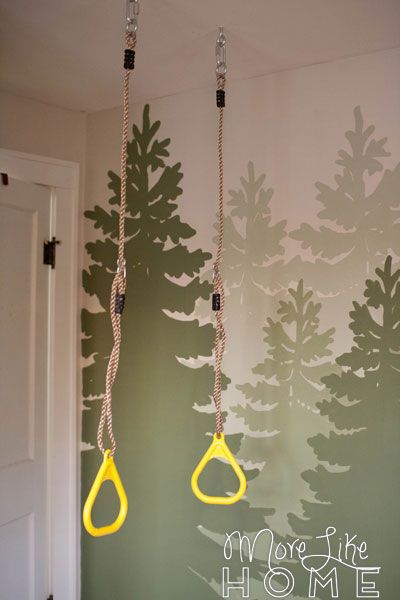
And the swing by the closet. They've already kicked the closet doors off the track once. So oops on that one, but so far nothing dangerous or sharp has happened - which is what we tried to avoid. So we'll take it.

And guys, they love this swing (find it here). It's so much better than the nest swing I thought we wanted. Thanks to aunt Cha Cha for the suggestion!! It was tricky to put together (it took four hands) but it was totally worth it. Now we want to get a bigger version for the backyard this summer!
The other corner of their room has their Ikea KURA bunk bed with a tent, so it feels even more like a camping adventure room. Plus their dresser beside it makes the bottom into a cozy little cave.
But that corner was... messy... so for now just enjoy this pic from our old house. (And see how we upgraded our tent here)

They were so surprised Christmas morning!
And that's it! Let us know if you have any questions, and we'd love to hear if you make your own!

Happy climbing!
You guys are awesome! Love your blog
ReplyDeleteThank you!! :)
DeleteI love this for your little guys! Great way to get some energy out before bedtime. I especially love the mountain tops!
ReplyDeleteWow! This is really cool! Wish my little son was old enough to do this :)
ReplyDeleteThank you! I think that's my favorite part, too. :)
DeleteThis is so amazing! My husband is all about DIY! He is planning to make our dining room table in time for Easter. I'm being hopeful! He's not exactly a carpenter lol
ReplyDeleteI love this idea! Maybe if I have boys in the future I will DEFINITELY look back to this! Such a cute idea!
xoxo,
Terri // www.teacupsandhiccups.com
Thanks! And good luck with the new table - I bet it will be great! No one is a carpenter when they start. :)
DeleteWow, coolest parent award goes to you! This is a great idea to have if it is too cold or rainy outside to make them get some energy out.
ReplyDeleteFor sure. They've spent a lot of time on it this winter!
DeleteThis is seriously cool! Such hard work, but you pulled it off and it looks great. I bet the kiddos LOVE!
ReplyDeleteThank you! They do love it! :)
DeleteWhat an amazing project! How lucky your kids are! And now I kind of want this in my house :)
ReplyDeleteHa ha, I told my husband we need an adult-size version! :)
DeleteThis is SO cool!! Defiantly going to remember this our son gets older. Such a great way to burn off some energy.
ReplyDeleteThank you! It's been great for our boys!
DeleteHello,
ReplyDeleteThese are our climbing holds :) Just so everyone knows, the climbing holds that were used for this project were the Screw on type of Climbing holds, they are meant for thick wood. The application for this project would have been best used with the Bolt on type of climbing holds. This is most likely why you had issues with the ones that were sent, they are not mean to be used with t nuts. Thank you!
Thanks for the info. I don't know anything about climbing holds (obviously. ha.) and didn't even know there were different kinds! Thanks for letting me know! If we ever do it again I'll know what to look for. :)
DeleteHi,
ReplyDeleteI was just curious as to what you used to paint those trees on the wall? They are so great!
Hi! We used a projector - you can read all about it here: https://www.morelikehome.net/2018/01/diy-forest-mural-great-for-boys-room.html
DeleteThanks for asking! :)
I am curious too!
ReplyDeleteHi! We used a projector - you can read all about it here: https://www.morelikehome.net/2018/01/diy-forest-mural-great-for-boys-room.html
DeleteThanks for asking! :)
Me too! Love the playground but I'm also curious about the trees :)
ReplyDeleteThanks! We used a projector - you can read all about it here: https://www.morelikehome.net/2018/01/diy-forest-mural-great-for-boys-room.html
DeleteThanks for asking! :)
Where did you get the gym rings?
ReplyDeleteAmazon! It looks like the exact ones aren't available anymore, but here's something similar: https://amzn.to/3lmKDAU
DeleteWe built our own version of this for our girls' play room for Christmas this year. They love it!
ReplyDeleteOh yay! I hope they love it! It's still a hit at our house. :)
DeleteWhere or how did you paint those trees on the main wall? Stencils? Wallpaper?
ReplyDeleteIs there a reason I can’t view any pictures? I’ve tried multiple ways
ReplyDeleteHow is this holding up with time? Is there anything you would do differently now? Are the boys still playing on them? We are looking at building a set for our girls.
ReplyDeleteI'm inspired! Can you give us an update? How have things held up over the years? I'm especially wondering about the eye hook into a ceiling joist for the rings. Does it hold up with use over time, or eventually pull out of the ceiling? I'd love to do this!
ReplyDeleteMy parents are going to make this for me thanks for the idea
ReplyDelete