
Shopping List:
2 sheets 3/4" plywood
6 - 2x2 @ 8' long
3 - 1x8 @ 8' long
1 - 1x10 @ 10' long
4 sets of 16" drawer slides (we like euro style slides)
4 drawer pulls
Tools:
Saw
Drill
1 1/4” screws (or Kreg Jig & 1 1/4" self tapping screws)
2" screws (or Kreg Jig & 2 1/2" self tapping screws)
1 1/4" screws
1 1/4" finishing nails
Wood glue
Wood filler
Sandpaper (a power sander is great if you have one)
**optional: Kreg Jig - you can definitely complete this project without one, but it would be really helpful to have here. You'll have a LOT of holes to fill on the outside of the dresser using regular screws, and a Kreg would allow you to hide almost all of them on the inside instead!**
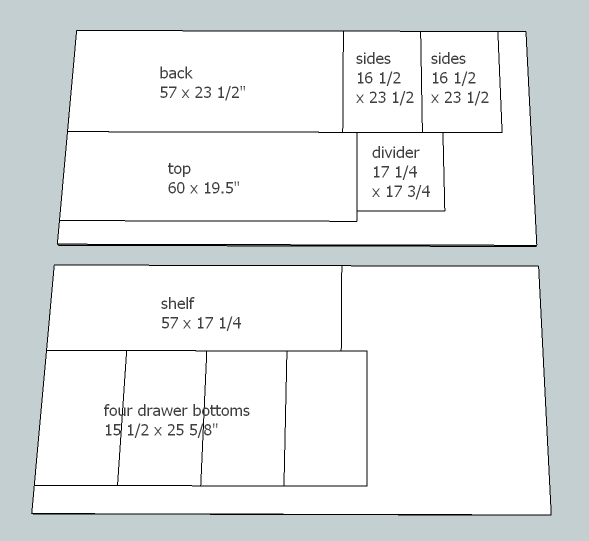
3/4" Plywood Cut List:
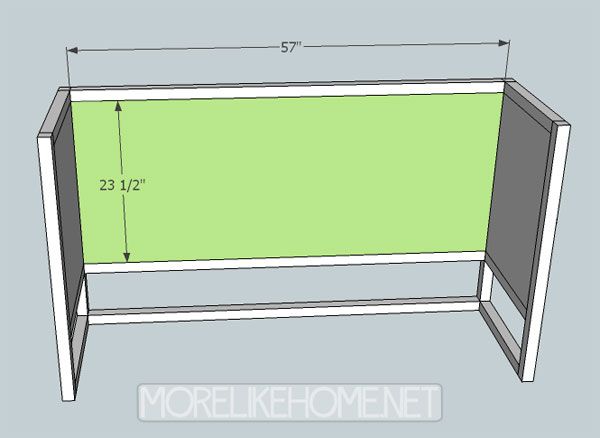
(A) - 2 @ 16 1/2 x 23 1/2" (sides)
(B) - 1 @ 57 x 23 1/2" (back)
(C) - 1 @ 57 x 17 1/4" (shelf)
(D) - 1 @ 17 1/4 x 17 3/4" (drawer divider)
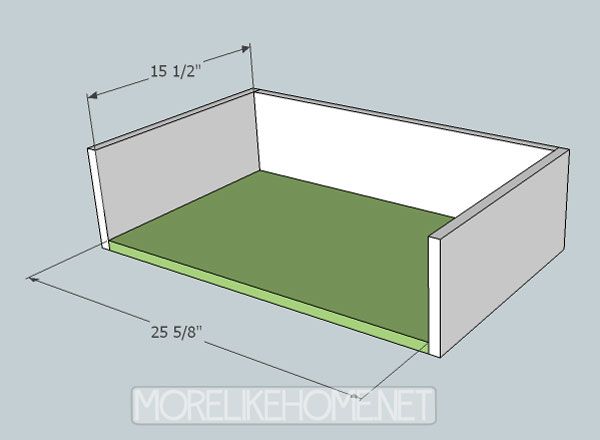
(E) - 4 @ 25 5/8 x 15 1/2" (drawer bottoms)
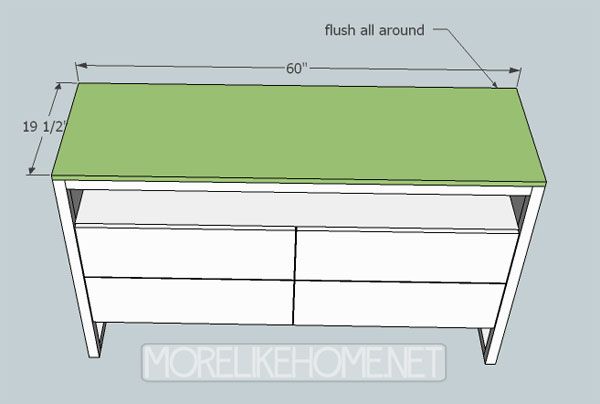
(F) - 1 @ 60 x 19 1/2" (top)
2x2 Cut List:
(G) - 4 @ 34 3/4" (legs)
(H) - 6 @ 16 1/2" (side bars)
(I) - 3 @ 57" (back bars)
(J) - 1 @ 57" (front bar)
(K) - 3 @ 16 1/2" (top supports)
1x8 Cut List:
(L) - 4 @ 25 5/8" (drawer back)
(M) - 8 @ 16 1/4" (drawer sides)
1x10 Cut List:
(N) - 4 @ 28 5/16" (drawer front)
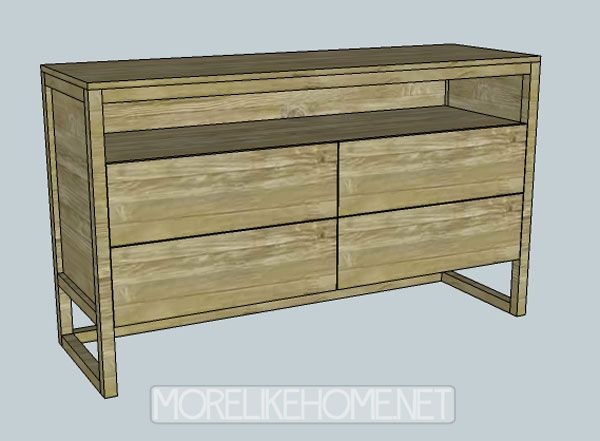
Dimensions: 60" wide x 35 1/2" tall x 19 1/2" deep

Please read all the directions before beginning, and cut your pieces as you go, measuring before each cut. Use 2” screws or pocket holes with 1 1/4" screws unless otherwise indicated. Always use glue. Pre-drill and countersink your screws. I have not built from these exact plans, so measure lots to make sure things work out!
Step 1: Cutting the Plywood
As you're building, it's better to make cuts as you go, measuring before each cut to make sure it's just the right size. But If you aren't able to handle a big sheet of plywood at home (or fit it in your car!), this is a diagram showing the best way to get all the pieces out of two sheets of 3/4" plywood (you'll have a pretty good size piece left over from the second sheet - hang onto it for your next project!). Lowe's will usually make your cuts for free, or for a small fee ($0.25/cut I believe). If you are able to cut at home, it may be better to use the diagram to cut the pieces as you go.
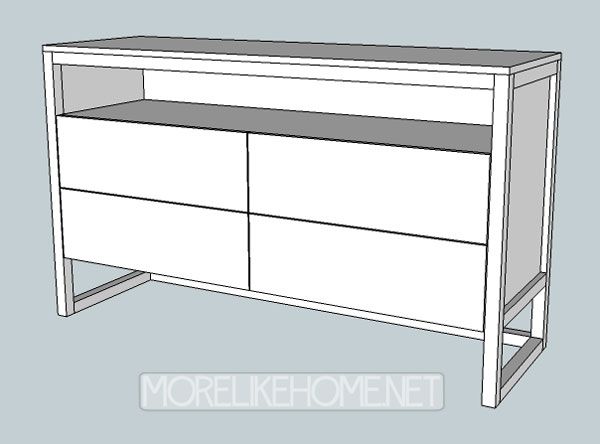
Step 2: Build the Shell
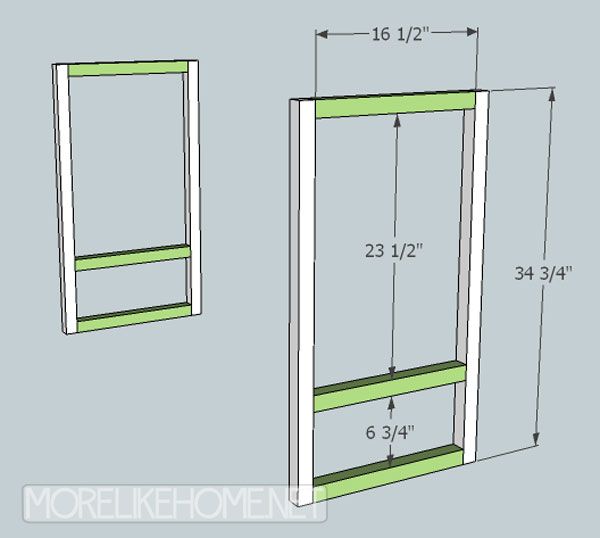
Start by building the two end sections. For each end, attach two legs (G) using three side bars (H). Attach one side bar flush with the top of the legs, one 23 1/2" down from there, and the last one flush with the bottom of the legs. Attach them using a Kreg Jig, or by drilling through the legs into the end of each cross bar. Use glue.
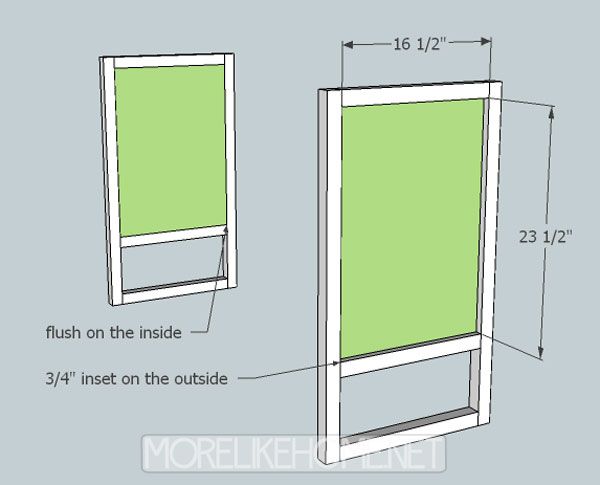
Next install the side panels (A). One will sit inside each side section you just built. You want the board to be flush with what will be the inside of the side section. This will leave about 3/4" of on inset on what will be the outside. Attach it using a Kreg Jig, or by drilling through the legs and side bars into the side panel.
Now connect the two side sections using the back bars (I). Attach one back bar flush with the top of the legs, one set down 23 1/2" from there, and one flush with bottom. This should line them up with the side bars. Attach them using a Kreg Jig, or by drilling through the legs into the end of each cross bar. Use glue.

Then install the back panel (B). This will sit inside the top and middle back bars you just installed. Like the side panels, you want it flush with the inside of the dresser which will leave about 3/4" inset on the outside. Attach it using a Kreg Jig, or by drilling through the legs and back bars into the back panel.
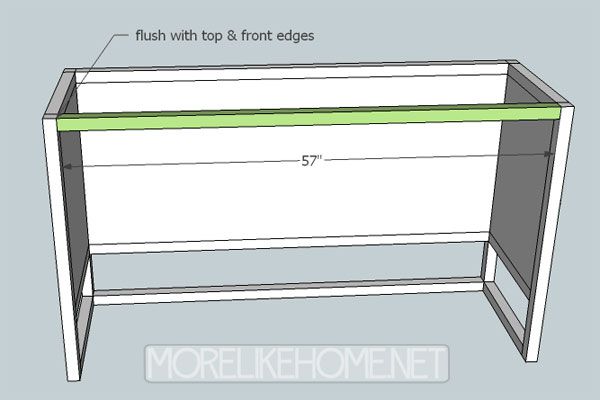
Next attach the front bar (J). It should be flush with the top & front of the front legs. Attach them using a Kreg Jig, or by drilling through the legs into the end of each cross bar. Use glue.
Then install the shelf (C). It should sit down 8" from the top edge of the legs and bars. Make sure it's level. Attach it by drilling through the side & back panels and into the shelf, or use a Kreg Jig.
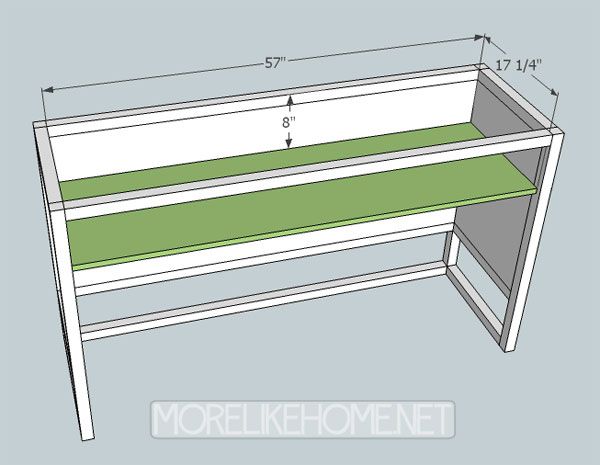
Now you can install the drawer divider. This should line up flush with the front edge of the shelf, and the bottom edge of the center back bar. Center across the opening with 28 1/8" of space on either side. Attach it using a Kreg Jig, or by drilling through the shelf and back panel into the divider. **note: you have the option to cut a second shelf board to run across the bottom of the drawer opening. If you want to do that, cut your divider 3/4" shorter. The second shelf board will be installed just like the first, but underneath the divider.**

Step 3: The Drawers
Start by using one drawer back (L) to connect two drawer sides (M). Keep the edges flush and attach the boards using a Kreg Jig or by drilling through the side boards into the back board.
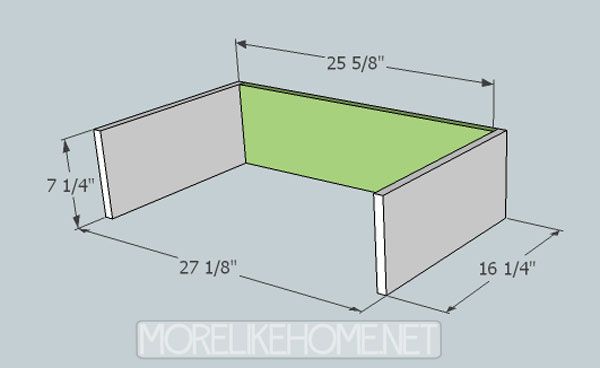
Now install the drawer bottom. It should sit inside the frame you just built and be flush with the front edges of the drawer sides. If it sticks out at all past the sides you'll want to trim it down. Attach it using a Kreg Jig or by drilling through the sides and back into the bottom. Repeat these two steps to build the other three drawer boxes.
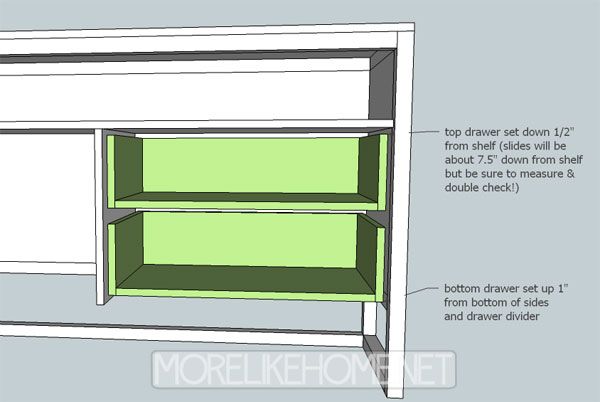
Install the boxes in the dresser, two on each side. The bottom drawer & slides should be set up about 1" from the bottom of the drawer divider and sides. The top drawer should be set about 1/2" down from the shelf (so the bottom & slides will be about 7 1/2" down). Be sure to measure and double check. It may be helpful to make a mark halfway down the divider and make sure neither of your drawer boxes cross that line. Also make sure the front edge of the drawer boxes end up flush with the front edge of the drawer divider. Follow the directions included with your slides to install them. Repeat to install two drawer boxes on the other side. **These directions are for euro style drawer slides that attach to the bottom corners of the drawer box. If you use a different style you need to adjust the placement accordingly.**
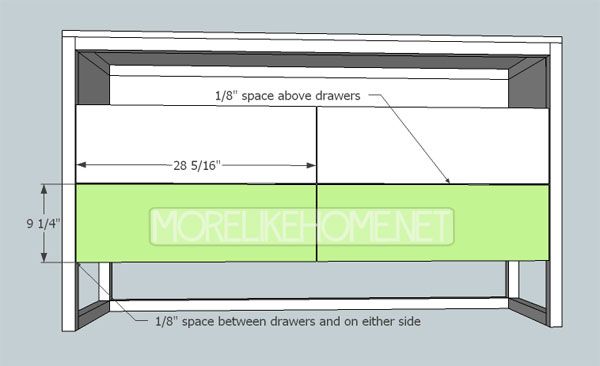
Once the boxes are installed, you can attach the drawer fronts (N). Let's start with the top drawers. With the drawer boxes in place, line up a drawer front over it. You want to line up the drawer front so it is flush with the top edge of the shelf, and leave 1/8" of space above between the drawer face and the leg (this will leave 1/8" between the two drawer fronts). Once you have it in place, use a couple finishing nails & glue to attach it to the drawer box. This is a great time to get an extra set of hands to help! You may have an easier time lining it up if you lay the dresser down on its back. Once you get a few nails in to hold it in place, you can remove the whole drawer and set it on the floor to finish attaching the front with more nails. That way you can really hammer it good and now worry about the drawer slides.

Then you can install the bottom drawer fronts (put the top drawers back in while you do this to make sure your spacing is right!). These drawer fronts should have 1/8" inch of space separating them from the legs, and from the drawer fronts above (which again leaves 1/8" between the two drawer fronts). You'll attach these drawer fronts in the same way with finishing nails.
Step 4: The Top
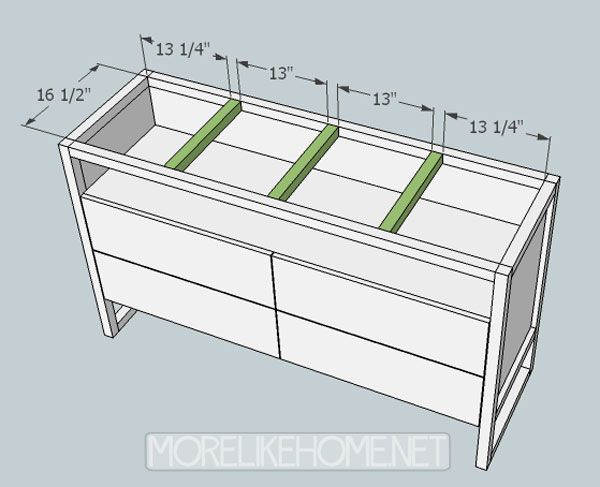
Start by installing the supports (K). You can just eyeball this to spread them across the the top opening, but if you want to be exact the measurements are in the pic. :) Install the supports using a Kreg Jig or by drilling through the front/back bars into the ends of the supports.
Now you can attach the top (F). It should be flush all the way around. Attach by drilling down through the top into the front, back & side bars. You may want to add some trim (or they make wood tape) to cover the raw edges of the plywood top. Just to pretty it up a little. **another option to avoid raw plywood edges is to do a solid wood top instead. If you can find somewhere that sells 19 1/4" boards that would be great, or you could purchase one 1x10 board and one 1x12 board and trim the 12" board down to 10 1/4" wide (Lowe's could probably do this for you). Then cut both boards to 60" long and install them side-by-side across the top**
Step 5: Finishing:
Start by filling any holes with wood filler. After it dries sand everything down to get it nice and smooth. Don't underestimate how important sanding is! You need a smooth surface to get a smooth finish! Once it's all sanded, you can finish it however you like. Try a natural wood stain coat of poly like the original, or mix it up with a weathered wood finish. Add some modern drawer pulls to finish the look
Or try primer and a fresh coat of white paint.
Or maybe a moody clay color.

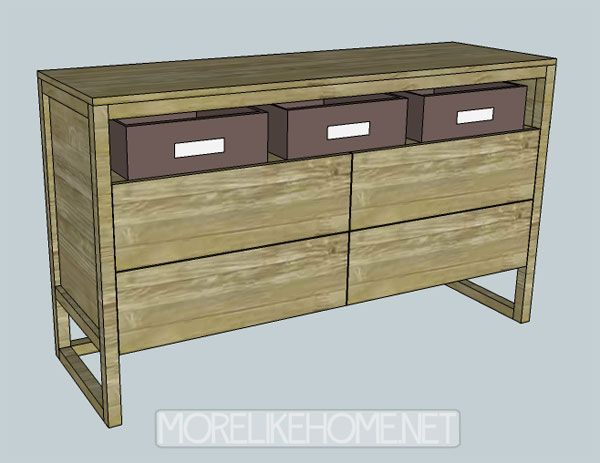
And don't forget about that shelf - it's perfect for baskets! The ones shown in the original are $20 each from Crate and Barrel, but you could even use shoe boxes covered in a pretty fabric!
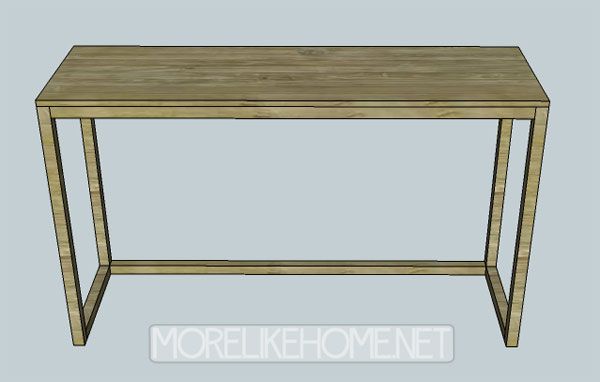
And if you want a little project within a project, While I was drafting I reached this point and was like "Oh! What a cute little console table!" You could slide a bench or some stools under it for extra seating. For this project you just assemble the legs, the top & bottom side bars, top and bottom back bars, and the front bar. Then attach the top supports and the top. Easy! :)
Anybody else get the CB catalogs? What's your favorite thing? Anything you would just LOVE to DIY?

Neat project - I expect I might be building one for our bedroom! Another option for the top would be a pine project panel from Lowes or Home Depot. A 1"x24"x72" panel will run around $30; simple matter of ripping it to the desired dimensions with a table or circular saw (or again they might be able to do this at the store). Thanks for the design!
ReplyDeleteWhat a great idea! Thanks for sharing! I'll have to check out these panels! :)
DeleteThis would be great in the living room. It could hold so many things handy without having piles clutter the room.
ReplyDeleteYep! Think of how many movies you could fit in those drawers. :)
DeleteThere is a typo as follows:
ReplyDelete(M) - 8 @ 16 1/4" (drawer bottom)
should be
(M) - 8 @ 16 1/4" (drawer sides)
Thank you! I'll fix it now! :)
DeleteI finished building this the other day. I am very much in love with it!
ReplyDeleteSo glad to hear that! I'd love to see if you want to share any photos on my facebook page or tag me on instagram!
Delete