Shopping List:
1 sheet 3/4" plywood
5 - 1x2 @ 8' long
1 - 1x4 @ 8' long
1 - 1x6 @ 6' long (3' is plenty if your store carries shorter boards)
1 - 2x2 @ 6' long (or 3' if available, you can even use scraps. you just need four 6" pieces.)
4 hinges for full overlay doors
4 drawer/door pulls
2 sets 12" drawer slides (we like the euro style)
**optional - 1x12 board for putting shelves in the cabinet***
**optional - four 6" legs such as these if you want a more mid-century modern look**
Tools:
Saw
Drill
1 1/4” screws (or Kreg Jig & 1 1/4" self tapping screws)
2" screws (or Kreg Jig & 2 1/2" self tapping screws)
1 1/4" screws
1 1/4"Finishing nails
Wood glue
Wood filler
Sandpaper (a power sander is great if you have one)
**optional - router & jigsaw (to get the more rounded mid-century modern look, you could use a router to round the edges of the cabinet doors and drawers and a jigsaw to round the corners of the top and bottom boards)**
3/4" Plywood Cut List:
(A) - 1 @ 34 1/2 x 30 1/2" (back)
(B) - 2 @ 34 1/2 x 14 1/2" (sides)
(C) - 2 @ 32 x 16" (top/bottom)
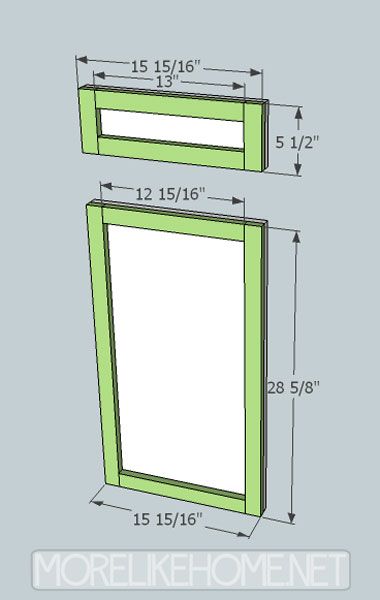
(D) - 2 @ 15 15/16 x 28 5/8" (doors)
(E) - 2 @ 12 3/4 x 12 1/4" (drawer bottoms)
1x2 Cut List:
(F) - 4 @ 30 1/2" (cross boards)
(G) - 1 @ 27 7/8" (door divider)
(H) - 1 @ 4 3/8" (drawer divider)
(I) - 1 @ 12 1/4" (slide support)
(J) - 4 @ 12 15/16" (drawer trim a)
(K) - 4 @ 5 1/2" (drawer trim b)
(L) - 4 @ 12 15/16" (door trim a)
(M) - 4 @ 28 5/8" (door trim b)
1x4 Cut List:
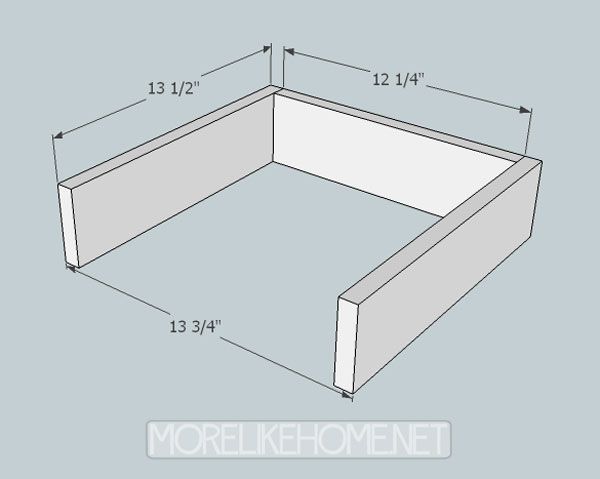
(N) - 2 @ 12 1/4" (drawer back)
(O) - 4 @ 13 1/2" (drawer sides)
1x6 Cut List:
(P) - 2 @ 15 15/16" (drawer front)
2x2 Cut List
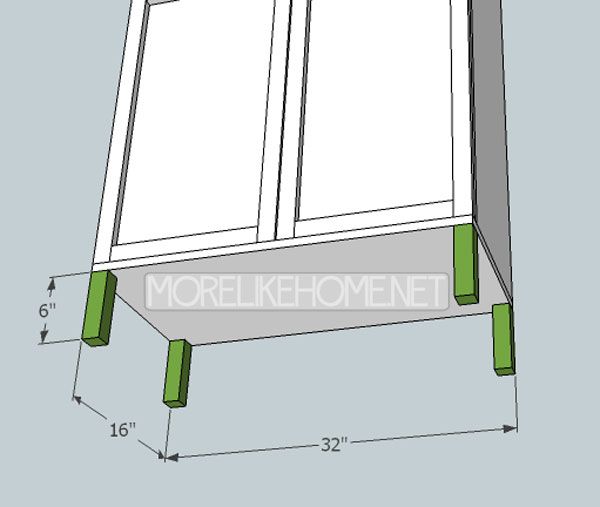
(Q) - 4 @ 6" (legs)
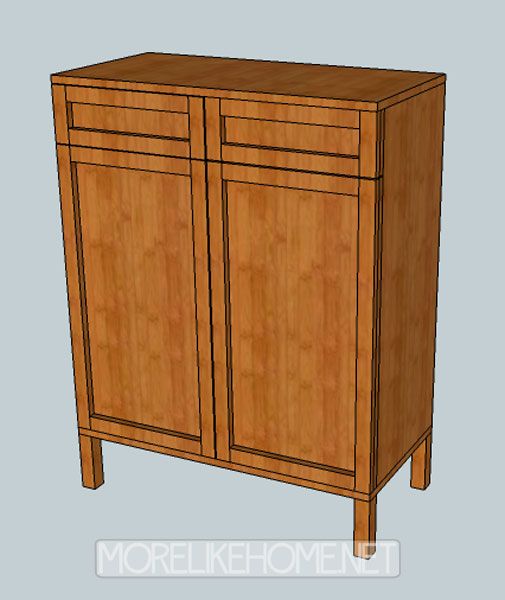
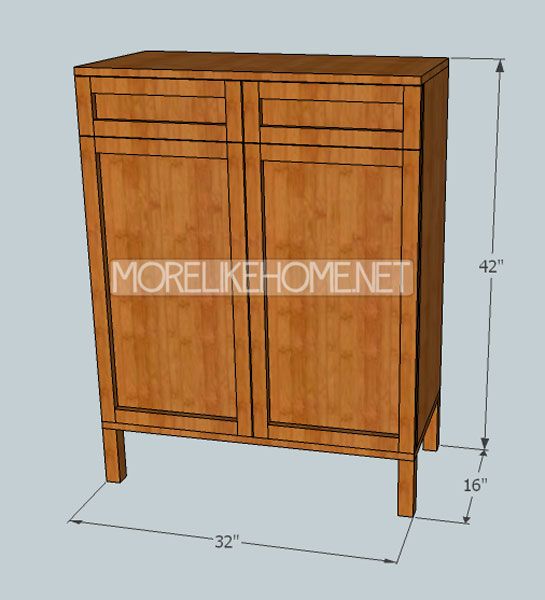
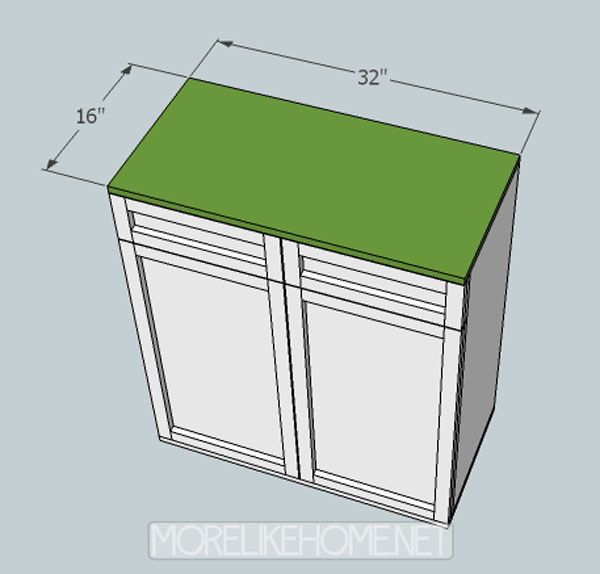
Dimensions: 32" wide x 42" tall x 16" deep
Please read all the directions before beginning, and cut your pieces as you go, measuring before each cut. Use 2” screws or pocket holes with 1 1/4" screws unless otherwise indicated. Always use glue. Pre-drill and countersink your screws. I have not built from these exact plans, so measure lots to make sure things work out!
Step 1: Cutting the Plywood
As you're building, it's better to make cuts as you go, measuring before each cut to make sure it's just the right size. But If you aren't able to handle a big sheet of plywood at home (or fit it in your car!), this is a diagram showing how to get all the pieces out of one sheet of 3/4" plywood. Lowe's will usually make your cuts for free, or for a small fee ($0.25/cut I believe). If you are able to cut at home, it may be better to use the diagram to cut the pieces as you go.
Step 2: Building the Box
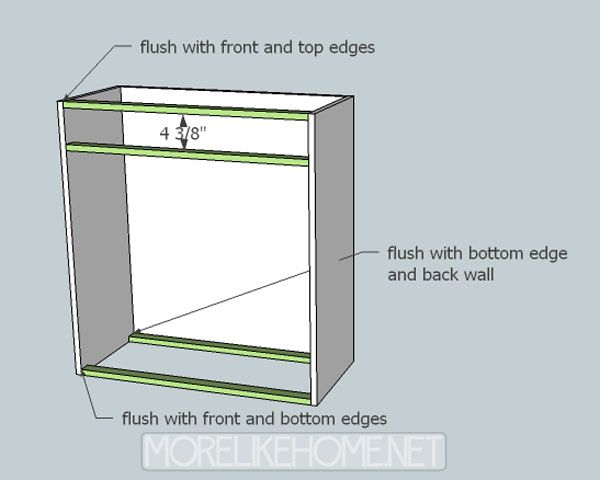
Start by attaching the side pieces (B) to the back (A) as shown below. The back will sit between the sides, and you will drill through the sides into the edges of the back (or use a Kreg Jig). Be sure to keep everything nice and flush across the back side of the box and use glue.
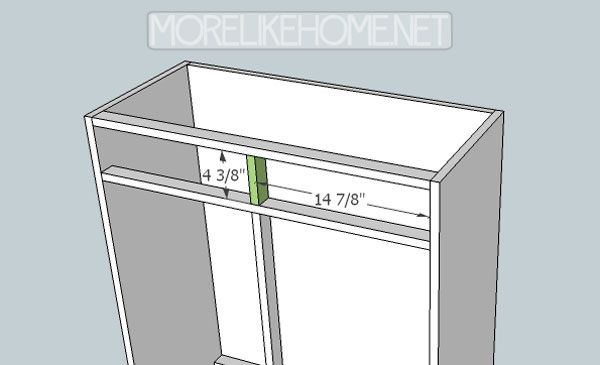
Next we'll add the cross boards (F). I know there is a real name for these, but I totally can't think of it right now. :) Anyway, the first board will be attached at the top of the box. It should be flush with the top and front edges of the side boards. To attach all of these you will drill through the sides into the cross board, or use a Kreg Jig to attach them. The next board will sit below this one. Measure down 4 3/8" from each end of the first cross board and make a mark on the sides. Line up the top of the second cross board with each of these marks (keep it flush with the front edge of the side boards) and use screws to attach it. The third cross board goes at the bottom of the box, flush with the front and bottom edges of the side boards. The final cross board goes across the back of the cabinet. It should be flush with the bottom edge of the side boards and set back against the back wall.
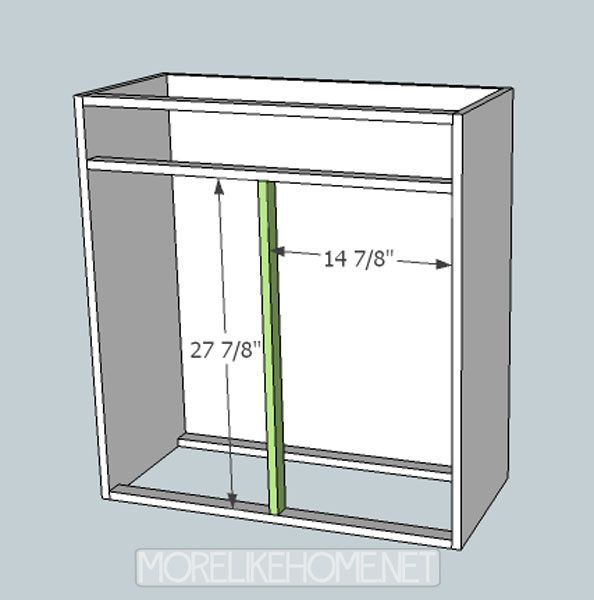
Next up is the door divider (G). This runs between the second and third cross boards as shown below. You want this centered in the opening with 14 7/8" of space on either side. Attaching by drilling through the cross boards into the ends of the divider.
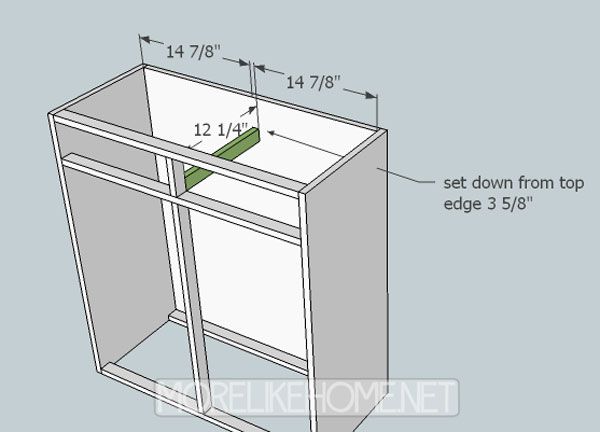
The drawer divider (H) will sit directly above the door divider, again with 14 7/8" of space on either side. To attach this board you can drill down through the top cross board. To attach the bottom end, you can either you a Kreg Jig or use a finishing nail pointed down at an angle on the backside of the divider, making sure you go into the cross beam but not through to where the screw pokes out. We don't want to see it anywhere when we're done.
Now you can install the drawer slide support (I). It's important to note I placed the support here to accommodate euro style drawer slides. If you're using a different style, read the package to see if your support needs to be placed higher. Did you check? Good. To install the support, line up the front end with the bottom of the drawer divider. You can use a Kreg Jig to attach it, or drill through the front of divider into the end of the support. The back end should be centered on the back of the cabinet with 14 7/8" of space on either side, and should be level with the front end which should set it down 3 5/8" from the top edge (but it wouldn't hurt to double check!).
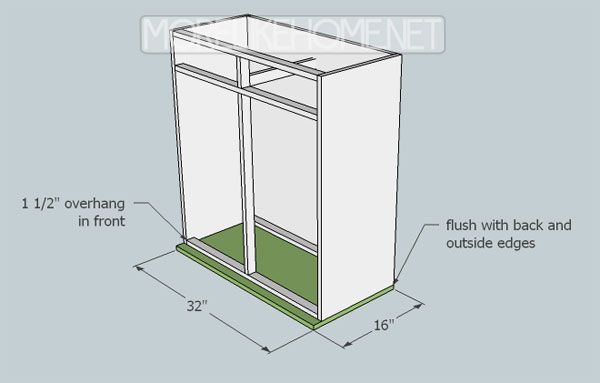
Now we'll attach the bottom. It will probably be easiest to turn the cabinet upside down while you work on this part. To attach the bottom, you wan to line it up flush across the back and sides of the cabinet. This should leave a 1 1/2" overhang in the front. Drill through the bottom into the back, sides, and cross boards using 1 1/4" screws. Be careful not to poke through into the cabinet! Use glue! You can also add a shelf or two here if you want. Just cut a 1x12 to length, make sure it's level, and screw it in place. For permanent placement and a cleaner look inside, drill through the outside of the sides and back and into the the shelf. However, if you think you may want to move the shelves later, you'll be better off using some extra 1x2s to create shelf supports like we did here. **If you used a router to round the edges of your doors and drawers, you'll want to use a jigsaw to round the front corner of the top before installing it. Trace the curve of the doors onto the top to make sure you get a matching curve.**
Step 3: Doors & Drawers
Lets start by putting the trim pieces on the drawers (P) and doors (D). You'll need pieces (J) & (K) for the drawers, and (L) and (M) for the doors. Lay out the trim pieces as shown below to make sure you have a good fit. Then attach the trim using finishing nails and glue. **If you want to round the outside edges of the doors & drawers, you can do so now. You'll need to run them through a router with a curved bit. If you plan to do this, make sure you don't put any finishing nails too close to the outside edge so they won't get hit by the routing bit!**
Next we'll do the drawer boxes. Attach the drawer back (N) to the drawer sides (O) as shown below. Keep the everything flush. Drill through the sides and into the ends of the back.
Now install the drawer bottoms (E). Keep them flush across the bottom (and they should be flush across the front. if the bottom sticks past the edges you'll need to trim it down.). Drill through the back & sides into the edges of the bottom board.
Now you can use your hinges to install your doors. You want to line up the doors flush with the outside edge of the cabinet, and leave 1/8" of space between the doors and under the doors.
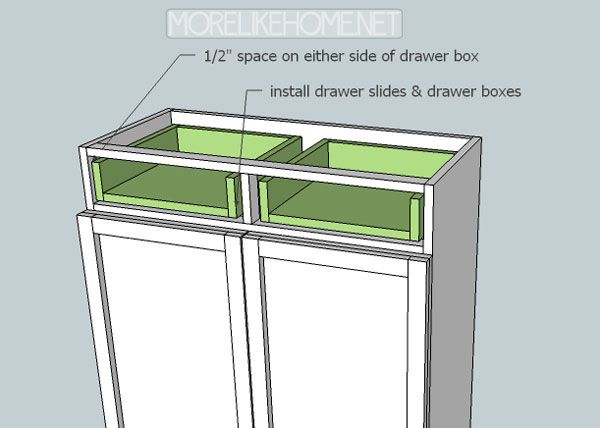
Then install the drawer boxes. Follow the directions included with your drawer slides to install them. You want the front of the drawer boxes to end up flush with the front face of the cabinet sides and cross boards.
To install the drawer fronts, set each one in front of the installed drawer box. You want to line up the drawer front so it is flush with the outside edge of the cabinet, and leave 1/8" of space above, below, and between the drawer fronts. Once you have it in place, use a couple finishing nails & glue to attach it to the drawer box. This is a great time to get an extra set of hands to help! You may have an easier time lining it up if you lay the cabinet down on it's back. Once you get a few nails in to hold it in place, you can remove the whole drawer and set it on the floor to finish attach the front. That way you can really hammer it good and now worry about the drawer slides.
Step 4: Top & Legs
Almost done! Now you can install the top. You want to line it up flush across the back and sides of the cabinet, and front should be flush with the front of the door trim. Drill down through the top into the back, sides, and cross boards to attach it. Be sure to use 1 1/4" screws on the cross boards so they don't poke all the way through! **If you used a router to round the edges of your doors and drawers, you'll want to use a jigsaw to round the front corner of the top before installing it. Trace the curve of the doors onto the top to make sure you get a matching curve.**
And finally the legs! You'll want to attach one leg in each corner, flush with the outside edges of the cabinet (or you could set them in an inch or so for a little different look). Use glue. You can use a Kreg Jig to attach them from the bottom, or you can drill down through the bottom of the cabinet into the ends of the legs. If you want a more mid century modern look like the original, you could purchase any 6" tapered legs like these.
Step 5: Finishing
Start by filling any holes with wood filler. After it dries sand everything down to get it nice and smooth. Don't underestimate how important sanding is! You need a smooth surface to get a smooth finish! Once it's all sanded, you can finish it however you like. Try a nice wood stain and coat of poly like the original.
Or maybe some primer and then a bright coat of paint? Some of my favorite inspiration pieces from pinterest are fun accents of red, yellow or teal.
Now go scoop yourself a big bowl of ice cream. You did it! I do want to add a cost estimate for this project, but I'm not confident on the prices for plywood, hinges, etc. Next time I'm at Lowe's I'll figure it out, but if anyone's itching to get started this should send you in the right direction. I'd love to see pics if anyone tackles this project! Happy building!







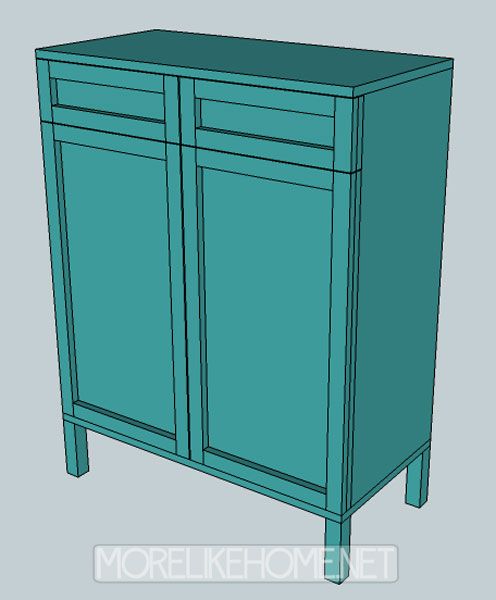
My mom has an antique in her living room that looks very much like this. It works great for holding throw afghans, games, and a few craft supplies.
ReplyDelete