

Shopping List:
3 - sheets 3/4" plywood (you really only need 2 1/2, so see if your store sells 1/2 sheets or scrap pieces instead of purchasing a full 3rd sheet)
1 - 2x6 @ 6' long (you only need 3', so check to see if your store carries shorter boards)
1 - 1x3 @ 10' long
3 - 1x6 @ 8' long
1 - 1x8 @ 8' long
8 - 1x2 @ 10' long
1 - 1x2 @ 8' long
3 sets of 16" drawer slides (we like euro style slides)
Tools:
Saw
Drill
1 1/4” screws (or Kreg Jig & 1 1/4" self tapping screws)
2" screws (or Kreg Jig & 2 1/2" self tapping screws)
1 1/4" finishing nails
Wood glue
Wood filler
Sandpaper (a power sander is great if you have one)
**optional: Kreg Jig - you can definitely complete this project without one, but it would be really helpful to have. You'll have a LOT of holes to fill on the outside of the dresser using regular screws, and a Kreg would allow you to hide almost all of them on the inside instead!**
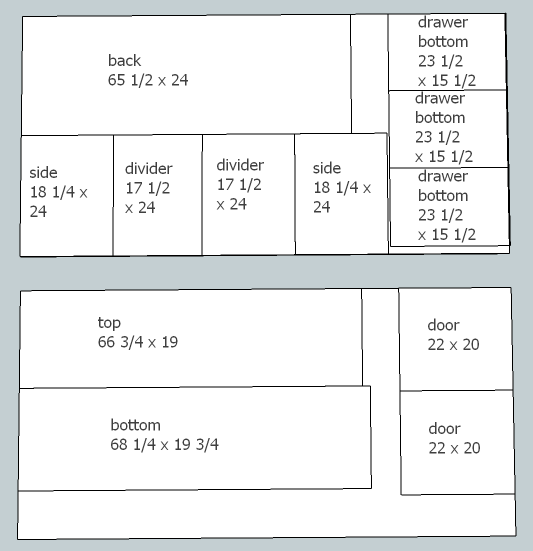
3/4" Plywood Cut List:
(A) - 1 @ 65 1/4 x 24" (back)
(B) - 2 @ 18 1/4 x 24" (sides)
(C) - 2 @ 17 1/2 x 24" (dividers)
(D) - 1 @ 66 3/4 x 19" (top)
(E) - 1 @ 68 1/4 x 19 3/4" (drawer bottoms)
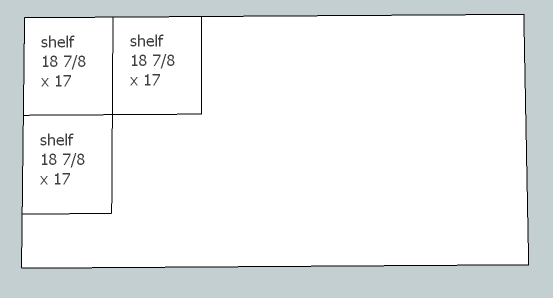
(F) - 3 @ 18 7/8 x 17" (shelves - you can make more or less!)
(G) - 2 @ 22 x 20" (doors)
(H) - 3 @ 15 1/2 x 23 1/2" (drawer bottoms)
2x6 Cut List:
(I) - 2 @ 17" (legs)
1x3 Cut List:
(J) - 1 @ 68 1/4" (front trim)
(K) - 2 @ 19" (side trim)
1x6 Cut List:
(L) - 6 @ 23 1/2" (drawer front/back)
(M) - 6 @ 17" (drawer side)
1x8 Cut List
(N) - 3 @ 26 1/2" (drawer front)
1x2 Cut List
(O) - 18 @ 18 1/4" (side trim)
(P) - 18 @ 20" (door trim)
(Q) - 9 @ 26 1/2" (door trim)
(R) - 5 @ 7 1/2" (pulls)
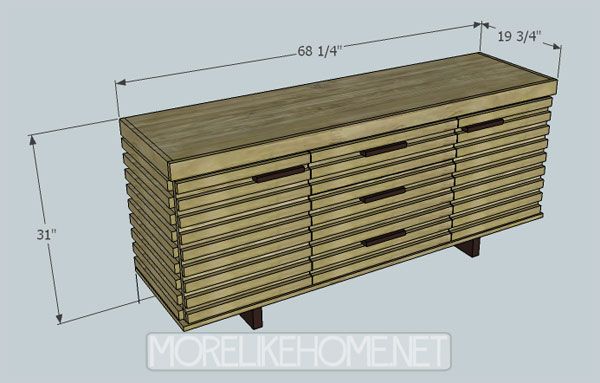
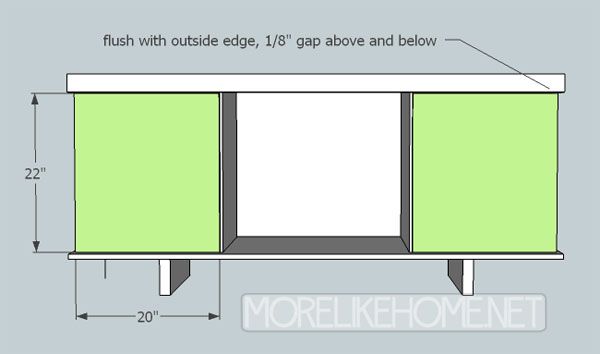
Dimensions: 68 1/4" wide x 31" tall x 19 3/4" deep
Please read all the directions before beginning, and cut your pieces as you go, measuring before each cut. Use 2” screws or pocket holes with 1 1/4" screws unless otherwise indicated. Always use glue. Pre-drill and countersink your screws. I have not built from these exact plans, so measure lots to make sure things work out!
Step 1: Cutting the Plywood
As you're building, it's better to make cuts as you go, measuring before each cut to make sure it's just the right size. But If you aren't able to handle a big sheet of plywood at home (or fit it in your car!), this is a diagram showing the best way to get all the pieces out of three sheets of 3/4" plywood (you really only need 2 1/2, so ask if your store sells half sheets or has scrap pieces you can purchase instead. Otherwise just hang onto the rest of it for your next project!). Lowe's will usually make your cuts for free, or for a small fee ($0.25/cut I believe). If you are able to cut at home, it may be better to use the diagram to cut the pieces as you go.
Step 2: Building the Box
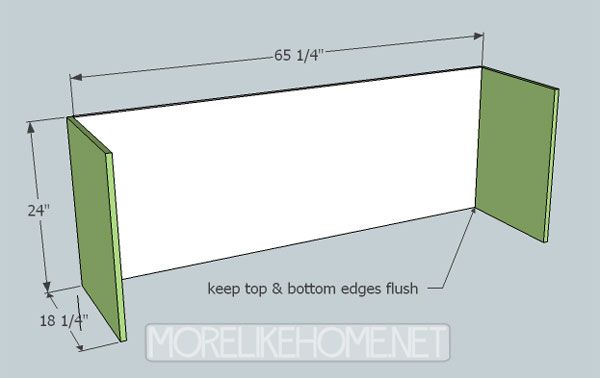
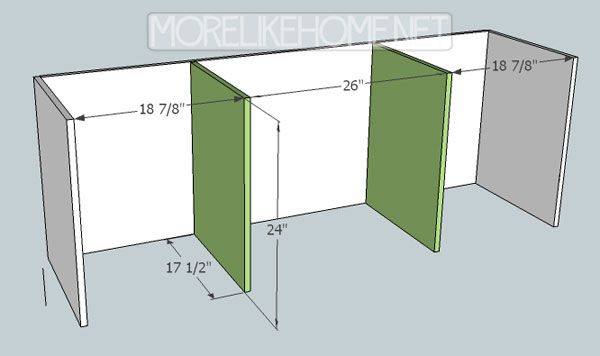
Start by using the back (A) to connect the two side pieces (B). Attach them using a Kreg Jig, or by drilling through the side pieces into the ends of the back. Make sure you keep the top & bottom flush, and keep the back edges all flush as well.
Next install the dividers (C). Each divider should be 18 7/8" from the sides. Mark the distance at the top and bottom edge of the back to make sure you attach them straight. There will be 26" of space left between the dividers. These will sit against the back (keep the top & bottom edges flush) and you can attach them using a Kreg Jig or by drilling through the back into the dividers.
Now attach the top (D). Line it up flush with the back and sides of the box, with a 3/4" overhang in front. Go ahead and drill through the top into the back and sides (or use a Kreg Jig to attach them from underneath) but don't do the dividers yet. First you need to check that your dividers are straight. Measure between the front edges of the sides & dividers to makes sure that there is still 18 7/8" of space between them. Once you're sure they're in the right place, drill through the top into the dividers to finish securing it.
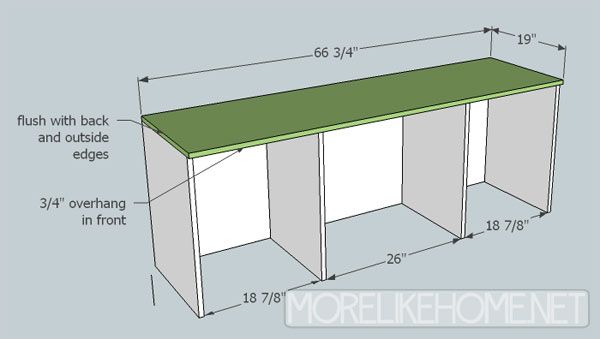
Then attach the bottom (E). You'll probably want to just turn the cabinet upside down for this part. :) The bottom should sit flush with the outside edge of the back with a 3/4" overhang on each side, and a 1 1/2" overhang on the front. Again, start by attaching it to the back and sides, then double check the spacing between the dividers and sides (18 7/8"), then attach it to the dividers. You can use a Kreg Jig or drill through the bottom into the back, sides, and dividers.

Step 3: Shelves, Legs, & Trim
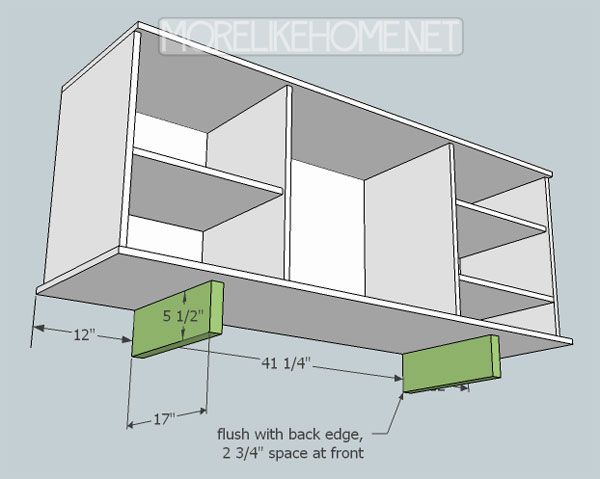
First attach the legs (I) (the shelves are shown in the pic, but you won't be able to get to the legs once they are installed). The legs should be set in 12" from the outside edges of the bottom board. They should be flush with the back of the cabinet and have 2 3/4" of space in front (but you can make them longer if you want a shorter overhang). Attach them using a Kreg Jig, or by drilling down through the bottom board into the top edge of each leg. Be sure to use glue.
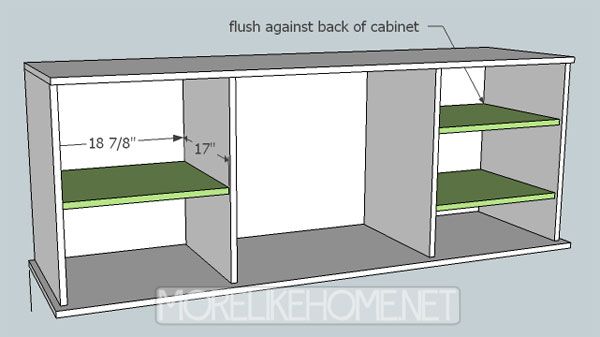
Now you can install your shelves (F). You can install as many or as few as you want, at whatever heights you need. You can install them by drilling through the sides and dividers into the edges of the shelves for permanent placement, or use a Kreg Jig to install them (which will make them super easy to move if you change your mind later).
Now attach the trim around the top. Start with the side trim (K). Attach one on each end of the top, keeping it flush across the top. Attach it by drilling through the trim, into the edge of the top board. Now attach the front trim piece (J) in the same way. Make sure it sits flush with the top, and the ends are flush with the outside edges of the side trim pieces.

Step 4: Doors & Drawers
Now you can install the doors (G). Follow the instructions with your hinges to install each door, keeping the doors flush with the outside edge of the cabinet, and leaving a 1/8" gap above and below the door.
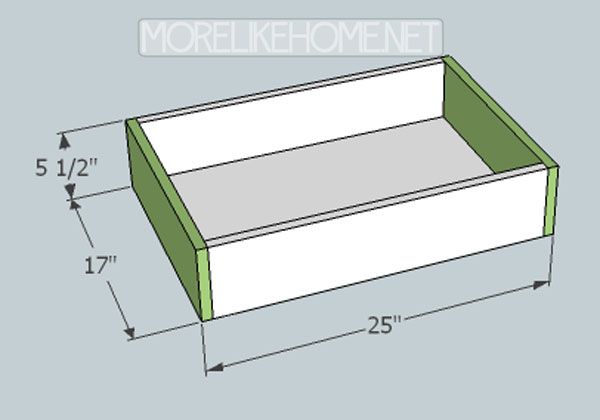
Now build the drawer boxes. Attach a drawer front/back (L) to the front & back of the drawer bottom (H). Make sure the bottom of the front back boards are flush with the bottom and ends of the drawer bottom (you don't want the front/back boards sticking past the ends of the drawer bottom at all!). Attach them by drilling through the front/back boards into the edges of the drawer bottom. Use glue. Repeat for the other two drawer boxes.

Next attach the drawer sides. They should sit flush with the bottom of the drawer bottom, and with the front & back edges of the front back boards. Again, you don't want them sticking past the front or back of the drawer at all. Attach the sides by drilling through the side boards into the ends of the drawer bottom and front/back boards. Use glue. Repeat for the other 2 drawer boxes.
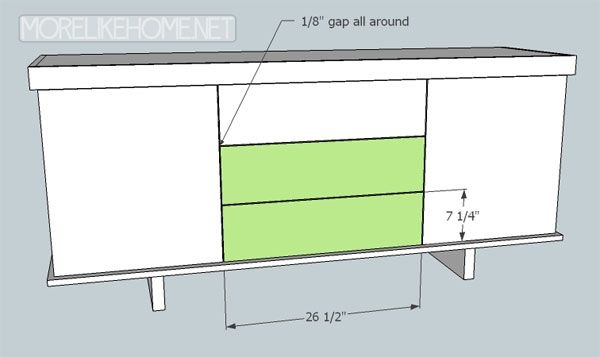
Now you can install the drawer boxes. Follow the instructions with your drawer slides to install them (and note these plans leave a 1/2" gap on either side for the slides, if your slides require a different space you'll need to adjust the size of your drawer box accordingly). When you install the boxes, make sure the front of the drawer box sits flush with the front edge of the dividers. The bottom drawer should be set up 1" from the bottom board, and there should be 2" of space between each drawer (leaving a 1" gap between the top drawer and top trim). The important thing with this spacing is that you don't want the drawers to overlap the spacing of the drawer fronts, so it may be helpful to mark where each drawer front will line up and make sure your drawer boxes don't overlap those lines.

Now you can install the drawer fronts (N). And I know I drew this putting the top one on first, but it would actually probably be safer to start with the bottom one. Line it up over the drawer drawer box, leaving a 1/8" gap on either side, and a 1/8" gap below (starting with the bottom one). Use finishing nails and glue to attach the drawer front to the drawer box. Once you use a couple nails to hold it in place, it may be easier to remove the whole drawer and then add some more nails to make sure it's really secure (it will be easier to hammer them with the box sitting on the floor).

Now put that whole drawer back in so it can work as a guide for your other drawers. Install the next drawer fronts in the same way. Line them up so they have a 1/8" gap on either side, and a 1/8" gap between each drawer front.
Step 5: Trim
Now we can add the trim. We saved this for last because we really want to make sure the trim pieces line up so it doesn't look wonky when we're done. Start with the side trim pieces (O). Starting with the top piece, line it up so it is flush with the front and back edges of side board, also making sure it doesn't overlap the door at all. Line it up so it is spaced 1/2" from the bottom edge of the top trim. Attach it using finishing nails and glue. Work your way down attaching 8 more trim boards on this side. Leave 1" of space between each trim board, and keep them level. You should have 1/4" gap left at the bottom when you are done. Repeat for the other end of the cabinet.
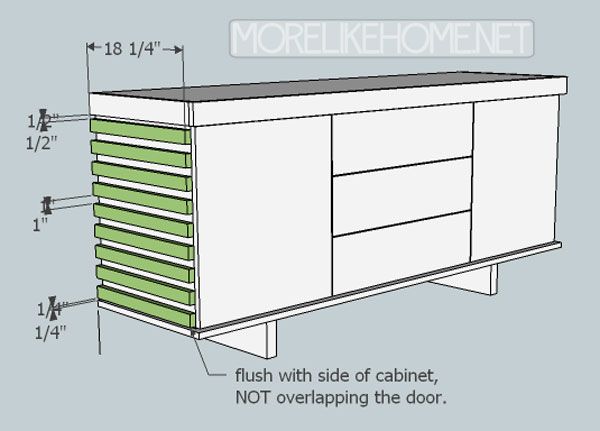
Now we can do the trim on the front of the cabinet. Start by attaching the door trim (P) to just one of the doors. Starting with the top board, make sure it sits flush with the edges of the door. Line it up so it is spaced 1/2" from the bottom of the top trim board (important - you are measuring down from the bottom of the trim board, not from the top edge of the door). Once it's in place attach the board using finishing nails and glue. Working your way down, attach 8 more trim boards to the door. Leave 1" of space between each trim board, and keep them level (they should line up with the heights of the trim boards on the sides of the cabinet). You should have 1/4" gap left at the bottom when you are done. Repeat for the other door.
Next attach the drawer trim pieces (Q). Starting with the top board, make sure it sits flush with the edges of the drawer front. Line it up so it is spaced 1/2" from the bottom of the top trim board (important - you are measuring down from the bottom of the trim board, not from the top edge of the door). It should line up with the trim pieces on the doors on either side. Once it's in place attach the board using finishing nails and glue. Working your way down, attach 8 more trim boards across the bank of drawers. Leave 1" of space between each trim board, and keep them level. Everything should look tidy and level when you are done.

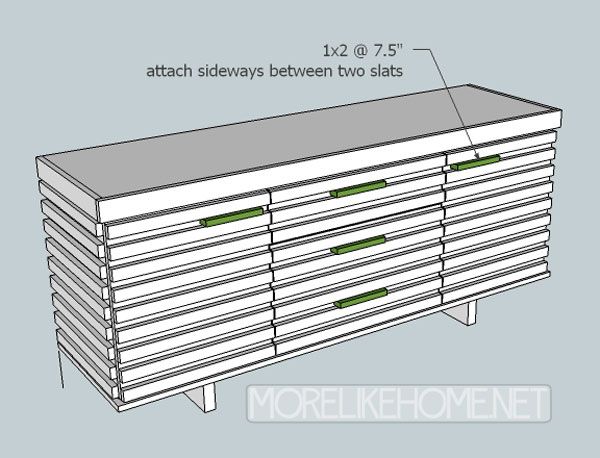
Finally you can attach the pulls (R). These are just strips of 1x2 that have been set sideways between the trim boards on the front of the cabinet (between the top 2 boards on each door, and between the 1&2, 4&5, 7&8 boards in the drawer bank). Center the pulls on the drawers, and you can place the door boards wherever looks good, just make sure they match. Attach them by drilling though the back of the doors and drawer, into the pulls. You can use 1 1/4" screws on doors, and 2" screws on the drawers.
Step 6: Finishing
Start by filling any holes with wood filler. After it dries sand everything down to get it nice and smooth. Don't underestimate how important sanding is! You need a smooth surface to get a smooth finish! Once it's all sanded, you can finish it however you like. To match the look of the original, try a rustic or weathered stain for the body of the cabinet, and a dark stain for the pulls and legs (if you do that you should finish the pulls before you install them). Top it off with a coat of poly to seal and protect the finish.
All done! This piece would be a fun way to freshen up any style. It's always fun to have a really unique piece or two thrown in the mix! I'd love to hear how you keep your style fresh or add a fun, eclectic feel.

Nice Sideboard and great information!!
ReplyDeleteNice job ! The instructions are very clear :) I think it is very similar to the Melange Delano Chest from Hooker Furniture, Did you use plywood for the trims as well ?
ReplyDeleteThanks! That chest is beautiful. I used 1x2's for the trim on this one, but plywood would be perfect if you wanted narrow strips more like the piece you mentioned. :)
Delete