
"THIS IS MY BEST MOMENT."
Because it's a clever design?
No.
Because it's super easy to build?
No.
Because it's affordable?
Also no.
I mean, sure, it is all those things. But here's the deal: all on my own, with no help from my lead advisor (a.k.a. husband), I, Georgia of the More Like Home, came up with the name "stack-a-bed". This is my best moment.
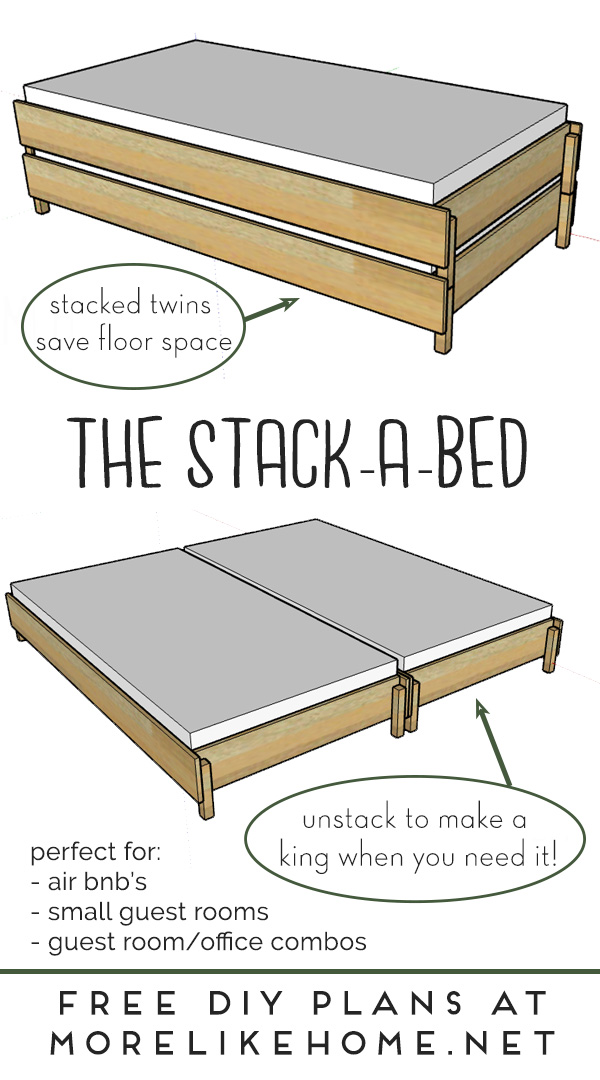
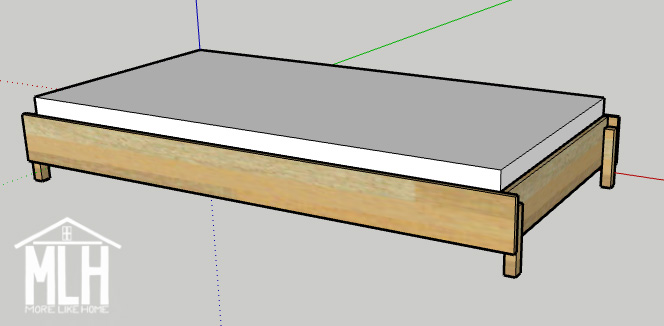
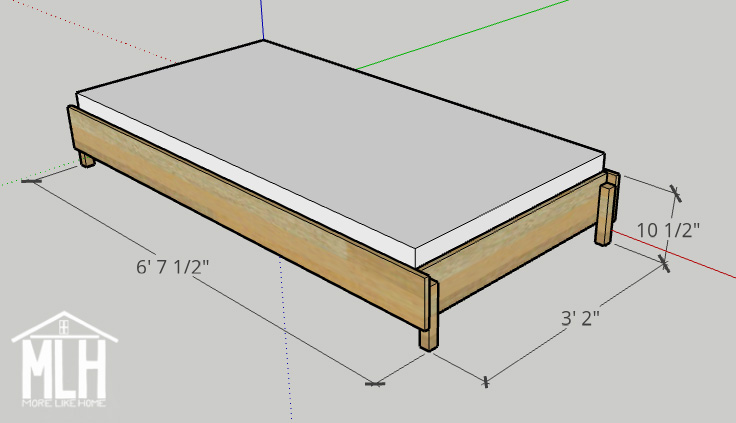
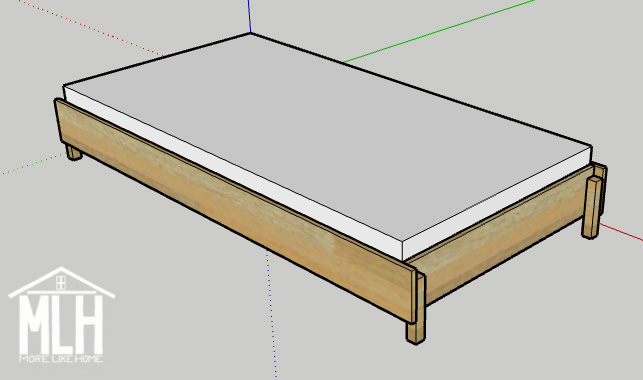
And now it can be your best moment when you build your own stack-a-bed. Why is it called the stack-a-bed, you ask? Well I'll tell you. The whole system is based on two of these super simple (and easy to build) bed frames:
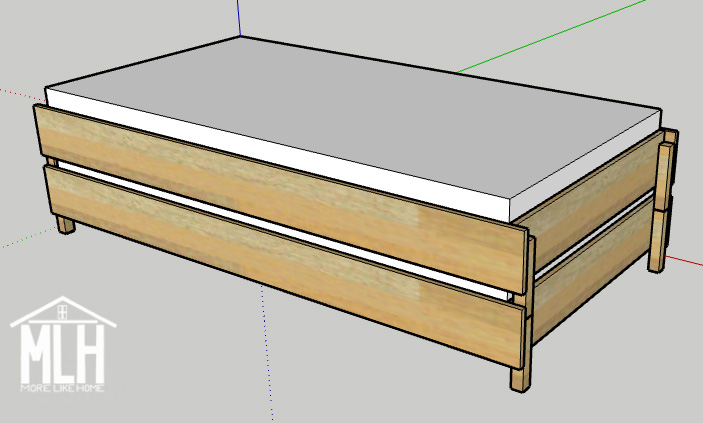
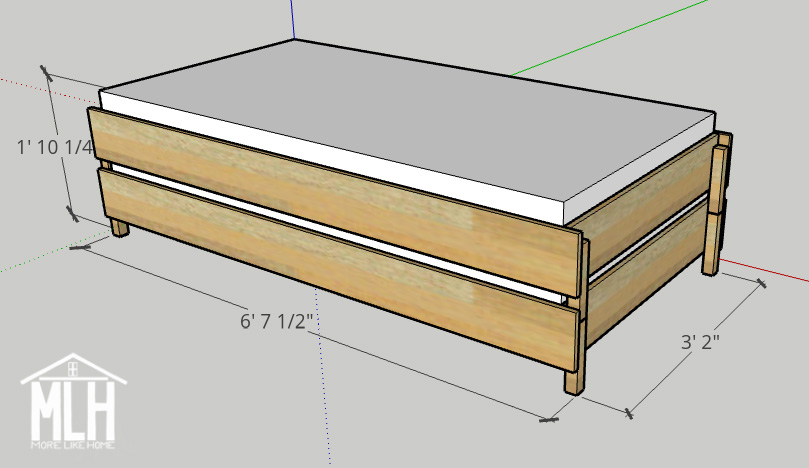
When you just need a twin bed, you can stack the two bed frames (with their mattresses) to save floor space! This makes it great for a small guest room, a guest room/office combo, playroom/office combo, a kids room for sleepovers, or even an air bnb where you need a flexible sleeping area:
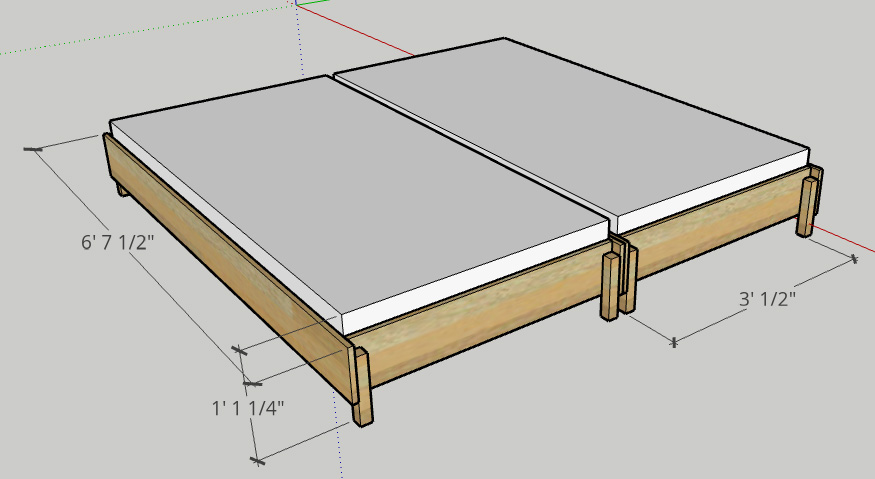
Then when you have guests and need a bigger bed, the beds unstack and sit side-by-side to make a king size bed! Just like that, you have a real, comfortable bed with room for your guests to stretch out:
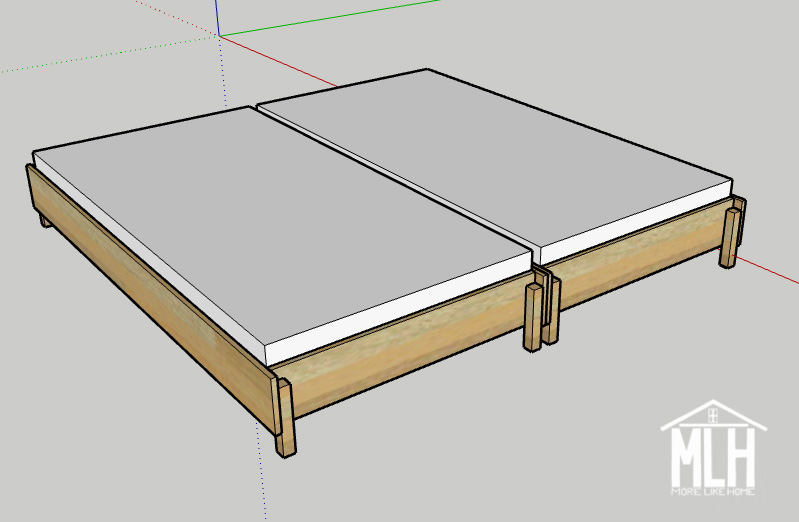
Don't worry about the gap between the mattresses! Amazon sells a converter kit that fills it in to make a seamless bed!
Then when the guests leave? Stack it back up and regain your floor space! Ikea just came out with a stacking bed and it's genius, but I thought you guys might like a DIY version that's:
- super easy to build and doesn't require any special tools (just a saw and a drill!)
- affordable (all the lumber at my local Home Depot would be under $100 for two bed frames, or even under $80 if you use 1x6s instead of 1x8s for the sides!)
- accessible for anyone who doesn't live near an Ikea
IMPORTANT SIZE NOTE: twin mattresses seem to be more commonly available 39" wide instead of the 38" mattress these plans are drawn for. I'm working to update the plans to reflect that (and add a little extra wiggle room for sheets), but in the mean time please check the size of your mattress before you begin and adjust your cuts accordingly.
Single bed dimensions: 79 1/2" long x 39.5" deep x 13 1/4" high (including 6" mattress)
Dimensions when stacked: 79 1/2" long x 39.5" deep x 22 1/4" high (including 6" mattress)
Dimension when king: 79 1/2" long x 79" deep x 13 1/4" high (including 6" mattress)
Measure twice, cut once (seriously, though). Use glue in every step (be careful to clean up any drips). Read through all the instructions before you begin. Use 1 1/2" screws unless otherwise indicated. Pre-drill and countersink all your screws. Be safe, have fun, and let me know if you have any questions! Please note I have not built from these plans myself (you might be the first!), so double check all your measurements as you go.
The shopping list and cut list are to make a pair of stack-a-beds, since they are better together! But if you're looking for a single bed that is super simple, modern, and easy to build, just cut the lists in half. :)
Shopping List:
4 - 1x8 @ 10' long (or use 1x6's to cut your cost!)
1 - 2x2 @ 8' long
4 - 1x2 @ 8' long (furring strips are much cheaper than regular boards)
17 - 1x3 @ 8' long (furring strips are much cheaper than regular boards)
2 - 6" thick twin mattresses
1 - twin-to-king converter kit
1 1/2" wood screws
wood glue
wood filler
sandpaper and finishing supplies
finishing nails (optional)
Cut List:
(A) 4 - 1x8 @ 38" (ends)
(B) 8 - 2x2 @ 9" (legs) you could swap for 2x4s to cut your cost!
(C) 4 - 1x8 @ 79 1/2" (sides)
(D) 4 - 1x2 @ 75" (supports)
(E) 34 - 1x3 @ 38" (slats)
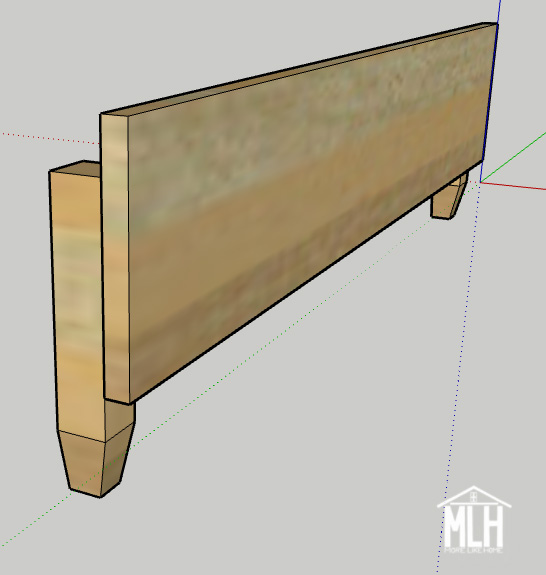
Start by attaching two legs (B) to each end board (A). The legs should be flush with the outside edges and set down 1.5" from the top edge. Attach the legs by drilling through the end board into the leg with 1 1/2" wood screws. Don't forget the glue!
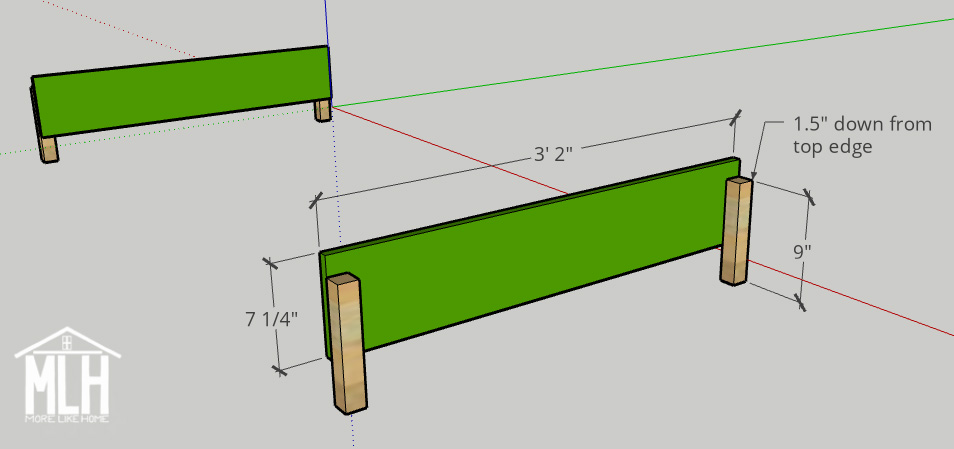
NOTE: for easier stacking, you can use a sander or saw to slightly taper the bottom of each leg. You can taper all four sides if you want, or you can just do the sides that face toward the end board and the sides that face toward the ends of the end board. Most confusing sentence I ever wrote. Hopefully this helps:
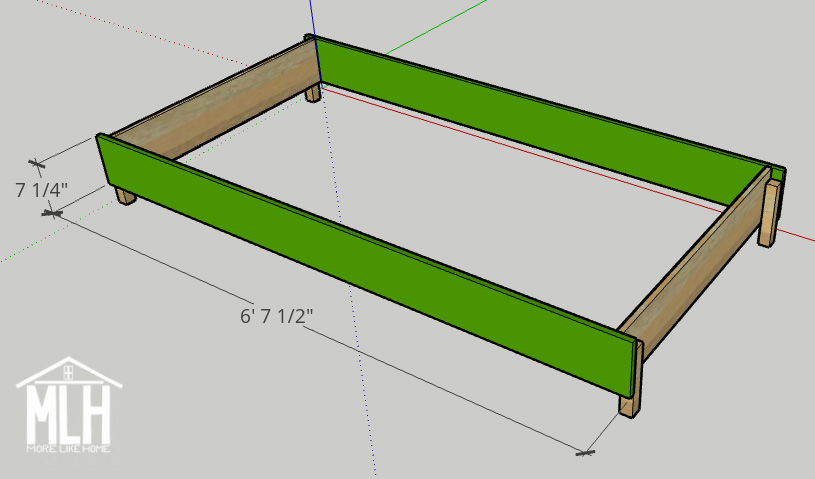
Attach the side boards (C). Line them up flush with the top of the end boards and with the outside edges of the legs. Drill through the side board, being sure to hit both the legs and end boards with a few screws each.
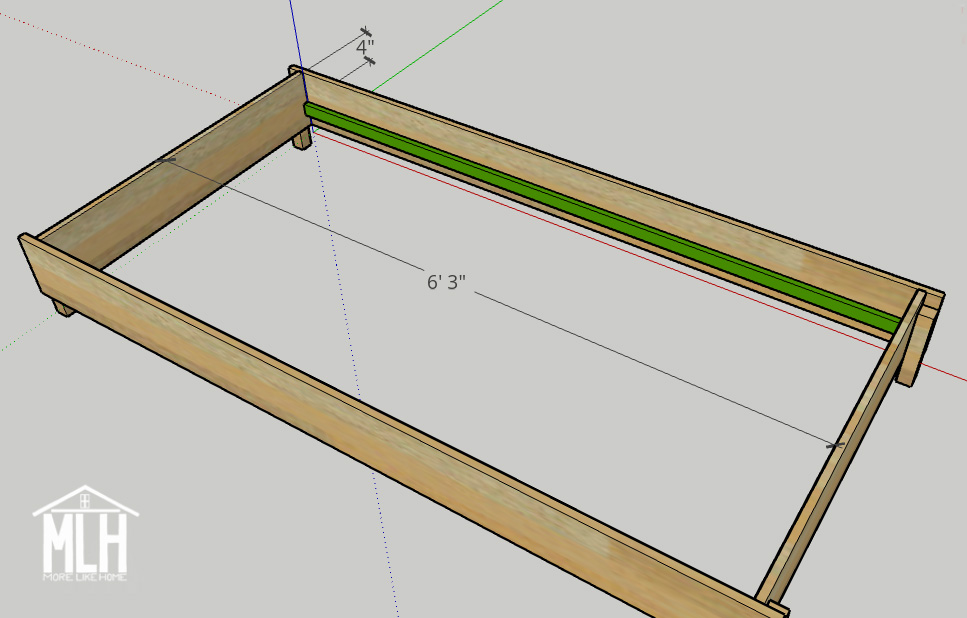
Add the support boards (D) along each side. They should be set down 4" from the top of the side board (if you swapped for 1x6 boards, just make them flush with the bottom of the side board). Attach the supports by drilling through the support board into the side board (careful not to poke all the way through).
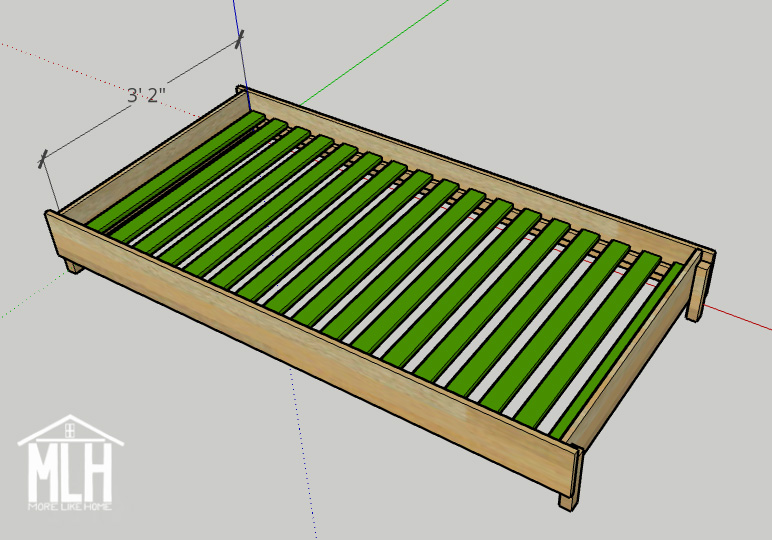
Add the slats (E) across the support boards. You should follow the slat recommendations for your mattress to determine slat size and spacing. For a heavy load, you can use 2x4's instead.
I've drawn the bed using 1x3 slats spaced 2" apart. Normally I would just lay them in place and call it a day, but if you plan to stack very often it would be better to secure them in place so they don't get knocked out while you move it. You can use a little glue and finishing nails to nail each slat to the support board, or even use a strap to attach the slats to each other like we did on our camper van bunk system.
You're almost done! To finish, fill any visible holes with wood filler then sand everything down really well. This is the most important step for a professional finish! Start with a rough sand paper, then go over everything with a medium paper, then again with a fine paper. Once it's super smooth, finish it with whatever paint or stain and sealer you like.
This bed is designed to accommodate a 6" thick mattress. A thicker mattress may prevent your beds from stacking properly, while a thin mattress that sits below the top of the side boards cannot convert to a king size. Don't forget to use the converter kit when you switch to a king size!
And that's a wrap on the stack-a-bed. Now I've gotta know:
What's YOUR best moment?
how much did these supplies cost you?
ReplyDeleteHi Georgia! Do you know if anyone has attempted to make this yet?
ReplyDeleteHi! I haven't heard of anyone making this yet. Sorry!
DeleteJust made this I used furniture grade lumber from Lowes and cost came to just under $200, not including paint. I used hardwood table legs that I cut down to size as well. I also made this for 11 inch mattresses. So legs are 11" instead of 9". Happy with the plans. Great Saturday project.
DeleteThanks so much for this feedback - it sounds beautiful! (Looove the idea to use table legs!) I'd love to see a photo if you have one - you can tag me on instagram or email me at morelikehome (at) gmail (d0t) com
DeleteHi the original plans were to accomodate a 6 inch mattress, right? DId you put the support board flush with the bottom on a 1 by 8 to accomodate your 11 inch mattress? Did you have to use a 1 by 10.
DeleteHave patience I am visually spatially challenged.
We've completed the project! Happy to share photos. Definitely had to taper the legs. To the above comment, supplies cost about $80-90
ReplyDeleteActually, we are having a problem with the width. Width only fits 38" and all mattresses are 39"...
ReplyDeleteDid you get your mattress to fit? I am planning to make one tomorrow, and wonder if I should expand the width by 1 inch.
DeleteWe ordered foam mattresses and they BARELY fit. I doubt spring mattresses would be as forgiving. We are going to force it to work but definitely make everything at least 1" wider. Even consider cutting to 39.5" so that there's room in case the mattress is a tad wide and you put thick sheets on. There's enough wood to cut wide enough for a standard twin size and it's a plan design flaw to cut everything at 38".
DeleteHey guys, thank you for this feedback and I apologize that the plan didn't work out better! I was under the impression that 38" was the standard and based the plan off of that, but even so it would have been wise to leave extra space for sheets and such as you suggested. I'll work on updating the plans to allow for both of those things. Thanks again for letting me know.
DeleteHi Georgia, I did just Google standard twin mattress and it does result in mostly a 38" width, so I completely understand how you arrived at that width. But, when one checks out dimensions for twin mattresses on the market now, they overwhelmingly are 39"! Not sure why! The foam ones we ordered will work fine, but it will be a very tight fit. Thanks again for the free design and inspiration!
DeleteDoes anyone have photos to share?
ReplyDeleteI do but I don't know how to upload them.
DeleteHi! I haven't gotten any photos for these plans yet, but I always like to add a few to the post once I do.
DeleteUnfortunately I don't have a way for readers to upload them here, but I do have a few other options for sharing if you're interested - you can email photos to morelikehome at gmail dot com, you can share on my facebook page, or you can tag me on instagram if you share there. Hope that helps!
Hi, would you have a plan for this in cm? I can't quite understand your measurements for the shopping list.. Thanks a lot!
ReplyDeleteHi! Unfortunately I don't have any plans in cm at this time. Sorry!
DeleteUm, just multiply any measurement in inches by 2.54… There are 2.54 cm in 1 inch.
DeleteI would also appreciate the measurements in cm or mm. Any chance you have them at this time?
DeleteWondering if anyone has plans for twin xl stacking beds, with thicker mattresses.
ReplyDeleteHi! You would need to measure your mattress to verify the sizing you need, but my understanding is that an XL mattress is about 6" longer than a standard twin, so you would just need to cut your side and support boards 6" longer to accommodate the extra length. You'll also need to measure the thickness of your mattress and probably cut the legs longer to fit the extra height. Hope that helps!
DeleteIf I get this weekend off I plan to make it. Thanks for all the information. Check double check . Measure twice cut once. Got it
ReplyDeleteBuilt it. Made it 40 and 80 and the mastress has just the correct fit with just a little room to make the bed.
ReplyDeleteJust wanted to say thank you! I built these in June, and guests slept on them recently, a great success! I really appreciate your sharing these plans. (I wanted to share a photo with you, but it's not supported on this site.)
ReplyDeleteI too want to thank you for these clever plans! I just finished them with slight alterations to the measurements (added an extra inch to width and length to leave room for linens— if I did it again would leave 1.5 inches!). I also used 2x6’s and like how they look. Happy to send pictures!
ReplyDeleteHow heavy are your beds? Would two 11 year olds be able to separate the beds on their own?
DeleteWould it be possible to add a headboard to this?
ReplyDeleteWould this be sturdy enough without using glue? I want to be able to disassemble it if needed for easy moving. Would using fatter screws help? Thanks!
ReplyDeleteHi
ReplyDeleteI'm wondering if this can be made as full sized stackables? Or would you need an extra support across the bottom for the slats?
Thanks for these plans. I made the beds using the cheaper 2x2 furring strips and found that for the legs, I needed to use 2” nails to attach to the end board. It made them much sturdier. Turned out great!
ReplyDeleteI'm not quite sure looking at the plans how the upper bed frame attaches to the lower bed frame to keep it from slipping off...I'm thinking maybe a few home made latches would to the trick
ReplyDeleteHi, I built these last summer... the beds fit together perfectly when stacked, the weight of the top bed prevents any movement. No need for latches!
DeleteIKEA has stackable beds. Their width is listed at 100 cm or 39 3/8”. Hope this helps
ReplyDeleteI am going to modify these plans for the sniglar/ len Mattress from ikea. The plan is to make them so they can either be pushed together for company, or apart for the littles, if I take the Mattress off, I shpuld be able to slide 1 under the other. Will update in spring
ReplyDeleteI made this! (Insert wonder women stance). Once you have the materials these beds can be made in a day. My twins were 39x75x8, a few adjustments were made on width and depth, keep length the same as instructions. I only used screws, easier to remove if needed in the future. Very sturdy stacked or separate. These will be perfect in my spare room for guests. I’m going to make them for my cabin rentals too since they can be twin or king. Sanding & varnish will be done in the winter! Very happy with the result.
ReplyDeleteSo glad to hear it!!
DeleteMade this this weekend and it was really simple to follow the instructions. The materials cost a bit more than expected though, around $200 form Lowe’s, but maybe I just shopped badly😂 I’ll tag you when I get the mattresses 😊
ReplyDeleteLumber prices have been insane the last couple years - it's not just you!
DeleteHi. I hope to make this tomorrow as I got two free twin mattresses. They're 9 inches tall though. Do you know exactly what I'd have to change? just making the legs longer seems like not enough? If it is, do you know if I just add 3 inches since my mattress is 3 inches thicker. Thank you so much.
ReplyDeleteYes I would add 3 inches to the legs! You could also swap the 1x8s for 1x10s if you wanted. That would make it look more like the original plans with less of the bottom mattress showing when they are stacked, but 1x10s will cost more and 1x8s will work just fine. So that's up to your preference! :)
DeleteHi Georgia! How much room is there on the bottom? Is it possible to have about 10 inches of room under the beds?
ReplyDelete