
We had family in town for a Memorial Day weekend full of food, walks, flower planting, and the occasional thunderstorm/tornado. It was a great weekend in spite of that last part. :) We also managed to knock out a little patio project while some very willing babysitters kept an eye on Baby B.

I've had my eye on this outdoor collection (picture below) from West Elm, but it cost $149-279 per piece! That was never going to happen for us. So we knew we would have to build it if we wanted to have a sectional for our patio.

Fortunately for us, Ana White already had plans for a similar sectional on her website! (Want to build your own? You can find the plans here and here.) It turned out great and looks just like what I wanted! We did make a few changes from her plans, mainly because we used 2x4s instead of 1x4s, so we had to adjust some measurements to get the same overall dimensions. We chose 2x4s because they were actually about 1/2 the cost, but a bonus for me was the chunkier look we got with the 2x4s.

So, ready to make your own?
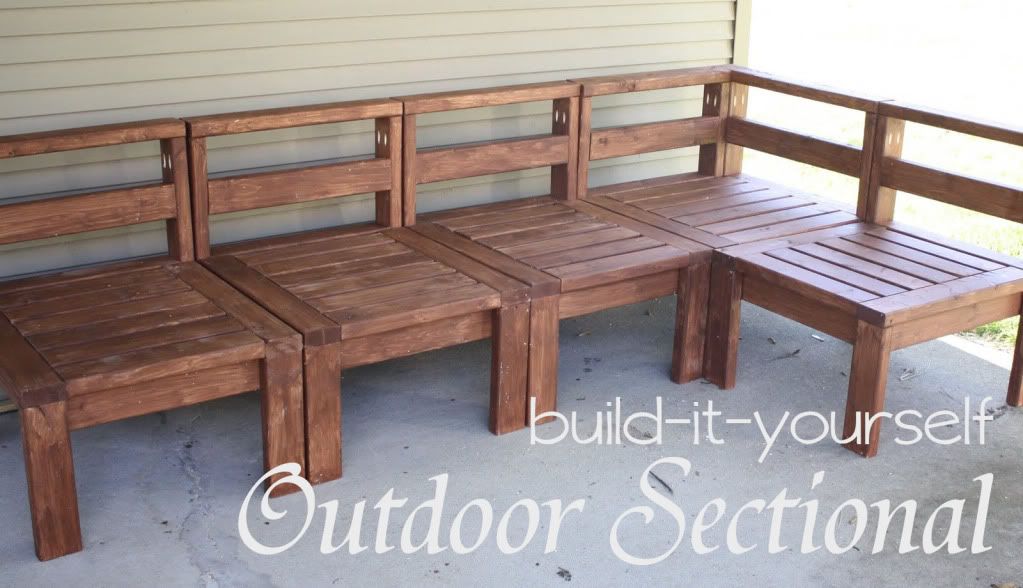
Here are the adjustments we made for using 2x4s for the armless sections (shown in red):
2 – 2×4 @ 24 1/2" (Seat Side Aprons)
1 – 2×4 @ 18" (Seat Front Apron)
2 – 2×4 @ 23" (Seat Supports)
2 – 2×4 @ 24″ (Seat Sides)
6 – 2×4 @ 17″ (Seat Boards)
2 – 2×4 @ 13 1/2" (Front Legs)
2 – 2×4 @ 27 1/2" (Back Legs)
1 – 2×4 @ 24″ (Back Top)
2 – 2×4 @ 21" (Seat Back Board and Seat Back Apron)
Step 2: over hang should be 1 1/2" instead of 3/4"
Step 5: You will have 13 1/2" below the seat back board instead of 14 1/4".
Plans here
For the corner seat:
1 – 2×4 @ 23" (Front Apron) AND 2 @ 23" (Seat Supports)
1 – 2×4 @ 24 1/2″ (Side Apron)
1 – 2×4 @ 24″ (Side Seat Board)
6 – 2×4 @ 20 1/2″ (Seat Boards)
2 – 2×4 @ 13 1/2" (Front Legs)
4 – 2×4 @ 27 1/2" (Back Legs)
2 – 2×4 @ 21" (Back, Short Top Apron and Seat End)
2 – 2×4 @ 22 1/2″ (Back, Long Top Apron and Seat End)
1 – 2×4 @ 24″ (Short Top)
1 – 2×4 @ 27 1/2″ (Long Top)
Step 2: over hang should be 1 1/2" instead of 3/4"
Step 5: You will have 13 1/2" below the seat back board instead of 15" to the top of the board.
Plans here
I think that's it!

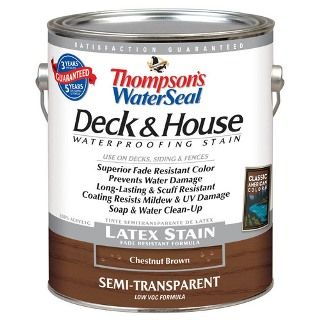
Like Ana suggested, we cut all the pieces and then finished all the sides of each piece before assembly. Instead of painting, we decided to try a waterproofing deck stain. It was super easy, we just painted on one coat and let it dry. It has a 3 year warranty for decks, and since our furniture is on a covered patio (and won't get traffic like a deck) we're hoping it will hold out just fine for our purposes. This is the one we used:
I had fun on this project using my first mother's day present - a miter saw! It made the cutting go SO much faster. I also broke in my Kreg Jig, which resulted in very sturdy furniture with almost no screw holes showing. I think it also made things go a lot faster.

Overall we probably spent about 10-12 hours on the whole project (mostly in one loooong day between storms). I probably wouldn't recommend tackling all the building in one day. Unless you have a babysitter in town and have to get it done while you can. :) For the project cost, we spent about $90 on wood, $20 on Kreg screws, and $20 on finishing. So our total was about $130, which is less than the cost of just one piece at West Elm! We're still looking for cushions, but haven't found a cheap enough option yet. :)

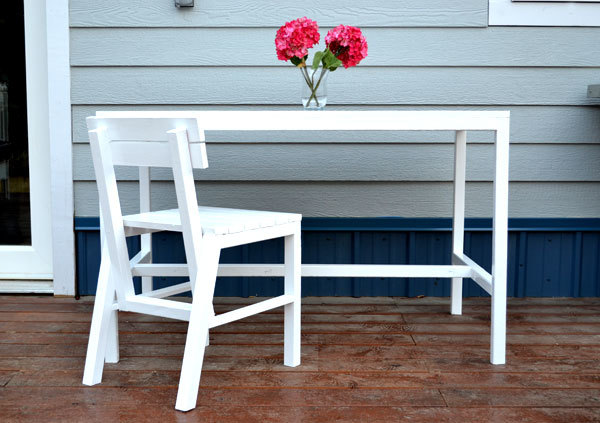
We're still planning to add some coffee table squares (plans here) and maybe a few chairs of some kind down the line. I'd also love to have this table set, but we may not have room for it on our current patio.
And just for the record, you probably shouldn't work in flip flops because 1) you might hurt your feet and 2) you'll probably ruin your nail polish.

So there you have our little weekend project. We can't wait to finish turning this patio into a great summer hang out!

We are SO ready for summer! :)
*UPDATE: We found cushions on sale at Target and after some terrible experiences with customer service returned the two we had. Then seat cushions went on sale at Walmart so we grabbed some green ones! And we're hoping to get some inexpensive back cushions at IKEA. I'll keep you posted. :)


I love that it is sturdy. It will take the climbing and crawling of rowdy kids and also be very stable for an elderly person who has problems with regular lawn chairs. Practical and stylish. . . way to go.
ReplyDeleteThanks! That was definitely a bonus of using 2x4s. And I think the Kreg Jig helped make the joints really strong, too.
ReplyDeleteThanx for doing this as we plan on building ours out of 2x4s as well to beef it up. You just made it so much easier for us and it's very much appreciated! I just wanted to bring something to your attention, however. You adjusted the measurements, but you have them all listed as 1x4s still. ;)
DeleteHa ha, oops! I just updated it to fix that problem. Thanks for pointing it out, I would never have noticed! :)
DeleteCan you please check your measurement for the front apron on the corner piece? Started it last night and the total width came up way too long. I dry fitted the seat sides the seat boards and the seat boards do not fit, they are too short. I'm sure it's that apron measurement that is off. I'd appreciate it.
DeleteWell we've started the corner piece twice and still haven't gotten any where, ha. I believe it's possibly all operator error. :) All other sections are now built so we'll definitely be tackling this piece next. Thinking the measurements might be ok after all. Will let you know how it turns out!
DeleteOh no! Sorry you are having trouble. :( I will run out and check the measurements after nap time. And yes, do let me know how it turns out!!
DeleteStill had issues with the corner piece, but I'm not sure exactly why. I get frustrated quickly so my hubby dealt with it. It might have been us. Who knows! Regardless it is done! I'd post a pic here, but the paste function doesn't seem to work in this field. It's posted on Ana's site . Thanx again for the mod's measurements!
DeleteSorry you had so much trouble. That is so discouraging when you are working on a project. :( I'm glad you got it figured out in the end, and I will definitely check it out on Ana's site!
Deletehi,
DeleteI was just curious for the cut lists, is that only for one seat, or are all the 2x4 list for the full sectional? Im doing this project with a class and just need to make sure i order the right amount of wood. We are going to be doing 7 sectionals altogether. 1 sectional per group...
Hi! The cut list is for a single section, so you need to do that 7 times to make 7 sections. Good luck! :)
DeleteGreat job detailing everything. We're going to use your plans. Looks fantastic. Thank you.
ReplyDeleteGreat! I'd love to hear how it turns out for you. Have fun building!
DeleteLove, love, love this!! So beautiful! I'm having my "handy" husband build something similar on our new deck. How do you feel about the straight back? He was going to angle them.
ReplyDeleteWhat do you think?
Allison P
Thank you Allison! The straight back is really uncomfortable on it's own, but one we added some throw pillows it is great. If you're wanting to use it without pillows I would definitely angle it, but if you have pillows I really think either way would be fine. :)
DeleteI tried this project (armless) and came up short with two of the measurements. For the 2 – 2×4 @ 24 1/4" (Seat Side Aprons), I had to make them 24 1/2" and for the 2 – 2×4 @ 22 1/4" (Seat Supports) I had to go 23" instead.
ReplyDeleteAre those just typos or what? There were some that didn't match up on the corner pieces too, but I can't remember what they are right now.
I just went and remeasured everything and my (Seat Supports) were actually 22 3/4", which is still shorter than you came up, and my (Seat Side Aprons) are what I stated and all my other measurements match, so I'm not sure where the difference is coming from.
DeleteWe've had problems with other projects where the thickness or width of our boards (from the lumber store) were off from what they were supposed to be and we had to adjust our measurements. Maybe you had the same problem?
I'm really sorry you had trouble. I'm sure that was super frustrating. :( Thanks for letting me know that there was a problem, I've updated the plans to correct the measurement I had wrong so hopefully that will help in the future. Sorry again!
I did a test build with 1x4 (new woodworker) and later came across this plan using 2x4. I just used a tape and used your measurements (making mental adjustments for 2x4s). The seat side apron comes to 24 1/2". I will be doing initial cuts with 24 1/2", since I can still shave 1/4" if it is too long. ;)
DeleteDid you use steel Kreg screws? I am thinking that the regular zinc may not hold in outdoor weather (SE Michigan).
Thank you for commenting! Let me know how it works out for you and I'll adjust the plans if needed.
DeleteWe used these blue-kote weather resistant screws.
http://www.amazon.com/gp/product/B000VK3TES/ref=as_li_tl?ie=UTF8&camp=1789&creative=390957&creativeASIN=B000VK3TES&linkCode=as2&tag=moliho-20&linkId=N2DIMHO62WFI77OR
My final adjustments were
DeleteSide Aprons = 24 1/2"
Seat Supports = 23"
I purchased my screws before your reply. I ended up purchasing Stainless Steel Screws Kreg from Amazon. It was a big mistake. The reviews were correct. These are not good quality screws like their others. I managed to destroy 2 driver bits and also 2 screws were stuck without fully driven due to the screw head getting rounded while driving them in.
So, I finally finished the job using "Grip-Rite 5-lb #9- 2.5-in x 2.5-in Pan-Head Polymer-Coated Star-Drive Composite Deck Screw" from Lowes. Not a single screw jammed or had any problem.
I will soon use your adjustments to make a corner chair.
Thanks again for providing your measurements for 2x4s.
Thanks so much for the feedback! I adjusted the plans to reflect your measurements (and sorry to Jesse for not changing them sooner!). Sorry to hear about your trouble with the steel screws, but I'm glad you found something that worked so well. And I wonder if those are cheaper than the Kreg brand screws we used? I'll have to compare next time!
DeleteThanks again!
Last night, I finished 1 corner chair. All your measurements are perfect. Thanks again.
DeleteHow is your latex stain holding up?
DeleteSo glad to hear it. Thanks again!
DeleteI'd say pretty well, considering we did it in 2011! It's starting to look pretty rough around the top, though. We may reseal it this year, if not we'll definitely need to next year. :)
That is a neat mod you did to the original design. 2x4's are gonna help put up with:
ReplyDelete1) String GA storms
2) Folks all filled up with the backyard food!
Too bad about the Ped...lol
Fred (formerly from Perry - GA!)
Thank you! We'll definitely test out #2. I'm getting hungry just thinking about it. :) Thanks for commenting!
DeleteGreat job looks really good!
ReplyDeleteThe only thing I would different (you noted this) is to map out the pocket holes ahead of time, you could hide all your pocket hole on the outside of arms where two pieces come together, or on the corner on the back side of the arm supports.
Looks really great!
Yes, thank you! I definitely should have planned ahead of time. Oh well, live & learn I guess. :) Hopefully this helps anyone else who gives it a try! Thanks!
DeleteYou should glue some pieces of foam core together with foam adhesive and cover them yourself to make the back cushions. You could even use batting over the foam core if you wanted them to be softer. Foam core is good for so many things!
ReplyDeleteThat is such a great idea! I would love to have the look of the west elm cushions instead of the pillows. I will have to give this a try, thanks so much for the suggestion!
DeleteUse the foam and cover with batting to make it softer then cover with fabric. I would make extension tabs with velcro to wrap to the back and fasten. You could use a 2-3 inch tab on each end or if I were doing it, I would make one tab that would stretch from side to side.
Deletewhat is a good water proof material, as jodi had mentioned for making the backing/cushion? i am new to this stuff, and will be doing this soon.. i cant wait....
ReplyDeleteAmanda
Joanne Fabric has a pretty big selection of outdoor fabrics that are water and sun resistant! You could use those to cover whatever foam or cushions you want to use. Another option would be a waterproofing spray you can also get at Joanne that can be sprayed on regular fabrics to make them water resistant, but I don't know how well something like that holds up in the long run.
DeleteAnd good luck! I'd love to see pics when you are done!
DeleteI saw someone on Pinterest used shower curtains to cover outdoor cushions, might be less expensive than waterproof fabric.
DeleteWhat type of wood did you use? Pressure treated? Thinking about trying to start this project this weekend! Wish me luck!
ReplyDeleteI just used regular construction grade 2x4's. But mine is under a roof so it's not exposed to the elements as much as something out in the open. I probably would have used treated wood if that was the case. :) I used a deck sealer to finish them so I'm hoping that will be enough to make them last. After their first winter they still look as good as ever!
DeleteFor anyone else deciding between regular and treated lumber, use regular! Treated lumber is not safe for use in furniture. A splinter with treated lumber is toxic, and you don't want your skin to come into contact with it, you can absorb the chemicals. Use a spar urethane/ spar varnish to finish it and recoat as necessary - usually every 4 to 5 years. :)
DeleteThanks for the tip, Jen! :)
DeleteThis looks great! My hubby and I are very excited to try this! Sectionals are soooo expensive.
ReplyDeleteThank you! It's a little crazy how much they cost. :) Have fun making your own!
DeleteAre the instructions or steps located somewhere? I started it but have questions on a few of the side pieces.
ReplyDeleteYes!
DeletePlans for the corner pieces are here: http://ana-white.com/2010/05/plans/corner-and-ends-outdoor-sectional
And plans for the armless pieces are here: http://ana-white.com/2010/05/plans/simple-modern-outdoor-sectional-armless-section
I didn't want to post the plans since I didn't write them, I just modified it to use a different lumber size! :) Good luck!
Love this! Would be really cool if the corner peice was made with the seat in the herring bone style. Not sure if I spelled that right. My husby will be making this very soon!
ReplyDeleteThat does sound cool! You should give it a try! I'd love to see pics when you guys are done. Good luck! :)
Deletewhat kind of wood did you use?
ReplyDeleteWe just used basic 2x4 studs. The same stuff they use for framing houses and such. If you ask at Lowe's for 2x4 studs they can point you in the right direction! :)
DeleteCould u share which kregjig u bought ? I notice there are 3 different ones and I am curious about which one I should buy ;)
ReplyDeleteI bought the regular Kreg Jig and have been very happy with it! I would not recommend the Jr. or mini versions because they have to be directly clamped to each board so they are much more time comsuming (and for me, frustrating!) to use. The regular one attaches to a table top so you can easily move from board to board with no down time. The Master System is the same as the regular Kreg Jig but includes a few extra pieces like a clamp. I think the regular Kreg Jig would be perfect for most people, and they sell a lot of the extra pieces separately so if you decide later you need one of the extras you can still add it. Hope this helps! :)
DeleteHello,I am about to head to the store to buy everything needed.I have only one question so far.What size screws did you buy?Since everything is with 2x4's now.Thank you!It looks amazing!
ReplyDeleteWith the Kreg Jig we used 2 1/2" screws. Without it, you'll need at least 2" to go through boards the thin way, and at least 4" if you're going through the wider way. Hope that makes sense!
DeleteI plan on using my kreg to try this for the first time? So all I need is the 2.5 inch blue screws? Do i need any others? Also did you use glue on all joints?
DeleteI did glue all the joints. Better safe than sorry! I do think you could do it all with the kreg screws. There are a couple places it's nice to reinforce without the kreg holes (like screwing the legs to the aprons, which can be done from the back so it won't be visible) but you could use the kreg screws in those places if you don't want to buy a set of regular screws. :) Good luck!
DeleteIm trying to figure which length of 2x4 to purchase to get the most out of it. What did you use? 8/10/12/or 16 ft pieces?
ReplyDeleteWe used standard 2x4 studs (92 5/8”) because they were cheapest per inch and because they fit in our car. :)
DeleteGreat idea! You could also enclose the bottom for storage
ReplyDeleteHey, great project going to do this these Sunday, one question? I dont understand how you did the supports under the chairs for the 2 x 4's the way they go across the chair. Thanks you can email me at Shulsey@co.washington.ar.us
ReplyDeleteOh man, I'm sorry, I don't understand what you're asking. :( Did you read through Ana's instructions?
Deletehttp://ana-white.com/2010/05/simple-modern-outdoor-sectional-armless-section
Hopefully that helps...
what size cushions did you buy/ do I need to look for? thanks!
ReplyDelete24x24" Target and Walmart both had that size. :)
DeleteHow many total 2x4s?
ReplyDeleteWell, we started with the number Ana suggested (6 for the corner section and 5 for each armless section) but since we were using 2x4's instead of 1x4s it worked out a little different and I believe we had to go back for just a couple more. :)
DeleteThis comment has been removed by the author.
ReplyDeleteThis comment has been removed by the author.
DeleteGeorgia, where can I find the step by step instructions for the corner seat? I made thecregularvseats but didn't see instructions on Ana's website for the corner seat. Thanks.
ReplyDeleteThe corner seat instructions are here: http://ana-white.com/2010/05/plans/corner-and-ends-outdoor-sectional
DeleteGood luck! I'd love to see pics when you finish! :)
We have made the armless sections and they have worked out wonderfully. However we too are having problems with the corner sections, would you be able to post to your site a picture of the underneath of the corner section so my husband could have a visual to see where we are going wrong. Thanks
ReplyDeleteWe are building this now and are having issues with the corner sections too. We're not even sure what our issue it :) but pics of the underneath of the corner section would help us big time too!!
DeleteAhhh, what a great idea! I will take an underneath picture for you tomorrow. :) Sorry you're having trouble. The corner section is tricky! I remember we had trouble when we first built it too. I'll get you a pic tomorrow!
DeleteAna has a picture underneath on her site too that might be helpful. http://ana-white.com/2010/05/plans/corner-and-ends-outdoor-sectional
DeleteI think I figured out the source of the confusion... Your amended cut list has both aprons (front and side) set at 24.5" when one of them (probably the side) has to be 1.5" shorter. When they are joined together, both sides should be of equal length.
DeleteThis comment has been removed by the author.
DeleteAn alternate approach to Chris’ is to reduce the length of the Front Apron from 24 1/2 to 23 inches. The Front Apron is the blue board in Step 1. I tried this yesterday and it worked out very well... Best of luck with your chairs.
DeleteThanks Ted! :)
DeleteHow did you attach each piece? On Ana's website she did it with scrap 2x4's. Did you do the same?
ReplyDeleteThis comment has been removed by the author.
DeleteWe used a Kreg Jig for parts of it, but other parts we just used a regular drill and screws (2 1/2" or 4", depending on how far they need to reach). You could definitely do the whole thing without a Kreg Jig! Be sure to use glue as well.
DeleteWe did not use scrap 2x4's. I would have it we had any, ha ha. :) But we had to buy some for the project.
I think kheckl was asking how you connected each individual sectional seat to the next one... Ana's plans used a small scrap of 2x4 between the seats which she screwed through. I think kheckl (and myself) want to know if that gap is still the same, or if we need a different width of wood.
DeleteAhhhh, thank you!! Mine are not attached to each other at all, they are pretty heavy so I just set them side by side and they stay. And then I can rearrange them whenever the mood strikes! :) I'm not sure on the size of the gap, I'll have to run out and measure.
DeleteMy wife and I will be starting this project in a week or so. I'm super excited...Thanks for the great idea.
ReplyDeleteThis comment has been removed by the author.
ReplyDeleteHi, I scanned the comments and hope I am not repeating a previous question. Roughly, how many 2x4 (x92 5/8) boards are needed to construct one section? I am building 7 sections and an estimate of wood materials would be appreciated.
ReplyDeleteMany Thanks
If you are careful, you can easily do a corner with six 92-5/8" 2x4s or a regular section with five. Here's how I did it:
DeleteRegular Section Cuts Per Board:
#1 - (24 1/4")x2, (18"), (22 3/4")
#2 - (22 3/4"), (24")x2, (17")
#3 - (13 1/2")x2, (27 1/2")x2
#4 - (24"), (21")x2, (17")
#5 - (17")x4
Corner Section Cuts Per Board:
#1 - (24 1/2"), (23")x2, (13 1/2")
#2 - (24 1/2"), (24"), (20 1/2")x2
#3 - (20 1/2")x3, (27 1/2")
#4 - (13 1/2"), (27 1/2")x2, (20 1/2")
#5 - (24"), (21")x2, (22 1/2")
#6 - (27 1/2")x2, (22 1/2")
Measure twice, cut once!
Hey, just started this project, am very excited. I did however notice that this list wasn't updated with the new lengths. Thanks so much!
DeleteRegular Section Cuts Per Board:
Delete#1 - (24 1/2")x2, (18"), (23")
#2 - (23"), (24")x2, (17")
#3 - (13 1/2")x2, (27 1/2")x2
#4 - (24"), (21")x2, (17")
#5 - (17")x4
Corner Section Cuts Per Board:
#1 - (24 1/2"), (23")x2, (13 1/2")
#2 - (24 1/2"), (24"), (20 1/2")x2
#3 - (20 1/2")x3, (27 1/2")
#4 - (13 1/2"), (27 1/2")x2, (20 1/2")
#5 - (24"), (21")x2, (22 1/2")
#6 - (27 1/2")x2, (22 1/2")
I think that should be it. It's the same number of boards and same cuts on each board, just a couple cuts are slightly different lengths. :)
This is fantastic, thank you. We're dismantling a deck that had a rail with 36" 2x4s spaced 2" apart ... long story short I could probably make 3 sets of this with the pieces I have. It's going to look great on the new deck :)
ReplyDeleteThat's sounds great! Up-cycled wood is a great way to go, no waste and super cheap! :)
DeleteTrying to plan out how many to build, how wide is each section?
ReplyDelete24" wide. :)
DeleteI love this project but have a comment. When you put the cushion on, there is not much height for back cushion and support. I will be modifying this so that the back of these benches come to shoulder blade heigt for comfort.
ReplyDeleteGreat idea. That's been my only complaint about them, too! :)
DeleteTed above is correct - I just made the corner piece last night and the front apron cut is too long - you need to reduce the length of the Front Apron from 24 1/2 to 23 inches otherwise when you measure 3.5" from one end to put the inside supports the seat will not fit inside the back frame which has a width of 21" - you should fix this dimension above.
ReplyDeleteThank you Brittney! I'll fix it now! :)
DeletePlanning on making these this spring. What type of wood did you use for this project? If you just used pressure treated wood how has it held up (warping). For some reason we are finding it really hard to find 2x4's in woods such as cedar in our area.
ReplyDeleteWe used regular stud lumber, which I believe is pine, and sealed it with a deck sealer. Even untreated it has held up great! But there is a roof over our patio so it is somewhat protected from the elements, I don't know if it would be different if it was totally out in the open. If you're looking to use cedar, Ana White's original plans use 1x4's which may be easier to find. :)
DeleteThis comment has been removed by the author.
ReplyDeleteI love this plan, however when reviewing the Kreg Jig system, they state it is 'for materials from 1/2"- to 11/2"-thick', so how did it work with 2" thick wood?
ReplyDelete2x4s are actually only 1.5" thick and 3.5" wide. It's confusing at first! :)
DeleteHi Georgia. Thanks for posting, these look great! I haven't started building yet, but just wanted to let you know why the measurements don’t add up:
ReplyDeleteIf you look from top down: 24” seat sides + 3.5” back legs = 27.5” TOTAL LENGTH FROM FRONT TO BACK
Now look from bottom up: 1.5” overhang + 1.5” front apron + 22.75” seat supports + 1.5” back apron = 27.25” TOTAL length from front to back
Or here’s another calculation: 1.5” front legs + 24.25” seat side aprons + 1.5” back apron = 27.25” TOTAL length from front to back
These measurements assume that the back apron lies flush with the back of the back legs. The way the measurements are provided currently, the back apron would need to be installed 0.25” in from the back in order to meet with the seat supports and seat side aprons.
I would suggest updating the measurements to the following:
24.5” Seat Side Aprons (from 24.25”)
23” Seat Supports (from 22.75”)
I’m usually wrong, but I’m pretty sure I’m right about this… :)
The plans are not currently available on her Ana's page, do you have a copy?
ReplyDeleteI don't, but they seem to be up now. Not something I thought of before, but I probably should have a copy in case it happens again! Thanks!
DeleteI don't, but they seem to be working now. Never thought of it before, but I probably should have a copy in case that happens again! Thanks!
ReplyDeleteThe link on Ana's page says "not found" - I built one set of these, but am building a second set. Obviously I can use my original set for measurements, but it would be much simpler from your plans again. Do you have a different link?
ReplyDeleteIf you just type "outdoor sectional" in the search bar on her site you can find it even when the links change. Here are the current links to both plans:
Deletehttp://ana-white.com/2010/05/plans/corner-and-ends-outdoor-sectional
http://ana-white.com/2010/05/plans/simple-modern-outdoor-sectional-armless-section
Hi Georgia!
ReplyDeleteWe recently featured your DIY sectional in our round up on patio projects at http://www.thebudgetdecorator.com/patio-perfection-diy-projects/ I couldn't find the contact form on your page, so I hope it's ok to send this along as a comment!
Great project! Please let us know if you have any issues you would like us to correct with your project feature, and we hope you enjoy some great traffic from it! Have an amazing week!
Looks great, thanks so much! *note to self: add contact info to my page* Thanks again!
DeleteI just put this together yesterday, & I did not have any problems with the pieces fitting together. I guess all of the measurements and cuts have been updated?
ReplyDeleteWe did get everything updated, and I'm so glad to hear it's working out now! Thanks! :)
Deletea
ReplyDeleteI noticed you did not put the arm rails on the end sections, do you wish you would have for you happy that you left them open?
ReplyDeleteHi! I was glad we left the ends open. It gave us more opportunity to rearrange and move things around... which I like to do a lot! :)
DeleteHi....thanks so much for posting this using 2x4s. Something about using 1x4s seems a little unstable. So I’m gonna be making this soon for a friend of mine for her new patio. She wants the seating to be 17-18 inches high like a normal bench or chair height. I’m great at following directions but terrible at math and figuring out measurements on my own. Could you tell me what I would need to adjust in order to make the seats that tall and also to make the backs taller as well. Thanks for your help. I really appreciate your help.
ReplyDeleteHi! To make an 18" high seat you just need to cut all the legs 3" longer. So the front legs will be cut 16.5" long and the back legs will be 30.5" long. That will give you the exact same sectional, just higher off the ground. If you want the back to be taller than mine, you need to add a few more inches to the back legs (in addition to the 3" to raise the seat). Hope that helps!
DeleteGeorgia wanted to thank you for the plans our sectional turned out great
ReplyDeleteYou're welcome! So glad it turned out great! :)
DeleteGot a stupid question for you, on the materials list that is per seat correct?
ReplyDeleteNot a stupid question at all! Yes, the list is for one seat. :)
DeleteWhat size are the cushions?
ReplyDeleteI believe they were 24x24. We actually left this sectional with the new owners when we moved a few years ago so I can't check for you - and I can't believe I didn't put that info anywhere! Sorry!
DeleteI am so excited to complete this project. I made the desk out of 2/4's and absolutely love it. We plan to put in a patio this summer and were starting to look for outdoor furniture. This is what I was looking for!!! Looking forward to completing it and using!!
ReplyDeleteAwesome! Have fun with it! And thanks for commenting - it totally makes my day to hear when someone uses my plans! Glad you like the desk, too! :)
DeleteQuestion: where did you get your lumber from?
ReplyDeleteI just bought it off-the-shelf at Lowe's! :)
DeleteThanks for this, I bet you can't believe people are still using these plans 10 years on! Due to the pandemic, garden furniture is in short supply in the UK at the moment as well as being really expensive.
ReplyDeleteI used your plans to make two of the chairs and then adjusted the plans to make a standalone wide bench and a low table.
It turns out UK 2"x4" is slightly different dimensions (3.75" wide X 1.75" deep) so I had to make a couple of amends to the cuts but I'm really pleased with the results. They are so sturdy, I am sure they will last for years.
Excellent outcome, may try something very similar but use 2 x 6" for the back rests so can create an angled back.
ReplyDeleteDid you connect the sections together with any hardware or are they all separate?
ReplyDelete