Tuesday, August 25

DIY Stretchy Wrap {our favorite way to carry a newborn!}

*Update - We have pictures with an actual baby! Hooray! Big thanks to Sister and Niece for posing!


 I know I've said it before, but a stretchy wrap is still our favorite way to carry a tiny baby. With baby #3 on the way, we decided it was time for a new stretchy wrap just for him/her! Two years ago we made one with a really pretty center panel (tutorial here), but it turns out we're just not really red people (and Husband isn't really feeling the flower power) so we decided to tone it down a bit this time around.

We don't have a baby yet so Curious George is modeling our new wrap. For some reason we decided to take this picture in the front yard so I was all "Hurry up and take it! Did you take it? Before the neighbors looks! Did you take it?!"

This is one of the easiest DIY projects you will ever take on. If you skip the middle marker patch, it's completely no-sew!


We watched the Joann Fabric ads and coupons until we found the perfect storm last week - knit fabrics 50% plus a 20% off purchase coupon! It was such a good deal we decided to go with two new wraps (and each piece of fabric is wide enough to make multiple wraps so we will end up with extras for my sister).


What you need:
  • 6 yards of knit fabric (go for one that's mostly cotton, polyester gets hot!)
  • small scrap of fabric for the middle marker (optional)

Saturday, August 22

DIY Felt Birthday Banner

We've got one more felty birthday project for you this week. While we were putting up the traditional streamers and balloons (they were black, as requested by the soon-to-be-2 birthday boy... who apparently likes black) the night before his birthday we decided it would be nice to have a reusable "Happy Birthday" banner to pull out for every birthday. So that night after I finished his polar bear birthday crown, I whipped one up from my felt stash (another reason I like to buy felt by the yard = there's always left overs for last minute projects!).


Like I said, this project was also completed the night before his birthday, so that will give you and idea of just how fast and easy it came together. And if you're really in a time pinch you could hot glue the letters on instead of sewing them. It's also really simple to make the banner say anything else you want - you don't even need a pattern! Here's what you need:
  • felt! Any colors you like. I used red, yellow, and a tealy blue. I guess the amount would depend on how big you make your pennants, like I said I did it all from left over pieces. :)
  • thread (or hot glue if you want a no-sew project)
  • hot glue 
  • rope or ribbon
Start by cutting out some pennants (you need 13 to spell "happy birthday"). I just cut one the size I wanted, about 6" tall, and used it as a pattern to cut out the rest. Next I cut felt rectangles for each letter. You can see in the pic below I cut the rectangle to just fit on one of the pennants. Then I used it as a template to cut out 12 more rectangles. Cutting the letters from the rectangles makes it easy to be sure your letters will fit on the pennants, and that they all end up evenly sized! Then I lined up all my pennants in order (red, blue, yellow, red, blue, yellow) with their coordinating rectangles on top of each pennant (I did yellow on red, red on blue, and blue on yellow).


Monday, August 17

Polar Bear Felt Birthday Crown {free pattern}

We like to keep birthdays pretty simple around here. So simple, in fact, that often the only thing I make for birthdays (apart from some favorite foods, of course) is our traditional birthday crown. And with another birthday just written in the books, we've added a two-year-old polar bear crown to our repertoire!


So far the crowns have all been animal themed, featuring whatever they are interested in at the time... which can change daily with little guys. So it actually works out perfectly that I usually put this activity off until the night before. Fortunately they come together pretty quickly so even starting after the boys are asleep, I know I'll be done in time to hang a few streamers before bed. And that is usually the extent of our birthday preparations - make a crown, hang a few streamers, blow up a few balloons, wrap gifts, and make the birthday boy's requested dessert. We usually pull the whole thing together between their bedtime and ours. It's super low-stress, and we love that we are able to put our time and energy into making the birthday boy feel like the star of the day with a few special birthday traditions and gifts, instead of pouring time into a perfectly pinterest-y day.


What you need:
  • 1/4 yard light blue felt (buying by the yard ensures a long enough piece to wrap around his head. You could also use felt sheets sewn together into a long enough piece.)
  • 1 sheet dark blue felt
  • 1 sheet gray felt
  • 1 sheet yellow felt
  • 1 sheet white felt
  • thread (or tacky glue, if you don't feel like sewing)
  • basic crown pattern

Tuesday, August 11

Industrial Chair Makeover

We've seen many dining chairs come and go during our few years in this house. We started with folding chairs, then upgraded to a pair of $3 yard sale chairs, followed by a a set of four hand-me-down chairs (that never made the blog. oops.). We loved the set of four for it's style (and as we've grown to a family of four we needed it!) but they were pretty old and decrepid. One chair broke completely and the remaining three were constantly in need of some repair or other. So when I came across another set of yard sale chairs for just $1.50 each I decided it was time for another switch!


I found the chairs at a church rummage sale, and they were actually some of their old classroom chairs. We looked through the whole stack to find four that were in the best shape with no big cracks, gouges, or broken feet. We hauled our prize home where it sat on our patio for approximately nine months collecting spider webs. *facepalm* Why do I do this to myself? Why? Once I finally got started it took just a couple hours of total work time to sand, stain, and paint. So again we learn the DIY lesson - JUST GET IT OVER WITH. Here's how I did it....

I may never figure out how to get a good picture in front of this window. Sorry, guys.

BUT WAIT! Did you think I forgot the before picture? Not this time.... BOOM.


I know, it's not much to look at. I think one of the hardest things when I'm yard-sale shopping for furniture is seeing the potential. When it came to these guys I loved the wood/metal combo and the curved lines, but I still wasn't totally convinced. It was the kind of purchase where you think "Well, it's going to cost $6 for the whole set. So if I hate it, it's okay."


Wednesday, August 5

Stroller Tote {free pattern & tutorial}

One of our most popular posts lately has been the Stroller-Friendly Diaper Bag tutorial. You guys have been loving it for the same reasons we do - it's super versatile with tons of storage space, and of course it attaches to a stroller in seconds to keep your hands free when you're out and about. But a custom request in my 
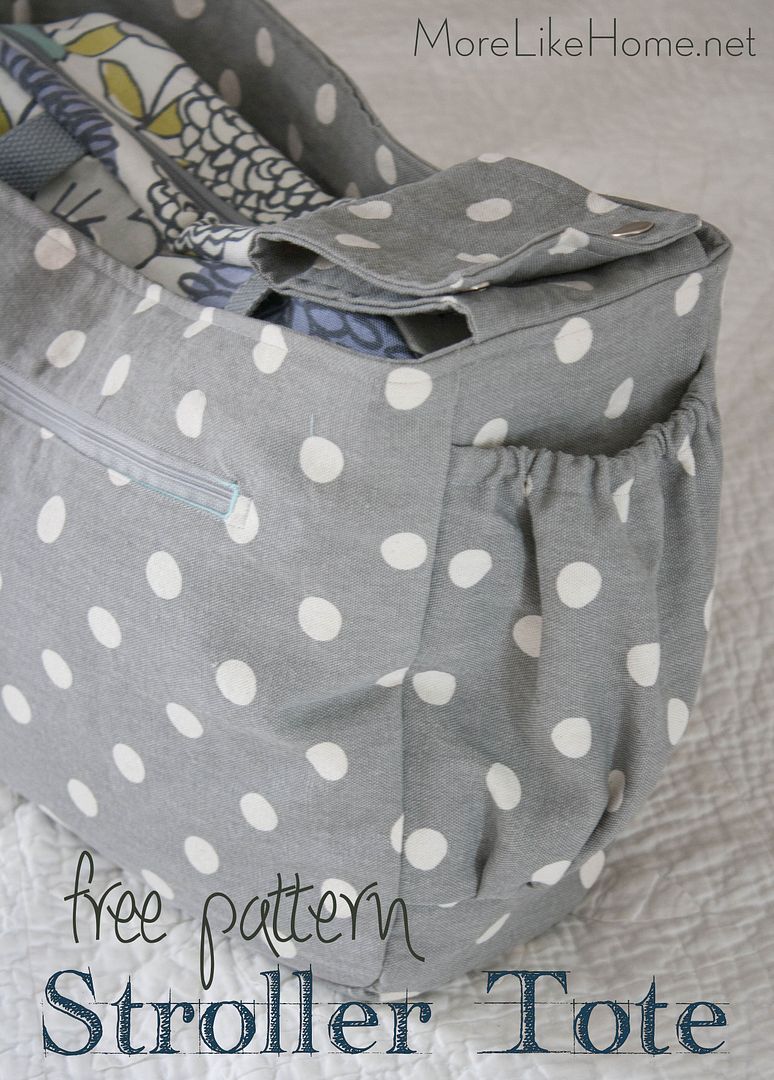
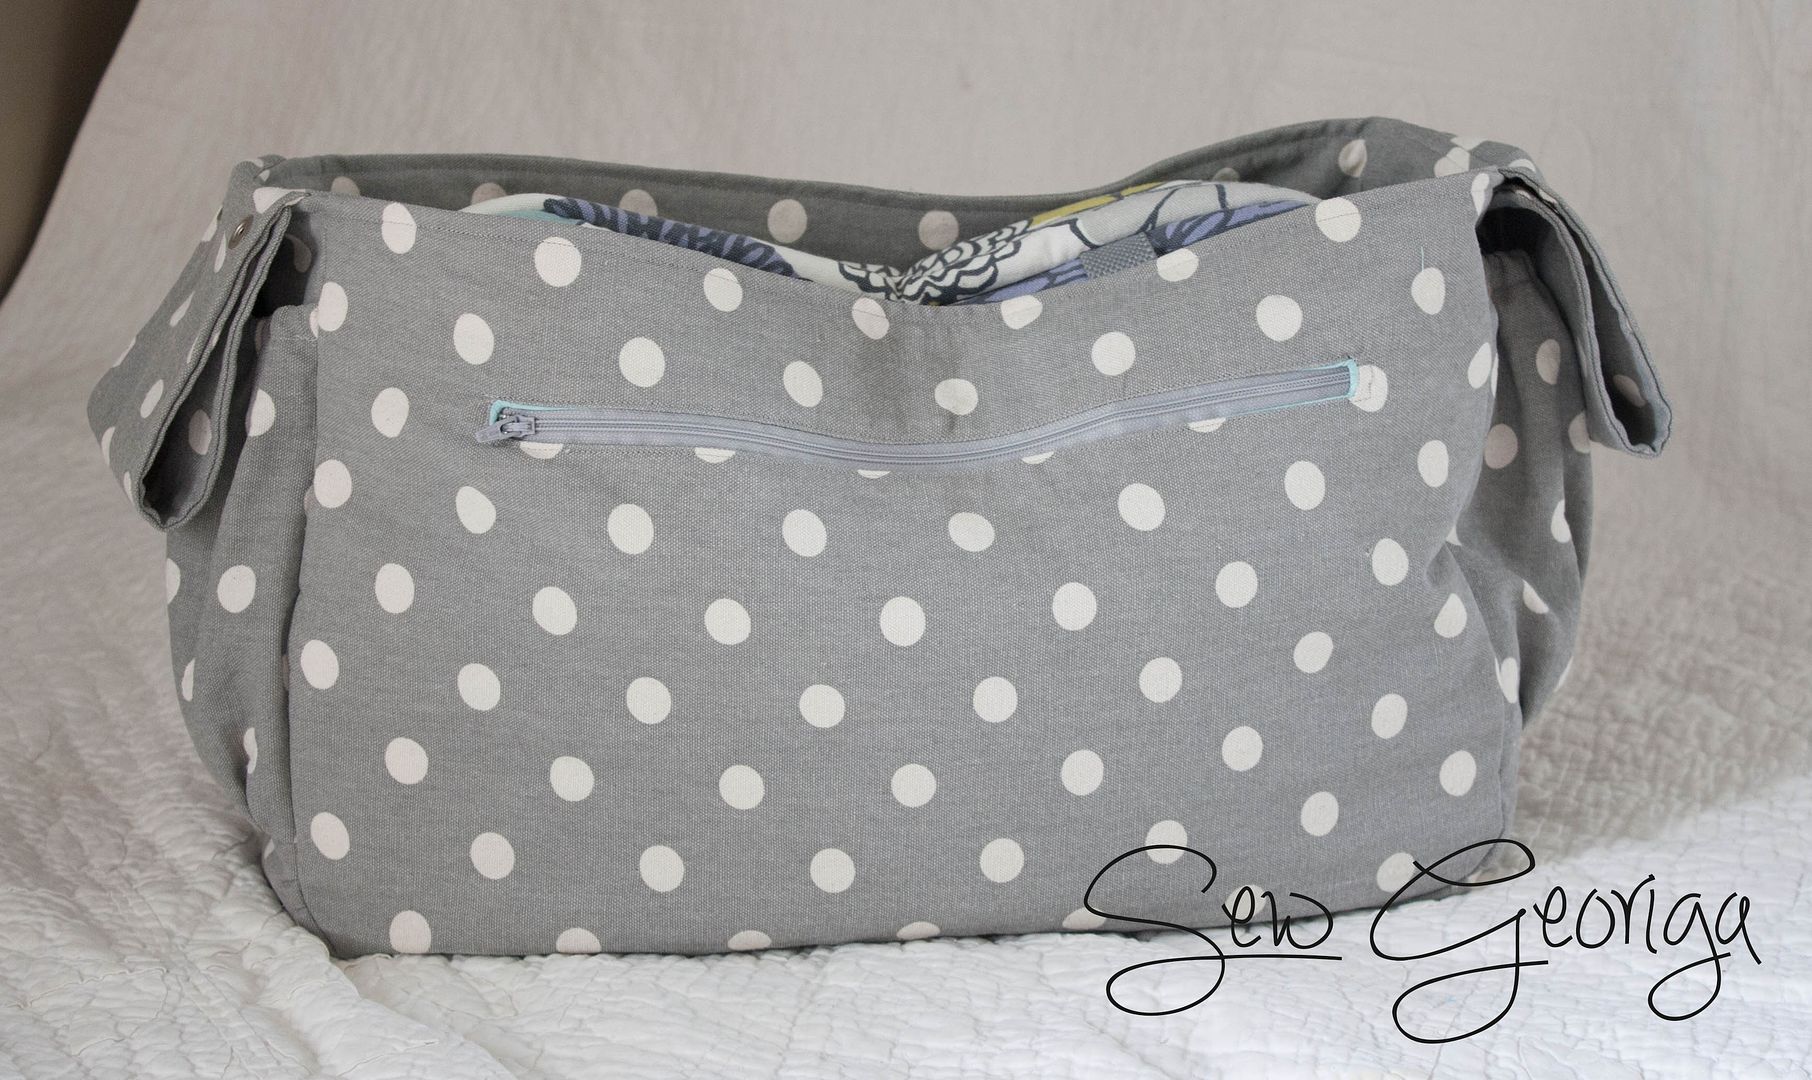
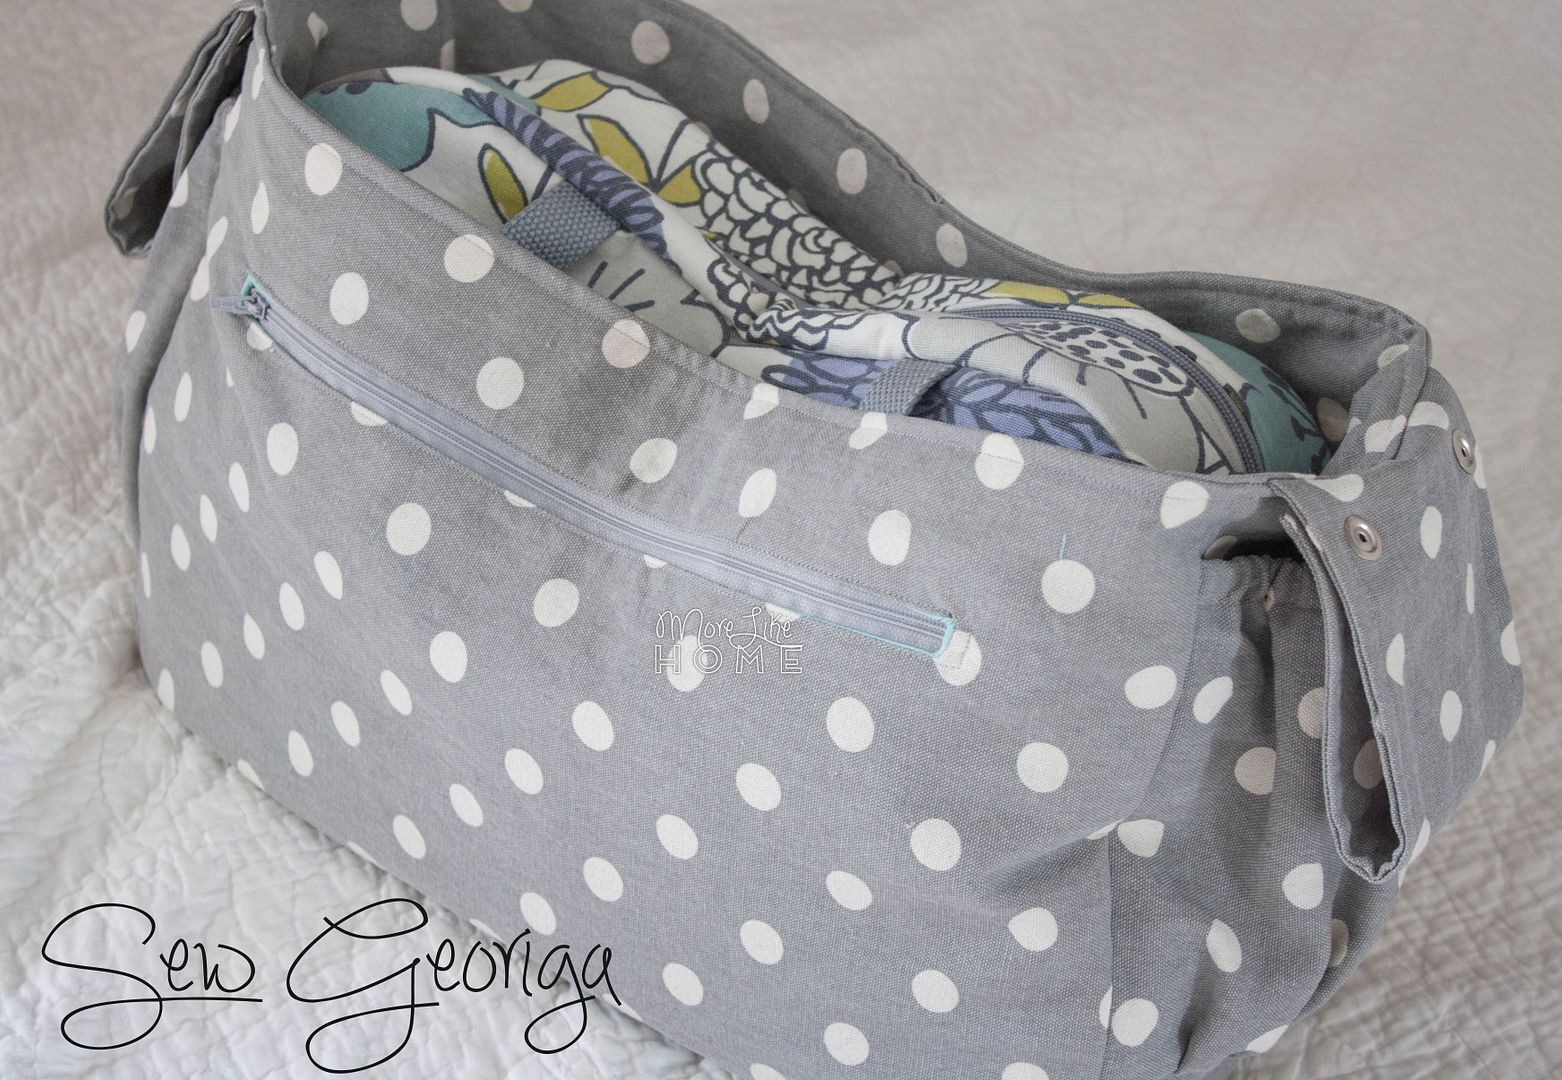
etsy shop has led to a cousin bag - the Stroller Tote!


This tote is like the original in that it attaches easily to a standard stroller, but instead of being a full diaper bag it's simply an open tote that is a full-time stroller bag (it doesn't have the option to convert to a messenger style bag... but of course you could add a shoulder strap if you want to. DIY, guys!)


This is perfect for anyone who already has a diaper bag they love because you can just tuck your favorite bag inside the tote. Plus you can leave the tote attached to the stroller so it's ready to go any time. If your kids are a little bigger (like our four year old who doesn't really need a diaper bag anymore but still needs a stroller sometimes) this is a great option to tuck in a jacket, some snacks, and a sippy cup for while you're out.


We've had several beginners make our stroller-friendly diaper bag already with great success (check out some of their finished projects 
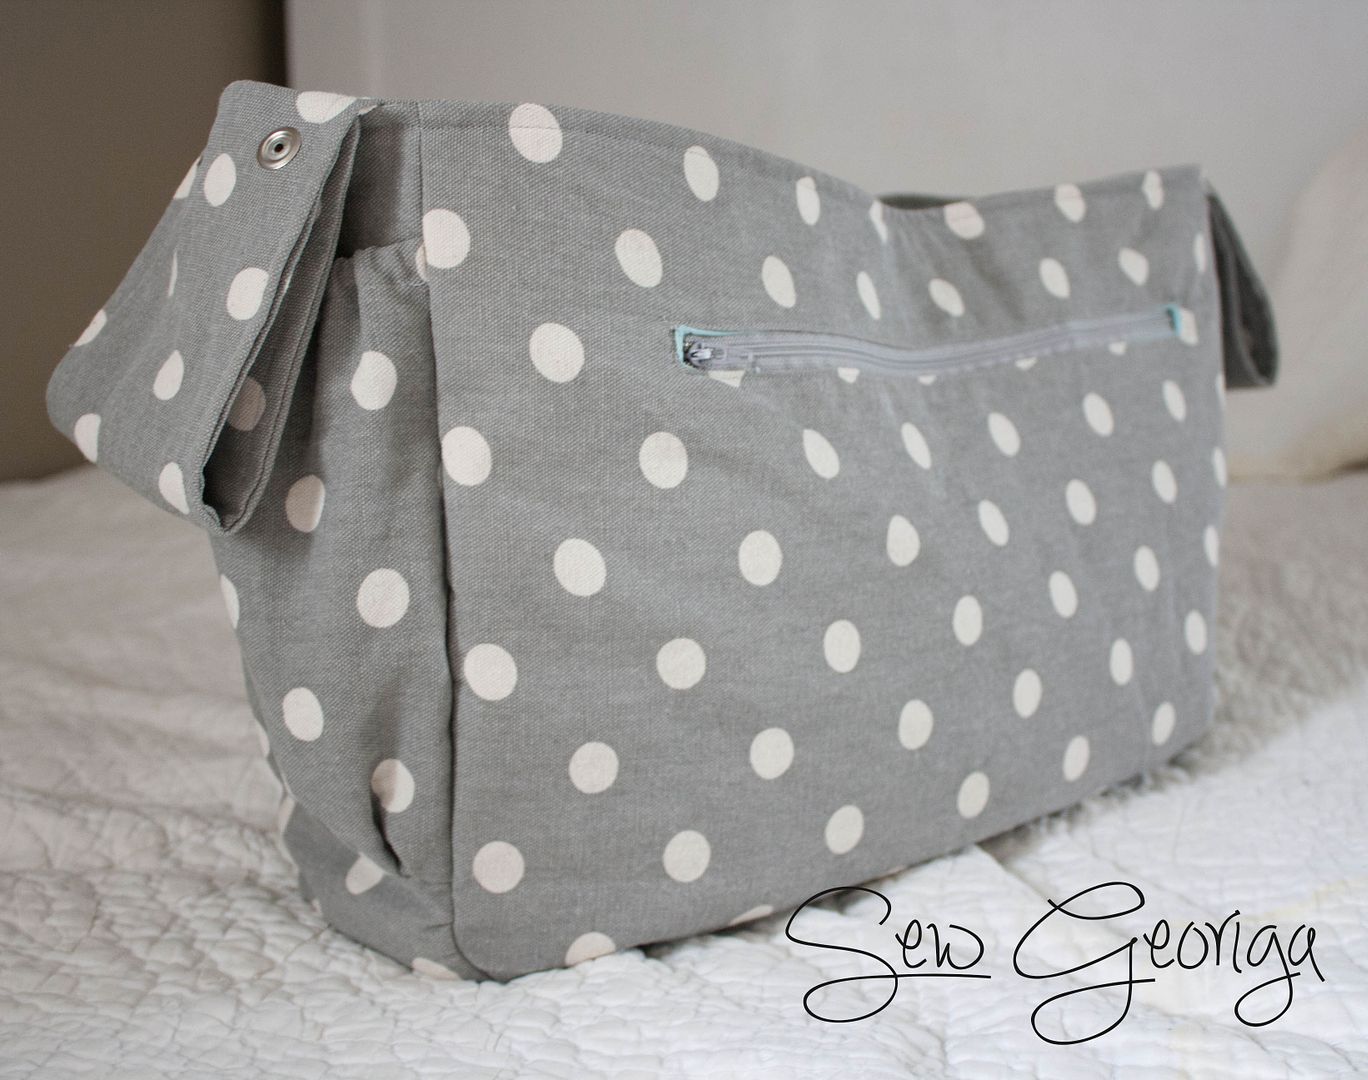
here), but this is a simpler pattern with fewer parts (and fewer steps!) that's good for anyone feeling overwhelmed with all that goes into the original stroller bag. As-is, it includes two water bottle pockets and two hidden zipper pockets (one inside and one outside), but as always feel free to customize it any way you like! If you're a beginner and feeling nervous you could skip all the pockets and just make the shell, or if you want more organization go ahead and add some extra pockets!


This pattern is for personal use only. I'm happy to offer all my plans and tutorials for free but I've put a lot of work and planning into these stroller bags & totes, so please don't ask others to pay for the work I've done. Thanks! :)

What you need:
  • 2 yards duck cloth, canvas, or similar weight fabric I used the same fabric for the outer fabric and lining. If you want a coordinating lining instead you could get 1 yard each of two different fabrics. You could also make the bag reversible just by adding an extra set of water bottle pockets to the bag lining.
  • 1/2 yard quilting cotton for the hidden pockets
  • 1 1/2 yards medium weight fusible interfacing
  • 12" of 1/4" wide elastic
  • 9" zipper
  • 12" zipper
  • 4 sets of heavy duty snaps
Use a 1/2" seam allowance unless otherwise noted. Start by pre-washing your fabric (always a good idea in case it shrinks!). Then cut out the following pieces:

Subscribe