
P.S. Check out the rest of our free DIY Desk Plan Series here!
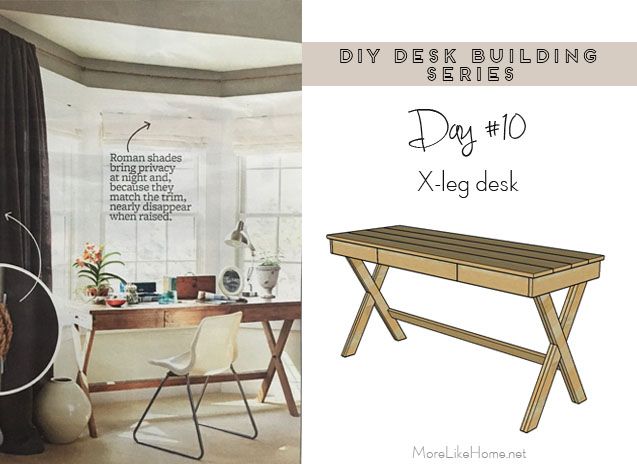
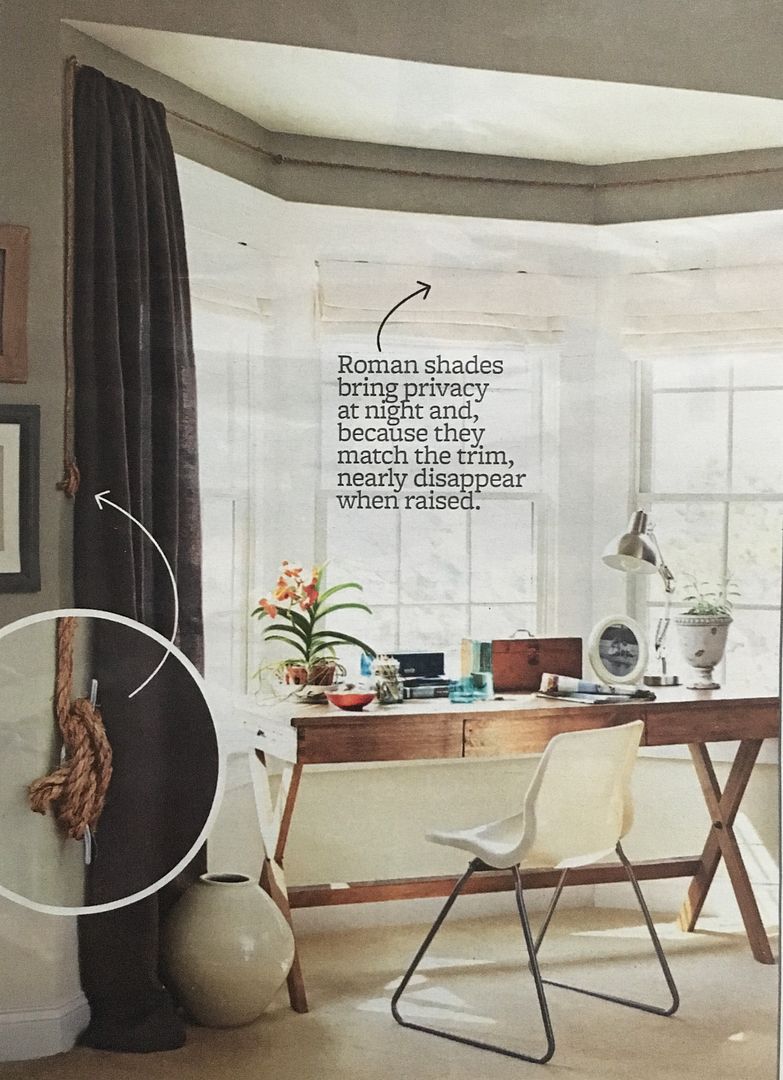
Confession: I'm a magazine ripper. I always pull my favorite pages or images out... and hoard them in folders. (except for the Magnolia Journal - my first one came and I'm keeping the whole thing. Sorry not sorry) It's like the original pinterest, and I've been doing it for years. Today's desk is inspired by a BHG magazine from a few years ago.
I was digging through my folders looking for ideas for this series and there it was. Patiently waiting for its perfect time. Sometimes it pays to hoard.
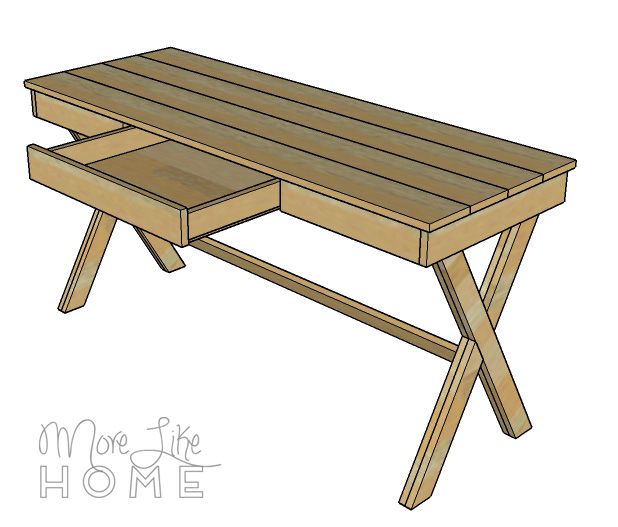
P.S. It even has a little drawer to keep your office supplies handy.
Shopping List:
1 - 1x4 @ 8'
1 - 1x4 @ 10'
1 - 1x6 @ 10' -OR- 4 - 1x6 @ 6' (whichever is cheaper)
3 - 1x3 @ 10'
1 - 1/4"-1/2" plywood @ 23 x 19 1/2" (you can buy a small piece, usually called a project panel, or use any scrap you have)
1 set 18" drawer slides (we love full-extension slides)
Kreg Jig (instructions without a Kreg Jig are included in italics)
1 1/4" pocket hole screws
1 1/4" wood screws
2" wood screws
a few finishing nails
drawer pull (or use the lip under the drawer to open it)
wood glue
wood filler, sandpaper, and finishing supplies
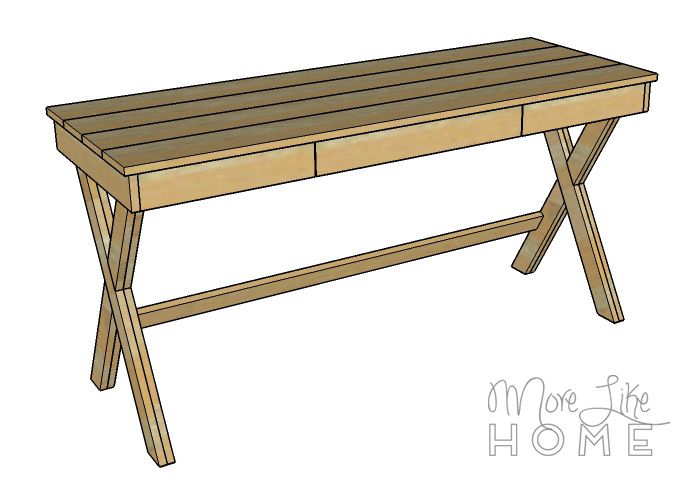
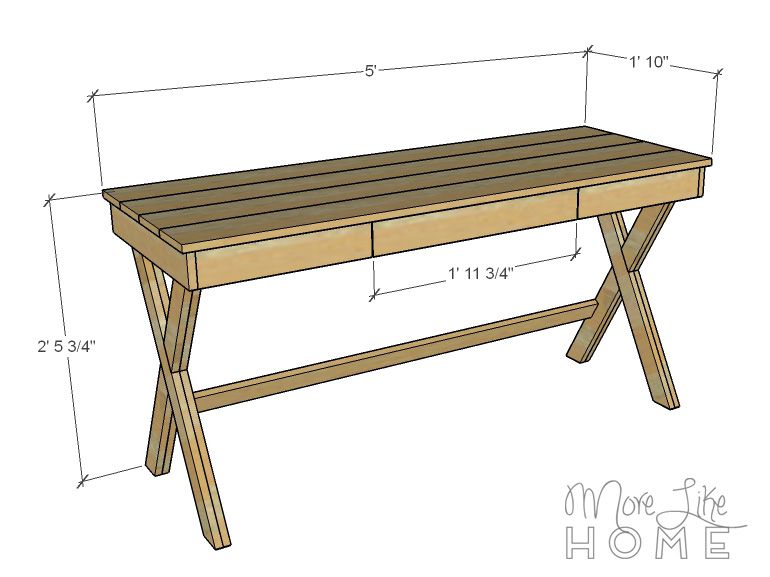
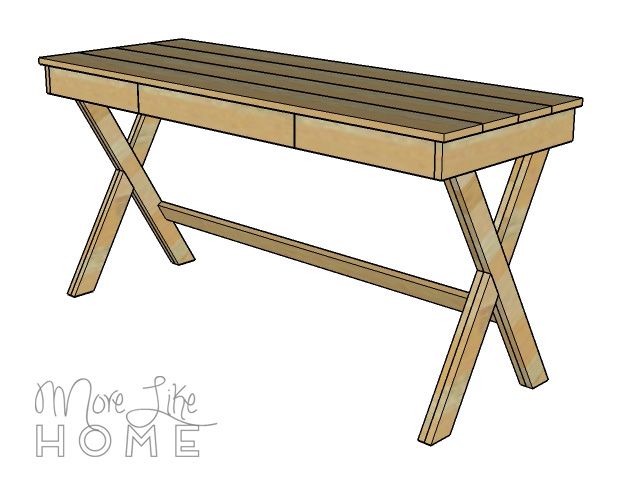
Dimensions: 60" wide x 22" deep x 29 3/4" high
Measure
twice, cut once (seriously, though). Use glue in every step (be careful
to clean up any drip, because they will mess up your finish at the
end!). Read through all the instructions before you begin. Use 1 1/4"
pocket hole screws unless otherwise indicated. Pre-drill and countersink
all your screws. Be safe, have fun, and let me know if you have any
questions! Please note I have not built from these plans myself (you
might be the first!), so double check everything as you go.
Cut List:
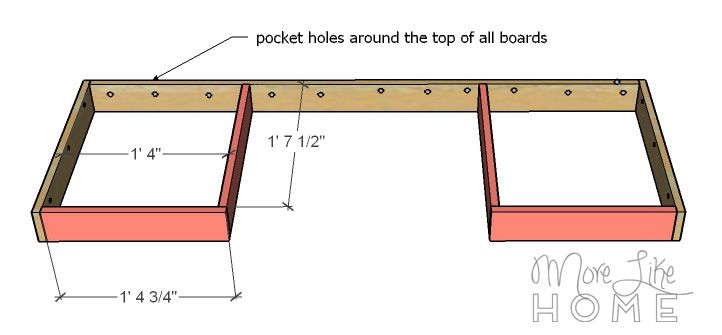
(A) 1 - 1x4 @ 57 1/2" (frame back)
(B) 2 - 1x4 @ 21" (frame side)
(C) 2 - 1x4 @ 19 1/2" (frame inside)
(D) 2 - 1x4 @ 16 3/4" (frame front)
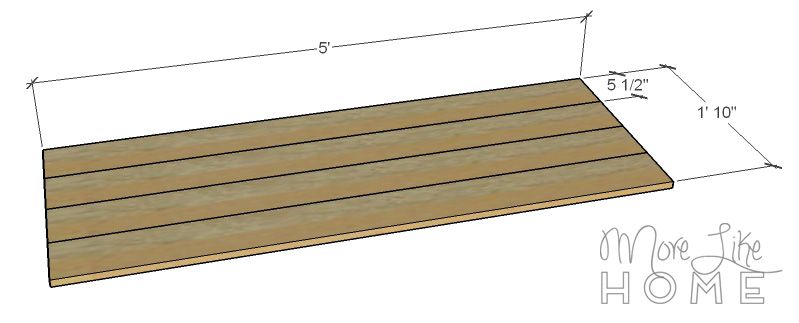
(E) 4 - 1x6 @ 60" (top)
(F) 4 - 1x3 @ 36" (legs) - see instructions before cutting!
(G) 4 - 1x3 @ 16 5/8" (leg trim top)
(H) 4 - 1x3 @ 16 7/8" (leg trim bottom)
(I) 1 - 1x3 @ 54 1/2" (stretcher)
(J) 2 - 1x3 @ 19 1/2" (drawer sides)
(K) 2 - 1x3 @ 21 1/2" (drawer back)
(L) 1 - 1/4" plywood @ 23 x 19 1/2" (drawer bottom)
(M) 1 - 1x4 @ 23 3/4" (drawer front)
Drill pocket holes along the top and ends of the frame back (A). Drill pocket holes along the top of the the frame sides (B). Attach the frame back to the frame sides using the pocket holes at the ends and 1 1/4" pocket hole screws. OR drill through the side boards into the back board with 1 1/4" wood screws.

Drill pocket holes along the top and both ends of the inside frame boards (C). Attach them 16" in from the frame side boards, using the pocket holes as one end and the 1 1/4" pocket hole screws. OR attach it by drilling through the back board into the ends of the inside boards with 1 1/4" wood screws.
Drill pocket holes along the top edge and one end of the frame front boards (D). Attach them to the inside and side boards as shown, using the pocket holes and 1 1/4" pocket hole screws. OR drill through the side board into the ends of the front board, and through the front board into the ends of the inside board with 1 1/4" wood screws.
Assemble the top by drilling pocket holes along one long side of two top boards (E), and along both long sides of the other two top boards. Lay all four top boards side-by-side (the ones with holes down both sides should be in the middle). Attach them side by side using 1 1/4" pocket hole screws. note: I would not use glue in this step. You don't want it dripping through to the top because it will mess up your finish later. OR, if you don't have a Kreg Jig, lay them side by side but don't attach them together.
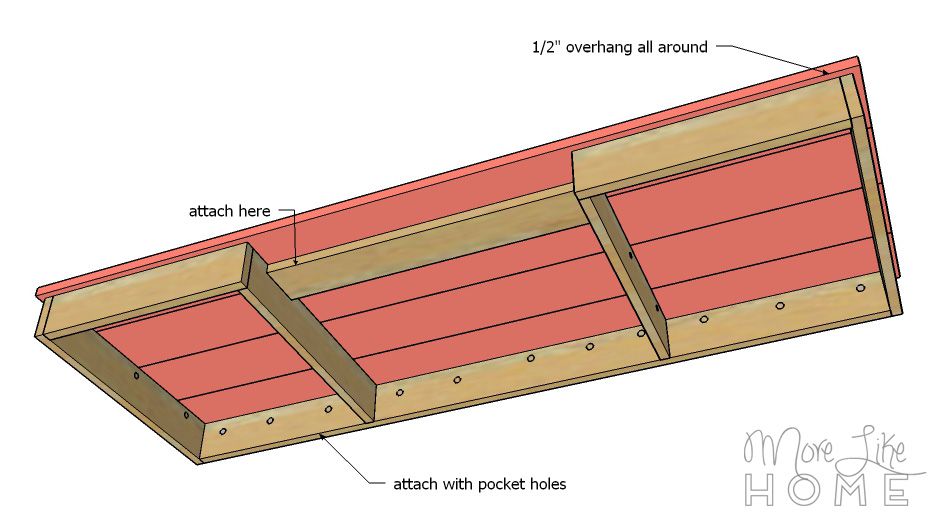
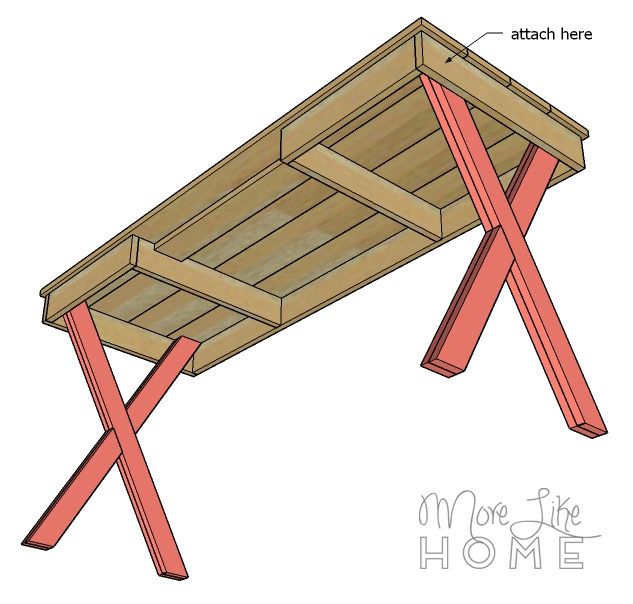
Lay the top right-side down and lat the frame right-side down on top of it. Center the frame on the top with a 1/2" overhang all around, and make sure the frame is square (measure corner-to-corner across the frame both ways and the measurements should match). Attach the frame to the top using the pocket holes in the frame and 1 1/4" pocket hole screws. OR center the top on top of the frame and drill down through the top into the frame with 1 1/4" wood screws.
ignore that extra board... change of plans. ;)
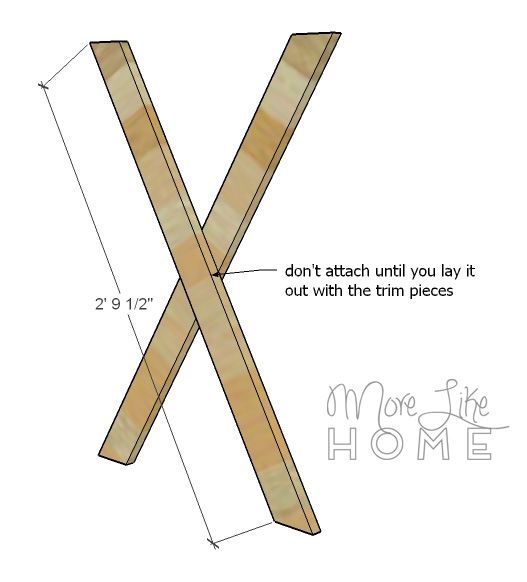
Cut the ends of the legs (F) at a 30 degree angle (cut them parallel //, not perpendicular / \). Each side should measure 33 1/2" long once cut. Cross them in an "X" like this, but don't attach them yet:
Cut the ends of top leg trim (G) and bottom leg trim (H) at a 30 degree angle (this time the ends should be perpendicular / \, not parallel //). Fit them all into place to make sure they line up snugly. Then attach them together with 1 1/4" wood screws by drilling through the boards that will be on the inside of the desk, toward the boards that will be on the outside (don't forget the glue!).

Fit the legs inside the frame, right up against the top boards, and attach them by drilling through the frame sides into the legs with 2" wood screws. Use 2-4 screws per leg.
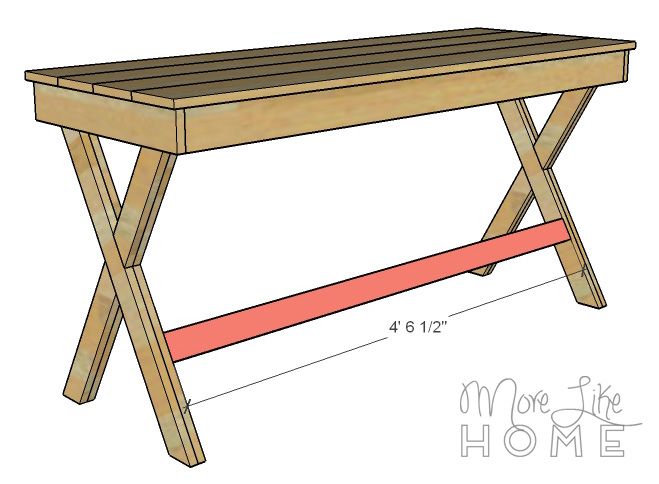
Drill pocket holes along both ends of the stretcher (I) and attach it between the back legs using 1 1/4" pocket hole screws. OR drill through the legs into the ends of the stretcher with 2" wood screws.
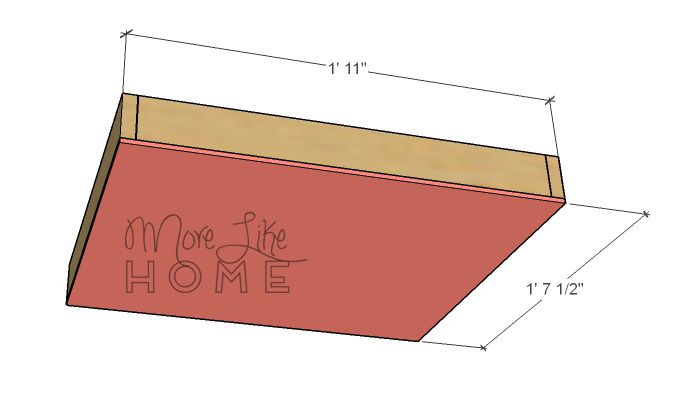
Now build the drawer box. Start by drilling pocket holes along both ends of the drawer back boards (K), then attach them to the drawer sides (J) using 1 1/4" pocket hole screws. OR drill through the drawer sides into the ends of the drawer backs with 1 1/4" wood screws.

Attach the drawer bottom (L) to the drawer frame by drilling up through the bottom into the sides and back with 1 1/4" wood screws.
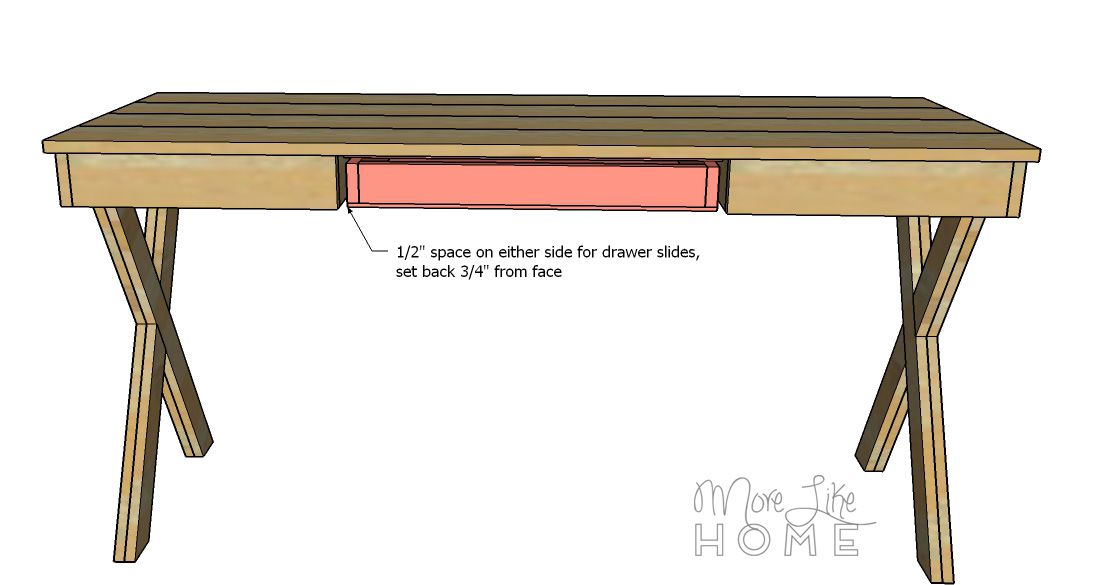
Follow the instructions on your drawer slides to install your drawer box into the desk. Make sure the front of the box is set back 3/4" from the front of the frame (so the drawer front will be flush in the next step).
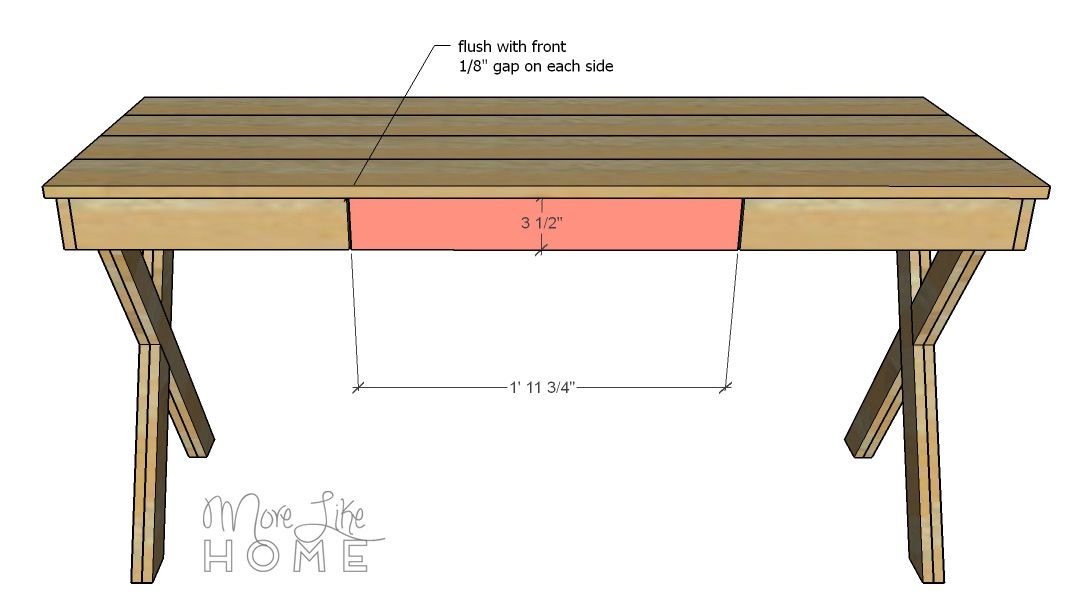
Center the drawer front over the drawer box with a 1/8" gap on each side. Attach it to the box with glue and finishing nails. You can then remove the drawer and reinforce the connection from the inside by drilling through the drawer frame into the drawer front with 1 1/4" wood screws.
To finish, fill any holes with wood filler then sand everything down really well. This is the most important step for a professional finish! Start with a rough sand paper, then go over everything with a medium paper, then again with a fine paper. Once it's super smooth, finish it with whatever paint or stain and sealer you like.
That's it! Come back tomorrow for another DIY desk plan, and check out the full series here!
)
Nice Info
ReplyDelete