
P.S. Check out the rest of our free DIY Desk Plan Series here!
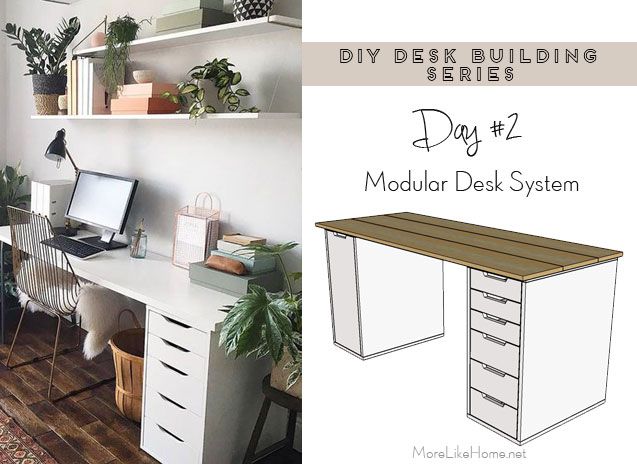
This desk system is based on an Ikea storage unit and we have several pieces you can choose from to fit your needs! Here are a few more inspiration photos to get your wheels turning:

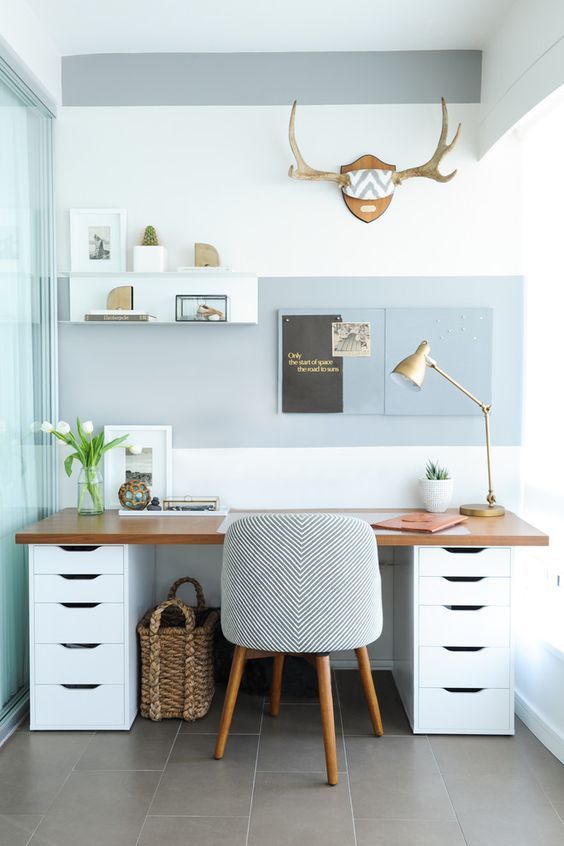


image via Mpls St Paul - check out the rest of this beautiful modern farmhouse!
Ready to make your own? Start by deciding which pieces you need to fit your space. You can choose from two widths of drawers, two widths of cabinets, and/or a set of free-standing legs. I'm breaking down the shopping lists and plans for each unit below so can buy and build just what you need.

Measure twice, cut once (seriously, though). Use glue in every step. Read through all the instructions before you begin. Use 1 1/4" screws unless otherwise indicated. Pre-drill and countersink all your screws. Be safe, have fun, and let me know if you have any questions!
NOTE for this project we are using plywood instead of dimensional lumber, and you will see the raw edges of the plywood around the cabinet. It can be a neat look, and you can expect the edges to take soak up more stain and be a darker color than the rest of the cabinet. If you don't like the difference in shade, I suggest painting your cabinets instead. :)
These are items you will need for any part of the project. For each unit you will find an additional shopping list for that item above the cut list:
- 1 1/4" wood screws
- finishing nails
- wood glue
- Kreg Jig with 1 1/4" pocket hole screws
- wood filler
- sandpaper & finishing supplies
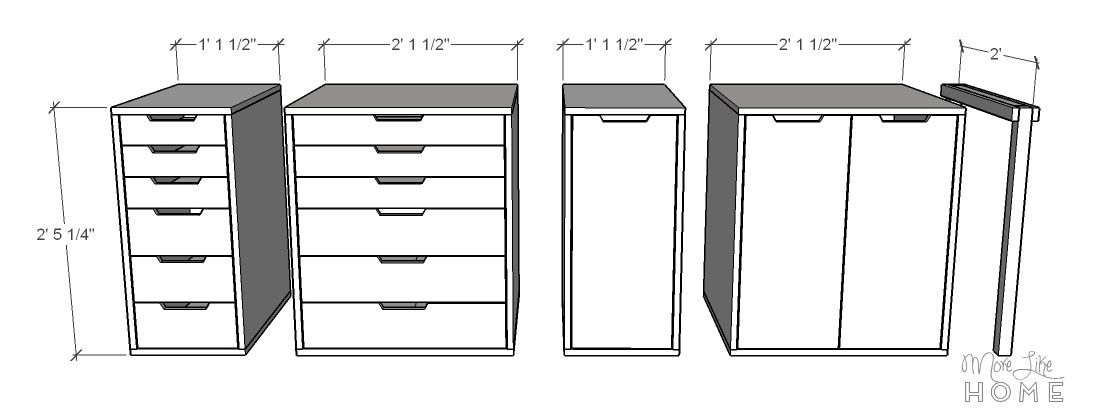
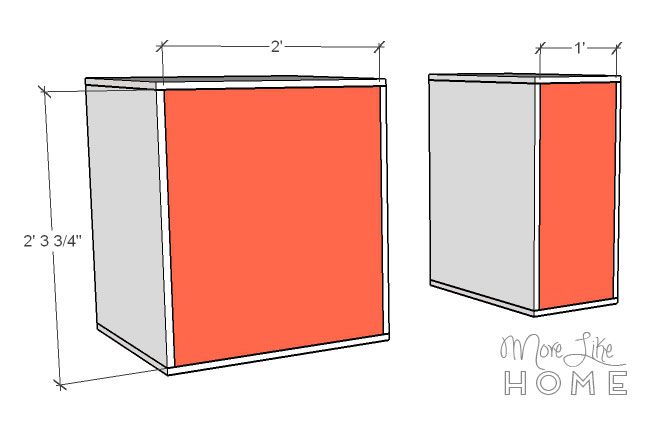
Dimensions for each narrow box: 13 1/2" wide x 29 1/4" high x 24" deep
Dimensions for each wide box: 25 1/2" wide x 29 1/4" high x 24" deep
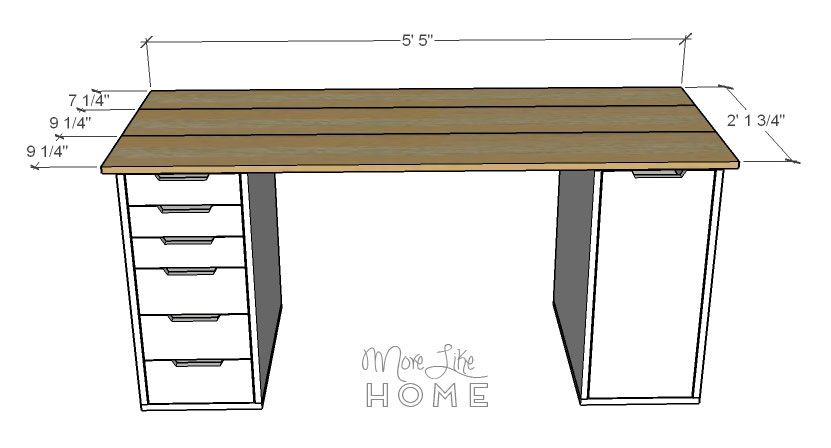
Overall size of the desk will be roughly 30" x 25 3/4" deep (but this is dependent on the countertop you choose), and the width will depend on the size and number of cabinet units you use. :)
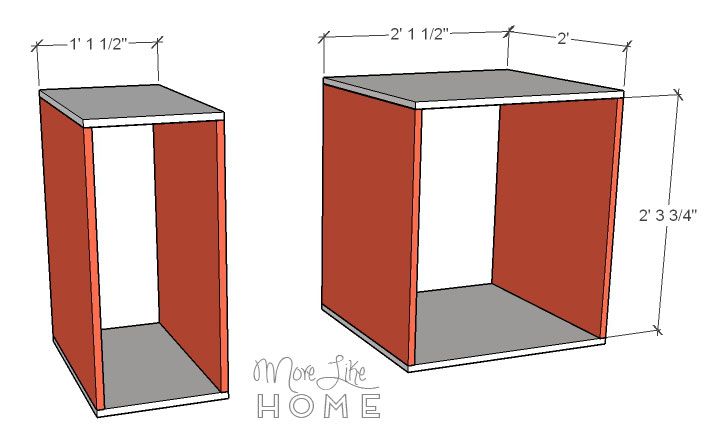
The Basic Box
Narrow Base (to make one):
- 1 sheet 3/4" plywood
(B) 2 plywood @ 24" x 27 3/4" (sides)
(C) 1 plywood @ 12" x 27 3/4" (back)
Wide Base (to make one):
- 1 sheet 3/4" plywood
(B) 2 plywood @ 24 x 27 3/4" (sides)
(C) 1 plywood @ 24" x 27 3/4" (back)
Start by attaching the top/bottom (A) to the sides (B). You can use a Kreg Jig or drill through the top and bottom boards into the ends of the side pieces.
Slide the back board (C) into the back opening of the cabinet and line it up flush with the back edge. Attach it with a Kreg Jig, or by drilling through the side and top/bottom boards into the edges of the back board.
Cabinet Doors and Shelves
Narrow Base (for one cabinet):
- the door and three shelves will fit on the sheet of plywood you used to make the cabinet box
- 1 set of hinges
- optional: 1 magnetic latch
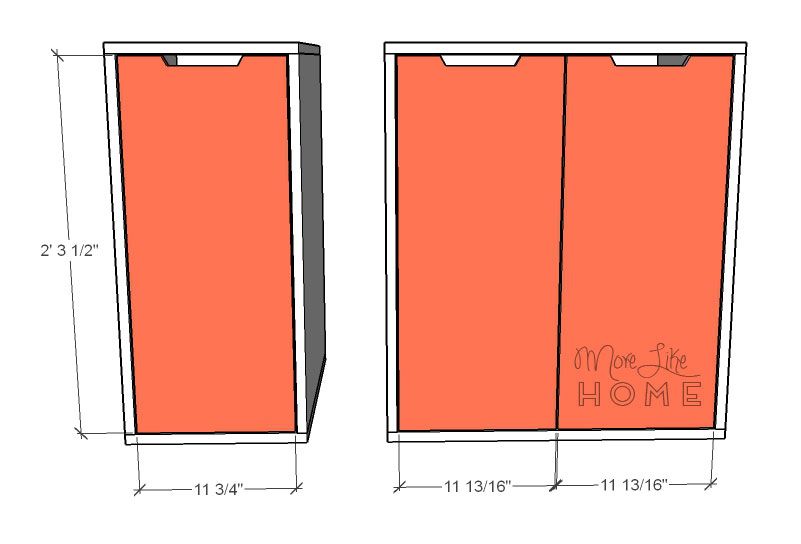
(E) 1 plywood @ 11 3/4" x 27 1/2" (door)
Wide Base (for one cabinet):
- the doors and one shelf will fit on the sheet of plywood you used to make the cabinet box
- 2 sets of hinges
- optional: 2 magnetic latches
(E) 2 plywood @ 11 13/16" x 27 1/2" (doors)
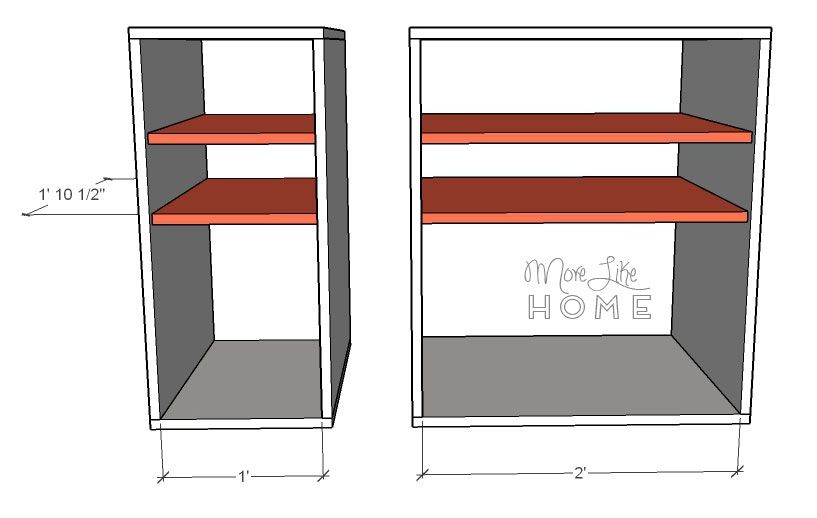
Install the shelf (or shelves). Make sure it is level and sits all the way against the back of the cabinet. (it will be inset from the front 3/4". Attach it with a kreg jig, or by drilling through the sides and back into the edges of the shelf.
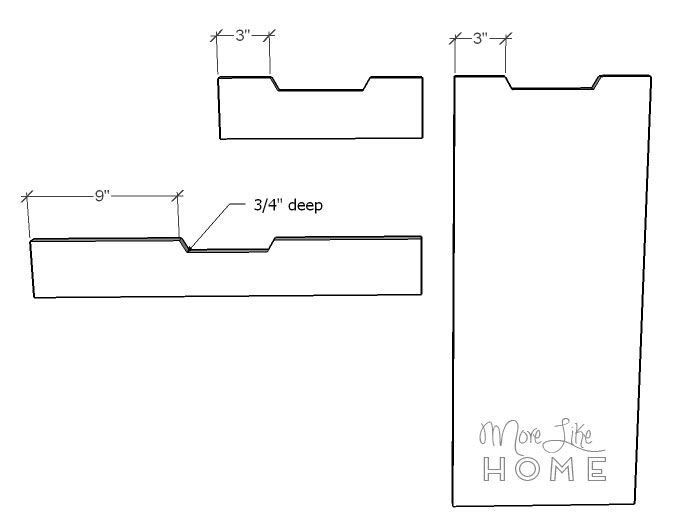
If you want the clean, modern look of the inspiration photos, you can cut a notch in the door to use as a handle. I've drawn it centered in the top edge of the door, but you could also put the notch on the side. For a top notch (ha) measure in 3" from each edge and cut a notch 3/4" deep between those marks. For a more traditional look, skip the notches and add a knob.
Install the doors using the hinges you purchased. There should be a 1/8" gap around each door so it can open and close smoothly.
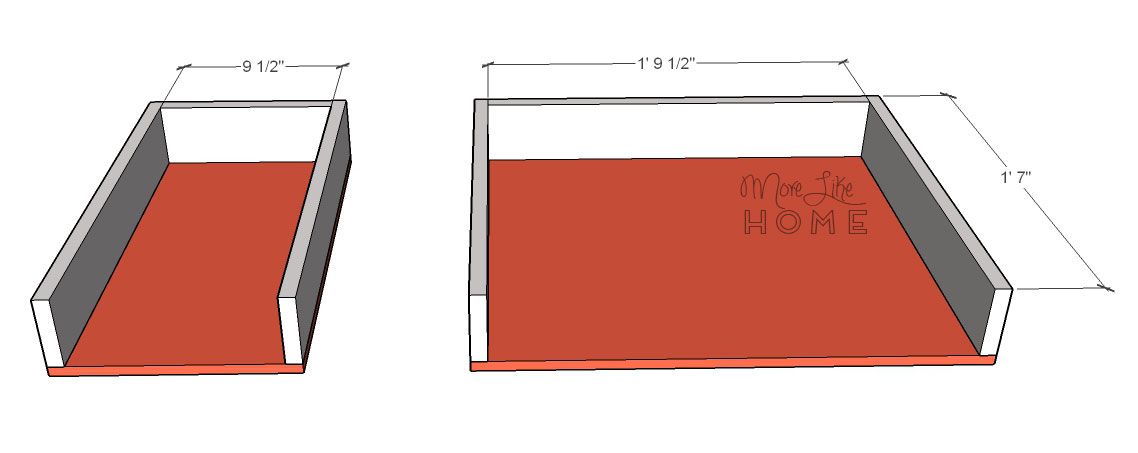
Drawers
Narrow Base:
- 1 - 1x3 @ 6'
- 1 - 1x3 @ 8'
- 1 - 1x4 @ 10'
- 1 - 1x4 @ 6'
- 1 - 1x6 @ 6'
- 1/4 or 1/2" plywood - 1/2 sheet (if you have scraps to use, either of these thicknesses are fine. If not, I'd go with 1/4" because it will be cheaper. Don't go any thicker than 1/2", though.)
- 6 sets of 20" side-mount drawer slides (we love full extension slides with a soft-close)
(G) 3 1x3 @ 9 1/2" (short drawer back)
(H) 6 plywood @ 11 x 19" (drawer bottom)
(I) 6 - 1x4 @ 19" (tall drawer sides)
(J) 3 - 1x4 @ 9 1/2" (tall drawer back)
(K) 3 - 1x4 @ 11 3/4" (short drawer front)
(L) 3 - 1x6 @ 11 3/4" (tall drawer front)
Wide Base:
- 1 - 1x3 @ 10'
- 1 - 1x3 @ 6'
- 1 - 1x4 @ 10'
- 2 - 1x4 @ 6'
- 1 - 1x6 @ 6'
- 1/4 or 1/2" plywood - 1 sheet (if you have scraps to use, either of these thicknesses are fine. If not, I'd go with 1/4" because it will be cheaper. Don't go any thicker than 1/2", though.)
- 6 sets of 20" side-mount drawer slides (we love full extension slides with a soft-close)
(G) 3 1x3 @ 21 1/2" (short drawer back)
(H) 6 plywood @ 23 x 19" (drawer bottom)
(I) 6 - 1x4 @ 19" (tall drawer sides)
(J) 3 - 1x4 @ 21 1/2" (tall drawer back)
(K) 3 - 1x4 @ 23 3/4" (short drawer front)
(L) 3 - 1x6 @ 23 3/4" (tall drawer front)
Attach two short drawer sides (F) to a short drawer back (G) with a Kreg Jig or by drilling through the sides into the ends of the back piece.
Attach a drawer bottom to the frame by drilling up through the bottom into the side and back pieces. Repeat to make two more short drawers.
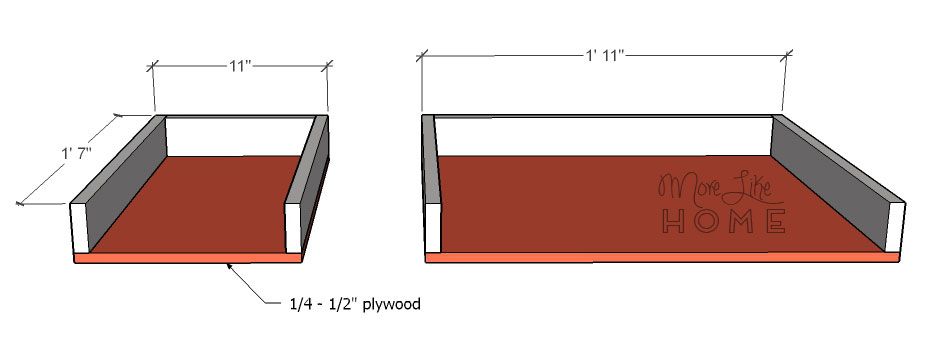
Follow the same steps with the tall drawer pieces (I) and (J) to make three tall drawers
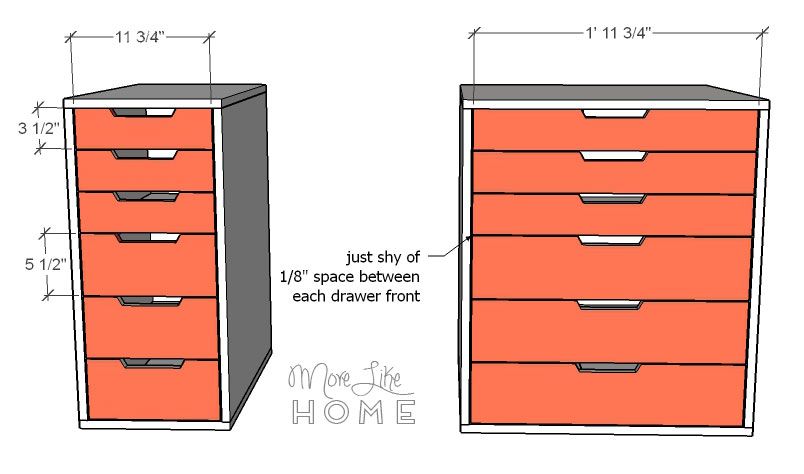
Install the drawer boxes with the drawer slides you purchased. Make sure you install them level, and be careful with the space so their drawer fronts will line up correctly. I've drawn it with 1/2" plywood (so if you used 1/4" plywood for the bottom the spaces will be a little bit larger) and they should be spaced like this: 1/8" space below the bottom drawer, 1 5/8" space in the next three spaces, and 5/8" space in the last two spaces. It also may be helpful to mark the height of the drawer fronts along the side of the cabinet to make sure each drawer box ends up in its own zone. Make sure you install the drawer boxes inset 3/4" from the face of the cabinet. This will allow your drawers to close flush once the fronts are installed.
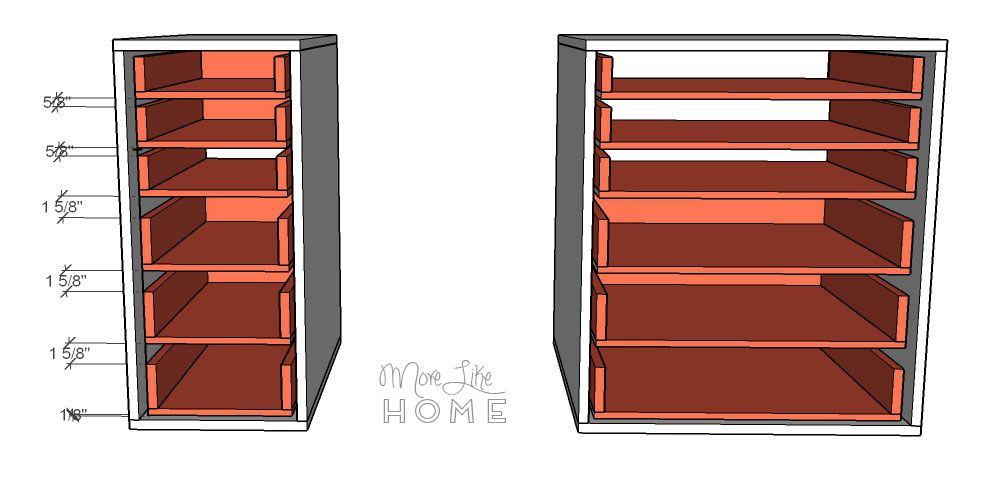
Optional: notch out drawer pulls in the top of each drawer front. (for a more traditional look, skip the notches and use drawer pulls instead) For the narrow drawers, measure in 3" from each side and cut a notch 3/4" deep between those marks. For the wide drawers, measure in 9" from each side and cut a notch 3/4" deep between those marks.
Center the drawer fronts over the drawer boxes, with three short drawer fronts (K) at the top and three tall drawer fronts (L) at the bottom. There should be just shy of 1/8" space around each drawer front. It may help to lay the cabinet down and line up all the drawer fronts at the same time to make sure you get a good fit. Attach the drawer fronts with finishing nails. You can reinforce this with a Kreg Jig, or by drilling through the front into the drawer sides (I prefer finishing nails or a Kreg Jig for this because regular screws leave large holes to fill on the drawer front, which doesn't look as pretty if you are staining the wood).
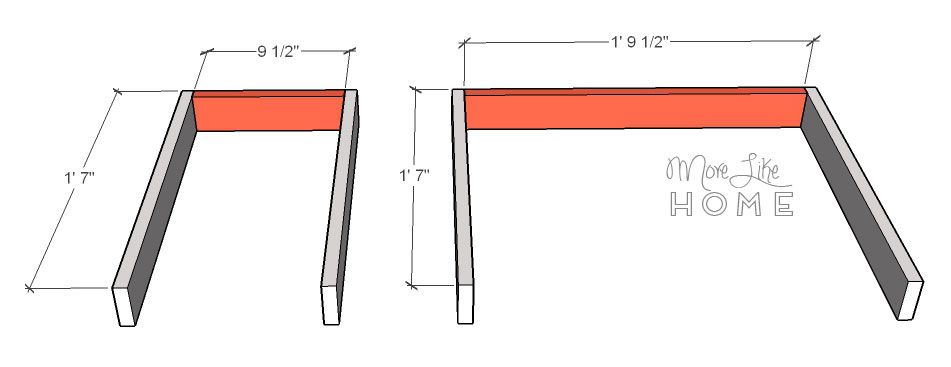
Legs
This will make one set of legs.
- 1 - 2x2 @ 8'
- 1 - 1x2 @ 4'
- 2 1/2" screws (unless you have a Kreg Jig)
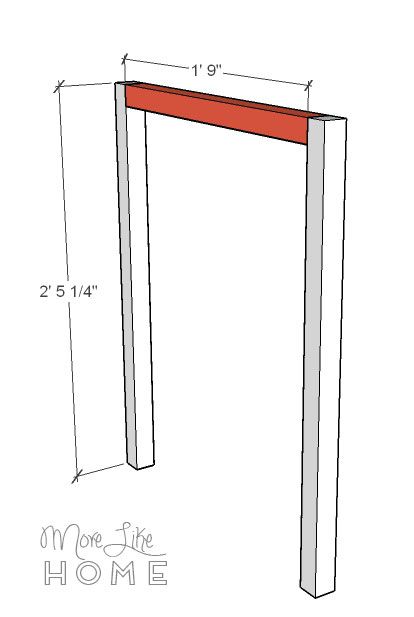
(N) 2 - 2x2 @ 29 1/4" (legs)
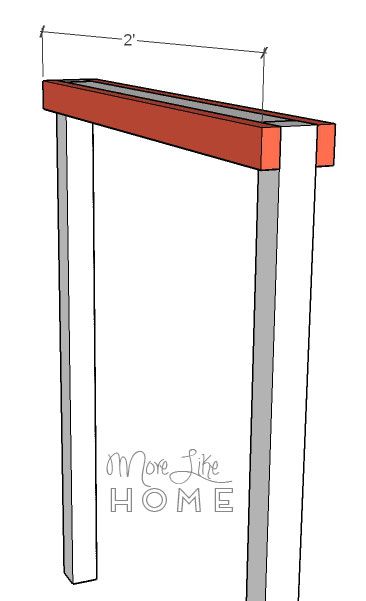
(O) 2 - 1x2 @ 24" (leg trim)
Attach a leg (N) to each end of the leg top piece (M). Use a Kreg Jig or drill through the legs into the ends of the top piece with 2 1/2" screws.
Attach a leg trim piece (O) along each side of the leg section you just built, being sure to put a screw into both legs and the top board. This will make your legs sturdier and less likely to twist or turn.
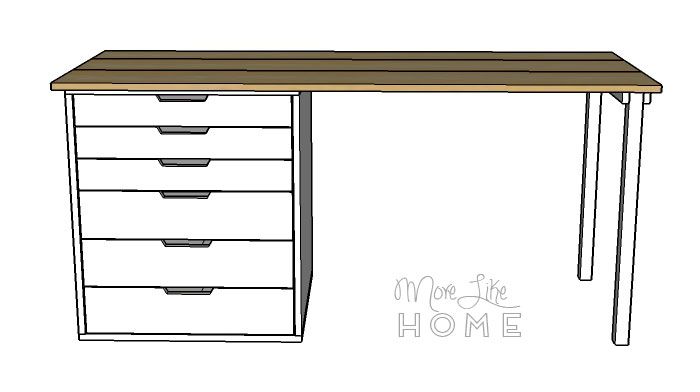
I don't suggest using these legs for both ends, as I don't think they would be sturdy enough on their own. You need something more substantial to anchor the other end, so be sure to pair a set of legs with a cabinet or drawers. You could also make a long desk with two sitting areas by anchoring it in the middle with a cabinet like this:

The Top
This is totally dependent on how long you want your desktop to be! Just be sure to leave at least a knee-space at least 20-24" and add the width of any cabinet units your are building. Make the top long enough to cover that total width. You can add a couple inches to overhang the ends, or size it flush with the ends for a cleaner look. You could use 2x10s and 2x8s instead for a thicker top, or a piece of plywood cut to any size you want. These measurements are for a 65" top:
(P) 2 - 1x10 @ 65" (top)
(Q) 2 - 1x8 @ 65" (top)
If you have a Kreg Jig you can start by attaching the top boards together side-by-side. If not, just skip that and line them up side-by-side. Center the top on the cabinet units. There will be a 1 3/4" overhang on the front, and you can choose if you want an overhang on the sides or not. Once you're happy with it's placement, Attach the top by drilling up through the top of the cabinets into the bottom of the desktop boards. Do not countersink these screws. You don't want them poking through the top!
Finishing
It's probably easiest to finish each unit and the top separately before you put it all together (especially if you're finishing them outside) and then bring them in and assemble them. To finish, fill any holes with wood filler then sand everything down really well. This is the most important step for a professional finish! Start with a rough sand paper, then go over everything with a medium paper, then again with a fine paper. Once it's super smooth, finish it with whatever paint or stain and polyurethane you like. I'm loving the two-tone look of white cabinets with a stained top!
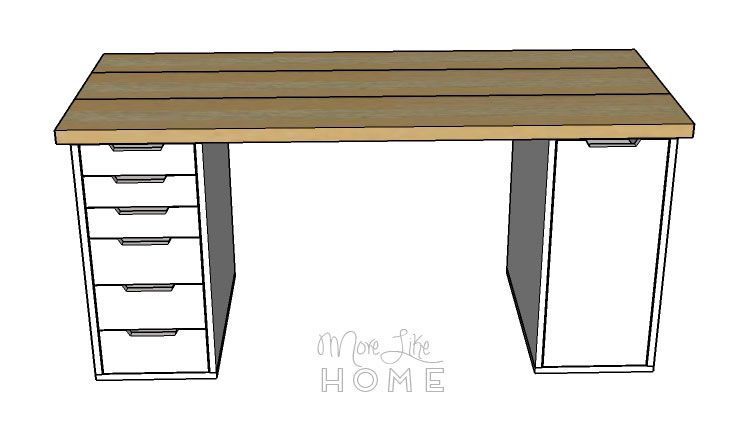
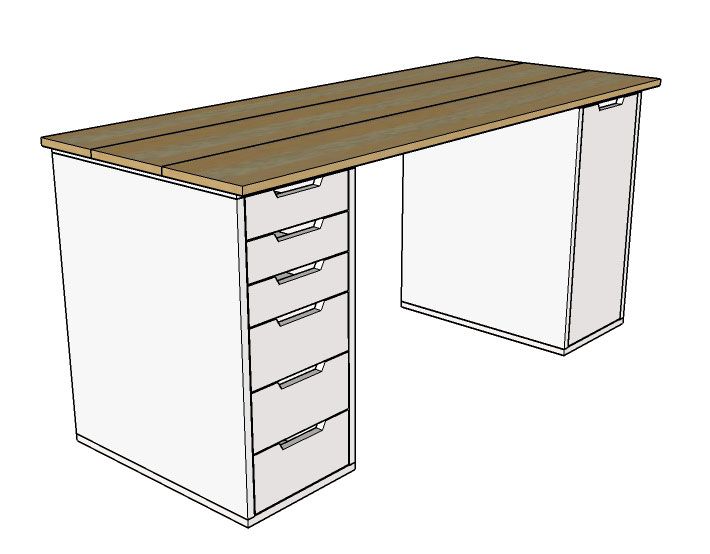
You can use any combination of cabinet, drawers, and legs to get the perfect desk for your needs and your space.
It's great as an office desk, a homework station, or a craft table!
That's it! Come back tomorrow for another DIY desk plan, and check out the full series here!
)
I really want to make this, but I'd really like to be able to see the pictures for reference!!
ReplyDeleteHi! They are showing up now on my end, let me know if you still have trouble. :)
Delete