
***I made an updated post to answer several questions (add color, dry faster, etc) and try some fun new designs! Check it out here! ***

I pinned an idea a while back for making salt dough gift tags because I love how they would look with my brown wrapping paper. Plus salt dough would be super easy and cheap. Then I came to find out those particular tags were actually made of clay, not salt dough. But not to be deterred, I set out to make some salt dough tags anyway!

My version of the tags turned out great, and I have to say they look pretty sweet on my gifts (which I'll be sharing pictures of soon). I think the main difference between these and the tags on pinterest is that mine are not as smooth. But they were practically free and I actually like the textured finish they have. Want to make some tags for your gifts this year? Here's how I did it:
Ingredients:
1 cup flour
1/2 cup salt
1/2 cup water
Combine ingredients in a bowl and knead until smooth. (I never got it super smooth, but I made some tags after just a quick knead and some after kneading longer, and there was a definite difference in quality with the tags that were kneaded longer being smoother and more even once they dried.)

Then roll out the dough to the desired thickness. (I think mine was roughly 1/4") DO NOT EAT THE DOUGH. This is your only warning. If you choose to ignore it and eat the dough, your friends and family have my permission to laugh at any resulting sour-puss faces you may make.
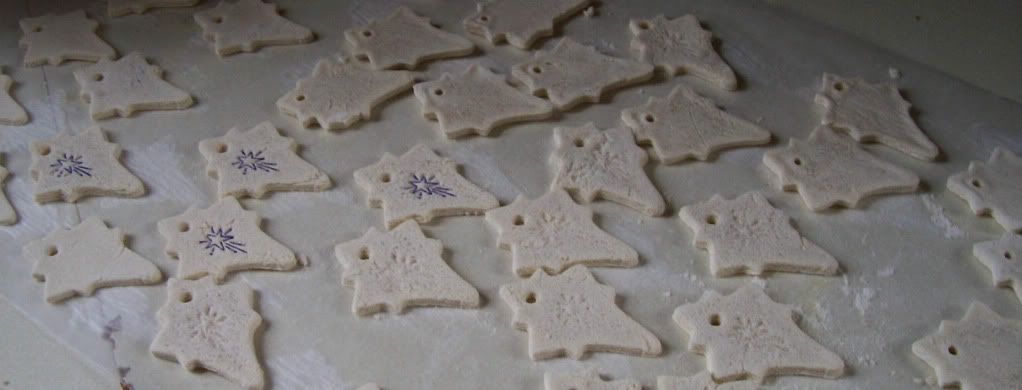
Use a cookie cutter to cut out your tags in whatever shape you want. You can re-knead the left overs and roll them out again to get more tags.

Now you need to make a hole for ribbon. I used a small drinking straw to get the size of hole I wanted.

Then comes the fun part - embellishing your tags! I tried a few different ways to decorate my tags. Some I left blank, just to keep it nice and simple. Some I stamped with a clean rubber stamp (in a star shape) to leave an impression with no color. The rest I stamped with the same stamp, but I dipped it in ink first. They all turned out fine, so choosing a style is really just a matter of preference. (although the tags I didn't knead as much came out rougher and the impressions didn't show up as well)

Then you wait... and wait... and wait for them to dry. It took these babies about 3 days to dry. I turned them over halfway through to let the backs have a chance to dry, too. But that was it! They were super easy and they will make toppers for my gifts this year. This would also be a fun way to make Christmas ornaments!
Have you ever made gift tags? What do you make them out of?
p.s. We accidentally left our camera behind at Thanksgiving, so we are temporarily using the old point and shoot we still have. Hence the dark/blurry/unfocused photos. Sorry about that. They actually look much better in person than in these pictures! :)
Don't forget to check out my update post!
Pin It
Thank you so much. pinterest keeps lying to me about salt dough projects, too!!! Did they stand up well or do you fell like they would be easily broken! To get that ceramic glaze look do you think mod podge would work?
ReplyDeleteHa ha, I feel the same way! I was a little worried about the one's I rolled thinner breaking but none of them did. I will probably try to keep them a little thicker anyway this year, just to be safe. But overall I was really happy with how they held up!
DeleteAnd the mod podge idea is genius! I can't say for sure if it will work, but it sounds like it would. I'm going to try that this year!
what if school glue was added to the dough? do you think they'd be sturdier and have a slight shine? I made these with my children years ago, they held up UNTIL the year the cellar got wet. Even though the dough ornaments were stored in a plastic tub, they were soft and broke easily.
DeleteWonder if putting them in a dehydrator would improve dry-time?
ReplyDeleteDee
I've never use a dehydrator so I honestly have no idea! :) Let me know if you give it a try. :)
DeleteApproximately how many tags did one batch make?
ReplyDeleteI think I ended up with about 40 - 45, but it would kind of depend on how thick you make them. :)
DeleteDid you use just cool tap water or warm water?? :) x
ReplyDeleteDo you think a glaze or lacquer finish would work after decoracted? Any idea how long they would last?
ReplyDeletecan you bake these to speed up drying process?
ReplyDeleteI made some of these, and if you bake them, they will puff up some. So, it depends on the look you are going for.
Deletedid you use self rise? that may be why they puffed.
DeleteHave you ever tried to add a coloring? I would wonder if you had to substitute some liquid for the coloring or just adding some would work?
ReplyDeletethanks for posting, my (multiple!) attempts are here http://abimakes.blogspot.co.uk/2012/12/salt-dough-gift-tags.html
ReplyDeleteDo you think these would work as coasters? Or would they be too fragile?
ReplyDeleteThey definitely seem more fragile than like a ceramic coaster would be. But maybe if you made them thick enough it would work? My bigger concern would be that if the coaster got wet (even from a glass sweating) they would soften up into dough again. So I definitely would seal them. The good news is salt dough is cheap and easy to make! It never hurts to try! :)
DeleteI would not use salt dough for anything that may be the sweat of a water glass. This stuff will mold if not SEALED CORRECTLY! But using for tags on a package is a GREAT idea !
ReplyDeleteOoo, good call, I didn't even think about mold!
DeleteAre animals attracted to it? Like ants? If I were to use it to make a puzzle or something that would be left out.
ReplyDeleteI honestly don't know, sorry! I would guess since it's food it would attract ants, but I can't say for sure. We store left over tags in a sealed plastic tote in the basement and no bugs have bothered them yet....
Deletebeen searching for a cheap craft that I can make quickly and many of (about 600). Saw this and got the idea that I could run yarn or string thru the hole and use as a necklace? I made crafts each year for mobile meals to hand out to the recipients. I think a heart would be cute but not sure if this would be stable enough for wearing.
ReplyDeleteHej a comment from the Netherlands here. I made xmas deco with saltdough. I let them dry in the oven 1 hour at 100 degrees celcius and than 2 hours more on 200 degrees celsius. They harden out a bit when there cold again. I saw on pinterest a recipe with cornstarch they were nice and white. But havent tried it yet 1/2 cup cornstarch, 1 cup baking soda, 3/4 cup water. Bake at 175 for about an hour. Here is a link to my tutorial maybe you can use google translate or just look at the pictures ;) http://hoodwinked-diezijnleuk.blogspot.nl/2011/12/kerstboom-versiering-maken-in.html
ReplyDeleteWelcome! Yours turned out wonderful. I LOVE the moose cookie cutter you used! Thanks for sharing! :)
ReplyDeleteHi do you have a newsletter or something that will notify of new posts? Thanks!
ReplyDeleteLooks interesting. I haven't tried anything like this before. I will give it a try for this Christmas.
ReplyDeleteIt's really fun, and a great activity to bring the kids in on! Let me know how they turn out! :)
Delete