
Check out my favorite (easy) houseplants here.
And how I propagate those plants to get more plants for free here.
Check out more DIY decor ideas here!
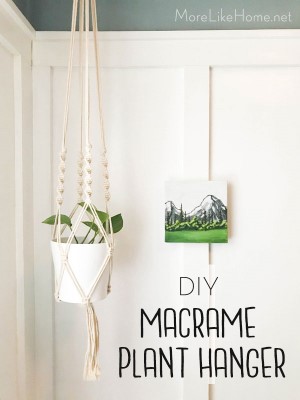
Macrame is making a comeback, and it just shines in hanging planters. And it turns out macrame is a super-fun craft! There's something peaceful and therapeutic about the steady repetition of tying knots. And that's basically all macrame is. If you can measure and tie knots, you can make this planter! It's an easy hobby to pick up and creates a beautiful end results (you might just end up making them for all your friends this Christmas!).
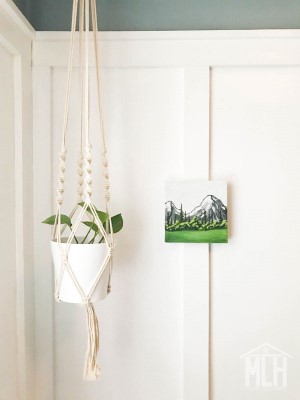
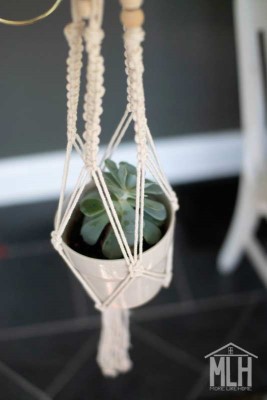
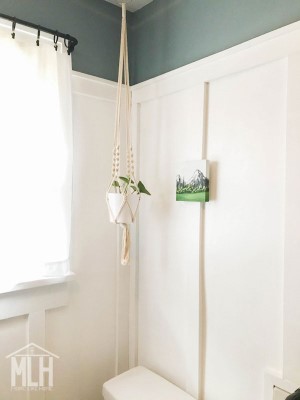
Today we'll be making a basic macrame plant hanger, and I'll give you a couple easy options to customize the style. You can stick with spiral knots like the one above, or use square knots like the planter below. I even added wood beads to this one and I love how it turned out!

And guess what? The knots we're learning today are the basis for all macrame! Once you get them down, you'll be ready to take on all kinds of macrame projects! I made this macrame garland with a free pattern by Cuckoo4Design:

Then I started using the same knots and techniques from that tutorial to make my own wall hangings:

And of course you can check pinterest for all kinds of macrame ideas and free patterns!
But today we'll just focus on hanging planters because they are my favorite and they can work in literally almost any corner of any home. It's such a versatile way to add a little texture and life!
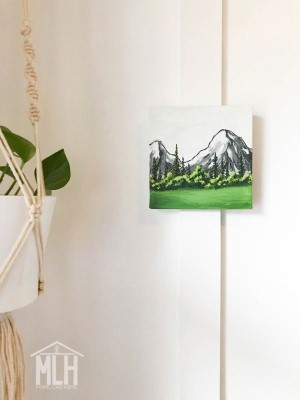
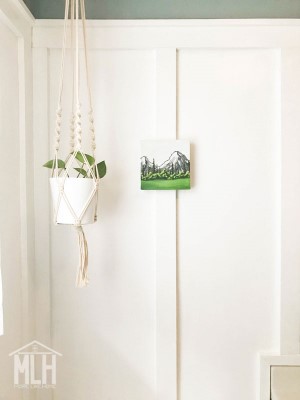
Tiny original painting by the wonderful RBH Print Shop!
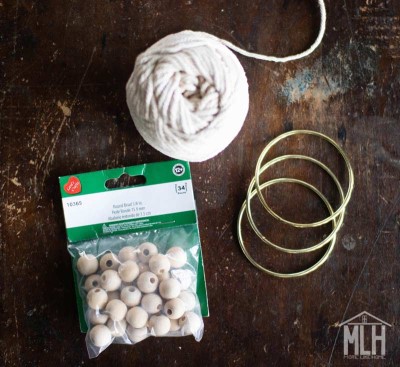
Supplies:
- 33 yards macrame cord - I buy it on Amazon, and I've been super happy with the price and quality of this one. I like 3mm cord for these planters (I get the same cord in 4mm for wall hangings). If you plan to make a longer planter, you will need more cord.
- a ring - I buy these 3" rings on etsy, but you can use any size you like
- wooden beads - optional if you want beads on your planter. I bought these at a craft store, but next time I will order something with larger holes like these.
- I got at least 6 macrame hangers (it might have been seven) out of one ball of cord which, would be under $3.00 each.
- The rings were $1.00 each ($10 for a pack of 10).
- I think it was like $2.00 for the whole bag of beads and I used less than half the bag, so we'll call that $1.00.
- Total: about $5.00 per plant hanger (if you're planning to make several and use up the supplies!). So these make great, affordable gifts or party favors!
If you prefer to learn through video, you can watch me make an entire plant hanger from start to finish here:
Or, if you prefer photos, you can follow these instructions:
Start by cutting:
8 pieces of macrame cord that are each 12 feet long
Note: If you plan to make a longer planter or make more knots on your planter, you will need to cut your pieces longer than 12 feet.
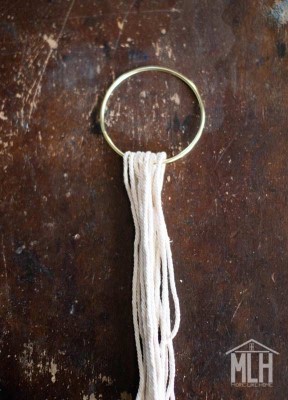
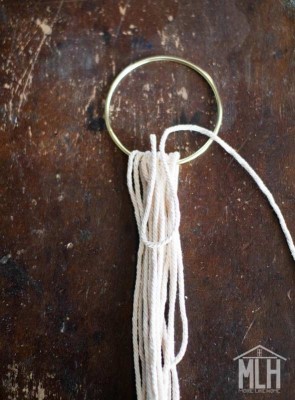
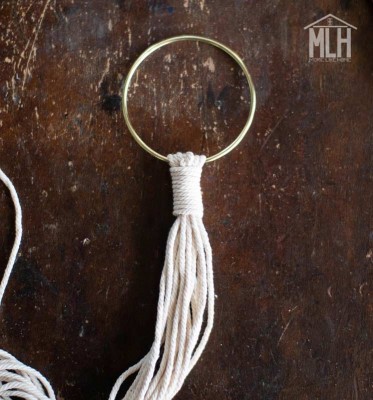
Loop the 8 cords through the ring and fold the cords in half to find the center. You want the ring right at the center like this:
To secure the ring, you can either tie a large knot right below it or follow these steps to make my fave fancy topper (it's easy and totally worth the extra two minutes!).
Cut a piece of cord about 2' long. Lay it so one end is sticking up toward the ring (the short tail on the left), then fold the other end up toward the ring leaving a loop about 2" long:
Just under the ring, begin wrapping the long end around the bundle of cords and work your way down toward the loop of cord:
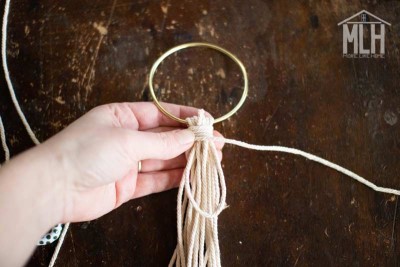
You should see the short end sticking out at the top and the loop sticking out below.
Keep the cord tight as you wrap, and continue wrapping until the topper is as tall as you'd like, or until you have about 2" of tail left:
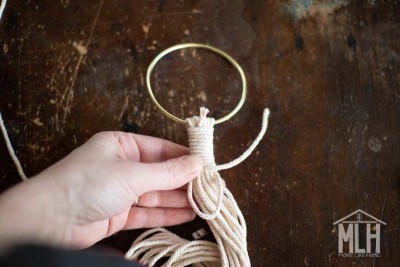
Thread that tail through the loop, keeping everything snug with your other hand:
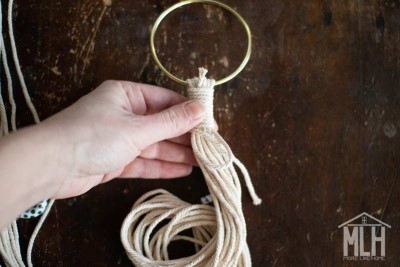
Then grab the short tail you left sticking out at the top and give it a tug. It will catch the long tail you threaded through the loop and pull it up underneath the cord you wrapped around.

It should feel snug and secure. Clip the tail ends at the top and bottom. Your topper is done! Be careful not to cut the 8 long cords!
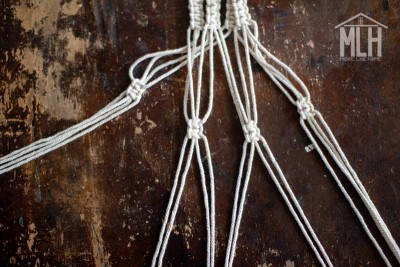
Now separate the bundle of cords into four groups, with four cords in each group:

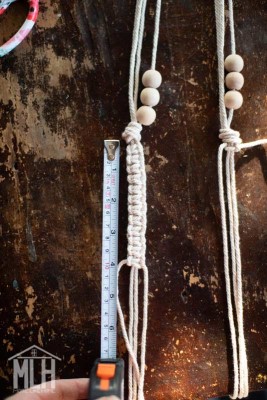
If you want to add beads, go ahead and string them onto each group now. Wrap the end of the cord with a small piece of scotch tape to make threading the beads on easier. For this planter, my beads fit onto a single strand in each bundle. Next time I'd like to try beads with larger holes that could slip over all four strands.
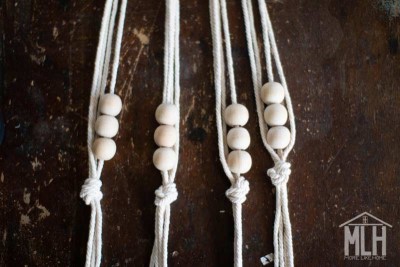
Once your beads are on, you need to tie a starter knot in each of the four sections. If you aren't using beads, just go ahead and tie the knots without them. I made my knots about 20" down from the topper. Remember you can make the planter any length you like, but if you're going longer than 20" here you'll need to start with longer cord.

Each section knotted about 20" from the top.
Just below these starter knots, you'll begin making your actual macrame knots. (I know, I don't have starter knots in photos below, but when you make your planter the macrame knots should butt up right against the starter knots.)
This is the basic knot you'll use for most macrame projects! Once you learn it your on your way to all kinds of macrame goodness. Start by making a left half knot. Take your first section and divide it so you have two cords in the center and a single cord on each side. Then tie it like this:
- Bring the left cord across the two center cords (leaving a loop on the left side).
- Take the right cord down over the left cord.
- Then slide the right cord under the two center cords.
- Bring the right cord up through the loop on the left side.
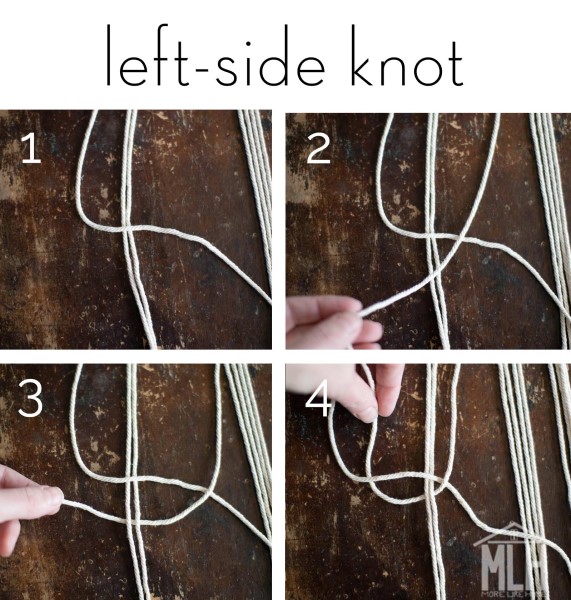
Pull the ends taught to create your first half-knot!
Now you have two options: you can continue making half knots just like this to create a spiral, or you can alternate left half-knots and right half-knots to create a straight row. I'll show you a photo of both options in a minute, but first this is how you make the right-side knot (it's just the opposite of a left side knot!):
- Bring the right cord across the two center cords (leaving a loop on the right side).
- Take the left cord down over the right cord.
- Then slide the left cord under the two center cords.
- Bring the left cord up through the loop on the right side.

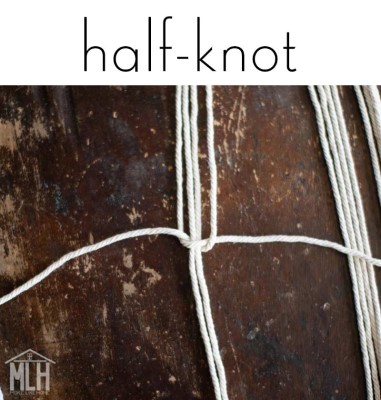
One left-side half knot + one right-side half knot = one complete square knot:
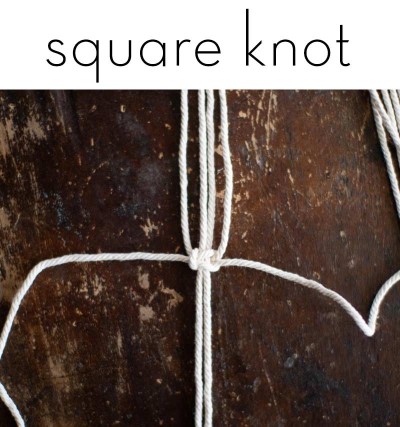
Here's a comparison of the two styles. If you keep making just the left-side half knots, you'll end up with spirals like the planter on the left. If you alternate left-side and right-side half knots, you'll get straight rows like the planter on the right:

You can see the starter knots right above the macrame knots in this photo.
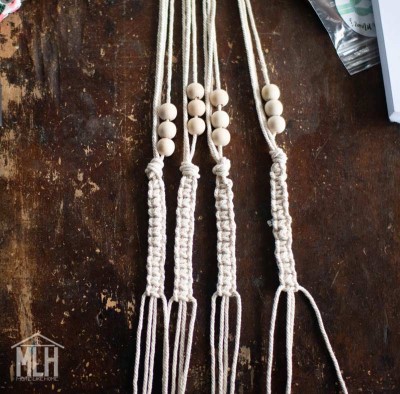
Whichever you choose (spiral or straight), tie a row of knots about 4" long underneath your starter knot:
Do the same on the remaining three sections. I don't measure each time, I just look at them side-by-side and tie knots until they match.
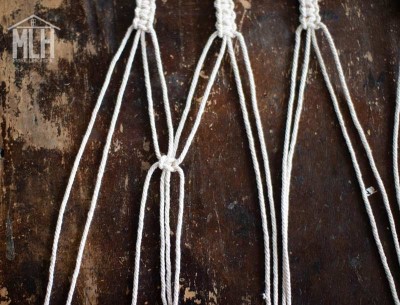
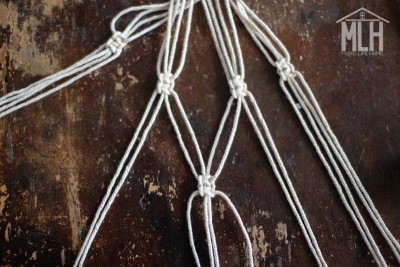
Lay the four sections side-by-by side and divide the cords from each section like this:

You're basically creating four new groups of four cords using two cords from each of the groups above. Make sure you're using a center cord and side cord from each group. The pairs at the far ends will join together to make the fourth group in a minute.
Measure down about 4" from the last knot and tie a new square knot. Remember to alternate a left-side half knot then a right-side half knot to make a complete square knot. Note: even if you did spirals above, you'll want to use flat square knots at this point. Then tie a second square knot right below the first.
Repeat for the next two sections, knotting at the same height as your first knot:

Now bring together the two stragglers at each end to make the fourth group and tie two square knots to match the other three groups. Make sure that the two strands that were the outside cords before are the middle cords now, and the formerly center cords are on the outside now. You should end up with something like this:

Now we're going to do the same thing one more time. Separate each group again to create four new groups, using two strands from each:
I only had the middle two groups set up for this photo. Let's ignore the wonky side groups, k?
Measure down about 3" from the last row of knots and tie two square knots:
I only do 3" here because I like where the knots hit my pots better with the smaller gap. You might want to leave slightly bigger gaps for a larger pot, or smaller gaps for a smaller pot - but really this set up is pretty flexible and will hold just about any pot! Work around to knot the remaining three groups until you have something like this:

You're almost done! To close up the end of your plant hanger, just tie a big knot about 2" below the last row of knots:

You could swap in a fancy topper knot here, too, if you want!
Trim the ends below the knot to tidy them up. You can leave any length of tail you like. You're done! Drop a pot in there and hang it up!
I can't wait to see macrame plant hangers popping up in your homes! What better way to ring in spring than with a little more green? If you share photos on Instagram or Facebook, be sure to tag me - I love to see what you guys are working on!
Guess what? You can win a macrame plant hanger in my March giveaway! You can enter on Instagram and/or Facebook!
Have you tried macrame yet? What kind of project would you love to try? I think a bigger wall hanging is next on my list!
Great blog post and tutorial! It turned out super cute. Thank you!
ReplyDeleteThat's great! Glad you liked it!
DeleteThanks! It turned out great and I learned enough to freestyle next time! Love it!!!
ReplyDeletePerfect! Free-styling is the best!!
Deletenice design
ReplyDeleteThis is beautiful ... I hope I can manage this ... this will allow me to convert existing small terracotta planters into hanging baskets - cheap for me, & comfy for the plants!
ReplyDeleteI love how terracotta looks in a plant hanger! Have fun!
DeleteAfter I did my spirals, I have 2 shorter strands in each group of 4. Is that right or did I do something wrong? Thanks.
ReplyDeleteThe strands with half knots shorter and the fillers do not. It is normal to have 2 shorter cords in this type of knot.
Delete^ Yep totally normal! :)
DeleteAmazing tutorial! I thought I’d need a video to learn this but the instructions are so well written that I had no trouble following it. It took me maybe 2 hours from finding this page to having a finished plant hanger and I know it will go much faster in the future now that I have the hang of it. Thank you for this!
ReplyDeleteThat's great to hear! Thank you so much for the feedback! :)
DeleteJust made one, YAY!! I used to macrame many years ago, but haven't for a long time. This one came out good, but I think the next one will be much better. Practice, practice, practice,lol.
ReplyDeleteThank you for your instructions. I had fun. :)
So glad you had fun! This is one of my favorite crafts! :)
DeleteThis is great and very straight forward, thank you! I haven't been able to find on here though, what is the finished length from ring to bottom of pot? It would be good to know before making one
ReplyDeleteMine is about 34" from the bottom of the ring to the end knot. Hope that helps! Have fun!
DeleteOhmigosh, I was looking for something just like this. None of the tutorials I was finding online showed me the knots I admired in other projects. I've made two now, thank you for the clear and detailed directions!
ReplyDeleteYou're so welcome! Glad you enjoyed it!
DeleteThank you! Just made this today following your instructions. The project came out beautifully! Can't wait to make more as gifts for the holidays. You can see the finished project on my blog, with credit to you (https://donnamhopkins.com/sketchbook), October 6, 2002 post.
ReplyDeleteAbsolutely made my week to make something by hand. Again, thank you for sharing and teaching what you know!
I love giving these as gifts, too. And yours turned out beautifully! Thanks so much for sharing!! :)
DeleteThank you for this! unfortunately the last 4 knots got pretty tangled and I think I did something wrong, I had to redo it but they're not too even. Would you have any advice for this? Thank you
ReplyDeleteI did the same thing the first time!! The second one I really had to take my time connecting the last 4 knots. I put the hoop over my head and fit the pot into the hanger and then loosely tied the strands together that needed to connect. It’s hard to see the 3D shape when it’s flat out in front of you.
DeleteI did the same thing the first time!! The second one I really had to take my time connecting the last 4 knots. I put the hoop over my head and fit the pot into the hanger and then loosely tied the strands together that needed to connect. It’s hard to see the 3D shape when it’s flat out in front of you.
DeleteI didn't see where it said what the finished length of this hanger is. I'm trying to make some and would like to know how long it is to the bottom of where the pot would be if I go by these instructions and make no adjustments. I'm not worried about the tassels at the bottom. Thank you
ReplyDeleteMine is about 34" from the bottom of the ring to the end knot. Hope that helps! Have fun!
DeleteHi there! What sizes of pots will fit in this? I have 6 inch pots
ReplyDeleteHi! You can make it to fit just about any size pot. You can experiment with putting the knots closer together or farther apart to get a good fit. I've used it with 4-6" pots as-is. :)
DeleteI’m wondering what pot size this holds also.
ReplyDeleteHi! You can make it to fit just about any size pot. You can experiment with putting the knots closer together or farther apart to get a good fit. I've used it with 4-6" pots as-is. :)
DeleteAny suggestions for a corded ring instead of the brass or steel (or whatnot)? I would like to make it completely organic, but haven't seen anything that doesn't use a metal ring.
ReplyDeleteLook online for different ways to start a hanger. There are a few that dint require a ring. Ive done a simple knot at the top after you fold cords in half
Delete^ That's a great tip! You can also use a wooden ring (I've bought them on etsy).
DeleteHello. Thank you for the fantastic tutorial. I'm assuming this is for 6" pots? Or, are they 8"? I would like to scale it down for 4" pots. Any measurements or information? Thank you.
ReplyDeleteIt's more about how low you knot it. You can put any size pot, just experiment. Once you know the knots you can do anything. 👍 I have done 12 inch pot ones. For 4-6 inch i found it nicer to use thinner cord.
Delete^ Great tip! I've used this as-is for 4-6" pots and it's pretty forgiving. :)
DeleteThank you so much for taking the time to post the tutorials! I’m on my third one!!! Next project...a wall hanging! ❤️
ReplyDelete-Cheryl
So glad to hear this. :) Wall hangings are so much fun! Enjoy!
DeleteThank you! I prefer reading instructions instead of videos. So I'm grateful you took the time. Lovely work! :-)
ReplyDelete