Monday, January 27

DIY Lace Skirt-Extending Slip

Do you have any dresses that you wish were a little bit longer? Or maybe you'd like a way to add a little fun and flair to your skirts? Well, my sister came across a great way to pull off both of those things and I DIYed it up... in exchange for painting a set of around the world ornaments for me. And let me tell you guys, I got the better end of that deal. This skirt extender is so fast and so easy, I knocked it out in about 15 minutes. She may have been on the second ornament by then. Thanks sister!


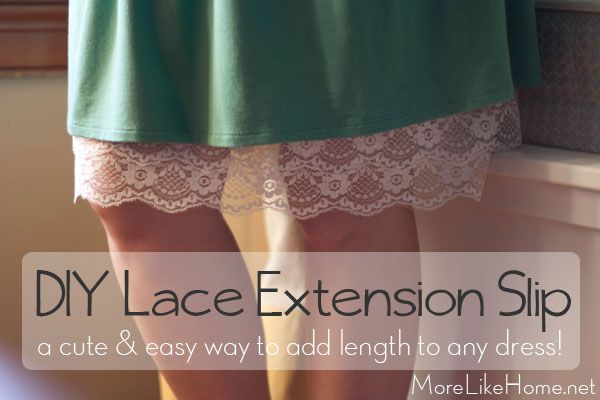
Not only was is it easy, it was cheap, too! She had an extra slip already so we just had to buy the lace for the bottom. It adds a pretty detail and decent amount of length to a skirt that may be a bit short.

Ok, I don't actually have any skirts this short. I made her hike it up for dramatic effect. Full disclosure. ;)

I especially liked how it looked under the softer, flowy dresses. They looked so pretty with a little lace detail around the bottom. So, want to make your own?


Here's all you need to make one:

Sunday, January 26

At the Aquarium

Happy Saturday, friends! Just wanted to pop in and share some pics from our first outing as a family of four last fall. I give you "Small Boys at the Aquarium!"

Watching the penguins.

Holding Baby Brother's hand and watching the fishies.

Sweet interactive reef.

I found a shell!

Tiny boy taking an otter nap. Was he ever so tiny?!

Lunch overlooking Lake Michigan

Naptime lunch. Aquariums wear the boy out. And oh my goodness that tiny baby hair.


I think he forgot we were at the aquarium during lunch because we walked back out to the tanks and he was all "Look mama! FISH!!!" We wore the boy out, he fell asleep as soon as we walked out of the building and slept all the way home!

Happy Sunday!

Friday, January 24

Newborn Photos {do it yourself!}

*Update: check out our DIY newborn photos for M3 here!
 
I'm pretty sure everyone who has a new baby wants those adorable, perfect newborn pictures. But you guys, newborn photo shoots can be EXPENSIVE. I looked into getting pictures before Baby B was born and between the fees for shooting, fees for the number of shots, and fees for the cd, it just wasn't something we felt comfortable sending that much money on. So I winged it DIY style. While they may not be up to professional par, I'm so happy with how they turned out! And did I mention they were basically free??


Update: check out our DIY newborn photos of m3, too!

I'm definitely not an expert. Definitely. But I want to share the tips I have in case any of you want newborn pictures and can't afford a photographer. So here we go!


Use Good Lighting. Lighting is probably the single most make it/break it part of getting a good picture. I would hands down go with natural lighting and it's well worth waiting for a nice, sunny day. But once you have that good light you must wield it carefully. You don't want it to be too harsh or make hard shadows so avoid direct sunlight. I took my pictures at a time of day when the room was still bright but the sun wasn't hitting our picture zone (a.k.a. the bed). To cut the shadows down even more it helps to diffuse the light a bit with something like sheer curtains (the ones we had up are made from an old bed sheet and worked perfectly). I liked my results best when I shot with the light directly behind me, but you can try different angles and spots around the room to find what works. And you can always practice with an older child or a toy to find what lighting will work well before you hop into baby photography!

Wednesday, January 22

Those Frames in the Office {and a real-life timeline}

I like to keep things realistic around here as much as possible. I get so frustrated when I see things on pinterest that are supposed to be so fast and easy and I can't even get halfway through it because my baby is feeling crabby. So from time to time I like to show what my real-life time scale looks like. Like in my kitchen that still isn't done... and we started in 2010. Half the cabinets have had knobs for months and, although we have all the knobs, the other half still don't. Yup.

So today we're going to flash back to 2012 When I found these cheap frames and hung them in the office. This is where I left you:


Well last summer I finally got around to painting all the frames white. And didn't even take pictures. Then in a pre-Christmas sale at snapfish.com I finally ordered some pictures!


A big part of the reason we waited so long was that I wanted to do something more artsy in the frames. But I realized that something in them was better than nothing. And, hey, my kids are adorbs so why not?!
Subscribe