You guys are pretty up to date on the status of our garden (from starting seedlings, to a mini greenhouse, to a bunny-proof salad garden, to companion planting and doubling the size our big garden) but we still have one more big change to share. Our latest move as we wage war against the bunnies. We fenced in the big garden!
You guys know we love a good 2x4 (you can see our full 2x4 series here) and we still had several sitting in our garage just waiting to turn into a fence. We love them because they are easy to work with and pretty affordable, not to mention sturdy - they hold up houses for goodness sake!
Throw a couple rolls of chicken wire in the mix and you're on your way to garden bliss. It takes a little work to get it all together, but the process is pretty straightforward and it's totally worth to protect your future produce!
Saturday, June 21
Thursday, June 19
Companion Planting in the Garden
We finally got our plants in the ground a few weeks ago (our mini greenhouses really helped our little plants get strong and hardy for the transplant) and we tried something new this year to hopefully increase our yields. I started reading up on companion planting with a couple books from the library (available here and here). The gist of it is that some plant, when grown together, help each other thrive while others can actually keep each other from producing.
There was a lot of information in those books, so I started by making a list of all the things we would be growing and making a column of thing that grew well with it and another column of things to avoid. From there, knowing I would have three garden beds to work with, I did my best to divide them into three list of compatible plants. In the first bed we planned tomatoes, carrots, cucumbers, eggplant, and some spinach. Those things also grow well with strawberries and asparagus, which already grow along the garage, so all these things went in the neighboring bed. In the second bed we planned broccoli, onions, cabbage, cauliflower, brussel sprouts, hyssop, and squashes (we have pumpkin, acorn, and I think zucchini but I didn't label them all and a few didn't make it this far... so we'll have some surprises!). They also grow well with chamomile which I'd love to add, maybe around the fence since it tends to spread. The third bed is just a little guy and he got stuck with all the things that didn't fit anywhere else - potatoes, beans, cantaloupe, and snake squash and tiny pumkiny things courtesy of my sister. I don't think those even are supposed to grow together... I do better next year.
Then I grabbed a handy print-out from my square foot garden book to use as a spacing reference during planting and headed out to the garden (which is now fenced in!).
But wait... did I say three beds? We also had to dig up two more. While we love our raised bed and hope to upgrade these in the future, the wood/bricks and especially the compost to fill them was not in the budget at this point. So we broke out the handy shovel and dug. And dug. And dug. Cried a little. Dug some more. Okay we didn't actually cry, but I don't think the neighbors would have judged us if we did. We added another long bed marked with flags in the pic below, and a smaller bed across the end of the garden (perfect for beans since it's right along the fence!).
We worked in small sections at a time loosening the soil, pulling up the grass (make sure you get those roots!), and shaking as much dirt off the roots and back into the bed as possible. Shaking the dirt off is important so you end up with a nice bed full of dirt instead of a big old hole.
Bye bye grass!
When it came time to actually get the plants in the ground I started by laying out all the pots to figure out the spacing and make sure everything would fit.
There was a lot of information in those books, so I started by making a list of all the things we would be growing and making a column of thing that grew well with it and another column of things to avoid. From there, knowing I would have three garden beds to work with, I did my best to divide them into three list of compatible plants. In the first bed we planned tomatoes, carrots, cucumbers, eggplant, and some spinach. Those things also grow well with strawberries and asparagus, which already grow along the garage, so all these things went in the neighboring bed. In the second bed we planned broccoli, onions, cabbage, cauliflower, brussel sprouts, hyssop, and squashes (we have pumpkin, acorn, and I think zucchini but I didn't label them all and a few didn't make it this far... so we'll have some surprises!). They also grow well with chamomile which I'd love to add, maybe around the fence since it tends to spread. The third bed is just a little guy and he got stuck with all the things that didn't fit anywhere else - potatoes, beans, cantaloupe, and snake squash and tiny pumkiny things courtesy of my sister. I don't think those even are supposed to grow together... I do better next year.
Then I grabbed a handy print-out from my square foot garden book to use as a spacing reference during planting and headed out to the garden (which is now fenced in!).
But wait... did I say three beds? We also had to dig up two more. While we love our raised bed and hope to upgrade these in the future, the wood/bricks and especially the compost to fill them was not in the budget at this point. So we broke out the handy shovel and dug. And dug. And dug. Cried a little. Dug some more. Okay we didn't actually cry, but I don't think the neighbors would have judged us if we did. We added another long bed marked with flags in the pic below, and a smaller bed across the end of the garden (perfect for beans since it's right along the fence!).
We worked in small sections at a time loosening the soil, pulling up the grass (make sure you get those roots!), and shaking as much dirt off the roots and back into the bed as possible. Shaking the dirt off is important so you end up with a nice bed full of dirt instead of a big old hole.
Bye bye grass!
When it came time to actually get the plants in the ground I started by laying out all the pots to figure out the spacing and make sure everything would fit.
Tuesday, June 17
$9.95
Yard season is in full swing around here! This last weekend was the first time I've really jumped in, thanks to a neighborhood wide sale. As you guys know, you usually have to hit a lot of sales to find the good stuff and it's hard to do that with the chitlins in tow. So a neighborhood sale where we're able to get out a stroller and walk a while (meaning no in-and-out of carseats) is our ticket to a good haul. And we lucked out this time when one of the houses we stopped at had little fella clothes (in great condition to boot) for just $0.50 a piece, which is my goal price for dressing my boys! Here is the total haul (minus a magna-doodle that couldn't be pried from a little boy's sticky fingers) for a total of $9.95. Keep reading for the full breakdown!
$3.00 - three summer outfits for Baby Brother
$3.00 - three fall outfits for Baby Brother
$2.00 - two too small summer outfits... but I may know someone who can use them. We have a cousin on the way, folks!
$1.00 - six pairs of socks for Baby Brother
$0.10 - Rachel Ray cookbook (because why not for $0.10?)
$0.50 - magna-doodle. Easily the best purchase of the day. The drawer on the side is full of magnet shapes and Big Brother has already played with it for hours!
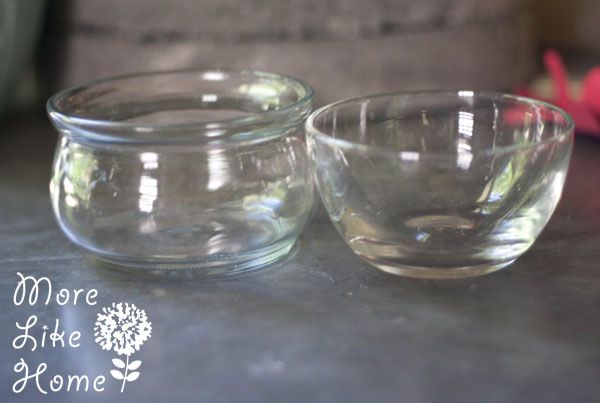
$0.35 - two little glass bowls to add to my kitchen windowsill.
I already have an aloe plant and another succulent on the windowsill and I'm excited to add a couple more!
And yes. We do have a dino infestation. No plant is safe.
That's it for me this week! Anyone else been hitting the yard sale circuit? What's your best find so far?
$3.00 - three summer outfits for Baby Brother
$3.00 - three fall outfits for Baby Brother
$2.00 - two too small summer outfits... but I may know someone who can use them. We have a cousin on the way, folks!
$1.00 - six pairs of socks for Baby Brother
$0.10 - Rachel Ray cookbook (because why not for $0.10?)
$0.50 - magna-doodle. Easily the best purchase of the day. The drawer on the side is full of magnet shapes and Big Brother has already played with it for hours!
$0.35 - two little glass bowls to add to my kitchen windowsill.
I already have an aloe plant and another succulent on the windowsill and I'm excited to add a couple more!
And yes. We do have a dino infestation. No plant is safe.
That's it for me this week! Anyone else been hitting the yard sale circuit? What's your best find so far?
Saturday, June 7
Taggie Teething Toys & Natural Olive Oil and Beeswax Wood Polish
Wooden teething toys are a great, all natural way for little fellas to work those new chompers. One of my favorites (and Baby Brother's favorites, too!) is a taggie toy with a wooden teething ring. The wooden part is great for baby's gums and the fabric taggie adds textural interest and gives baby something to hold on to. They are perfect for baby shower gifts or stocking stuffers. And the best part is they are so easy to make! Today I'll show you how I make the taggie rings and also how to make an all natural beeswax & olive oil sealer. Let's get started!
What you need:
Flip it right-side out and push out the corners. Tuck in the fabric at the opening and pin it closed. Press the whole thing to get the edges nice and crisp. Then topstitch all around the outside edge with a 1/4" seam allowance.
What you need:
- wooden rings (I like these)
- two fabric scraps about 4" x 15" or so (I like to do one side flannel and one side quilting cotton. you have lots of wiggle room on the size too, just find what you like!)
- thread
Flip it right-side out and push out the corners. Tuck in the fabric at the opening and pin it closed. Press the whole thing to get the edges nice and crisp. Then topstitch all around the outside edge with a 1/4" seam allowance.
Subscribe to:
Posts (Atom)