
Woohoo! We made it! Day 31! Exclamation points! You can see links to the complete series here. In this series, we're seeing what we can make out of 2x4s. I want to keep it cheap, keep it easy, and keep it totally doable for anyone. I thought we'd go out with a bang today, and tackle a big, unique project - we're building a sofa!
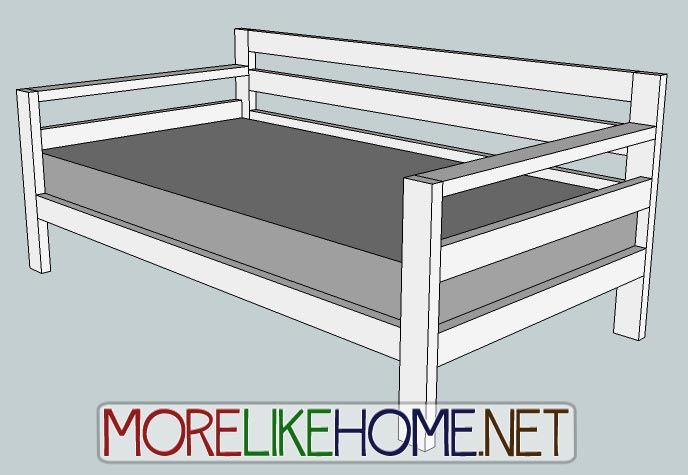
This is a sofa with a twin sized mattress as the base. So it's super comfy for lounging during a movie, and it's ready to go for overnight guests! It would also make a great daybed in a guest room. Ready to build it? Let's go!
Shopping List:
10 - 2x4s @ 10' long
Twin Mattress (I've seen them under $100 on sale - check Big Lots!)
Throw Pillows or Back Cushions (optional)
Tools:
Saw
Drill
2 1/2” screws (or Kreg Jig & 2 1/2" self tapping screws)
4" screws (or Kreg Jig & 2 1/2" self tapping screws)
Wood glue
Wood filler
2x4 Cut List:
(A) - 2 @ 33" (back legs)
(B) - 4 @ 71" (back rails)
(C) - 6 @ 39" (arms/sides)
(D) - 2 @ 27" (front legs)
(E) - 1 @ 71" (front)
(F) - 10 @ 39" (slats)
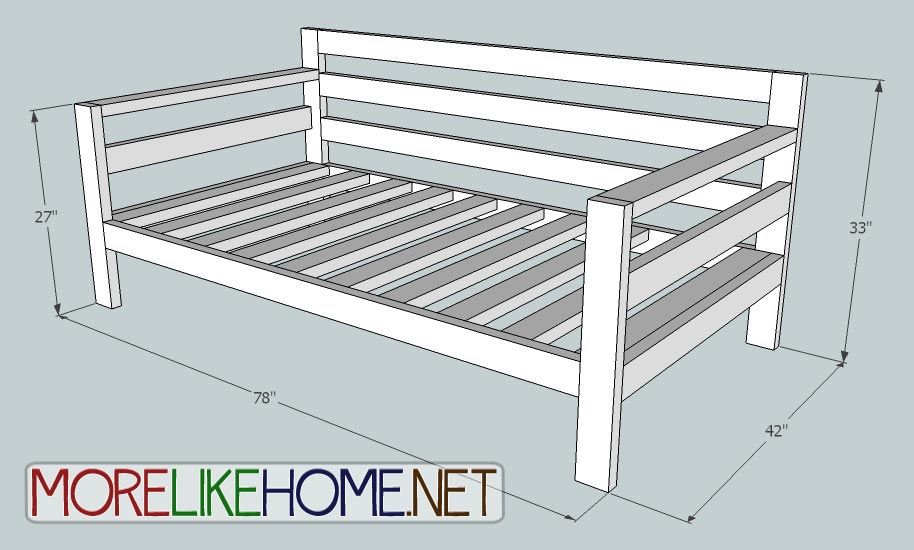
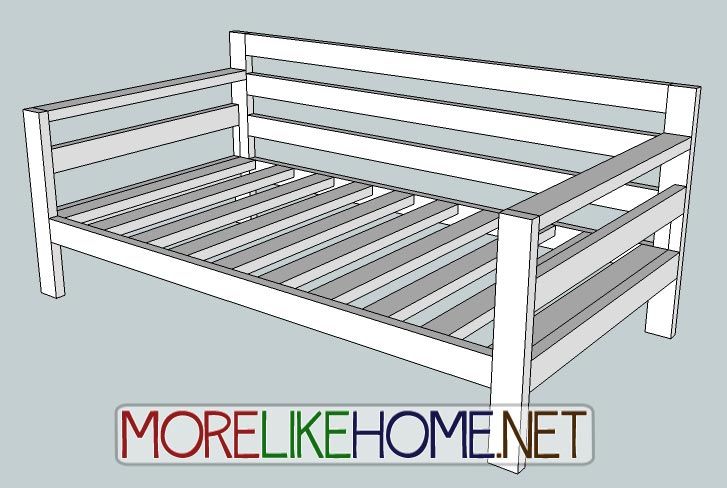
Dimensions: 78" wide x 33" tall x 42" deep
Please read all the directions before beginning, and cut your pieces
as you go, measuring before each cut. Use 2 1/2” screws or pocket holes
with 2 1/2" screws unless otherwise indicated. Always use glue.
Pre-drill and countersink your screws. I have not built from these exact
plans, so measure lots to make sure things work out!
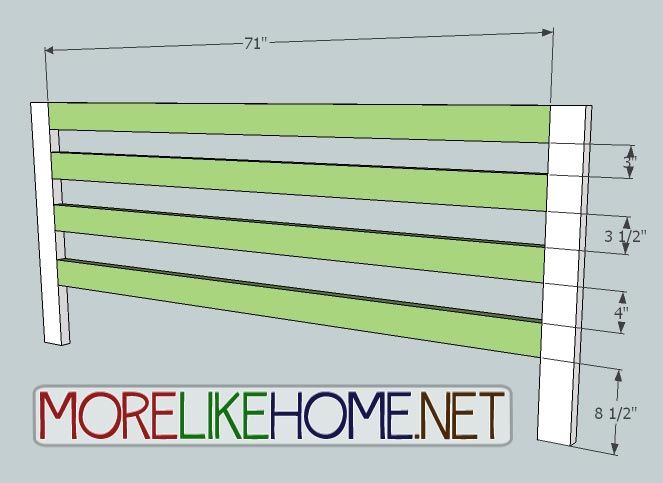
Step 1: Build the Back
Use the four back rails (B) to connect the back legs (A) as shown below. The first should be flush with the top of the legs. Below that there should be 3" of space before the second rail, then 3 1/2" before the third rail, then 4" below the final rail (with 8 1/2" left at the bottom). Attach the rails using a Kreg Jig and pocket hole screws, or by drilling through the legs into the rails with 4" screws. Use glue
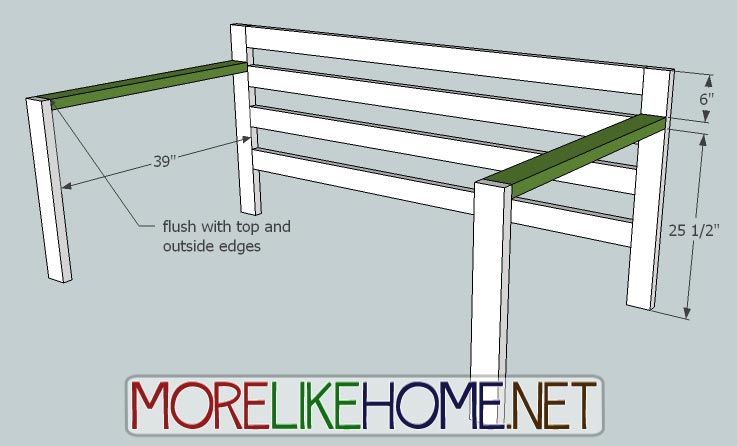
Step 2: The Arms
Start by using one arm/side board (C) to connect each front leg (D) to the back section as shown below. The front of the arm should be flush with the top of the front legs. Attach it by drilling through the front legs into the arms. The back of the arm should be at the same height on the back section with 25 1/2" of space below the arm, and 6" of space above. Attach it by drilling through the back legs into the arms. Do all this with 2 1/2" screws, or with a Kreg Jig and pocket hole screws. Use glue.
Now attach two more side boards (C) on either end of the sofa as shown below. The outside edges should be flush with the outside edges of the legs. The top side board should be spaced 4 3/4" down from the arm, and the bottom side board should be 5 1/2" down from there (with 8 1/2" of space underneath). Attach the side boards by drilling through the legs into the side boards with 2 1/2" screws, or by using a Kreg Jig and pocket hole screws. Use glue.

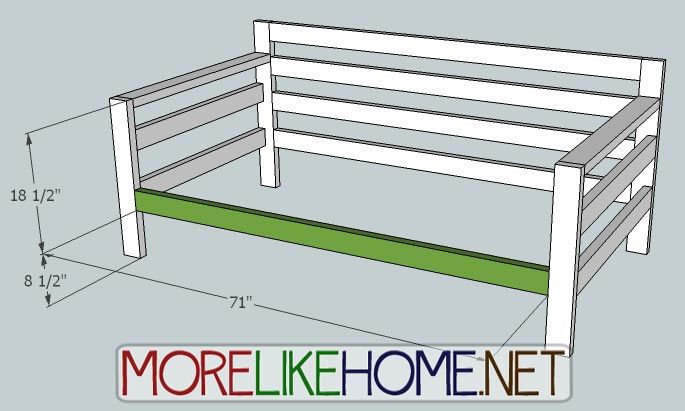
Step 3: The Bottom
Now attach the front board (C). This runs between the front legs, and should be set 8 1/2" above the floor. Attach it using a Kreg Jig or by drilling through the legs into the front board with 4" screws. Use glue.
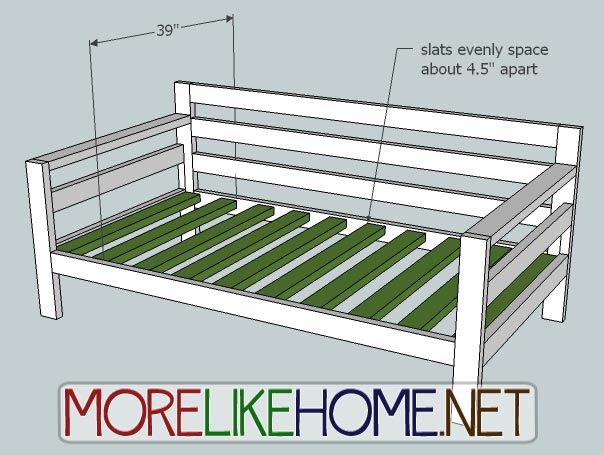
No you need to install all the slats. These run between the front board and the bottom back board. Space them evenly, about 4 1/2" apart, and set them down 1" from the top edge of the front and back boards (setting them down a little will create a little lip around the slats that will help keep your mattress in place). Attach these boards using a Kreg Jig and pocket hole screws, or by drilling through the front/back boards into the slats with 2 1/2" screws. I recommend using two screws on each end of each slat for this step. And be sure to use glue!
Step 4: Finishing
Start by filling any holes and sanding everything smooth. Then finish with any paint or stain and polyurethane. Try a crisp white (with bold fabric accents) or use this opportunity to try a fun paint color on your couch... remember, you can always paint over it later if your tastes change!
Now add a twin mattress. You can cover it with fabric, or just use a fitted sheet. Also add some fluffy throw pillows or cushions across the back to make it more comfy and give it a more couchy feel. Then chillax with a big bowl of ice cream. :)
Project 2x4 Cost:
$28.80 - 9 2x4s @ 10' long ($3.20 each)
$31.30 - 1 2x4 @ 8' long ($2.50 each)
$31.30 Total
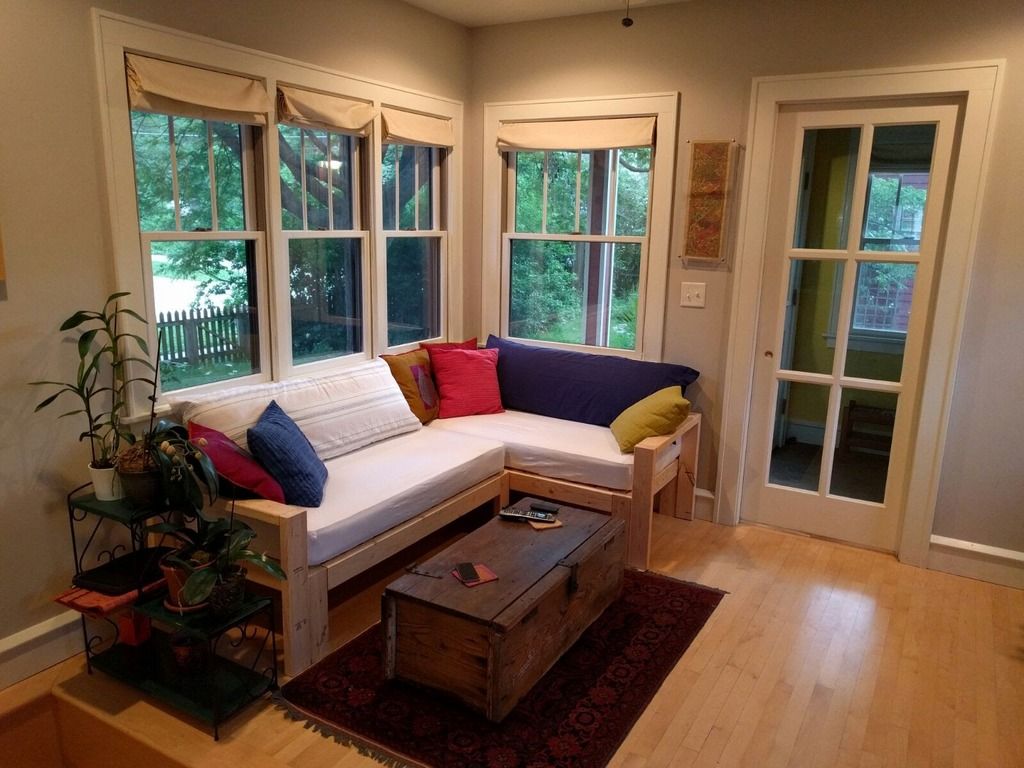
Hold the phone, Peeps! Vikas modified our sofa plans to accommodate two crib-size mattresses and created this beautiful custom sectional! Can you believe this was first-time builder?! Beautiful work, I can't wait to see what you do next!
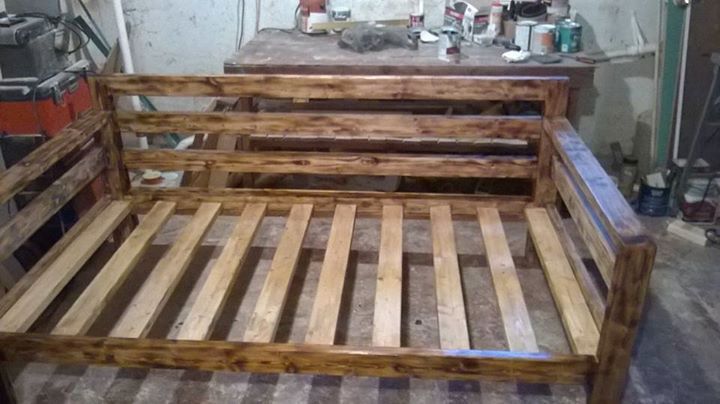
A big thanks to David for sending in a picture of his finished 2x4 daybed! He built it for his camo mancave and altered the plan by adding a leg to the back of the arms so it can work as a stand-alone twin bed. The back is attached with decorative bolts that makes it removable and easier to move. The finish is 2x4's burnt with torch, Shellac to add color and seal wood, then 3 coats of Poly. Thanks again!
And thanks to Hope for sending photos of her finished project! She built hers to double as a couch/bed for her apartment. It's painted gray and decked out with a white quilt and lots of pillows (love the Be Merry pillow!). For anyone without a Kreg Jig, she made her daybed without one and used 4 1/2" screws instead of 4".

And here is proof that you can handle furniture even if you live in an apartment. Thanks again, Hope!

See giveaway winners here.

Share on Facebook

This would be great in my office that doubles as a guest bedroom!
ReplyDeleteI could so use one of these right now for my extra bedroom.. how hard would it be to accomodate two mattresses instead of one??
ReplyDeletewouldn't be a couch at that point...you would have to modify for structural support.
Deletesorry this is such a old thread
I've enjoyed your projects! Maybe I'll be motivated to try some out soon!
ReplyDeleteLove this idea! Would be perfect for an office/guest room when I get my own place.
ReplyDeleteOkay... this is great! I'd love to try this one!
ReplyDeleteI want this kind of couch!
ReplyDeleteThis looks pretty simple. Good work.
ReplyDeleteI can't believe you can make a sofa!
ReplyDeleteThis would be great on my screened in back porch!
ReplyDeleteThis is my first time checking out your blog. I am excited to try out some of your projects. Thanks for sharing.
ReplyDeleteLove it! Exactly what I have been needing for the office in our new home!
ReplyDeleteThank you all for visiting! It has been suggested that this design would not hold up to the load common to sofas, but I haven't gotten any complaints from anyone who actually built it. I have not yet built from this design, but if you do and you have a problem, please let me know so I can update the plans. Thank you!
ReplyDeleteI'm tempted to make this for my geriatric Great Dane. I will let you know how it supports him.
ReplyDeleteI used 2 x 6 for the base then insert 2x4 along the bottom of the 2x6 then installed the 2x4 slates. would hold up a house lol
ReplyDeleteHa ha! Thanks for sharing! I'd love to see pics if you have any. :)
DeleteHi, just started this project. Trying to screw the back legs to the rails, the 4" screws don't seem to be long enough. i think I'm using the self tapping, am I missing something? thanks
ReplyDeleteIt will definitely be close. Are you countersinking the screws? That would give you a little more length. Either way a Kreg Jig would create a stronger joint in this instance. Hopefully you've gotten it to work by now, so sorry for the slow answer!!
DeleteSince you didnt make this yourself, can anyone or has anyone confirmed that a twin mattress does fit in it? From the inside of front 2x4 is 71" but a twin is 75" Planning on making this Sat and Im super excited, my first project but Im nervous
ReplyDeleteYes! The mattress actually sits behind the front legs so it has an extra 2" on either side where it rests against the side boards, giving you 75" total. And having the legs in front keeps the mattress from sliding forward. :)
DeleteAwesome!! Thank you so much for the quick reply. Once I give it a go I will post how it went.
DeleteHI! I'm going to build this soon and have a question: at the end of each step, you say "use glue". What am I glueing? I figured the screws would hold it in place.
ReplyDeletethanks in advance!
Hi Emica! We put glue between all the wood pieces before screwing them together, so I probably should have put it earlier in the directions. :) We've found it really helps things hold together for the long haul. Some of the earlier things I built without glue have started to shift & wobble over time... not like they're going to fall apart necessarily, but just not as nice and sturdy as I want after I put all the time in to make them. Hope that helps!
DeleteI'm almost finished this. My partner and I are not in the least handy, so why we started with this ambitious project I don't know!! The hard part was finding the drill we had somewhere!! I also found that I can't measure to save my life. The helpful folks at Home Depot made all my cuts for me, and as I was selecting my 2X4 boards a nice man pointed out that a couple of them were bowed. Oh!! Good to know. I used 5" screws in all the spots where you are drilling through the wider part of the 2X4. I forgot to use glue in some spots, but it still seems sold. I have the last few slats to put in, and I can hardly wait to "dress" my daybed. I did paint it and it will be outside so I'm planning on using spar urethane on it to protect it from the elements. I may add an aerial structure, in order to hang curtains and weave fabric over the top to keep the sun out and make it a really nest-like spot. I'll post some pix when I'm done.
ReplyDeleteOh my goodness, this all sounds wonderful! Shady little next spot = yes please! I'd LOVE to see pictures!
DeleteVery, uncomfortable... Back is way too straight up and down... As far as construction - very sound - very strong... But if you are making this to sit on with back against the back of it... Well it's good for about 10 minutes then you'll want to get up... We put big cushions from a couch we had on it - so it was soft enough but just too straight. We modified it after the 1st try - lengthen the front legs by 2-3/4" . Now sits better but looks a bit funny... so if you make this project - you might want to modify the design a little - giving the back a 5 to 10 degree incline... Other than that - it seems very sound...
ReplyDeleteThanks for the feedback! :)
Deletewhat kind of adjustments would I need to make to put the bottom slats about a foot off the ground? we're all pretty tall....and creaky-boned :) Standing up would be easier with a taller base....
ReplyDeleteJust add 2.5" to each leg, so the back legs would be 35.5 and the front would be 29.5". You could reinforce things later if it feels wobbly at all, but for just a couple inches I would try it out and see how it feels. :)
DeleteHello, what is the cut list for the 2x4x8?
ReplyDeleteHi, 33 + 33 + 27 would make the best use of the board. :)
DeleteOk so for the 2x4x8 make the cut list (2) @ 33" (1) @ 27" correct? Thank u will follow the plans
DeleteYou got it! Have fun! :)
DeleteI made this as a daybed for my Man Cave. Made 1 alteration...added a leg to back of arms so it is a twin bed. Then added back by attaching with decorative bolts. Makes it easier to move through doors and if you don't want as a sofa...you can just use as a twin bed. Wouuld love to share pics but not sure how to post them here.
ReplyDeleteCan I make this high enough so I can fit in wooden crates for storage underneath?
ReplyDeleteYou can make it as high as you want by making the legs longer, it just depends on how much you want to climb to get up there. :) How tall are the crates you want to use?
Deleteplease review your page and remove or move that floating ad for your newsletter. It blocks the instructions.
ReplyDeleteThanks for letting me know. It's happening on the mobile site, right? I'll see if there is a way to get that changed.
DeleteWe are very short legged. How can we modify the depth to accommodate very short people. I'm 5' and hubby 5'8. Thanks
ReplyDeleteTo modify the depth you just need to take the same amount off of each board that runs the depth (the slats, arms, and side boards). The tricky part will be finding a cushion the right size since this is made to fit a mattress, so I'd start by looking for that (you may have to make one with something like foam-by-the-yard from Joann Fabric). Once you find something that is a good size, adjust the depth of your boards to fit. Have fun!
DeleteJust made this as a guest bed/couch for my new apartment. I was a little intimidated because I've never made anything this big, but it actually turned out to be pretty easy (thanks in large part to my dad's help). I followed the directions exactly, except I used 4 1/2" screws instead of 4" and made do without a kreg jig. I painted it a darker grey and for the cushion I used a twin mattress covered by a plain white quilt with lots of pillows. I'd love to send you pictures!
ReplyDeleteWay to go! I would LOVE to see pictures. And maybe share a few on the post if you don't mind. :) You can post them on my facebook page (facebook.com/morelikehome) or email them to me at morelikehome(at)gmail(dot)com. Can't wait to see your work!
DeleteI'm attempting this project & would love to see your pics if you have any.
DeleteHello, thank you for the plans. My husband and I build that sofa. We used a futon instead of a mattress and we extended the legs a little in order to put storage bins under. It was the perfect solution for our small apartment! Budget wise we did it for under 75$ (plus futon for 100$) thank you again for the tips, the plan and the idea.
ReplyDeleteWhat a great idea to use a futon! And great job, you can't beat that price. :) I'd love to see pictures if you have any you'd like to share. You can post on my facebook page or email me at morelikehome (at)gmail (dot) com. :)
DeleteDoes anyone have an idea or modification to keep dogs off when you're not using it....love my dogs, but they have their own beds!!!!
ReplyDeleteNo dogs here, hopefully someone else can chime in! :)
DeleteUsing this design idea but will use a queen size memory foam mattress cut in 2 pieces and glued together for a thick sofa cushion. Of course, I will also build the sofa so that it will fit a 30 inch deep cushion and not a twin mattress.
ReplyDeleteThat is a great idea! I'd love to see how it turns out. :)
DeleteHello! I would like to know if you can give me the cut list if I want to make it " double " for a double mattress?
ReplyDeleteJust built this today! This is my third project now from your plans, I have at least 3 or 4 more of your ideas I'd like to build yet as well as a few of my own. Kreg jig is so awesome!
ReplyDeleteThat's great! I'd love to see it if you want to share a photo. You can share on my facebook page or email me at morelikehom (at) gmail (dot) com. I'm glad you got a Kreg Jig - you'll never go back! :)
DeletePlans call for 4in screws to attach through width of 2x4's. I found 4in screws were too short, had to use 5in. Getting the sides on was the toughest part for me. Extremely hard to do alone, had to have a helper hold the side while I held the back and used a level to make sure the side was on correctly before I drilled. I used long bolt type wood screws. I doubled up in a few places to make it more sturdy. Once complete, this day bed is solid - almost indestructible. Added a 12in memory foam mattress and my 12 yr old son loves it. Way cheaper and more solid than any day bed you can buy online. Thanks for the plans!
ReplyDeleteSo glad your son likes it! Thanks for the feedback! :)
DeleteCould this be made taller so a trundle can be added? Has anyone done this?
ReplyDeleteI don't know of anyone who has tried this yet. My only thought would be that raising it for a trundle would make it a bit high for use as a couch (so it might be better suited as a daybed). :)
DeleteThis comment has been removed by the author.
ReplyDeleteBuilt this yesterday, great project. A few comments/suggestions. 1) Get a pocket hole tool, it will pay for itself in this one project, which uses, by my count, 84 screws and pocket holes. Can you do it with 4" screws? Yep. And you risk splitting the 2x4's and you'll have screw heads showing all over the place. 2) Get the Pocket Hole Tool from Harbor Freight. $65 and they always have coupons for -20%. It's made of metal and more adjustable than the plastic Kreg tool. 3) Use real Kreg screws, and the Kreg square tipped driver. Better grip than the philipps heads that come with the HF tool. 4) Try to find a miter box to make your cuts. Square ends are really important for the look of this job. 5) I upgraded the quality of the 2x4's to the one up from the cheapest at Lowes. For an extra $1 per 10' piece (an extra $10 for the project), I got better quality wood and while they were not exactly presanded, but much smoother than the cheaper ones. 6) Umm, I am not the best at math, but I worked it out before hand and bought 10 10 footers and not 9 plus an 8 footer. Glad I did, because I didn't have any piece that was longer than 2 feet when I finished. A cutting guide would have been nice.
ReplyDeleteThanks for all the great feedback!! I'll change the shopping list to 10 10' boards, sorry about that!
DeleteIf I'm not using a kreg, what size screws should I use? Maybe 8?
ReplyDeleteSure! I've used both 8 and 10. :)
DeleteDoes anyone know what the dimensions would be to make this for a queen size. Would love to do this for my daughters room
ReplyDeleteI don't think this plan is well-suited for a queen mattress, unfortunately. You would need to add an extra support down the middle, which would require quite a bit of alteration to the plans. :(
DeleteJust completed this project today, it looks great and is super comfy!
ReplyDeleteThat's great! I hope you love it!
DeleteWhat is the best way to put together so it comes apart for moving?
ReplyDeleteHi! Unfortunately this plan isn't great for that. You'll have to just assemble it without glue, and then remove the screws to take all the pieces apart for moving. It's not going to come apart in big, convenient sections. Sorry!
DeleteI've been mulling over making this a daybed/trundle with room to fix another mattress under it using a frame I bought that has wheels. Same thing though, with the increased size I'd need to disassemble it to get it out of the room. My concern with not using glue is you're putting all of your faith in the pocket holes which by most accounts is one of the weakest joinery techniques available. When you factor in the weight of the mattress & 2x4 slats I'm not sure how much I'd trust this without glue - unless it's for a <100 lb teenager. I'm looking into bed hardware that will give me more piece of mind.
DeleteI'd be interested in building this couch. But do you have any plans for some matching chairs? Ones that preferably recline.
ReplyDeleteI share a small apartment with my roommate and his teenage daughter. The daughter sleeps out in the living room and I want to build a couch to replace the aging one we have now, that will also double as her bed. I'd like to build some matching simple reclining chairs that would also double as a temporary bed for when my roommate's son comes to visit.
Thoughts?
Hi! I don't have a matching chair plan, but Ana White's sleeper chair may help you out. :) https://www.ana-white.com/woodworking-projects/twin-sleeper-chair
DeleteMade it as an actual bed frame for my 2 yo
ReplyDeletehttps://imgur.com/gallery/71jhZc8
Slightly modified to include a rail on the front.
For the 4 inch screw issue I actually drilled a hole about an inch into the wood and then screwed it together, and I’ll fill the holes with dowels later :)
Wow I love this! Thanks for sharing! And great call sinking the screws. :)
DeleteI there a plan with the measurements and cut list for a 60x80 queen bed?
ReplyDeleteSorry for bad grammar. Is there a plan for a queen day bed?
DeleteSorry, I don't have plans for queen version.
DeleteI just finished my full size version of this plan. Turned out wonderfully. I’ve never built anything before and the instructions were easy to follow for a complete beginner.
ReplyDeleteThis is the first woodworking project I made without my husband’s help. Daybeds in Hawaii are often called punee. I made mine with salvaged lumber, piled on the aloha print pillows, and it has become my mom nest! :)
ReplyDeleteIf you’d like to see a picture, you can check out my Instagram account: Scrappy_Aloha