
Ready for day 29? You can see links to the complete series here. In this series, we're seeing what we can make out of 2x4s. I want to keep it cheap, keep it easy, and keep it totally doable for anyone. Today's project is one for the bathroom - it's an Open Storage Vanity!

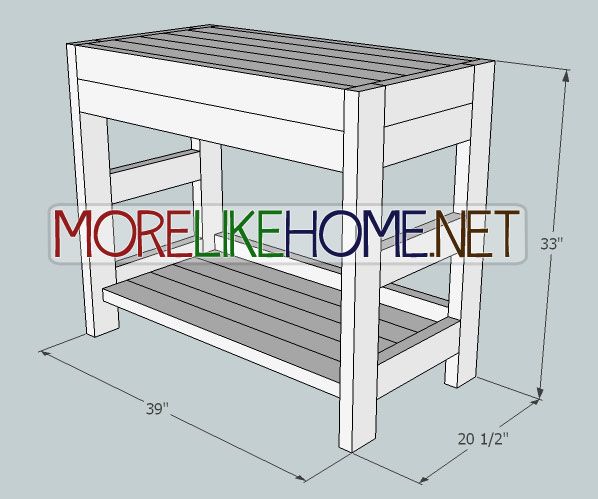
Designed for the bathroom, you can use the wood top as drawn or get a standard vanity top to fit. There is plenty of room underneath for towels or big baskets. It would also make a great console table! Let's get started....
Shopping List:
7 - 2x4s @ 10' long 1 - 2x4 @ 8' long
Tools:
Saw
Drill
2 1/2” screws (or Kreg Jig & 2 1/2" self tapping screws)
4" screws (or Kreg Jig & 2 1/2" self tapping screws)
Wood glue
Wood filler
2x4 Cut List:
(A) - 4 @ 33" (legs)
(B) - 8 @ 13 1/2" (sides)
(C) - 6 @ 36" (shelf)
(D) - 4 @ 36" (front/back)
(E) - 2 @ 17 1/2" (supports)
(F) - 5 @ 36" (top)
Dimensions: 39" wide x 33" tall x 20 1/2" deep
Please read all the directions before beginning, and cut your pieces
as you go, measuring before each cut. Use 2 1/2” screws or pocket holes
with 2 1/2" screws unless otherwise indicated. Always use glue.
Pre-drill and countersink your screws. I have not built from these exact
plans, so measure lots to make sure things work out!
Step 1: Build the Sides
Use four side pieces (B) to connect two legs (A) as shown below. The first two should be flush against the top of the legs with no space between the two. The third board should be 7 1/2" down from there, and the last one 7 1/2" down from the third with 4" of space left underneath.Everything should be flush across the outside edges. Attach them using a Kreg Jig or by drilling through the legs into each side board with 4" screws. Use glue. Repeat to build the other side.

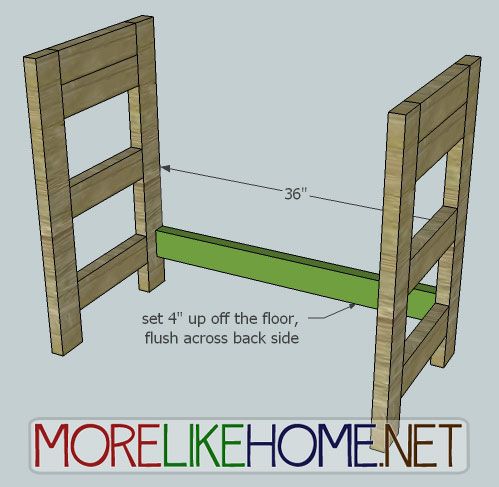
Step 2: The Shelf
Attach the first shelf board (C) vertically across the back of the vanity. It should be flush with the back side of the legs, and set up 4" off the floor. Attach it using a Kreg Jig or by drilling through the legs into the shelf board with 2 1/2" screws and glue.
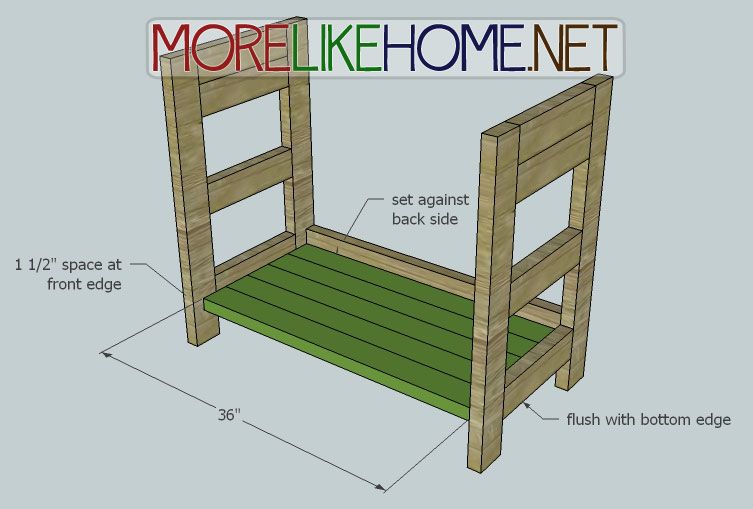
Now attach the remaining shelf boards (C) side-by-side in front of the board you just installed. (Putting that first board vertically will create a lip on the back of your shelf to keep things from slipping off the back.) The shelf boards should be 4" up off the floor and the bottom edges should be even with the bottom of the lowest side board. Attach using a Kreg Jig or by drilling through the legs and side boards into each shelf board with 2 1/2" screws. Use glue.
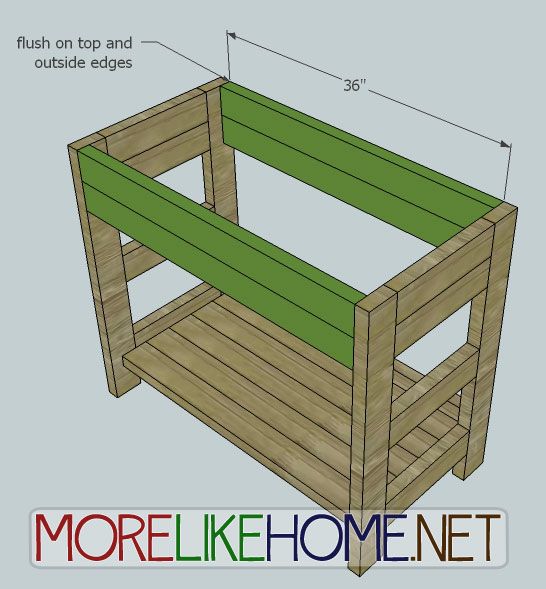
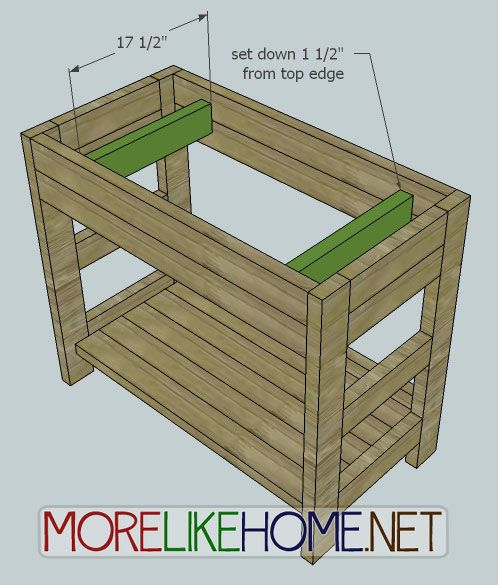
Step 3: The Top
Use the front/back boards (D) to connect the top of the leg sections. Use two each in front and back, keeping them flush across the top and outside edges. Attach them using a Kreg Jig or by drilling through the legs into each front/back board with 2 1/2" screws. Use glue.
Now install the two support boards (E). If you are putting a sink in your vaniy, be sure you space the supports far enough apart that they won't interfere. If you widen the vanity or put in two sinks, you'll need to use three or more supports, making sure you have at least between the two sinks. If you are using the wood top as this is drawn, you need to set the supports down 1 1/2" from the top edge of the vanity. If you are buying a vanity top to install, it will sit on top of the vanity so your supports will need to be up flush with the top edge of the vanity. Once you decide where your supports will go, attach them using a Kreg Jig or by drilling through the front/back boards into the supports with 2 1/2" screws. Use glue.
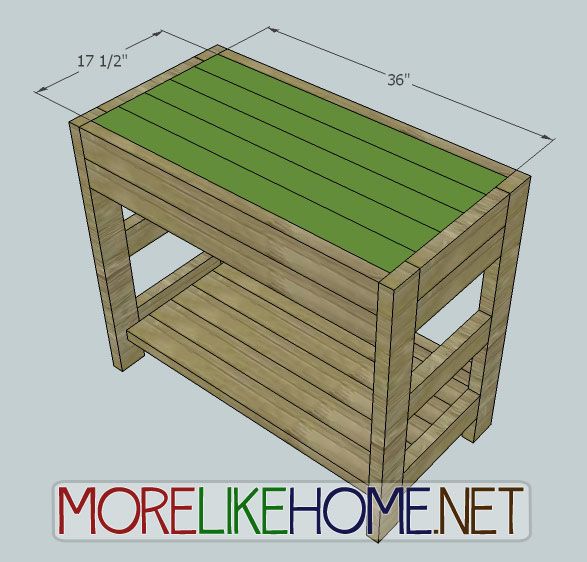
Now install the top boards (F). They should sit inside the frame of the vanity and rest on top of the supports. The top should be flush with the top of the frame. Attach them by drilling through the sides into each board with 2 1/2" screws and glue, and by drilling down through the top boards into the supports with 2 1/2" screws and glue. (If you're using a store-bought vanity top, it will sit on top of the frame and you will not need these top boards)
Step 4: Finishing
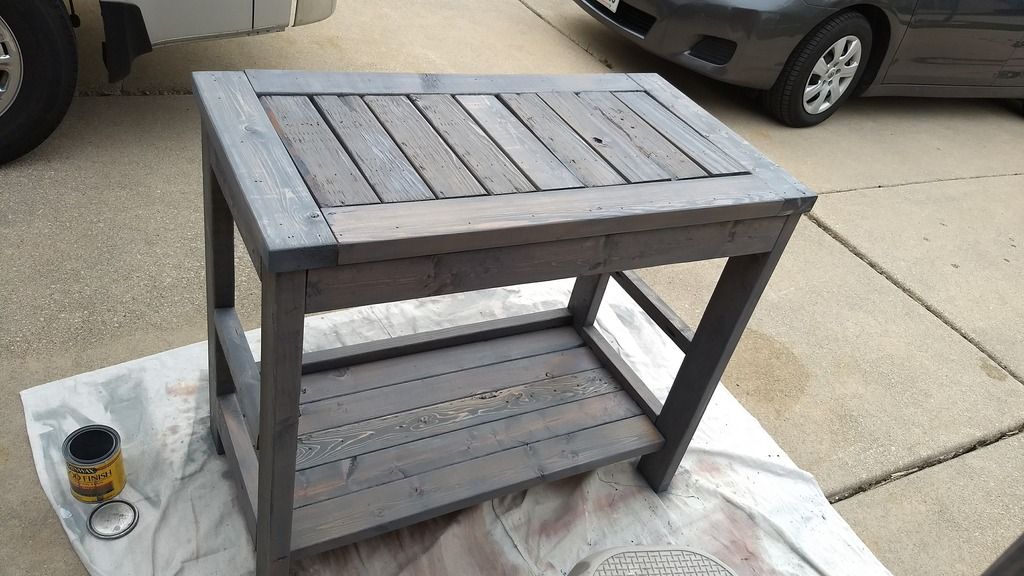
If you are installing a sink, start by using the sink template to cut out a hole for the sink and faucets if necessary. Then fill any screw holes and sand everything smooth. Now you can finish with any paint or stain you like! If you will be using this in the bathroom (or anywhere wet) make sure you get everything nice and sealed up with paint or polyurethane. This would look great in a rustic finish with clean white towels stored underneath.

Or give it a coat of white paint and stick a couple big, textured baskets underneath. Once your table is finished, install your fixtures according to the manufacturer instructions.
Project 2x4 Cost:
$22.40 - 7 2x4s @ 10' long ($3.20 each)
$2.50 - 1 2x4 @ 8' long ($2.50 each)
$24.90 Total
See giveaway winners here.
I Did It!
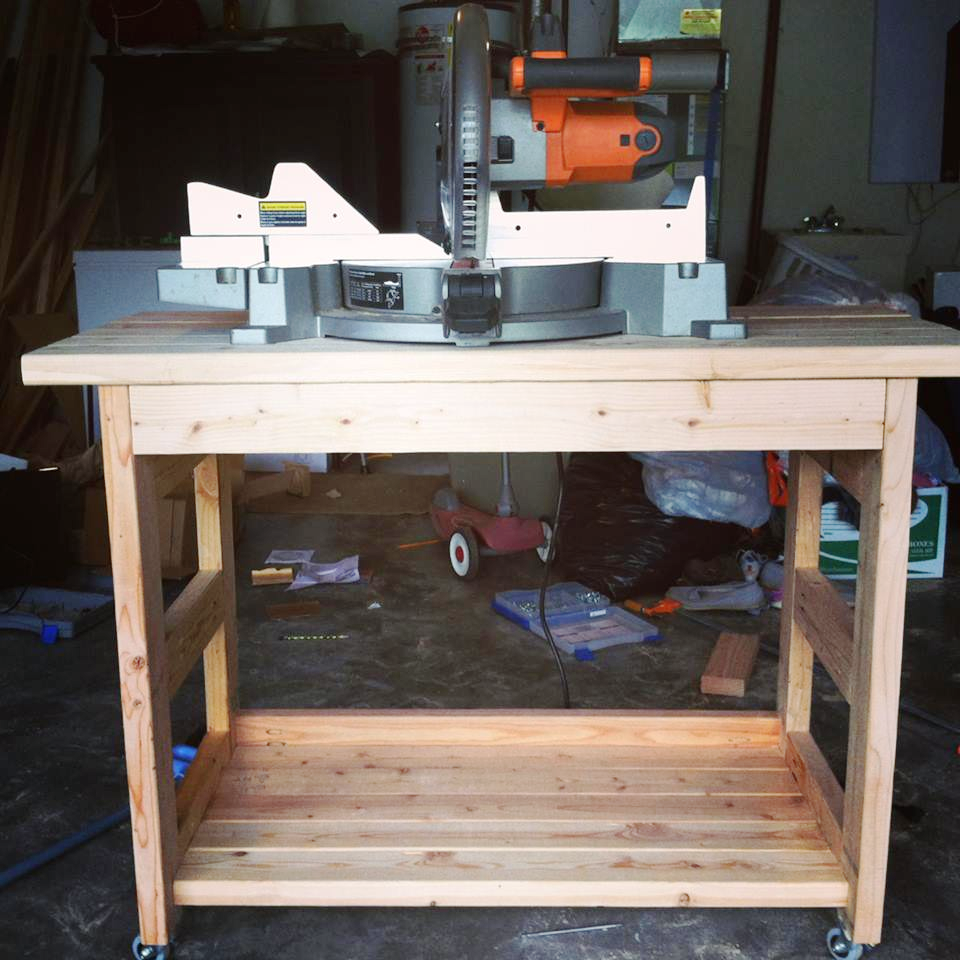
Jerod modified this vanity to use a a coffee bar in his office. See more photos of this and the rest of his DIY 2x4 office furniture here!
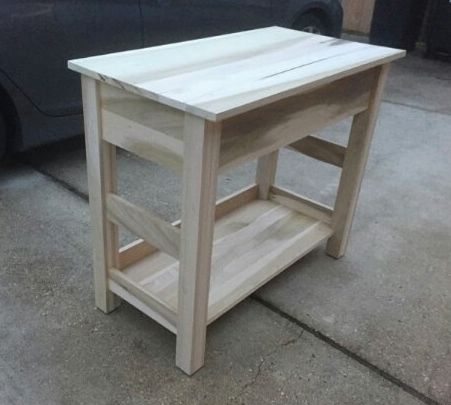
This beautiful poplar vanity was submitted by Elisia Tipton who says "Jason Tipton and his son Alexander Tipton did the construction while I was helping out at a humane society fundraiser. Jason and I are an MBA and an Attorney who are having a blast renovating our new home ourselves." After staining it they plan to add a vessel sink and waterfall faucet, and will use the vanity in their spa/sauna room. Thanks for sharing!
From Serena via Facebook: "
Jeff is modifying it to make a changing table. Looking great, Jeff! Thanks for sharing!
Dan built this to hold his wintering plants. And he says it's strong enough you could dance on it! Thanks for sharing and happy dancing, Dan!

Christy added a wine rack and butcher block top to create a sweet little coffee bar.

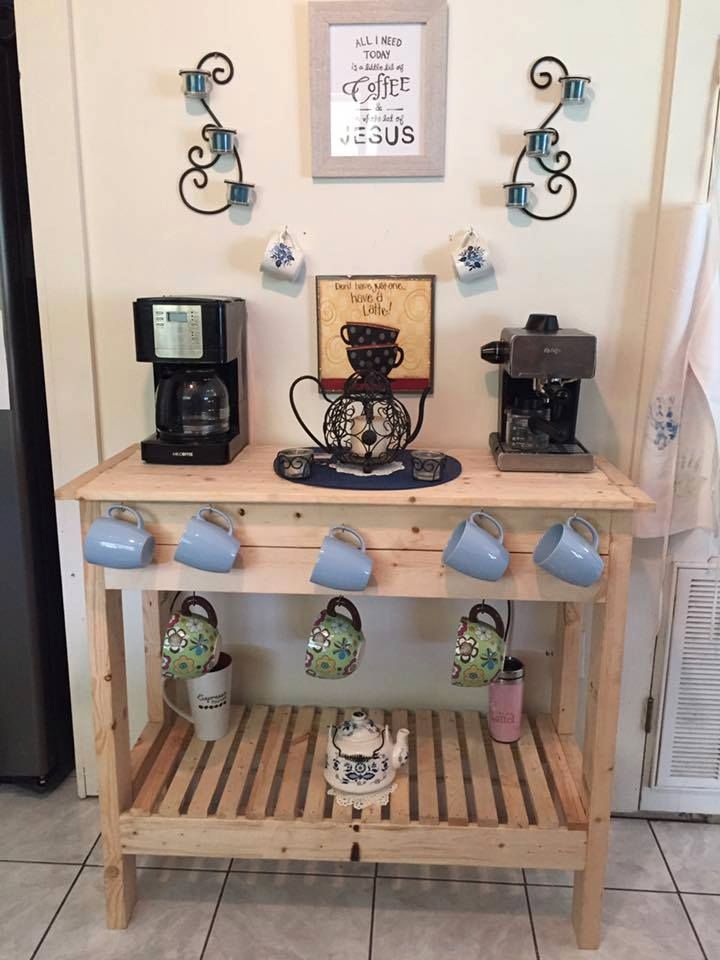
Connie also built a coffee bar and added some perfect cup hooks along the front.

Share on Facebook

Very functional could be used for many different things!
ReplyDeleteI like the big space for the open shelf, but I also like that if I don't need a space that big, I can use the side supports as supports for another shelf if I need another shelf.
ReplyDeleteI could use this as a workbench!
ReplyDeleteCute--would also make a great console table!
ReplyDeleteI'm building mine to be a baby changing table! :)
ReplyDeletehttp://i61.tinypic.com/2hhglew.jpg
Wow, Jeff, that is turning out beautiful! Love the extra shelf for more storage. I'm going to add your link in the post so everyone can see this. Thanks so much for sharing!
DeleteI was surprised at how quickly this piece goes together. My only comment for people wanting to use this as a vanity is you will definitely want to reinforce each side before you make cuts for the sinks. Also, I used paintable silicon caulk on the top to make sure that water doesn't leak between the boards.
ReplyDeleteVery useful set of plans overall. I will use this again for other applications.
Great tips! I'd love to see pictures of any completed projects. Thanks for visiting! :)
DeleteHi Georgia, great post. Sorry to post so late, was wondering: How difficult would it be to add a back panel and hinged doors and make it a closed vanity?
ReplyDeleteA back panel would be easy, just add a sheet of plywood across the back between the legs (skip the 2x4 at the back of the shelf). For doors you'd probably want to add a vertical stop at the center of the opening for the doors to rest against when they are closed. Hope that helps!
ReplyDeleteI made this with my Dad at the end of the summer. Thanks for the plans. It looks perfect in my kitchen. If I could see how to post pictures on here I would do!
ReplyDeleteHi! We don't currently have a way for readers to share photos here, but you can post them on my facebook page or email them to me at MoreLikeHome (at) gmail (dot) com. I'd love to see how it turned out! :)
DeleteLOVE! LOVE! LOVE THIS!! I'm definitely gonna attempt to build it. I've never built anything but I'm excited to start! Thank you so much!!
ReplyDeleteYolanda
Thanks! I'd love to hear how it turns out. Good luck with your first build!! :)
DeleteI just completed this project and it was so easy. It turned out great, thank you for the plan! How can I send you a picture of the completed project??
ReplyDeleteWonderful! I'd love to see! You can tag me in photos on Instagram or Facebook, or email me at morelikehome at gmail. :)
DeleteAmazingly easy... thank you for sharing. I've cut and put together in 1 day. It's waiting to receive polishing.
ReplyDelete