

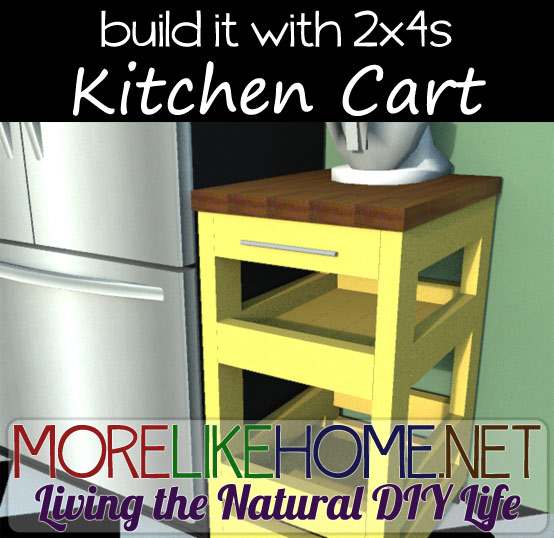
Day 3! You can see links to the complete series here. In this series, we are seeing what we can make out of 2x4s. I want to keep it cheap, keep it easy, and keep it totally doable for anyone. Today's project is another one of my favorites - The Kitchen Cart.

This cart is big enough to add extra storage space and extra counter space, but small enough to tuck under a standard countertop and take up just 18" of space. The shelves are perfect for storing pans, mixing bowls, or even canned goods. It's on casters so you can roll it wherever you need a little extra space to spread out. Let's build it!

Shopping List:
5 - 2x4s @ 10' long
1 - 2x4 @ 8' long
4 casters
long drawer pull (optional)
Tools:
Saw
Drill
2 1/2” screws (or Kreg Jig & 2 1/2" self tapping screws)
3 1/2" screws (or Kreg Jig & 2 1/2" self tapping screws)
Wood glue
Wood filler
2x4 Cut List:
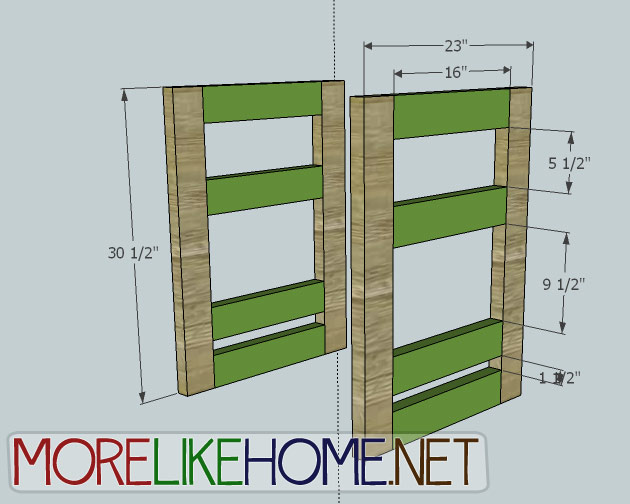
(A) - 4 @ 30 1/2" (legs)
(B) - 8 @ 16" (sides)
(C) - 8 @ 14" (front/back)
(D) - 8 @ 20" (shelf bottoms)
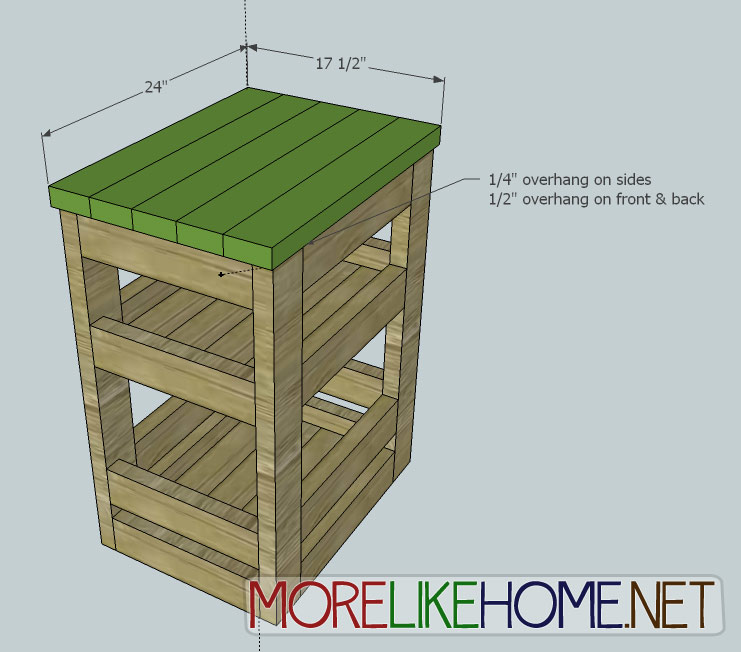
(E) - 5 @ 24" (top)
Dimensions: 17 1/2" wide x 32" tall x 24" deep

Please read all the directions before beginning, and cut your pieces as you go, measuring before each cut. Use 2 1/2” screws or pocket holes with 2 1/2" screws unless otherwise indicated. Always use glue. Pre-drill and countersink your screws. I have not built from these plans yet, so measure lots to make sure things work out!
Step 1: Build the sides.
Use four of the side boards (B) to connect two of the legs (A) as shown below. The first side board will be flush with the top of the legs. The second will be 5 1/2" down from the first. The third will be 9 1/2" down from the second. The fourth will be 1 1/2" down from the third, and flush with the bottom of the legs. You can attach the side board using a Kreg Jig & 2 1/2" pocket screws, or by drilling through the legs with 4" screws. Use glue. Repeat to build the other side of the cart.
Step 2: Connect the Sides.
Use the front & back boards (C) to connect the two sides you just built, four in front and four in back. These will line up with the side boards so they will be spaced the same. Attach them the same way you attached the side pieces in step 1.

Step 3: Shelf Bottoms
Next is installing the bottom of the shelves (D). You will be using 4 boards per shelf. If you have a Kreg Jig, start by attaching the four boards together, side by side. Then attach this larger piece in place using Kreg Jig holes on the bottom side. If you don't have a Kreg Jig, just attach the boards one at a time by drilling through the side, front, and back boards with 2 1/2" screws and glue. One shelf will be flush with the bottom edges of the second set of side boards, the other will be flush with the bottom edges of the bottom side boards as shown below.

Step 4: Table Top
Finally, attach the table top. If you have a Kreg Jig, attach all these board together side by side first, then attach the top to the cart by drilling down through the top into the legs, sides, front, and back with 2 1/2" screws and glue. Center the top so you have a 1/4" overhang on the sides and a 1/2" overhang on the front and back. If you don't have a Kreg Jig, just attach the boards one at a time by drilling down through the top with 2 1/2" screws and glue, making sure you leave the correct amount of overhang.
Step 5: Finishing
Now all that's left is finishing! Start by filling any screw holes and giving the whole things a really good sanding to make sure it's nice and smooth. Attach your casters to the bottom of the cart legs according to the manufacturer recommendations. If you want, add a long drawer pull to the front of your cart - this is not only great for pulling your cart around the kitchen, but can also double as bar for hanging dishtowels. Then finish it with whatever paint or stain you want! I'm loving a bright coat of paint on the shelf and a wood butcher block look for the top. If you plan to use the surface for food, make sure you use some kind of food safe sealer. :)
Project 2x4 Cost:
$16.00 - 5 2x4s @ 10'
$2.50 - 1 2x4 @ 8'
$18.50 Total
See giveaway winners here.
I Did It!
Steven shared his final product on our Facebook page. Looks great! (via Facebook).

(via Facebook)
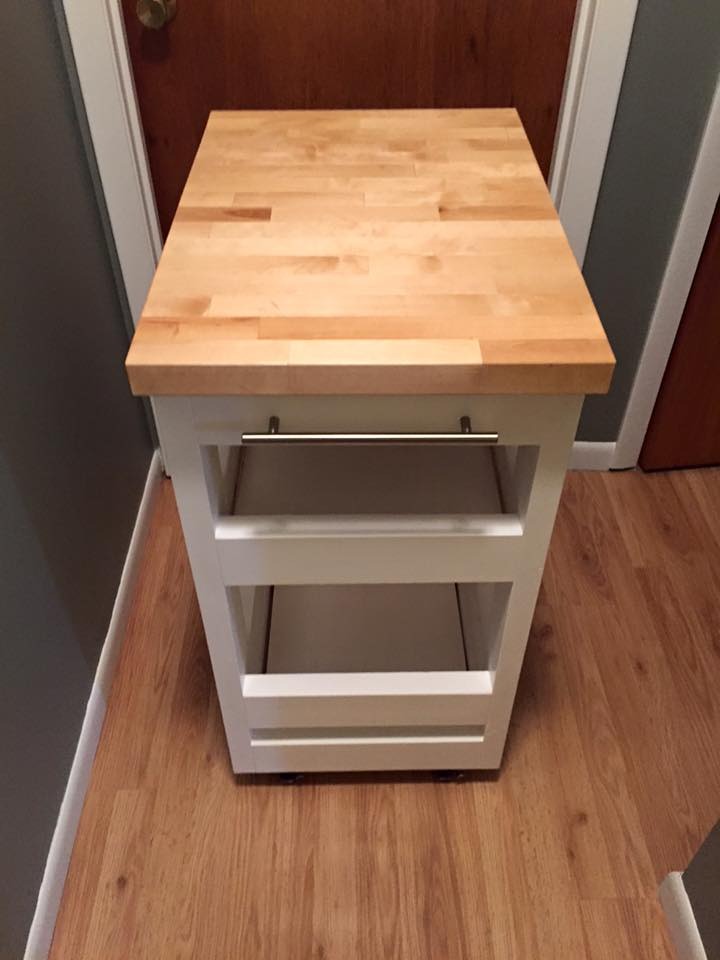
And here's another cart by Trae with a butcher block top. I'm loving the white base with a wood top. Great job!

Share on Facebook

Will have to pass this on. its great for small spaces
ReplyDeletePretty sad...it's all about you.
DeletePerfect for a Kitchenaid mixer!
ReplyDeleteKristen
Oh man, so handy! Thank you!
ReplyDeleteThis would be perfect for my mom for Christmas!
ReplyDeleteThis is a really cute little project! I wonder if it might be helpful for cost estimation to add in the hardware or at least the screws. I always find that a project seems completely affordable until I add that part :P
ReplyDeleteThat's a great idea! Thanks! I will go back and add that in. :)
DeleteI have been looking for something to add to my kitchen corner for extra storage! Now to find the tools and get the materials :)
ReplyDeleteI like the fact that it is on wheels, so I can easily pull it out to clean.
ReplyDeleteI had a hard time looking for a kitchen cart in colors and designs that I liked. Problem solved!
ReplyDeleteThis is EXACTLY what I've been looking for... hoping to make this over the holidays! I'll get back to when I do. :) Thanks a million!
ReplyDeletefrom R.O.R.
If using a table saw or even a circular saw you could use thin plywood for the shelves by cutting grooves in the shelf 2x4s. some home stores sell precut pieces too.
ReplyDeleteLove this idea. :)
DeleteI love this site! I'm actually going to try this but with supervision from my husband on the tools.
ReplyDeleteGreat! Building with a buddy is always more fun anyway. I'd love to hear how it turns out. :)
DeleteI am giong to make this as a microwave cart and free up some counter space. They want hundreds of dollars for one, and they don't seem as sturdy.
ReplyDeleteSounds perfect! Let me know how it goes!
DeleteI'm definitely going to make this for my microwave & toaster oven... Love it
ReplyDeleteThanks! I'd love to see it when you're finished! :)
DeleteI'm new to building and want to build this for my wife. I don't have a kreg jig. It would be helpful to know where to put the screws to hold it all together. Help.
ReplyDeleteperfect for what my mom wants for her kitchen, i'm going to build this and give it to her for Christmas. thank you for posting
ReplyDeleteWhat a great gift! I'd love to hear how it turns out!
DeleteCost estimate?
ReplyDeleteLooks great, looking forward to building it.
For wood alone I would expect to pay around $20.
DeleteYou'll also need glue, screws, casters, a drawer pull, and paint/stain supplies. I can't really give you an estimate for that since it can vary so much based on what you choose. :)
Very excited about this cart! I inherited a ton of 2x4s cut to 33 inches in the garage of my house when I bought it. I've been on the lookout for projects I could use them for and I've been looking for something to store potatoes and onions in my kitchen. Two birds with one stone!
ReplyDeletePerfect! Let us know how it turns out! :)
DeleteDo you trim the edges off on the top boards- to eliminate the gaps?
ReplyDeletenice
ReplyDeleteI like this. It is a great simple construction that is not too difficult and can be adapted to other sizes. With the same idea, it the plan can be adapted for those with more woodworking skills. nice!
ReplyDelete