
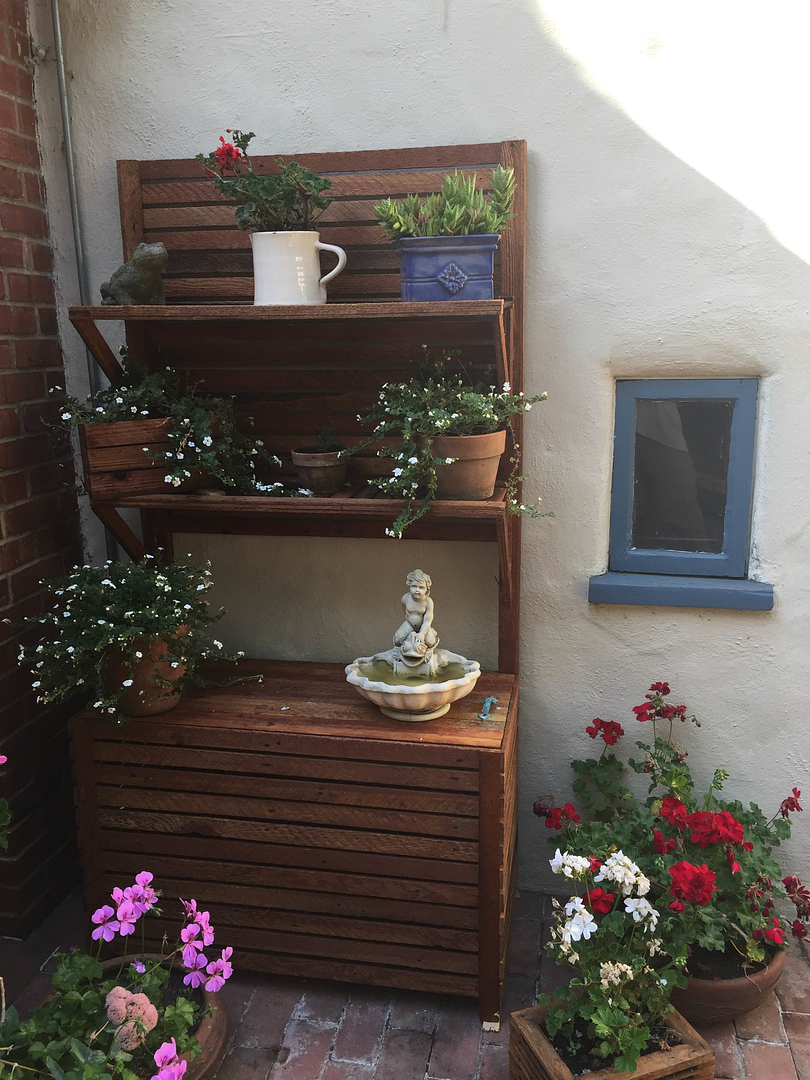
Built by an anonymous reader... we are in love with this patio!
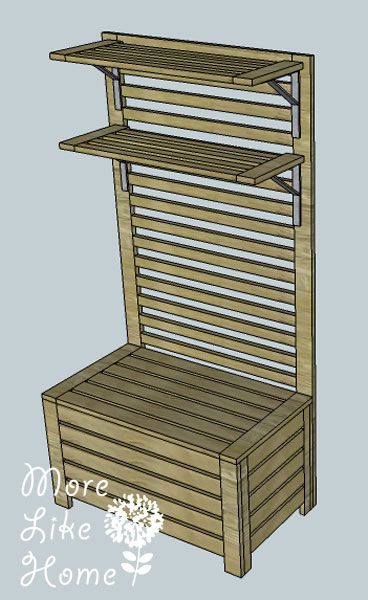
But of course I don't want to pay $40 for a single panel, so today we're to DIY our own! We'll start with plans for a basic panel & shelf today (and of course you can use the panels without shelves!).

Source: Ikea
And later this week I'll add plans for the optional outdoor bench that works with the system. So start planning that patio makeover! You can use any mix of panels, shelves, benches, and hooks to make an outdoor space perfect for entertaining or just relaxing with a good book.

Source: Ikea
There are a few notes on this project before we get started:
- The only difference with my plans is that the shelves and hooks won't be adjustable like the original (but if you know where to get that kind of hardware I'd love to hear about it!!). Our shelves and hooks will be screwed in place instead.
- Be sure to install your panels carefully so they don't tip over! They should either be attached to a wall, or you could put posts into the ground to attach them to.
- For outdoor pieces it's a good idea to finish each piece with an outdoor paint or poly before you assemble it. That way all the edges are sealed from water. If you finish it when you're done, just be careful to get into the cracks really well.
- I like to do projects that can be done with a few simple tools, but for this one you'll really need a Kreg Jig to assemble it. Sorry!

So, ready to get started? Here's what you'll need:
Shopping List for One Panel:
Shopping List for One Shelf:
- 1 - 1x3s @ 2' long (or you'll have enough left over from one panel to make one shelf)
- 2 - 1x2 @ 8' long (but you'll just a third of the second board, if you're making more than one shelf plan on 1 1/3 boards for each)
- two shelf brackets (they need to be less than 1" wide and one side should be less than 10" long)
Tools:
saw
drill
Kreg Jig & 1 1/4" self tapping screws
level
wood glue
wood filler
finishing Supplies
Cut List for One Panel:
(A) - 2 1x3 @ 62 1/4" (legs)
(B) - 1 1x3 @ 26 1/2" (top rail)
(C) - 14 1x2 @ 26 1/2" (rails)
Cut List for One Shelf:
(D) - 2 1x3 @ 10 1/2" (sides)
(E) - 4 1x2 @ 24 1/2" (slats)
Dimensions: 31 1/2" wide x 62 1/4" tall x 10 1/2" deep

Build a Panel
Start by using the top rail (B) to connect the two legs (A). The top edge of the rail should be flush with the top of the legs. (use your Kreg Jig to make pocket holes in the back of the rail, and use the pocket hole screws to attach it to the legs, keeping the edges flush)

Next install all the 1x2 rails (C). Leave a 1 1/2" gap between each board like in the picture below, and make sure everything is flush across the front. Like with the top rail, use pocket holes on the back of each rail to attach them. My plans will leave about 17 3/4" of space open below the rails like the original piece (it won't be visible if you build the bench to go with it) but if you prefer the rails go all the way down you can just add some more. That's the beauty of DIY!!

Build a Shelf
For a shelf all you have to do is use the four slats (E) to connect the two shelf sides (D). The first slat should be flush with the front edge of the shelf sides. Then leave a 1" gap between each of the other slats (see the pic below). Use pocket holes on the bottom of the slats to attach them to the sides.

Use your brackets to attach the shelf to your wall panel. The shelf should be centered with 1" space on either side, but you can put it at whatever height you like. Use a level when you install it. And of course you can build an extra shelf or two to add more storage to your panel. If you want a look like the original go for a simple metal bracket, but you can use whatever you like!

Finishing
Like I mentioned before, it's best to finish each board individually before assembling it. Use an outdoor paint or stain it and use an outdoor poly (or use poly on the natural wood color!). For our outdoor sectional I used a tinted deck sealer that has held up really well! If you finished the pieces ahead of time you'll just need to go back and fill your pocket holes with wood filler, sand them smooth, and finish those spots to match. If you waited until now to finish (do the panel and shelves separately before you attach the brackets) go ahead and fill the holes first, sand everything down, and paint or stain the whole piece being careful to get the cracks really well. If you bought hooks (they are great for hanging garden tools or grilling utensils!) you can install them now.
Be sure to install your panels carefully by attaching them to a wall or to posts in the ground. And remember to come back for the matching outdoor bench plans later this week!
Anyone planning a patio makeover this summer? If you tackle this project I'd love to hear about it!!
An anonymous reader sent a link for our first finished build of this project and, oh my goodness, it turned out beautiful! When I dream of patios, this is basically what it looks like. You can get the details here.

my outdoor sitting area is at the very end of my back yard. a few of these would be great for privacy and cheaper and nicer than privacy fence, Thanks for posting.
ReplyDeleteYou're welcome! Good luck!
DeleteI saw your plans on AnaWhite.com, thanks for posting them. You said "The only difference with my plans is that the shelves and hooks won't be adjustable like the original (but if you know where to get that kind of hardware I'd love to hear about it!!)."
ReplyDeleteYou might try slat wall accessories -- search Amazon or Grainger.com. The rails may need to be closer together if you are going to use that type hardware, but it gives you lots of options for hooks, baskets, shelves, etc.
Thanks so much for the suggestion! I will check it out! The baskets would be awesome!
DeleteThank you for the inspiration. Here is my build of the project http://www.ana-white.com/2016/09/DIY_furniture/ikea-inspired-outdoor-storage-bench-and-rack
ReplyDeleteOh goodness, this is BEAUTIFUL! Thank you so much for the pic, I'll add it up in the plans if you don't mind!
DeleteGreat article! What wood do you recommend for this project?
ReplyDeleteSomething like cedar would be great for outdoors, but I honestly haven't been able to find that in the right size boards. So I would probably just stick with pine and hit it with a good outdoor sealer. Hope that helps!
Delete