Thursday, May 31

DIY House Painting Tips {how we painted our huge house and saved thousands}

Last fall we took on our biggest project to date. It was a doozy. But a very necessary doozy that would have cost thousands of dollars to hire out. We painted our house! It was an enormous job but we're here to tell you that it is actually totally doable, and it can save you a big chunk of change.


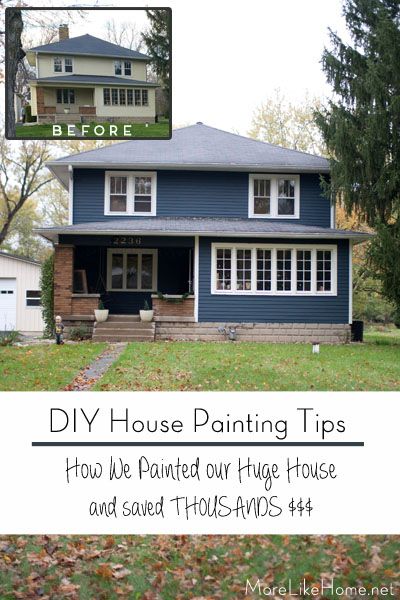
We knew when we bought our old yellow farmhouse that it came with 90-year-old wood siding. Which was pretty cool. But in our new house excitement we maybe overlooked just what condition that siding was in. After our first winter, we started to notice that it was looking a little worse for the wear. Then we found out from a neighbor that it hadn't been painted it about 15 years. And it showed.


We spent the summer trying to decide if we should paint it now or hold off until next year. And then we had a hail storm that knocked off huge amounts of paint (so I guess it did some of the work for us!). Now it was painfully obvious that we needed to do something before things got any worse.


Fortunately I had spent those summer months thinking about what color paint to buy. Which is good because I used every minute right up until my husband called and said "I'm on my way home and we are buying paint tonight. You have to decide." Seriously, it took me months. (You can see all the top contenders here. Including the one Husband hated the most. Just do me a favor and don't tell me if I was wrong. M'kay? We are not repainting.)

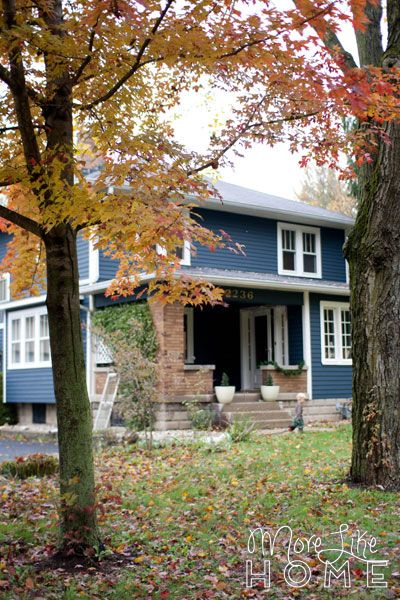
It was so pretty in the fall!

Tuesday, April 10

2x4 Simple Outdoor Table with Benches {two styles!}

I've always liked the look of Ana White's simple outdoor table & benches. With the popularity of our 2x4 building series, I thought I'd just make a quick twist on her original design to make a 2x4 version!  I dream of eating outdoors on summer evenings, and I feel like this set-up with a roomy table and long benches would be the perfect place for the family to gather. Plus it would be a great compliment to a 2x4 outdoor sectional!


I made two simple variations for the table top - one with the top boards running length-wise:


And one with the top boards running across the width:


The dimensions will be the same for either table: 67 1/4" long x 33 1/2" deep x 30" high


I'm also including plans for matching 2x4 benches to tuck under the table.  Perfect for some backyard summer fun! Ready to get started?


Thursday, March 15

DIY Constellation Wall Hanging

One of the best ways to make your house feel like home is to decorate with unique pieces you love. But what happens when you can't find that perfect piece you're searching for?

Well... guys... that's where a little DIY magic in order. You probably already know that, because you guys are amazing, but today I'm going to show you some of the easiest DIY magic ever that you can use to make your own sweet constellation wall hanging (or just about any other wall hanging you can come up with!)


When we were finishing up our gallery wall in the dining room, I knew I needed a large piece on the right end for balance. And I had a vision of this amazing constellation map that would fill the space perfectly. But, search as I might, nothing I turned up felt right. For one main reason: I wanted a fabric wall hanging. Something a little more casual. Something that didn't need to be framed and that would add a more texture to the grouping. Turns out those are... hard to come by.


But then out of the blue, completely by accident, I stumbled across the perfect thing. It was at a cute little home decor shop I love to visit when I go see my sister. And on this fateful day, they had a set of tea towels. With constellation maps. Bingo. I grabbed the set for $10, and with just a couple more supplies I made my own wall hanging!


Saturday, March 10

Gallery Wall: 6 Curating Tips and Tricks!

Guys, it's starting to look like someone actually lives here. We have art up in the dining room. And curtains. And there are plants. Thank goodness for nesting. So today I just wanted to take you on a quick tour of our new gallery and share a few tips for curating your own gallery wall. It's easier than you might think!


The chandelier is a Craigslist upcycle (read about it here),
we built the huge farmhouse table last year (get the plans here)
and the chairs were a happy yard sale find a few years ago.

Now, I definitely don't believe a gallery needs to be themed. I'm also a big believer in "things I like and want to hang up together" galleries. In fact our "adventure theme" was more of a happy accident when I realized I'd collected several pieces that fit perfectly with our "Adventure is Out There" centerpiece. But I do love how our theme turned out. And once I found a direction, it was so much easier to round up pieces to finish the grouping.

 So if you're trying to fill a wall but feeling a little stuck (whether you're after a themed gallery or not), these tips can help get you back on track and charging forward!


1. Start with the things you love. Have a painting from your grandma? A favorite photo? Old wallpaper you found in the attic? A life quote? If you want to love your finished gallery, you need to start with pieces that you love. Fill in the gaps to make your favorite pieces work together, but make sure they are your priority and let everything else work around them.


Curtains peeking in on the right!


2. Find an anchor. We've had this large wooden sign hanging here for over a year. It was looking pretty lonely. But I knew it would be the perfect thing to anchor a gallery wall, and I knew that I loved it. So we put it up and waited for the rest to happen. It turns out, having one large piece in the center makes it easier to find balance when you hang up the little guys.


I made this sign during one of our sister craft nights. If you check out this post, you can learn how to easily make a template to create any kind of sign! Seriously, you can print out anything you want - phrases, pictures, whatever - and turn it into a beautiful wooden sign.


Subscribe