
Happy Friday! You can see links to the complete series here, and learn about my Lowe's gift card giveaway here. In this series, we're seeing what we can make out of 2x4s. I want to keep it cheap, keep it easy, and keep it totally doable for anyone. Today's project is one for the kids - we're building a fun little car!

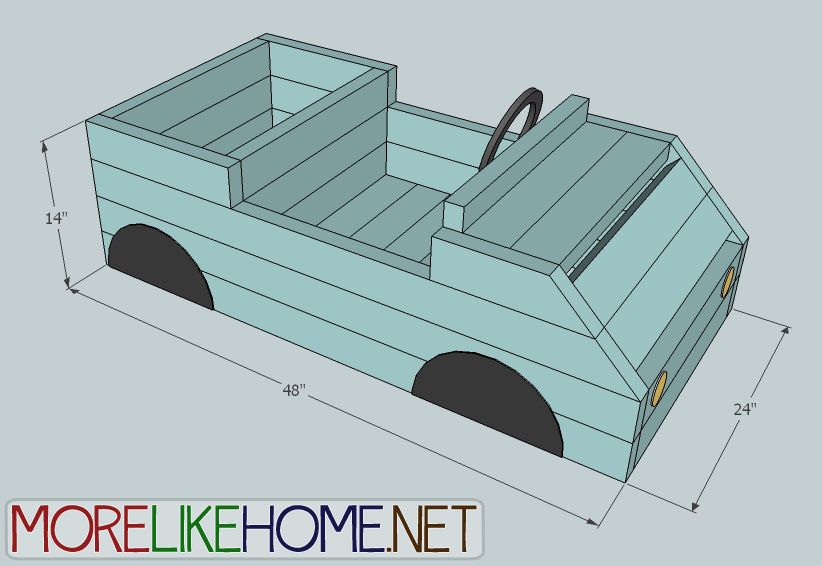
Perfect for lots of pretend play! It has a seat in front wide enough for two, and the back can be used as a trunk or toybox! This would be a great surprise under the tree on Christmas morning! So let's get started....
Shopping List:
6 - 2x4s @ 10' long
1 - 2x4 @ 8' long
Steering Wheel (optional)
Tools:
Saw
Drill
2 1/2” screws (or Kreg Jig & 2 1/2" self tapping screws)
4" screws (or Kreg Jig & 2 1/2" self tapping screws)
Wood glue
Wood filler
2x4 Cut List:
(A) - 4 @ 48" (side A)
(B) - 2 @ 48" (side B)
(C) - 2 @ 15" (side C)
(D) - 2 @ 12" (side D)
(E) - 18 @ 21" (everything else!)
Dimensions: 48" wide x 14" tall x 24" deep
Please read all the directions before beginning, and cut your pieces as you go, measuring before each cut. Use 2 1/2” screws or pocket holes with 2 1/2" screws unless otherwise indicated. Always use glue. Pre-drill and countersink your screws. I have not built from these exact plans, so measure lots to make sure things work out!
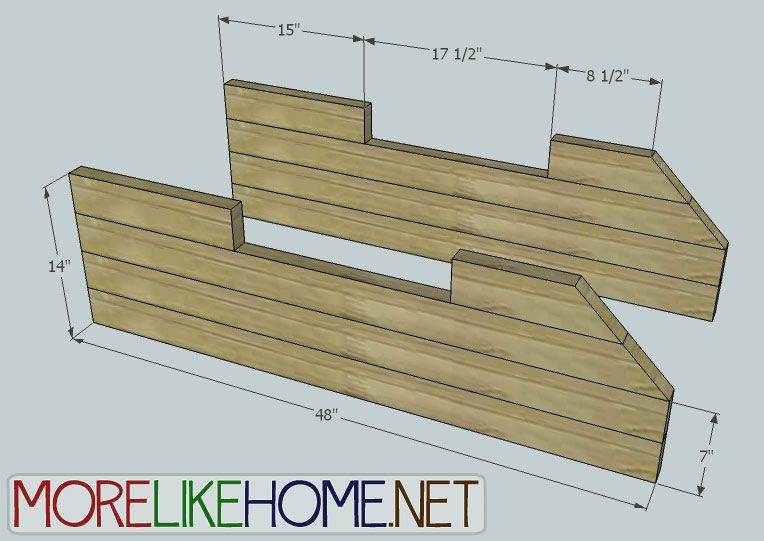
Step 1: Build the Sides
Start by cutting one end of each Side B & Side D board at a 45 degree angle. Then assemble the first side as shown below. Start by stacking two Side A boards (keeping the ends flush). Then put one Side B board on top, then one Side C and Side D board on top of that. The picture makes it more clear how to do this. :) Keep all the ends flush. Attach the boards using a Kreg Jig, or by drilling through the top of each board into the one below with 4" screws and glue. Repeat to build the second side.
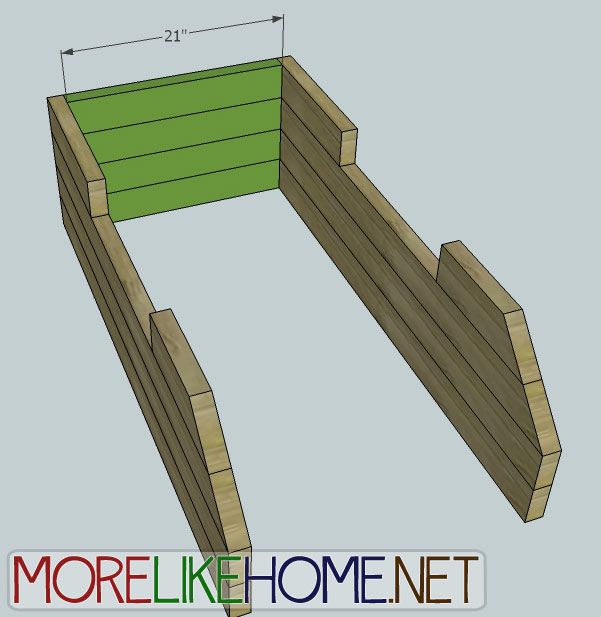
Step 2: The Toy Box
Use four E boards to connect the two sides across the back. They should be flush with the back edges of the sides. Attach them with a Kreg Jig or by drilling through the sides into each back board with 2 1/2" screws and glue.
Now use four more E boards to make the front side of the toy box. There should be 12" of space between the back and front of the toy box, and the top E board should be flush with the front edges of the side C boards.

Step 3: Seat
Now use 3 more E boards to make a seat. These should be set against the toy box and lined up with the top edge of the bottom side board (with 2" of space underneath). Attach the seat boards with a Kreg Jig or by drilling through the sides into the seat boards with 2 1/2" screws. Use glue. **If you prefer two rows of seats, you can omit the front side of the toy box and fit a small seat across the back. **

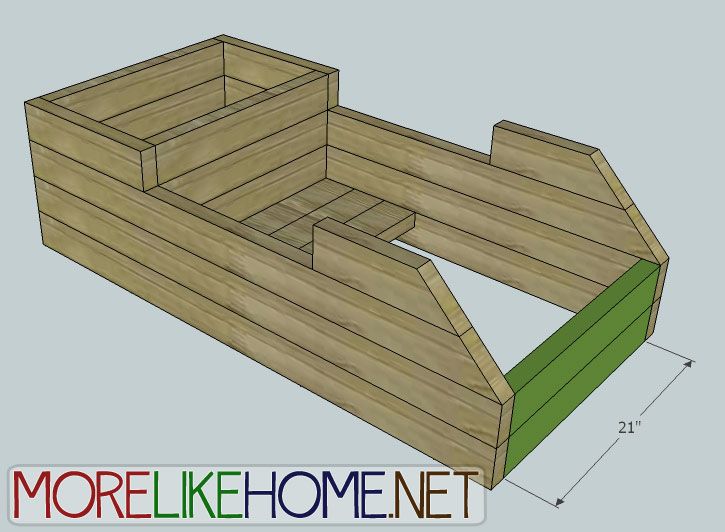
Step 4: The Front
Start by using two E boards to connect the front ends of the car. These should line up with the bottom two side boards and be flush across the front. Attach these boards with a Kreg Jig or by drilling through the sides into the front boards with 2 1/2" screws. Use glue.
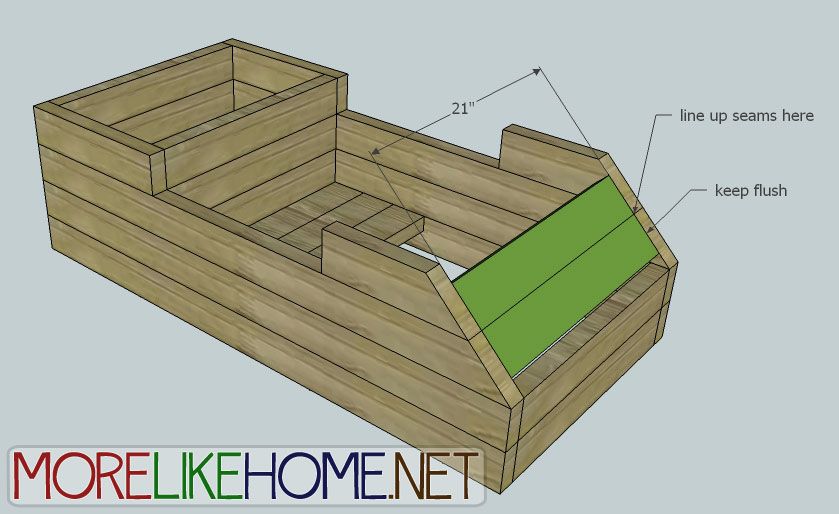
Now attach two more E boards across the angled part of the front. You want the surface to be flush across the front boards and the angled edges. Line these two boards up so the seam between them is lined up with the seam between the two angled boards on the side. Attach these boards with a Kreg Jig or by drilling through the sides into the front boards with 2 1/2" screws. Use glue.
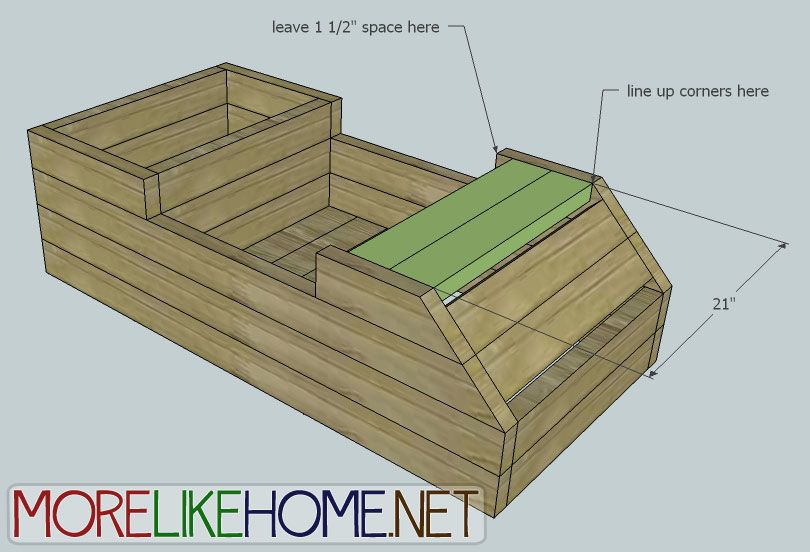
Attach two more E board across the top of the front. They should be flush across the top and the front edge should line up with the top front corner of the side D board (there should be 1 1/2" of space at the back side).
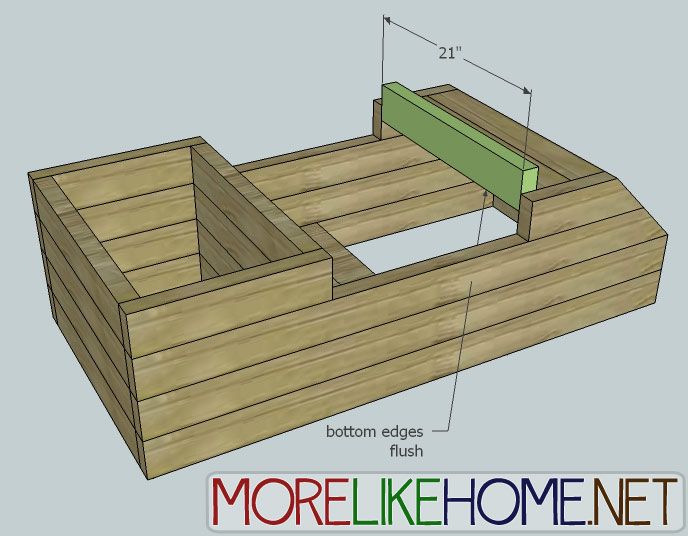
Use the last E board to make a "windshield". It should fit in the space left by the top front boards you just installed and the bottom edge should be flush with the bottom of the top boards.
Step 5: Finishing
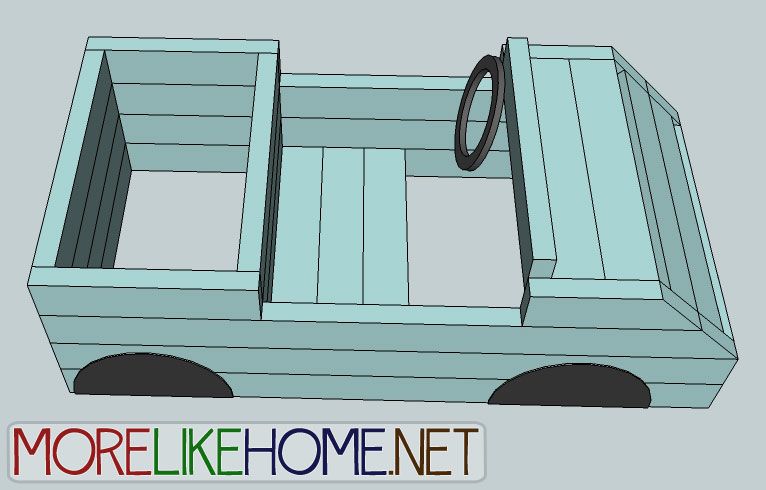
Start by filling any holes and sanding everything smooth. You may want to sand the corners a little extra to round them down. If you're adding some kind of steering wheel, attach it according to the manufacturer recommendations. Then paint Your car! Use a plate as a template to trace wheels on the sides and paint them black, and use a cup to trace headlights on the front and paint them yellow.
You could also paint it to be a ship or plane or anything else! Or make it more
versatile by keeping it plain. Let the kids imagine what they want it to
be!
Project 2x4 Cost:
$19.20 - 6 2x4s @ 10' long ($3.20 each)
$2.50 - 1 2x4 @ 8' long ($2.50 each)
$21.70 Total
See giveaway winners here.
I Did It!
A work in progress by www.iwantbdphotography.com (via ana-white.com). I hope they send a picture of the completed project!

(via ana-white.com)

Share on Facebook

I love the idea to use a plate as a template!
ReplyDeleteSuper cute! When will we see the baby B in this?
ReplyDeleteThis would make a cool bed with afew modifications :)
ReplyDelete-Ernie
Love this idea and I appreciated how detailed the instructions are.
ReplyDeleteI love it!
ReplyDeleteGreat idea! Easy to understand instructions and yet can be versatile!
ReplyDeleteThis is adorable!
ReplyDeleteI just built this! I'm so excited thanks for the excellent plan. had to do some modifications you can check it out over at your ana-white.com post under brags. it looks just like his toy little people play car, but lifesize.what an excellent design thanks again! I cannot wait to put it out in his play driveway next to the play house. I haven't even painted it yet and already I'm dying to build a matching gas pump for him...any chance I could get a plan for that?? :-) :-)
ReplyDeleteYay! I just checked out your pics on Ana White's site, it looks amazing already! A gas pump is a great idea, I'll have to see what I can come up with! :)
Deletevery nice. Am building one for my neighbor's young son for a Christmas present.Using 12" sanded plywood for sides and luaun for the floorw/ a spring loaded hinge for the top of the toy box to protect little fingers.Great idea.....thanks
ReplyDeleteI would love to see pics when you're done. And spring loaded hinge was a great idea! :)
DeleteI just wanted to thank you for providing these amazing plans. I just finished building this for my son who is almost two. I am not very handy but with your plans it made this very easy. I made a few modifications: I added a functioning hood to the front of the car to add more storage, I also had some extra molding laying around so I used it to add a spoiler on the back of the car and used it for the windshield. Thanks again I will definitely be using your plans for other projects in the future. I would love to send you some pictures, just not sure how.
ReplyDeleteSincerely
specspiderdad
Just realized I could email them to you, so I just emailed some pics to you. Thanks again for the great plans.
DeleteIt looks great! Thanks so much for the photos! I'll add one up in the plans if you don't mind. :)
DeleteThis looks like an awesome project and I look forward to building it for my son. Just a head's up, in your first description you have your 14" listed as 142" which would make the box 11 feet tall. LOL
ReplyDeleteI'm going to make it with a couple of Mods. I going to make the bonnet (Hood) lift up and create some space for toys. (need to buy hinges.) Obviously I will need to create a compartment to go underneath the hood. Might even put some lights on the front. Sure I have something lying about...
ReplyDeleteSounds great! Have fun! :)
DeleteHey there was just wondering would you be able to tell me what cuts go on what boards, just a little confused on what boards to cut to the lengths
ReplyDeleteHey there are you able to tell me what cuts to the 10ft and witch ones go to the 8ft
ReplyDeleteSorry to keep posting lol just really want to do thus for my little man!
ReplyDelete