
- Where do you all sleep?
- Do you have any privacy with all those windows?
- Isn't it hot/cold?
Check out all our camper van posts and tutorials here!

I was amazed the first time we used these shades - camping in 90+ degree weather in direct sun. We put up the shades, put a screen over the door to keep bugs out, and turned on a small portable fan. I napped in there with the baby without breaking a sweat. I couldn't believe it. I had been dreading the trip, afraid the van would be like an oven. But it wasn't!
I pretty closely followed this tutorial and used Reflectix insulation for the base of my window shades, then backed them with pre-quilted fabric. Could you use the Reflectix without the backing? Probably. It still insulates pretty well on its own, and it would save you some time and money for sure. So if funds are tight, give it a try! But the quilted fabric is great for several reasons: it gives more stability to the shades, adds another layer of insulation, and softens the interior of the van. I would use the quilted backing again in a heartbeat for that last reason alone. It helps to dampen sound and feels less stark than the plain Reflectix. It feels so cozy and quiet in there!

It was 90 degrees out in this photo, but we were cool and comfy in front of the fan! You can also see the window shades behind him.
Don't have a Transit? No sweat! You can use this tutorial to make shades for whatever vehicle you have! Camper, minivan, even your car! Here's all you need:
- Reflectix insulation
- We used one 4'x25' roll for our whole transit. If you have a smaller vehicle you could try a smaller roll.
- We bought it at Menards but it's also avaliable on Amazon.
- Pre-quilted Fabric
- I bought some at Hobby Lobby and then more at Joann Fabric to get enough! I think I ended up getting 14 yards total, and had enough for all the windows except the front windshield. But I could have lost a receipt so I don't make any promises.
- When I bought fabric, Hobby lobby had it for $10/yard and I used a 40% off coupon to get it down to $6. Joann was $15/yard and if you can hold out for their 50% coupon you can get it down to %7.50.
- Double Fold Quilt Binding Bias Tape
- I lost count of how many packs I bought, but I cleaned them out in two colors of gray twice. You could measure around your windows if you want a better idea of how much you need!
- This was the same price at Hobby Lobby and Joann Fabric, so wait for a sale at one of them if you can!
- Suction Cups (you may not need them for smaller windows)
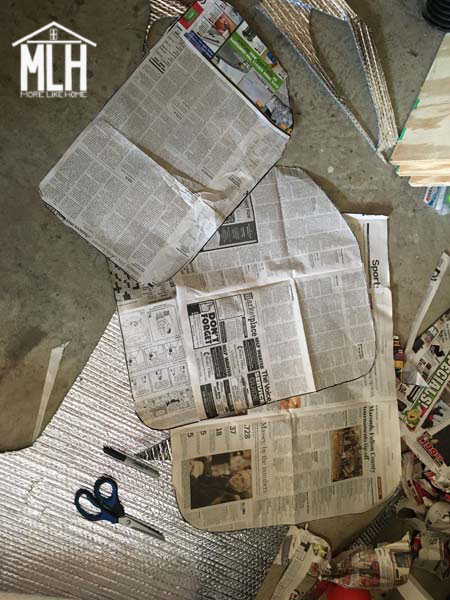
Hold or tape paper up over the inside of the window and trace around the edge of the window with a pencil. Full disclosure: I definitely used a sharpie, and completed the project with sharpie-filled dread. I do not recommend a sharpie and will not be held responsible if you get sharpie on your beautiful van. Sounds simple enough, right? More full disclosure: I was very sweaty and cranky by the time I finished this step. If you have an extra set of hands available, USE THEM. Turns out it's very difficult to wrangle a piece of crinkly paper over the larger windows. Use hands, use tape, use whatever you can find. Just get it done because, trust me, it will be so worth it! I mean, I hope I never have to do it again. But I will if I have to because these work great and we saved a small fortune over buying anything pre-made!
Step 2: Cut out the shade pieces.
Use your templates to cut a piece of Reflectix and a piece of quilted fabric for each window. Stack the fabric on top of the Reflectix and -this is the most important thing - make sure you have the fabric on the side that will be the inside of the window shade. I made more than one of them backwards. *facepalm* So double check each one before you start sewing! Once you're sure the fabric is on the right side, pin around the edges with clothespins or binder clips.
Lesson learned in hindsight: if I did this again, I might use spray adhesive to attach the fabric to the insulation before sewing. I think it would help keep them lined up while you sew, and prevent the fabric from drooping over time. We haven't had a drooping problem yet, but I'll keep you posted.

Step 3: Sew around the edges with binding tape.
I tried all variety of bias tapes and methods and I can say with confidence that this is the tape and method I would choose again hands-down. Skip the narrower bias tapes and go straight for the Double Fold Quilt Binding Bias Tape. Go ahead and sandwich it around both layers of the window shade and sew around the edges, going through the all the layers of the sandwich at once.
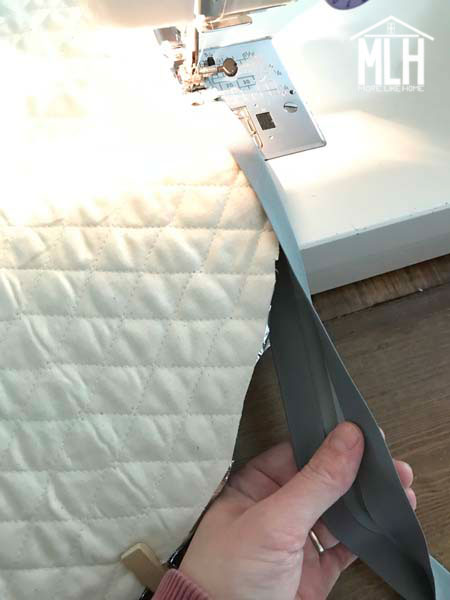
If you've used bias tape before, you know that you usually open up the tape, sew around one edge, fold it over, and sew around the whole thing again. It only took me two shades to realize how many extra hours that would cost me. Guys, it takes a long time to get around all these large shades! With this method I had to be a little more careful to make sure I caught the bottom side of the binding, but it saved a ton of time and still turned out looking great (but I wasn't going for perfection. Life's too short to waste time on window shades, guys.). It was a little tricky to maneuver the larger shades around the sewing machine, so make sure you have plenty of open workspace.

That's the gist of it! Repeat and repeat and repeat to make shades for the rest of the windows. I made shades just like this for every window except the front windshield. I ran out of the fabric and didn't want to buy more for that huge window... and I was pretty tired of sewing by this point anyway. So we're rolling with plain Reflectix up there right now and it still seems to work pretty well, but we need to find a better way to get it to stay up there without falling down.
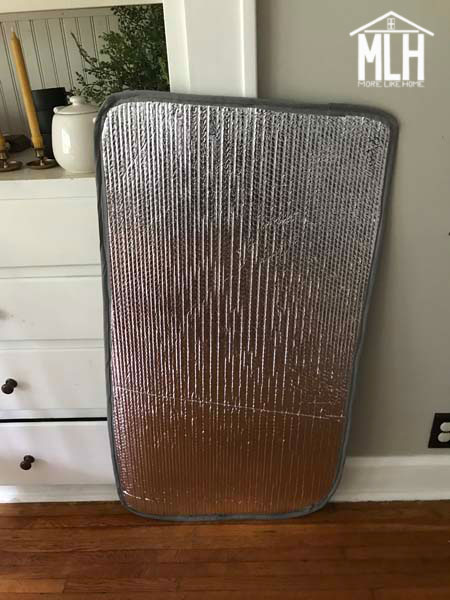
Here is the Reflectix side of a finished shade:
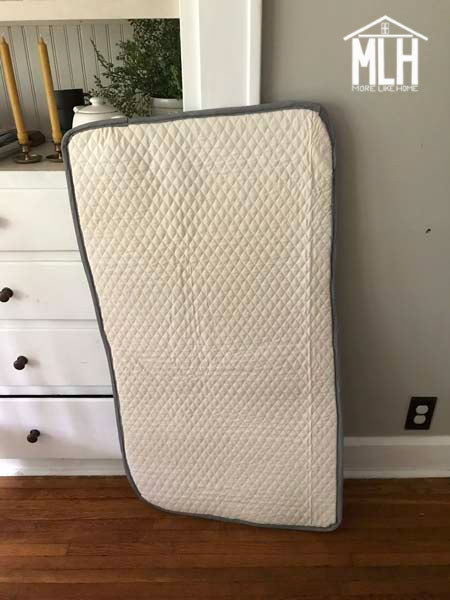
And here is the fabric side:
Step 4: Put them up!
Now for the "How We Use Them" portion of the post. Most of the shades actually hold themselves in place. I was careful to cut the insulation just a hair larger than the actual window so they kind of wedge into place. I found this also works best when you cut the shades so the lines on the insulation run up and down (the shades with it running side to side seem a little less stable, but it still works for the smaller shades). For most of the shades, we just pop them into the windows and they stay put!
The larger windows posed more of a problem... largely because I managed to make both of them backwards. *facepalm* So if we flip them around and put the insulation inside and cozy fabric outside they fit like a glove. I may or may not fix it someday. It will take forever, but I don't want them turned backwards (and honestly I don't know that the larger ones stay put on their own anyway). So for now we found an easy solution to keep them in place that will probably work for our windshield as well! This should also help if you end up with any shades that don't fit snuggly and won't stay up on their own. We bought a set of suction cups on Amazon and put them in the corners of the windows:

Then I made loops out of scrap bias tape and sewed them to the window shades:
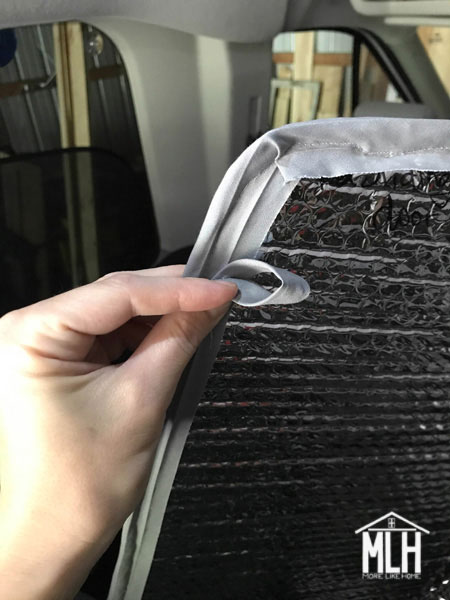
The loops hook onto the suction cups. So far I've only done this for the two long windows. The rest have worked fine without the suction cups.
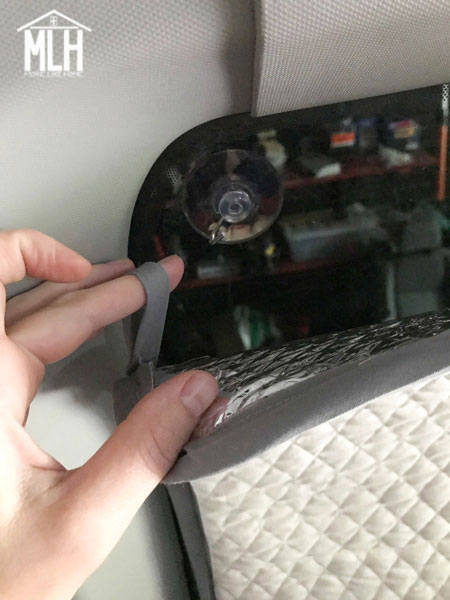
This works especially well for the sliding door, because I think the shade would have fallen every time we opened and closed the door without the extra support.

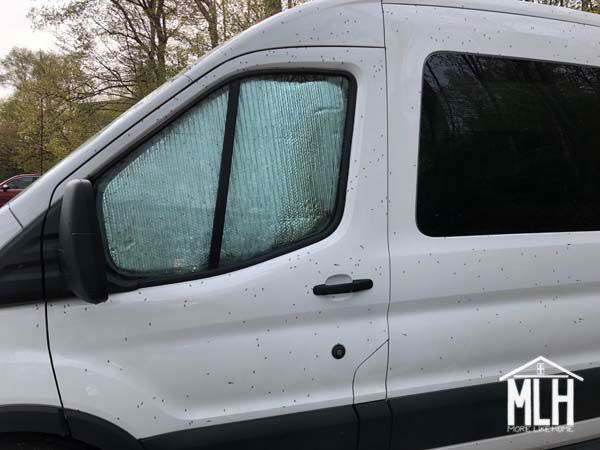
Here's how they look from the outside:
When we get home, I roll them up and stash them in a plastic tote in the basement. The huge windshield shade sits on top, but the rest fit inside along with the window screens, door screens, and the bins for the shelving unit. (tutorials for screens coming soon - you can find them here once they're posted)

The best advice I can give you (for this whole camper series, really) is straight from The Nester: it doesn't have to be perfect to be beautiful. Guys, we're working on a camper van for creating beautiful memories while driving muddy little boys around! (See Exhibit A) It's going to get messy. I don't want to worry about it getting messy. It doesn't have to be perfect, and even if it is, it will never stay perfect. So please guys, don't worry about crooked stitches or wonky binding. Just make shades, put them up, and go camping (maybe not in that order). Then come back and tell me about all the memories you made.

Exhibit A
Happy camping!
Thank you for the detailed instructions. Awesome ! Now I feel confident I can do it too. Enjoy making memories.
ReplyDeleteThank you! :)
DeleteI've been having trouble getting my sewing machine to stitch properly around the fabric and the reflectix. I have played with the stitch length and tension settings but still without luck. Do you have any recommendations?
ReplyDeleteI would try two things:
DeleteFirst, if you've been trying it with the same side down the whole time (like if you've have the reflectix on the bottom every time you've tried to sew it) you could try turning the whole thing over to see if your sewing machine can move it along better with the other material on bottom.
Second, you could try putting a walking foot on your machine (like this https://amzn.to/2PYTEBn) to help move everything through the machine better.
Hopefully one of those things will help. Let me know how it goes!
Thank you so much for this tutorial! I'm new to bias tape. What size did you use/ do you have a link to one of the same size so I can make sure I get the right one? Thank you again.
ReplyDeleteHi! This is the kind I used: https://amzn.to/2QcsXwy
DeleteIt's probably a bit cheaper at a store like Hobby Lobby or Joann Fabric (especially if you can wait for a sale!), but this will at least let you see the packaging to make sure you get the right one! You just need to make sure it says "double fold bias tape" to get the right type, and "quilt binding" to make sure it's the right size. Good luck!
We have these on our campervan but the fabric encloses both sides the reflectix. The fabric is cut an extra half each wider the whole way around and then tiny magnets are sewn into the extra fabric at key intervals around the shade. They stick onto the window frames perfectly!
ReplyDeleteOops half inch!
Delete