
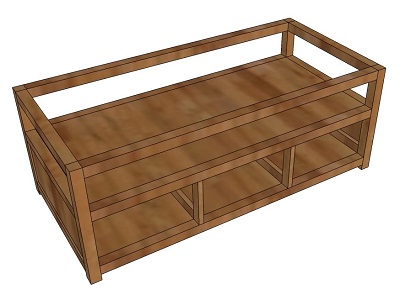
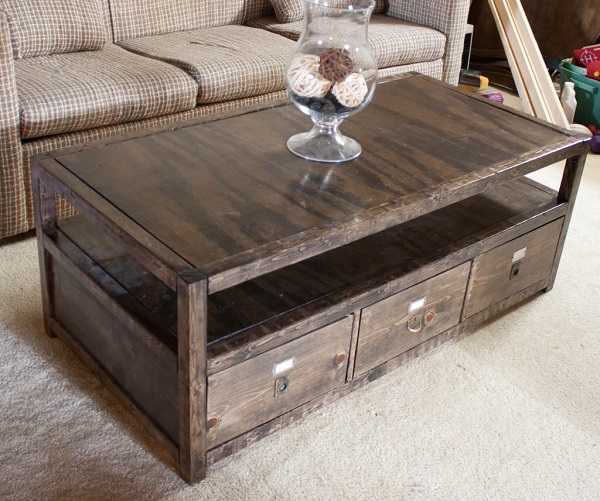
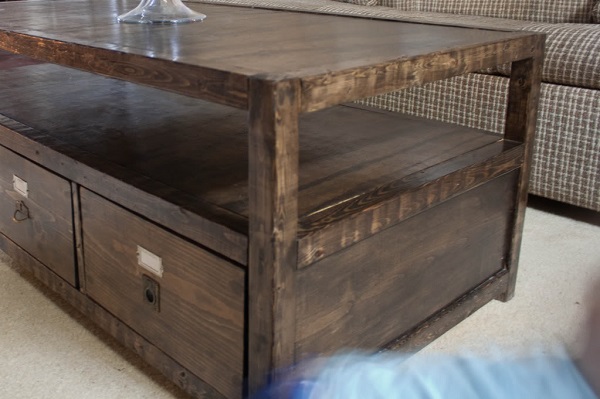
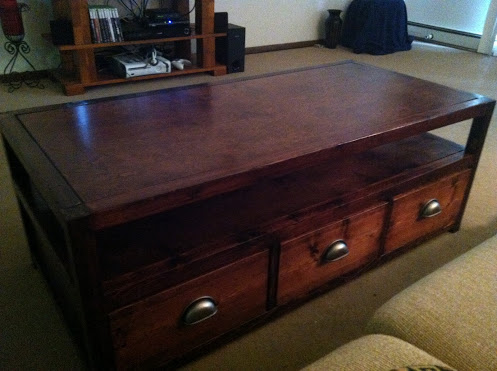
The first blog post I ever wrote was a plan for building our Pottery Barn inspired coffee table. To this day that has been one of my most popular posts! But I've learned a lot since I drew up those plans. I know better building techniques and I'm better at drawing with Sketchup. And that's why today's post is an updated plan for my favorite coffee table!
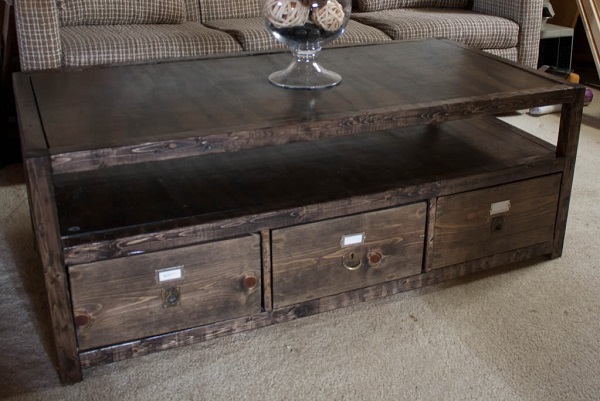
The original cost $700 (it's no longer available) but my husband and I built this table out of pine for about $60, not including hardware. That was a $640 savings! **This was the cost when we built our table in 2012.** And we could not be happier with how it turned out! Want to save that money yourself? Give these plans a try! You can also see my original coffee table plans here, my matching end table plans here, and my matching console here.

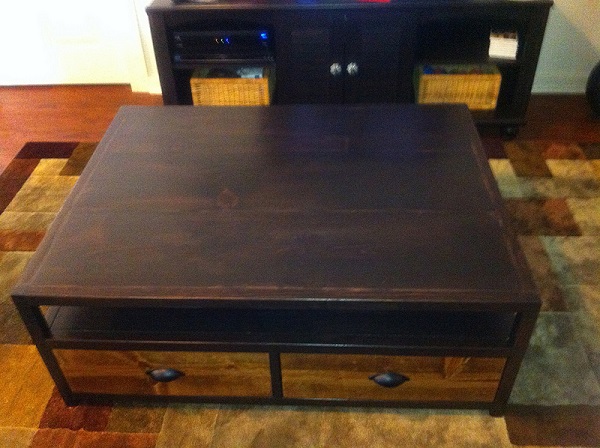
Now, down to business! These plans are actually slightly different from the dimensions of the inspiration table and the table I built, but they use standard lumber sizes. I could have saved myself a lot of headaches if I’d thought all that through before I started. Oops. :) But don’t worry, I’ve corrected the plans to make it easier for you! I also drew this version to accommodate drawer slides (the table I built doesn't have them and works fine, but it would be really nice to have them).
Please read all the directions before beginning, and cut your pieces as you go, measuring before each cut. Use 2” screws or pocket holes with 1 1/4" screws unless otherwise indicated. Always use glue. Pre-drill and countersink your screws. Home Improvement stores will generally cut your plywood for you. Ask them to cut your shelves to size to save you some trouble. I have not built from these exact plans, so use measure lots to make sure things work out! And don’t forget to check out Knock-Off Wood for more tips!
Shopping List:
6 2x2 @ 8’
2 1x2 @ 8’
1 1x10 @ 10’
1 1x8 @ 10’
1 1x6 @ 8'
1 1x6 @ 10'
1 sheet plywood (I used ½” thick)
Several small L-Brackets OR Scrap wood
6 drawer pulls
Tools:
Saw
Drill
2” screws (or Kreg Jig & 1 1/4" self tapping screws)
1 ¼” screws
Wood glue
Wood filler
Cut List:
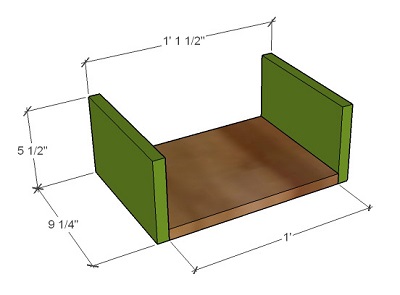
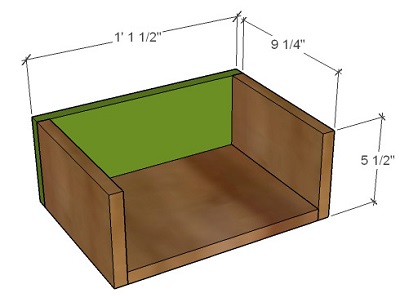
A) 4 2x2 @ 18” (legs)
B) 6 2x2 @ 20” (side rails)
C) 2 1/2" plywood @ 7.5 x 20" (side panels)
D) 6 2x2 @ 45” (front & back rails)
E) 4 1x2 @ 7 ½” (stiles)
F) ½” strips of scrap wood OR several small metal L-Brackets (shelf supports)
G) 3 ½” plywood @ 45x20”(shelves)
H) 2 1x2 @ 20” (drawer dividers)
I) 3 1x2 @ 14 ½” (center divider)
J) 6 1x10 @ 12” (drawer bottoms)
K) 6 1x8 @ 14 ¼” (drawer fronts)
L) 6 1x6 @ 13 1/2” (drawer backs)
M) 12 1x6 @ 9 ¼” (drawer sides)
N) 4 1x2 @ 20” (drawer supports)
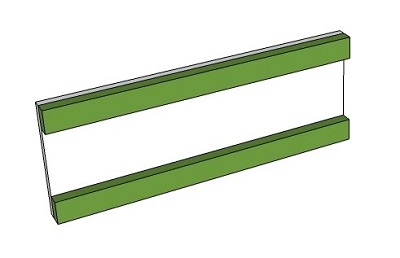
Step 1: Start by assembling the short ends of the table.
Attach the drawer supports (N) to the side panels (C), lining one up with the top edge and one with the bottom (the rest of my pictures only show the bottom support):
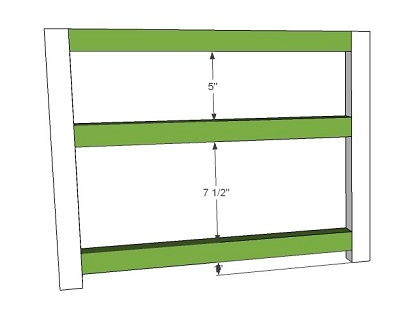
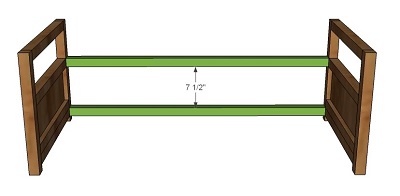
Assemble the the legs (A) & side rails (B). Attach the bottom rail between the legs leaving a
1” gap at the bottom of the leg. Then attach the center rail leaving 7 1/2” in between. Attach the top rail flush with the top of the legs. If you have a Kreg Jig, you
will be in good shape! I did this without, just screwed through the legs
and into the rails but it was harder and we probably risked splitting
the wood more. But it can be done:
Insert the side panel (C) in the gap between
the bottom and center rails. Keep the drawer supports flush with the face of the legs to make sure your drawers fit correctly later. Attach the panel through the drawer supports using a Kreg jig (if you don't have a kreg jig, you can drill through the rails and legs into the 1x2 drawer supports instead. Do this before attaching the top rail so you have room to work):

Once the sides are complete, attach the back bottom & center rails (D) in between the sides. Leave a 1” gap below the bottom rail, and a 7 ¼” gap between the bottom and center rails. They will line up with the rails on the short ends. Repeat for the front rails:
Step 3: Attach the stiles.
Attach the stiles (E) between the bottom and center rails as shown below. There will be 2 stiles on each side, with 14 ½” between the stiles and the legs. You can use a Kreg jig or drill through the rails. Repeat for the front stiles:
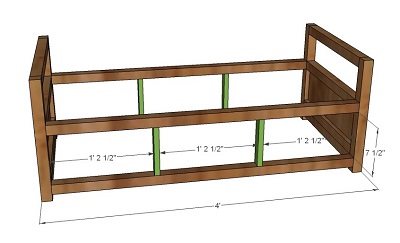
4. Attach the top rails.
Attach the top rails on the front & back by using a Kreg jig or drilling through the legs:
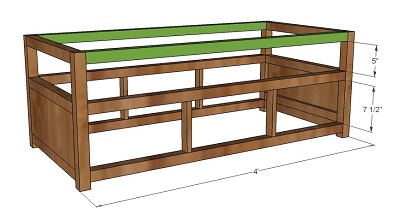
Step 5: Bottom shelf.
Next you need to cut some ½” strips of wood (F) to use as shelf supports. Leave a gap above the supports equal to the thickness of the plywood you will use for the shelves. I used ½” plywood, so I left a ½” gap above the supports for the shelf to sit in. Attach the supports for the bottom shelf as shown above using 1 ¼” screws. I had a left over 1x12 laying around, so I cut ½” strips off the side of it, parallel to the grain. You’ll want to do the supports as you go. For now just do the bottom supports, then place the bottom shelf, and we'll move on to the middle supports and shelf later:
You could also use small L brackets like these placed around the edges instead of wood strips:
 Set the bottom shelf (G) in place. You can attach it with glue and screws or finishing nails, but mine is just sitting in there. Note: this was the tecnhique I used when building my table, but if I did it again I would skip these supports and use my kreg jig to attach the shelf to the rails with 1 1/4" Kreg screws. However, if you don't have a Kreg jig this will do the trick! Also, if you are planning to use drawer slides I don't think you would even need the bottom shelf!
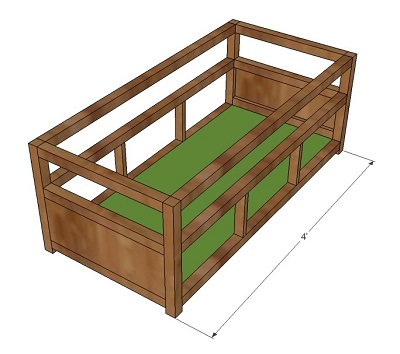
Step 6: Drawer Dividers
Attach the drawer dividers
(H) to the bottom shelf, running between each
set of stiles as shown below. Attach by screwing down through the
dividers into the shelf:
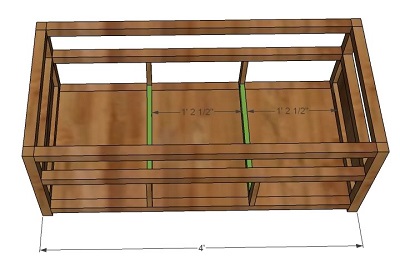
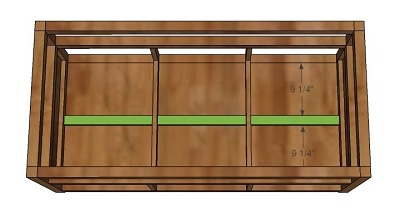
Step 7. Center Dividers
Then attach the center dividers (I) to the bottom shelf as shown below . The dividers should be centered between the front & back of the shelf. Note: This is to keep the drawers from sliding all the way through on my table which doesn't have drawer slides. If you are using drawer slides, you may not need these either.
Step 8: Center Shelf
Repeat step 4 to attach supports to the center rails as shown below:
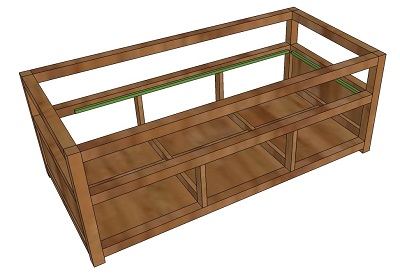
Put the shelf in place as show below. If you want you can secure it to the supports using glue & 1 ¼” screws:
Step 9: Top Shelf
Repeat step 4 to attach the supports for the top shelf:
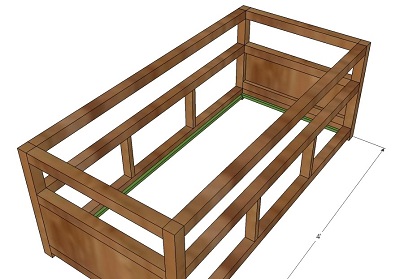
And set the top shelf in place and secure it as desired (again, mine is just sitting in there). Now your basic table is complete!
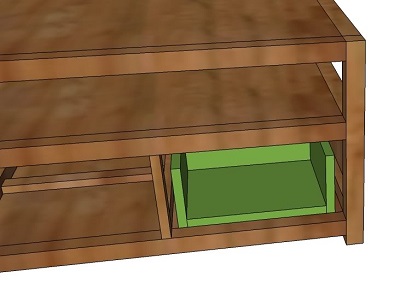
Step 10: Drawers
You will have 6 drawers total (which is different than the pottery version). You could also use baskets instead which would be sweet! If you are not using drawer slides, see my original plan for the drawers instead. To assemble the drawers, start by attaching the sides (M) to the short ends of the bottom (J):
Then attach the drawer back (L), keeping all edges flush:
Now install your drawer slides (before attaching the drawer front). This drawer is designed for a standard slide requiring 1/2″ clearance on each side of the drawer. Adjust so that there is an even fit around the drawers and the drawers slide smooth. Note: if you want more room to work you could assemble the drawers and fit the slides before installing the second and third shelves.
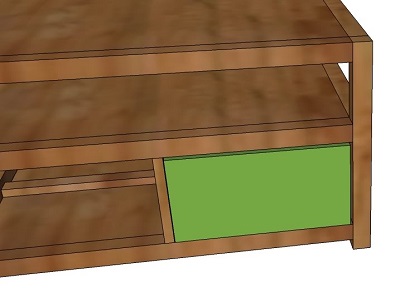
While the drawer box is in place, fit the drawer front (K) onto the front of the drawer box. Wiggle it around to get the front centered with an equal gap on all sides, then attach the front to the box using glue and finishing nails. Note: trace the box on the front with a pencil so you have an idea of where you will need to nail.
Step 11: Fill holes, sand and finish as desired.
I went with a dark espresso stain on my table.

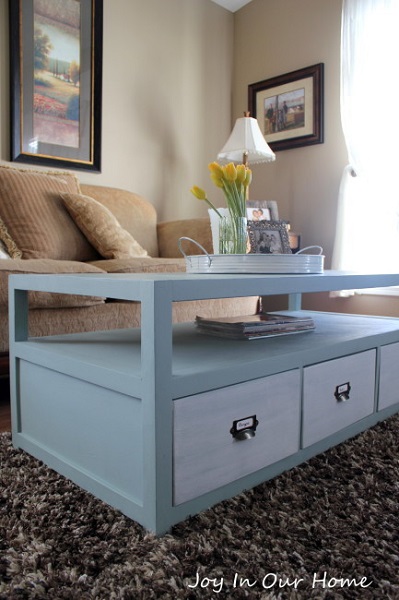
But a bright coat of paint would be beautiful too! Maybe teal or yellow?
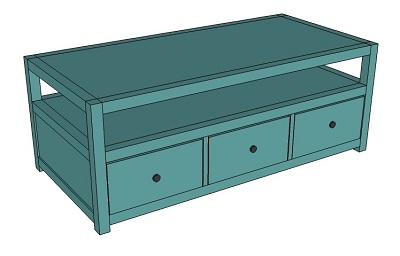
Step 12: Attach hardware to the drawers and you are done!
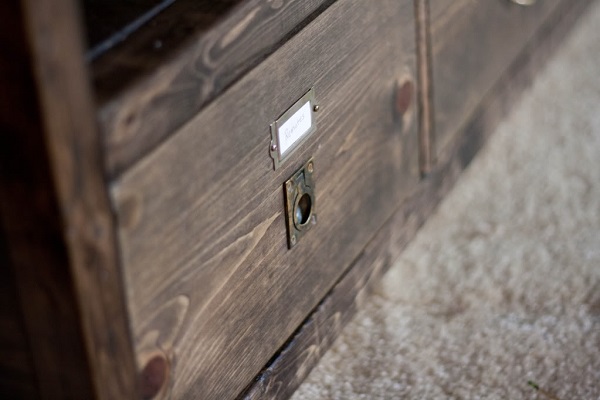
To get the same look as the inspiration table we ordered recessed ring pull hardware like this and used some matching label holders.
The beauty part of home-built furniture is that you have no limitations! Make it your way and make it beautiful!

I hope you enjoy my updated plans. Let me know if you give it a try!
**UPDATES: I have been put to shame. Check out some of the beautiful work you guys have been doing at home!
This table with a beautiful blue finish was built by Joy in Our Home. Check out her blog for more pictures and details!
Austin built a table from the plans and it turned out AMAZING! Love the cup handles and the rich color. And the corners look so perfect and tidy! (You can check out his pictures here.) Thanks for sharing!
Tyson Chenier made some adjustments to the original plans, adding another drawer under the tabletop. See more pictures here. Thanks for sharing!


Pin It
Congratulations on creating one of the most popular pieces of furniture on Pinterest. I hope people post here if they make one!
ReplyDeleteThanks. :) That would be great! I'd love to see them!
Deletejust started making this table for woodworking in highschool really excited
ReplyDeleteAwesome! Let me know how it turns out, I'd LOVE to see pics when you are done! :)
DeleteWe have a couple of these tables from the collection and my wife would like me to build the side tables. Your plans look great! Thank you for drawing these up and posting them. I have one quick question, how do you get the small 1/16th to 1/8th gaps between the legs and side rails? I'm hoping my knock off side tables look as close to the originals as possible. Thanks again.
DeleteSorry Dave, I'm not totally sure what you're looking at! I don't have any gap between the legs and side rails. Do you mean the originals have gaps there?
DeleteI also have plans for the side tables that might be a good starting point for you. :)
Deletehttp://www.morelikehome.net/2010/06/plans-for-end-table-knock-off.html
Great plan! You mention using a dark expresso stain, but so many brands turn out different. I love the way your project turned out! What brand of stain and specific color name did you use?
ReplyDeleteThank you! This is the stain I used:
ReplyDeletehttp://www.amazon.com/Rust-Oleum-241412H-Varathane-Stain-Espresso/dp/B000RUODRO/ref=pd_sxp_f_r
I ordered it online because I couldn't find it locally. To get the same finish as me, you'll have to apply it a little different than the directions say to make sure the grain shows up nicely. The way I did it was that I didn't let the stain soak in AT ALL. I dipped a rag into the stain, and rubbed it into the wood pretty fast so that it only picked up a little of the color. There wasn't any brushing it on or letting it sit. Just rubbing it on as fast as I could go, making sure not to leave any kind of puddles. Hope this helps!
I finally fished my table it has taken me a little longer then expected i have been very busy. But i love the turn out and the plans worked great thank you so much i would like to show you my final pictures but i dont think that i can upload pictures on this comment list.i will try and figure out a way
ReplyDeleteok if you click on my name it should bring you to my google+ account and i just uploaded it to there so you should be able to see it thanks so much for the plans o n ps still havent had time to put handles on the drawers yet but will soon thanks again
ReplyDeleteAustin! It turned out AWESOME! Seriously, I think it looks better than mine. And I LOVE the stain you used! What color is that? Would you mind if I link to your picture in my post? This is the only other one I've seen done! :)
DeleteWell thank you very much! I just moved it into my new apartment and it looks awesome in there! The stain that i used was called red mahogany and that would be just fine if you posted the picture! Thank you so much for the plan.
DeleteJust updated the post to include your pic. Thanks again!
DeleteGreat plan! I've been working on it, and was hoping I could ask for some advice - I'm in the final step of applying the wood finish (I've used a dark espresso stain), but there are still a lot of little splinters coming off of the plywood top. Is there anything I can do without having to re-sand, re-stain, and refinish everything?
ReplyDeleteHmmm... I don't really know, I'm sorry to say. I might try lightly sanding the rough areas and just touching up the stain in those spots, but I can't guarantee that would work. :-/ If you want to ask some people with more experience than me I would recommend the forum on Ana's website: http://ana-white.com/community/building-support-and-help/finishing-support-and-advice?sort=asc&order=Replies. Hopefully someone there would be able to help!
DeleteI have been doing a lot of projects lately with old/distressed wood (from a fence that was knocked down by a tornado that hit our house last spring) and my wood usually always has some splinters because of its distressed nature...I like to add several light, thin coats of polyurethane or polycrylic as a finishing coat - it really helps prevent splintering. Here's a trunk I made from the distressed wood with a water-based polyurethane finish:
Deletehttp://house-capades.blogspot.com/2012/07/hi-my-name-is-callie-and-i-built.html
This is an awesome table! I'm about to do my first woodworking project and want this one to be the 2nd. Had a question: what kind of wood did you use in this build?
ReplyDeleteOh! One more thing, in the list of tools you noted "Saw". Did you use a Circular or Miter saw for your cuts?
ReplyDeleteWe just used a circular saw for this - we didn't even own a miter saw yet! A miter saw would be a little easier for cutting the 2x2's, but a circular saw works just fine. And you need a circular saw if you will be doing any of the plywood cuts yourself! :)
DeleteJust re-read and saw you mentioned the table was made with Pine--duh.*
ReplyDeleteI'm glad you found it, I'm so slow at answering! Ha ha. :) Yes, we used pine for the dimensional lumber and the plywood was called "project plywood" I believe. It has nice smooth sides so the table turns out smooth and pretty. :)
DeleteAwesome, thank you so much! I intend to start on this in the next couple weeks--I hope it turns out as nice and yours/Austin's.
DeleteI'd love to hear how it goes and see pictures if you get any! Good luck!
DeleteJust finished this table, thanks for the great plans. Made a few changes; used 1 x 12 instead of plywood, made 2 drawers on one side to allow for bigger items to be stored, made the table 3ft x 4ft. I used Kona stain for the table and Early American for the drawers. Photos can be seen here: http://www.flickr.com/photos/pauldes2012
ReplyDeleteWow Paul! That turned out great! I love that you put two drawers on one side, and the two tone finish is gorgeous. Could I share some of your pictures in the post?
DeleteThanks! and yes you are more than welcome to share some of the photos on the post.
DeleteNice job!! The table looks amazing!! Thanks for linking up at Romance on a dime!!
ReplyDeleteI'm following you now. Hope to see you link up this Tuesday!
Paul, great job on the table i love the colors that you used
ReplyDeleteThanks, I appreciate it.
DeleteI can't wait to try to make this table! I was just wondering where to put the screws? I'm trying to look into the pictures of the finished table for any hints as to where the pieces were screwed together and I can't see any. Also, I've had bad experiences with the wood splitting when using screws on other projects. Do you have any tips I could use so that I can do this table without having the wood split? Maybe pre-drill the holes?
ReplyDeleteThanks so much!
Are you talking about the frame? I drilled through the front of the legs into the ends of the side boards, then through the outside edge of the legs into the front/back boards (just be careful not to hit your first screws when you drill the front/back holes). Does that make sense? The reason you can see the screws is because we used a countersink bit to sink them in (http://www.amazon.com/gp/product/B0000225OW/ref=as_li_ss_tl?ie=UTF8&camp=1789&creative=390957&creativeASIN=B0000225OW&linkCode=as2&tag=moliho-20) then filled the holes with a stainable wood filler. When we stained the table the filler made the holes blend right in!
DeleteIt’s important to pre-drill your holes! I’ve split a couple boards since still, but not nearly as many as before I started pre-drilling. (I’ve also heard that pine splits easier than some other kinds of wood. It’s still what we use because it’s so cheap, though!) If you do a lot of building you may want to think about getting a Kreg Jig (http://www.amazon.com/gp/product/B0044BBOQK/ref=as_li_ss_tl?ie=UTF8&camp=1789&creative=390957&creativeASIN=B0044BBOQK&linkCode=as2&tag=moliho-20). It makes really strong joints and I’ve only split two boards since I started using it 2 years ago. They have great info and instructional videos on their website if you want to see how it works (http://www.kregtool.com/Pocket-Hole-Jigs-Prodlist.html). Hope this helps!
love this! I really should have mentioned you in my Ana White tribute post... you're right up there with her as far as I'm concerned :) thanks for all the wonderful posts!
ReplyDeleteR.O.R.
Wow, what a huge compliment! Thank you so much! I love Ana White! :)
DeleteIn the directions it says to leave 7 1/4" between the bottom and center rails. However in the pictures it shows a 7 1/2" gap. Just wondering if this could be clarified? Thanks!!
ReplyDeleteOops, it is supposed to be 7 1/2"! Thank you for pointing that out! I fixed the text in the post. :)
DeleteIt does not appear to be fixed in the text.
DeleteYour plans look great. I am looking to start this project but I'm having problems finding 2x2 pine. You also mention "project plywood" above in an earlier post. Where were you able to get these items?
ReplyDeleteThanks so much.
Chad
Thanks! We got both of those at Lowe's. The 2x2s were in the section with stud lumber, not with the rest of the dimensional boards. The project plywood is just plywood with one side really nice and smooth, maybe if you describe it to an employee they could help point you find something similar? Hope this helps! :)
DeleteI love that table! I was wondering where you were able to find those drawer pulls - you mentioned that you ordered them, but I have been unable to find them anywhere. Also, what do you do to antique the brass?
ReplyDeleteThanks!
Tom
It took some digging to find them, they are kind of hard to come by! Here are a few options from Amazon. The first is a smaller size with an antique bronze finish, the second is larger with an oil rubbed bronze finish:
Deletehttp://www.amazon.com/gp/product/B004FOLMUO/ref=as_li_ss_tl?ie=UTF8&camp=1789&creative=390957&creativeASIN=B004FOLMUO&linkCode=as2&tag=moliho-20
http://www.amazon.com/gp/product/B004FOOYN6/ref=as_li_ss_tl?ie=UTF8&camp=1789&creative=390957&creativeASIN=B004FOOYN6&linkCode=as2&tag=moliho-20
With these you wouldn't even have to worry about antiquing them! But if you end up finding brass ones, I sat them outside in ammonia and checked them every couple hours until they had a finish I liked. I did read that it doesn't always work and can mess up the metal though, so be careful! I couldn't find any finishes I liked so I decided to risk it and it worked out for me. :)
The table looks great! I'm planning on building a version of this after Christmas (I'm hoping to get my own tools). The question I have for you is how well the plywood held up without any cross support underneath it. Was there much (if any) deflection on either surface?
ReplyDeleteThat was something I was worried about! But so far we haven't had any deflection at all. I can't say whether it will with more time, but so far it's holding up great!
DeleteThis comment has been removed by a blog administrator.
ReplyDeleteI am a little confused, I bought and cut all of my materials already however I am stuck on step 1 haha. You called for two (N) pieces, yet in step one you say to put one on top edge of c and one on the bottom edge of C.Does this only go on one side panel or both meaning I need 4 (N) Pieces?
ReplyDeleteOh, yes, you need 4! Sorry about that, thanks so much for pointing it out! I'll correct it! :)
DeleteI have completely struck out looking for drawer slides of the right length for these drawers. Any info on where I might find some?
ReplyDeleteWe had to do some hunting, and finally found a Menards that carries them. Otherwise you could order them online, here are a few options.
Deletehttp://www.zorotools.com/g/00064403/k-G1225673?utm_source=google_shopping&utm_medium=cpc&utm_campaign=Google_Shopping_Feed&kw={keyword}&gclid=CLD8pZLYibYCFWORPAodtVwA7Q
http://www.doorcorner.com/pr10fuexbabe.html?utm_source=googlepepla&utm_medium=adwords&id=20005783933&utm_content=pla&gclid=CI_ChJTYibYCFY6PPAod2UEAwQ#sthash.iUx5MTTg.dpbs
http://www.ebay.com/itm/250794433598?hlp=false&var=
And there are lots more if you google it. Hope this helps!
Hi...
ReplyDeleteYour legs is 2" wide, stiles at 1" wide and 14 1/2 gap in between. That would be 2x(2") + 2x(1") + 3x(14 1/2") which is 49 1/2 inches total which is 1 1/2 inch over the actual 4' dimension.
Am I getting my math wrong? Or there is an error on the drawing.
Ray
Hey Ray, the the named sizes of lumber are different than the actual dimensions. A 2x2 is actually 1 1/2 x 1 1/2, and a 1x2 is actually 3/4 x 1 1/2. So the math would be 2x(1 1/2") + 2(3/4") + 3x(14 1/2") = 48" total. :)
DeleteGot it... :) Thanks...
DeleteJust wanted to say thanks for the plans you posted. I accessed them through www.anawhite.com
ReplyDeleteI have just finished this and it turned out very nice. I made an alteration so I could have a concealed keyboard drawer attached (as our TV viewing consists of Netflix, etc). Also masked the keyboard drawer with a flushed wooden piece and matched it around the table for uniformity.
Here it is on Pinterest (with some other items I built)
http://pinterest.com/tysonchenier/diy-built/
Thanks so much for sharing!! It looks fantastic, love how you added the keyboard drawer, and the hardware is great! I also love that media console - so pretty! Would you mind if I shared one of your pics in my post? I'll be sure to link it back to you. :)
DeleteHi- my dad and I just finished building the table last night and we are ready to sand and stain! I am so excited to see how the table turns out. Thanks so much for the plans!!! Now I want to build the end tables to match!! I would love to send you pictures when it's done.
ReplyDeleteThat would be wonderful! I love to see finished projects. :) You could email them to me at morelikehome (at) gmail (d0t) com. I would love to include your table in my post if you don't mind.
Deletewhere did you buy the recessed ring pulls from? theyre so expensive
ReplyDeleteWe ordered from Van Dyke's Restorers. You're right, they aren't cheap! Here is a sample from their site, but they have other colors and I believe other sizes as well: http://www.vandykes.com/flush-ring-recessed-pull/p/204529/
DeleteThanks for the plans! I will be back when i get it finished.
ReplyDeleteJust as a heads up for anyone else building it, I found my lumber costs to be significantly higher than $60. Mine totaled up to $165.33 just for lumber. Still a great deal over retail and I personally love making it myself.
Thanks for sharing! I wonder if wood has gone up that much, we built ours almost seven years ago. Or I could have done the math wrong. ;) Anyway, thanks for letting me know! I made a note up in the plans. And I'd love to see your table when you're finished!
Deletehi, i am making this table for my year 10 Major Work. it is a very good design, but i am making a few adjustments such as an overhang for the tabletop, and better support for the drawers. awesome job and look forward to reading more plans!
ReplyDeleteSounds great! I would love to see pictures of your adjustments when you are finished. Thanks for commenting! :)
DeleteI Just Made this coffee table 9-14-2014. I once again have the dilemma or trying to find the drawer slides. I tried Menard, Home Depot, Mac's Hardware and Two local lumber stores with no Luck. i final found a break at a local cabinet shop were they pointed me to Rockler's website http://www.rockler.com/center-track-and-slide-glides
ReplyDeletethe problem is the drawers are around 10" and all slides now are 12" or more. The part below can be cut to what ever is needed.
Center Track for Slide Glides Item #: 29892
Slide Glides Item #: 28357
Oh, thank you so much for commenting! I had found them at Menards in the past, but it's been a couple years. I didn't realize they aren't made that way anymore! Thanks for the tip!
DeleteAnd I would love to see pictures of your table if you get a chance! :)
This comment has been removed by the author.
ReplyDeleteCurrently making the table now going to use a red oak finish on it its my parents Christmas present still have to buy plywood but drawers are complete and frame just got screwed together today I love the detail you put into these plans I am starting up a wood working company right now and finding plans like these are hard thanks for the plan I'll send picture when she's all done
ReplyDeleteSo glad you are enjoying the plans. Have you checked out Ana White yet? She has some really great plans, we've built quite a few of them over the years. Good luck with your new business, and I can't wait to see your table! :)
DeleteI saw this and can't wait to start working on it!! What size drawer slides did you use? I have seen some at 8" and 9" on Amazon and did you use side or bottom mount with these plans?
ReplyDeleteThank you!!
9" would be great. The drawer is sized for side-mount slides (I've never used bottom mount so I don't know if there would be enough space under the drawer to fit them?). Good luck, can't wait to hear how it turns out!
DeleteDid the lumber really only cost you $60? i am pricing this out and I am coming in a little over $100? Still most likely going to make the table, was just curious?
ReplyDeleteYes, that was what we spent but it was over seven years ago! I put a note up in the post because so many people have asked about it recently. :)
Deletehow long did this project take. in hours if possible, thanks.
ReplyDeleteSorry, I'm not really sure in hours. We got it built in one weekend, but I'm not sure how long we worked each day. It took us about a week to finish it completely, though, with the sanding, staining, and sealing (we did a one coat per night).
DeleteSo glad I found your site because this is not the table on Anna White's site. I like this table. I do like the chalk paint job she did on Joy In Our Home but I don't see any credit to you. She really takes a lot of credit for the table. We have been building a large bar room in our house and I will be building that table with the labels. It is just too cool. Thank you so much for the cut list and plans. Georgia and Husband ROCK!
ReplyDeletePlease, can you give me dimensions in centimeters.
ReplyDeleteThank you very much
:)
Hi there. Just a quick question. I finished my table this weekend and was wondering if you put some sort of clear coat on it? Thanks?
ReplyDeleteYes! I just used a clear polyurethane. :)
DeleteStep 10 says the drawers are 13.25 wide to allow a 0.5 gap for the slider, but step 3 says the gap for the sliders is 14.5. What is going on?
ReplyDeleteThat is an excellent question. I must have drawn the drawers wrong, they should be 13.5" wide then. Sorry about that!
DeleteCan I use a dowell pins instead of kreg's joinery
ReplyDeleteI don't see why not? I don't have any experience with dowell pins, but if you have the equipment for it I think it would work!
DeleteHmmm... you guys all realize you are doing this as hobbies, right?
ReplyDeleteI spent 40 years owning furniture manufacturing companies and producing 100's of millions of dollars of casegoods, wood products. Bedroom, dining room and occasional tables.
We bought wood in 100 truckload lots, at a fraction of the cost you will pay at the lumber yard. We would build this cocktail table with just 2.25 hours of labor. We could apply the finish that we bought in 55 gallon barrels, at a fraction of the cost of what you pay for a quart of finish.
At the end of this very time consuming project in your garage... your material costs will exceed what you could buy this table for from a furniture store.
If you allocated $10 per hour to your total time invested in completing this table in your garage... it will cost you double or triple what you can buy for online... after delivery cost.
I get the DIY thing but 3 times the cost... com on man.🙈
DIY definitely isn't for everyone. I know the money out of my pocket to build this table was a small fraction of the cost had I bought it at Pottery Barn. And I am thrilled with that savings. :)
DeleteIt's called a hobby, dork.
DeleteLove you coffee table and the stain you used! Thanks so much for sharing mine too... I really appreciate it! xo
ReplyDeleteYou're welcome! Your table is beautiful!
DeleteThis comment has been removed by the author.
ReplyDeleteDIY'ers beware:
ReplyDeleteThis "plan" is very misleading and has multiple errors and omissions. Note that the Author states she hasn't actually built this table, but one similar to it. The drawer slides she mentions in this plan don't actually exist and there is no such thing as a standard 9.5" drawer slide. If you're thinking of building a DIY table, move along. This one will just cause headaches.
Hi! Sorry that you are having trouble with the plans. A 9" full-extension drawer slide would do the trick and is available on Amazon (http://amzn.to/2trwURf).
DeleteOr if you prefer to skip drawer slides all together you can go back and reference the original table plans (http://www.morelikehome.net/2010/05/lets-build-coffee-table.html) which are the actual plans I used for my table. I made these updated plans specifically to accommodate drawer slides in case someone wanted them, and to update the drawings to hopefully be a little easier to follow. Which sounds like it may not have worked. ;) Hope that helps.
I ordered a pair of those slides, to give you the benefit of the doubt. Long story short, I shouldn't have.
ReplyDeleteThe slides you sent, albeit, 9" long. Do not possess the required thickness to attach to both the drawer, and the inside of the table. You will be left with a 1/2" gap. Again, your measurements don't line up. This is because you do not know how to properly make dimensions in Sketch Up. A simple drafting course will explain how you are supposed to lay out dimensions to allow for recreation.
This plan has been nothing but a headache if you actually follow the steps 100%. I'm assuming everyone else on here made adjustments as they saw fit.
I am now left with a skeleton of a table that does not match standard draw slide measurements, so to find the proper one to fit the 6 drawers I've already cut and paid for, I now have to search the internet for slides that don't exist. Or make my own. Or rip out the entire bottom of the table and build it to standards used in furniture building.
I built this with my father, who own a custom home construction company and has been an avid woodworker for well over 40 years. He thought the plans were terrible.
Long story short, if you like this table, guy buy one that's similar. It will be built with much better lumber (Home Depot and Lowe's have terrible lumber options), the construction will done with industry standard techniques and joinery, AND they come with lifetime warranties as long as you don't cheap out and go to a knock off store.
Last but not least; Half Finished Coffee Table for Sale. Finish and use, or great for firewood!
Hey big guy...maybe you should just stick to show production and video games...
DeleteIf you and your father couldn't make it work by improvising as you go, maybe you should sell your tools, like the guy below. Seriously, who just orders something without researching and seeing if it would work prior to? And industry standard techniques and joinery, really? You clearly are trying to act like you know what your talking about because, supposedly, your father owns some construction company. In regards to the lumber, you're the one buying it! Lifetime warranties, really? If you're worth your salt and something happens to it, put down the video game controller and just fix it yourself or build another one.
I hate when people come on sites like this and criticize the OP.
It says “built this with my father.” Not “tried to build this.” Maybe you should learn to read before you try to criticize someone’s opinion.
DeleteLook at you, but internet tough guy coming onto a page just to comment. Did you even attempt this project? Are you even here for DIY? Or to stroke your keyboard hard-on?
You’re telling him to put down a controller when your mother clearly needs to take away your keyboard.
The last line says "half finished coffee table"...I don't think they completed the project.
DeleteThese plans are so poorly written. Good plans show you the sheet of plywood and how the cuts should be laid out. Who puts measurements as 1' 11"? Why wouldn't you put 23"? You don't show different angles of each piece to see how things should be attached. You don't show where screws go. I can follow along since I have built several diy pieces of furniture but its taking a lot of extra time to figure out what you are trying to do. Now i'm concerned the drawer slides don't exist so i'm reluctant to start the project. You should hire someone to revise the drawings and instructions so they make more sense.
ReplyDeleteI am a professional drafter. 1’-11” dimension is the correct industry standard. For a non professional drafter, these plans are very clear. An experienced DIY builder should have little problem with them.
DeleteGood grief man...if you need someone to show you exactly where to put each individual screw, maybe it's time to just sell your tools, and go buy your furniture, instead of coming on here criticizing her plans.
ReplyDeleteI genuinely want to make this project but the imperial units are so confusing as in Australia we use metric. My measurements don't add up :P
ReplyDeleteSorry! I don't think I can help with that, I don't have much experience with metric. :(
DeleteAhaha its all good. I've ended up using your design with slight mods, ill be sure to send you some pics once its done :)
DeleteGlad you got it worked out! I can't wait to see! :)
DeleteThank you for the idea! I built this for my mother because she was in dire need of a new coffee table. I’d like to send you a picture of my finish product, but I’m not sure how to send it.
ReplyDeleteI'd love to see! You can share photos on our facebook page: facebook.com/morelikehome or email photos to morelikehome (at) gmail (dot) com :)
DeleteGeorgia,
ReplyDeleteThanks for the plans! I used this table as my first wood project. I made some modifications but love how it turned out. The plans definitely helped. I used solid blue pine, would love to kick you some pics if I can figure out how to add to my google account.
Hi! I'd love to see pics if you get a chance. You can also share them on our facebook page or email them to me at morelikehome (at) gmail. :)
DeleteI like the look of this coffee table but the instructions do not mention the RIP size of the 1/2" plywood that you use. You mention buying a sheet of plywood but do not give the dimensions of the cut pieces. I was able to figure out the dimensions by calculating the total length and width of the coffee table and then reducing the length and width by the 4 sides but I would make the suggestion of placing the exact measurements in your "Cut List" section as it would really help. I came up with needing 3 pieces cut at 3'8" (L) x 1'7" (W) and it worked for me. Just FYI on something that seems to have been left out by mistake.
ReplyDeleteHi! I have the shelves listed in the cut list like this:
DeleteG) 3 ½” plywood @ 45x20”(shelves)
The 2x2s used for the side pieces are actually 1.5 x 1.5" so each shelf is only 3" smaller than the overall length and width of the table.
Hope that helps! :)
hello. Does anybody have a sketchup file made for this table?
ReplyDeleteThanks so much. I was able to build it and everyone who knows me is really shocked. This is the first thing I've ever attempted to build and I aced it. I also learned how to use the Kreg jig without destroying anything. Thanks again!!!
ReplyDeleteYou're so welcome! And congrats on your first build!! If you share any pics be sure to tag me on FB or Instagram! :)
DeleteIs there any chance you would know the measurements and lengths etc for this project in centimetres and millimetres???
ReplyDeleteI don't. I'm sorry! :(
DeleteDid you use pressure treated 2x2's?! I can't find anything cheap in 2x2x8 dimensions.
ReplyDeleteHi! I don't use pressure treated. So far I've always found them at Lowe's near the stud lumber. (I haven't looked for them at other stores so I can't say for sure if every retailer carries them) They aren't as nice as the more expensive stuff and they take a little more sanding to get them smooth, but they're so cheap! Here's a link to them on the Lowe's site if that helps: https://www.lowes.com/pd/2-in-X-2-in-x-8-ft-Furring-Strip-Common-1-5-in-x-1-5-in-x-8-ft-Actual/1000483975
DeleteThank for your share!
ReplyDeleteI like the look of this coffee table but the instructions do not mention the RIP size of the 1/2" plywood that you use. You mention buying a sheet of plywood but do not give the dimensions of the cut pieces. I was able to figure out the dimensions by calculating the total length and width of the coffee table and then reducing the length and width by the 4 sides but I would make the suggestion of placing the exact measurements in your "Cut List" section as it would really help. amazon coupons
Hi! The plywood pieces are listed as (G) in the cut list. Sorry if that was confusing. I'm glad you were able to figure it out anyway! :)
DeleteHi just wondering what joints were used when joining the legs
ReplyDeleteHi! Just a regular butt joint. You can use a Kreg Jig with pocket holes if you want to. :)
DeleteWhat is the best type of wood to use I’m trying to make this for wood shop in highschool I don’t know what wood to use
ReplyDeleteWhat are the measurements in centimetres and millimetres cause I don't understand the numbers used in these plans
ReplyDelete