
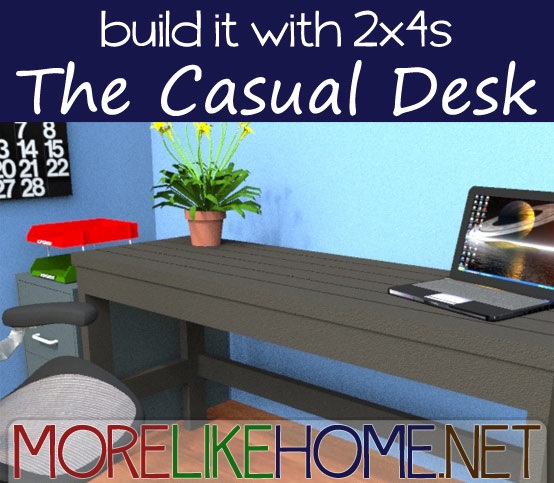
Welcome to day 2! You can see links to the all 31 2x4 projects in the series here. Like I mentioned yesterday, my plan for this series is to see what we can make out of 2x4s. I want to keep it cheap, keep it easy, and keep it totally doable for anyone. Today we are going to start with one of my favorite projects I have planned for this month - The Causal Desk.
It is so easy to put together, requires only basic tools, and is super affordable to build. It has a simple, sturdy style and a big work surface that is perfect for your home office. So let's get started....
Shopping List:
6 - 2x4s @ 10' long
1 - 2x4 @ 8' long
Tools:
Saw
Drill
2 1/2” screws (or Kreg Jig & 2 1/2" self tapping screws)
4" screws (or Kreg Jig & 2 1/2" self tapping screws)
Wood glue
Wood filler
2x4 Cut List:
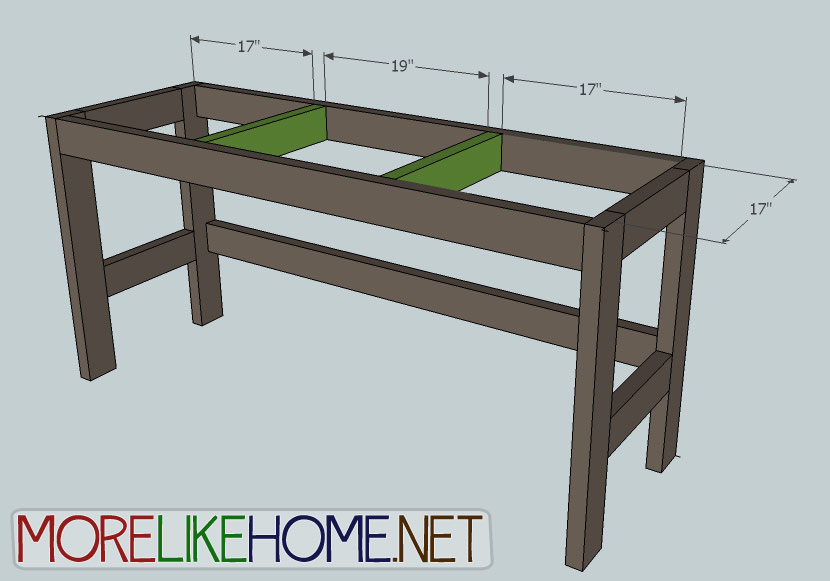
(A) - 4 @ 28 1/2" (legs)
(B) - 4 @ 13" (side supports)
(C) - 3 @ 56" (back/front supports)
(D) - 2 @ 17" (top supports)
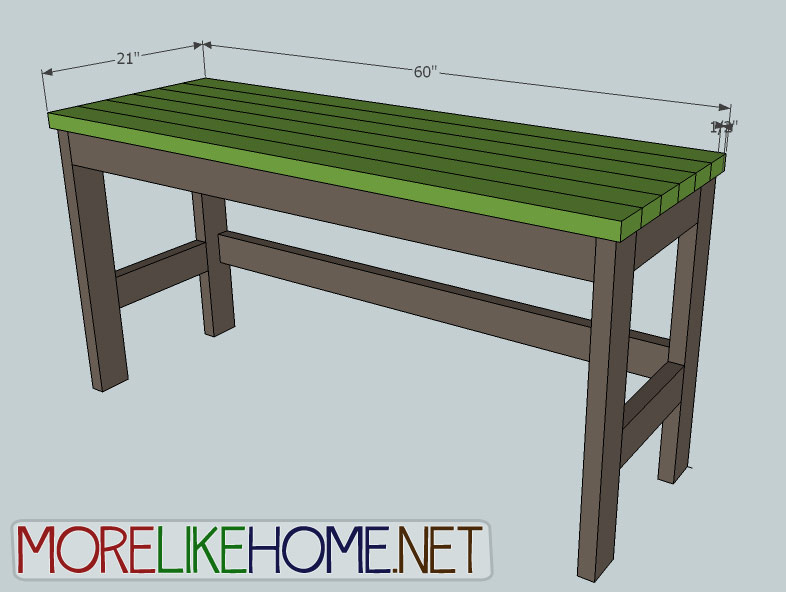
(E) - 6 @ 60" (table top)
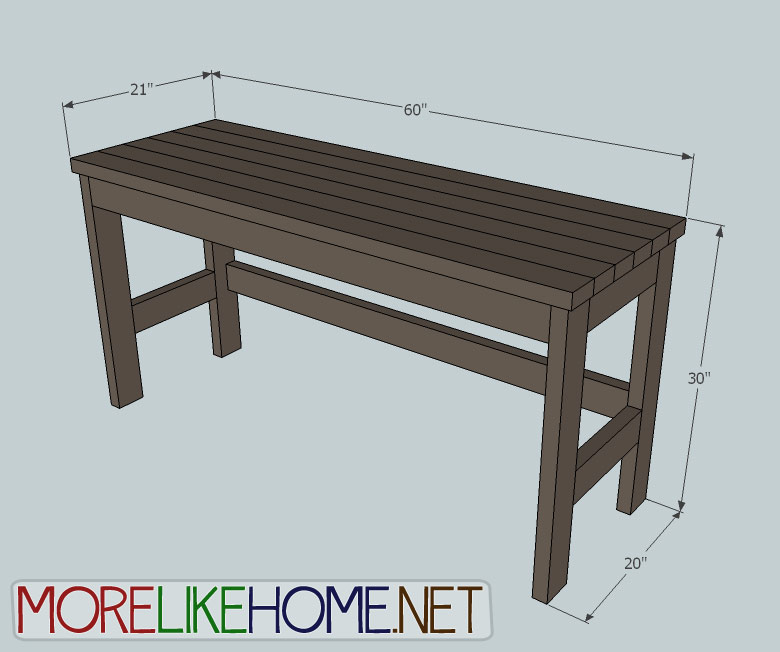
Dimensions: 60" wide x 30" tall x 21" deep
Step 1 - Build the Side Sections
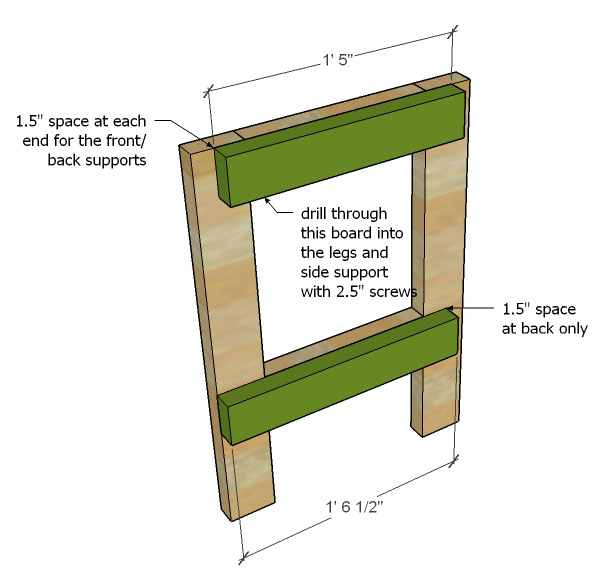
Use two side supports to connect two of the legs as shown below. The first support should be flush with the top edge of the legs. You can attach it using pocket holes with 2 1/2" pocket screws and glue, or by drilling through the legs into the supports with 4" screws and glue (you need long screws to get all the way through the legs!). Do the same to attach a second support 8" up from the bottom of the legs (this will leave 13 1/2" between the two supports. Repeat to build the other side section.

P.S. If you don't have a Kreg Jig, this is another options without wrangling the long 4" screws. Cut an extra 2x4 17" long and lay it across the top side support and legs, centered with 1 1/2" on either side (space for adding the front/back supports later). Drill through this board into the side support and both legs with 2.5" screws to join them all together. You can do the same thing with the bottom side support, but cut the new board 18 1/2" long and leave a 1 1/2" gap at the back only.
Step 2: Connect the end sections.
Use the front & back supports to connect the ends you just built. On the front of the desk attach one support, keeping the edges flush with the tops and front of the legs. On the back attach one flush with the top & back edges of the legs and another flush with the back of the legs and 8" up from the bottom of the legs (it will line up with the supports on the side sections). You can attach all these pieces with pocket holes (using a Kreg Jig), 2 1/2" pocket screws, and glue OR by drilling through the legs with 2 1/2" (or longer) screws and glue.
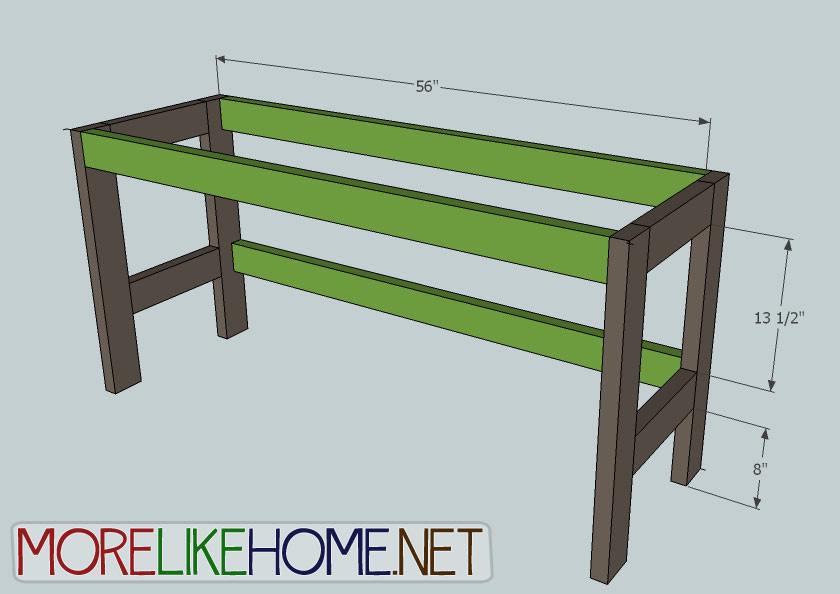
Step 3: Table Top Supports
Next attach the table top supports. These will keep your desk from sagging in the middle. Put them in about 17" from each side and attach with your Kreg Jig (or by drilling through the front & back supports with 2 1/2" screws) and glue. **If you are making your desk longer or shorter you can use more or less supports to fit.
Step 4: Tabletop
Now you can attach your table top. You will have a 1/2" overhang on all sides, so just line up your boards and then attach them in place by drilling down through each top board into the supports below using 2" screws and glue. (If you have a Kreg Jig, you can first attach all the tabletop boards together side to side to form a solid surface, and even use your Kreg Jig to attach the top to the supports from underneath so you don't have any holes to fill on the top.)
Fill any nail holes and give the whole desk a good sanding to get things nice and smooth. Then finish it off however you like! Maybe a bright coat of paint, or some stain and polyurethane. Or maybe a nice dark charcoal color?

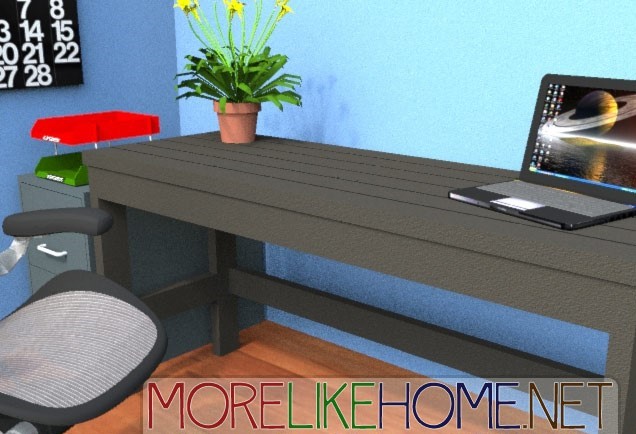
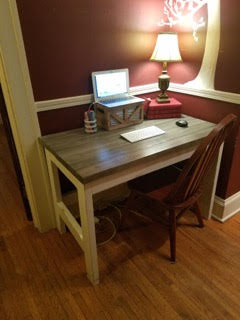
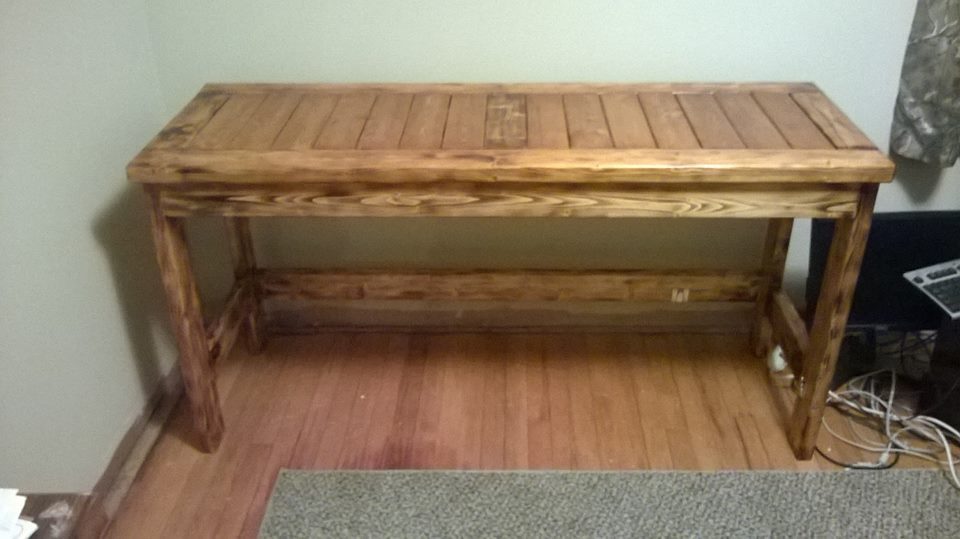
And you're done! An easy and affordable desk - and look at all that work space. Perfect for setting up the laptop or the sewing machine. Or both! So exactly how much does it cost?
Project 2x4 Cost:
$19.20 - 6 2x4s @ 10'
$2.50 - 1 2x4 @ 8'
$22.00 Total
Building your own Casual 2x4 Desk? I would love to show off your work! Please send pictures of the completed project to morelikehome (at) gmail (dt) com. Happy building!
See giveaway winners here.
I Did It!
Lee Anne modified the plan to make a smaller desk to fit her workspace, and created a beautiful finish with a gray wash top and white painted frame.
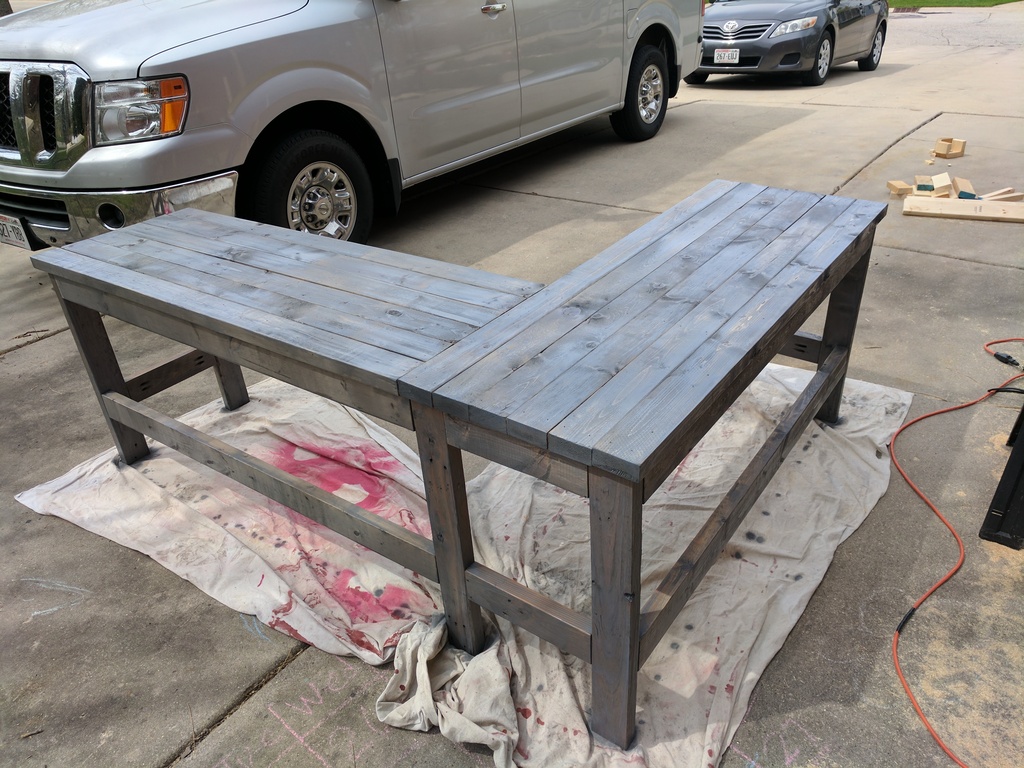
Jerod modified these desk plans to build a beautiful L-shape desk for his office! See more photos of this and the rest of his DIY 2x4 office furniture here!
ILOVELUMBER took a different approach on the top in order to use scraps already on hand. Looks great! (via ana-white.com).
(via ana-white.com)
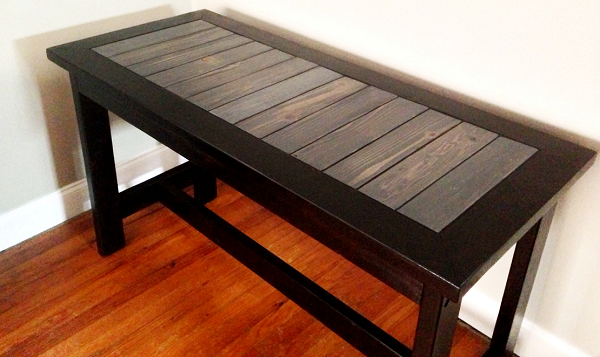
DINIFAM went two-tone by painting the legs black and staining the top. Great idea! (via ana-white.com).
(via ana-white.com)
(via mattsdiyhome.com)
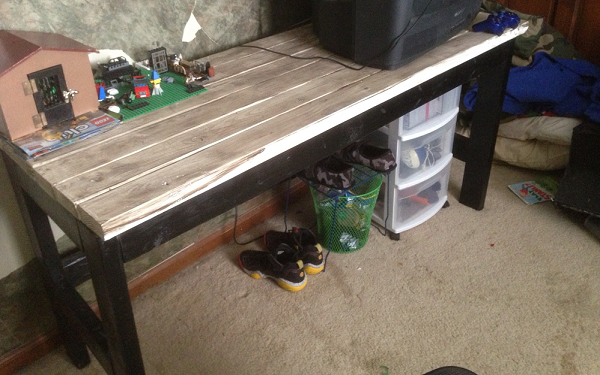
Redditor gk78 built a striking computer desk for his wife. (via reddit)
(via imgur.com)
Jeremy modified the plans to make a corner desk. He built one regular desk and a second with only three legs and attached them together. Thanks, Jeremy! Looks great!

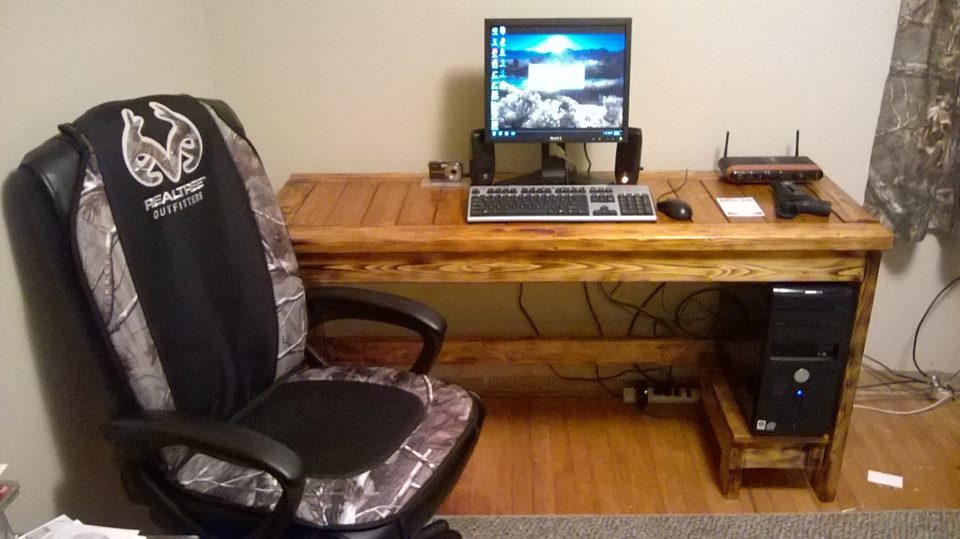
David built this desk for his man cave and added a custom shelf to hold his computer (see second pic).
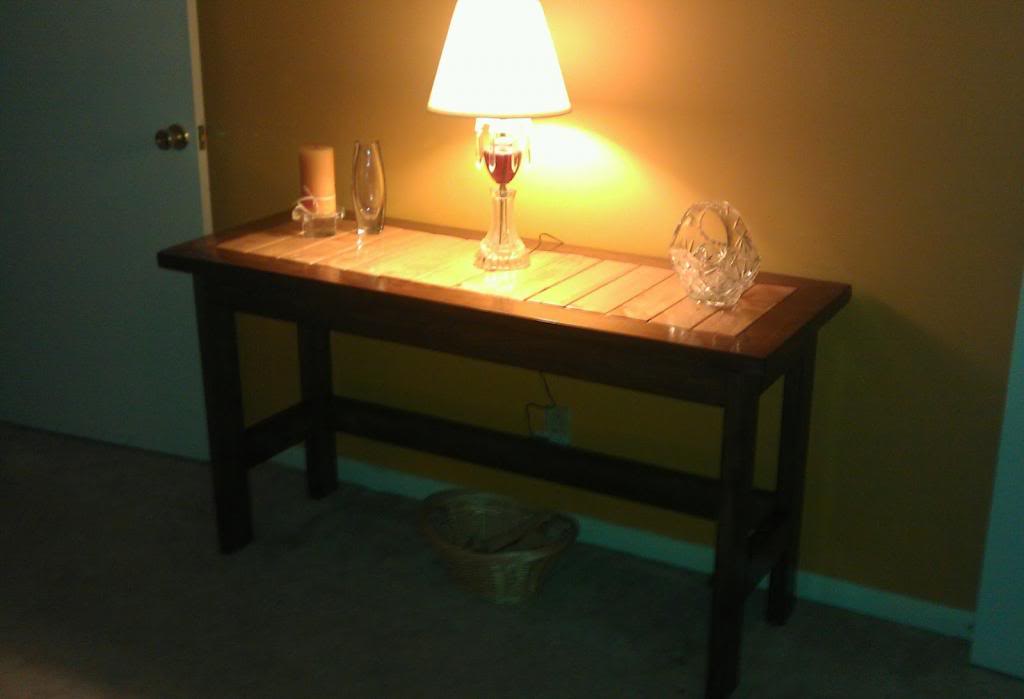
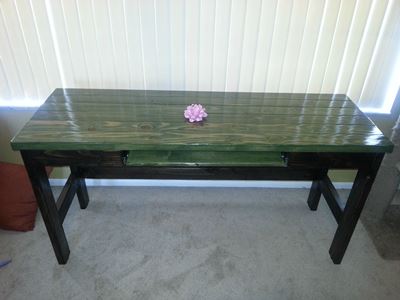
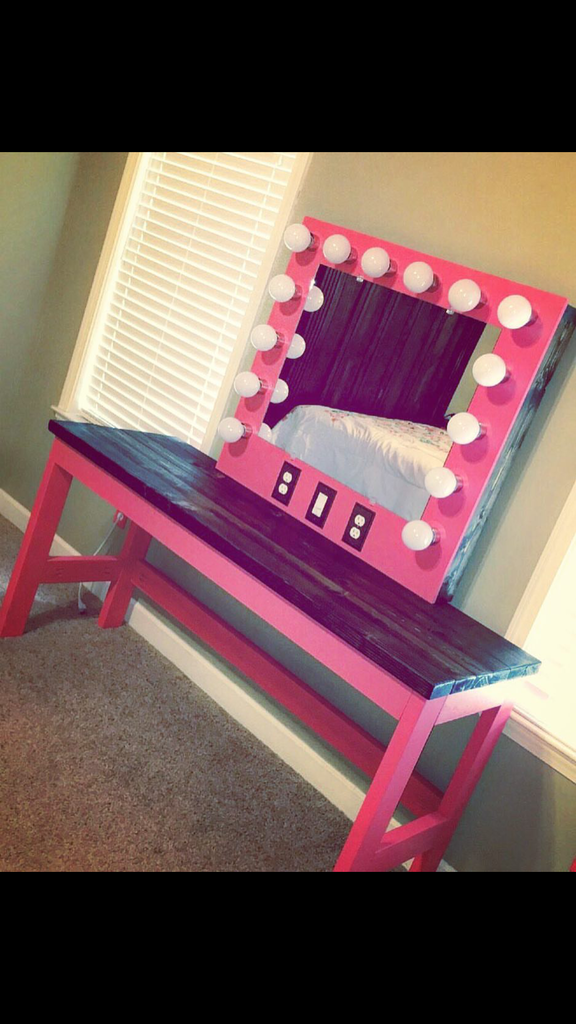
Jon used these plans to create a fun vanity area by adding a mirror and lighting. I love the built-in outlets, too!
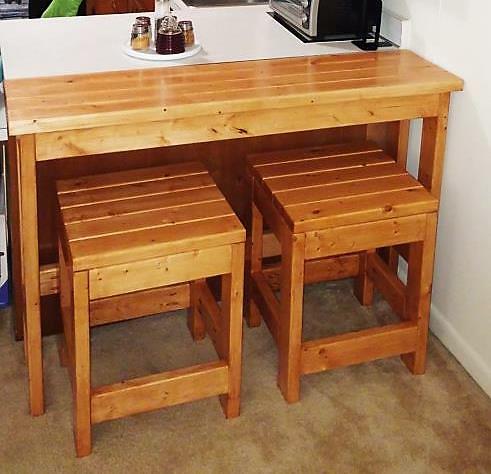
Pam modified the plans to create an eating space in a small apartment. It's a great solution when there isn't room for a full size table! She also made custom bar stools based on our 2x4 Chunky Bar Stool plans.

Share on Facebook

cute and casual, very nice, Kristen Lea
ReplyDeleteIts amazing what can be done with 2X4's. looking forward to the rest of the projects
ReplyDeletelove it,,simple and affordable.
ReplyDeleteThat's exactly what I've been looking for! Something simple looking for my desk! Maybe it's time to start learning how to use power tools :)
ReplyDeleteI like the fact that it is both narrow (not interfering with foot traffic) but also spacious in length.
ReplyDeleteThat is really simple. I wish I had somewhere to put it!
ReplyDeleteI love how simple it is. If only I had room for this!
ReplyDeleteCheck out this website. It is fabulous!
ReplyDeleteYes!!! I am showing this to my husband now! Just what I want, and really inexpensive! Thanks!
ReplyDeleteThis is a great simple desk. So many ways to make it your own!
ReplyDeleteVery cool idea! I like the 3D modeling.
ReplyDeleteI love the color!
ReplyDeleteLooks good.
ReplyDeleteModified slightly and it still worked out great for a computer desk for the kids room. Love your site, thanks for the easy to follow plans.
ReplyDeleteGreat! I'm so happy you made one! If you have any pics I would love to see (and post them on the site if you would be up for that). I love seeing finished projects! :)
DeleteFeel free to email me at morelikehome (at) gmail (dt) com if you have any pics you want to share. :)
In the process of getting this desk made, plans are awesome and easy! I used pockethole screws and the kreg jig, which made things a lot easier. Put the desk together in 2 hours, building my first ever piece of furniture. Thanks for the plans! Plan to tackle the bedside tables next.
ReplyDeleteSo glad to hear it! Thanks for sharing! I'd love to see pics if you have any. :)
DeleteI want something similar that wouldn't have the lower back piece in the way.I basically need one that can be adapted to slide or roll back and forth and be clear underneath. If I take off the back bottom wood piece, would it still be stable enough to support about 100 pounds or so of weight on top?
ReplyDeleteI can't say for sure since I haven't tried that myself, but I would guess that it would still hold up just fine under 100 pounds. I'm thinking I would still sit on it and I weigh more than that, so it seems like it would work. ;)
DeleteI ran out and bought the wood this afternoon. This is happening tomorrow! I took over the husband's den with my piano studio, and he gifted the desk he didn't love to his father. So. When he wants to work at home, he rolls his office chair up to the piano, props his feet on the bench and his computer on his knees, and gets down to business. So professional. Hehe.
ReplyDeleteHa ha, yes that man needs a desk! How did it turn out? I'd love to see pics if you have any!
DeleteAny tips on adding a drawer? Would it compromise the structure?
ReplyDeleteHmmm... you could probably reinforce around the drawer to keep it nice and sound. Add a 2x4 on either side of the drawer. The trick would be making one shallow enough to blend in, if that's what you want to do, you'd have to use 1" thick boards or maybe even thinner plywood. Some of my other plans have drawers, you could check them out and just adjust the measurements to fit your needs. Hope this helps! :)
DeleteForgive me if this sounds stupid, but a lot of the measurements here don't make since. For example, the tabletop is shown as 21" by 60", but if these are six 2x4s side by side that's six times four which equals 24. That creates a inch and a half overhang on the front and back.
ReplyDeleteAlso, I don't think there will be an overhang on the sides, because on your cut list you have the front and back supports at 56", along with two inches on each side for the legs. If the top planks are cut at 60" each, it seems to me that there would be no overhang at all. I'm not trying to be overly critical here, I just want to make sure I'm not going crazy. Ha ha ha
It is confusing at first! The actual measurements of lumber are different than the nominal names. A 2x4 actually measures 3.5 x 1.5" so that would account for the discrepancies you're seeing. Let me know if I can help with anything else! :)
DeleteI plan on making a desk with a overall length of 84 inches so the 3 supports for the front and back would be 78 inches?
ReplyDeleteHmmm. I'm thinking the supports would need to be 80", or you could do 78" and have a wider overhang on the sides.
DeleteHi Georgia,
ReplyDeleteI used your plans again (kindof). I did what the person at the bottom of your post (ILOVELUMBER) did with it but modified it with my own plans. All 2x4! I love it and once again your plans came to life on my workbench. Your site has kept me very busy!
http://www.mattsdiyhome.com/2014/02/3000-diy-2x4-console-table.html
- Matt
Thank you Matt! Looks great as always! Love what you guys are doing with the design and two-tone finish. I added you picture to the post... I hope that's okay, next time I'll ask first! :)
DeleteI just finished my desk project. We used a sheet of MDF for the top instead of 2x4s. That more than doubled the cost but I think it will be worth it.
ReplyDeletehttp://twitter.com/caseybentz8/status/439770393402814464/photo/1
It looks great, Casey! Thanks so much for sharing! Do you mind if I link your picture at the bottom of the post? :)
DeleteJust wanted to add a cut list with a little more specifics.
ReplyDeletehttps://docs.google.com/spreadsheet/ccc?key=0AucMhz7H4zM5dHptVWktTlowZkM5eFRVZGtVbnVJeXc&usp=sharing
Thanks! :)
DeleteI'd love to know where you bought your wood from and what type of wood it was? All the boards I'm looking at on Home Depot's website cost much more.
ReplyDeleteThe cost of lumber can vary by location and this post is a couple years old. I would say if you were to buy the lumber now it would cost you roughly $30.00.
DeleteCarrie, Matt is correct. I think the least expensive 2x4s we found at our Home Depot in Phoenix were about 2.89 ea. "white wood".and fir boards were around 3.49.ea. It's still the least expensive, but you do have to inspect the boards before purchase and use them quickly once you get them home. You may be able to find a lumber yard in your area where you can get the boards for a bit less and sometimes you can find them on Craig's List in the "Materials" section where people list their leftover materials from other projects. Reclaimed wood is great, usually very inexpensive, but, as we found, it can have umm... quirks lol.
DeleteThanks guys! :)
DeleteI just wanted to thank you for posting all of these great 2x4 projects. I was first inspired by Ana White and then found your page and plans that I could afford on a small fixed income. My husband passed away last November and to help me remain sane through the grief, my son and I took up his unfinished "To-Do" List. Highest on the list was decorating the patio and pool yard with beautiful, functional and, above all, sturdy furniture. You helped me get through a really lousy 9 months and now I have a wonderfully serene backyard where I can heal. Here is my big "reveal" post on my blog: http://azprancingponyfarm.com/2014/09/01/billiams-backyard-and-patio-reveal/
ReplyDeleteWow, your backyard is beautiful! Good job! So sorry about your husband. I'm glad you're finding a way to heal and I hope you're doing well. :)
DeleteHi, I forwarded you question and this is the response: "The desk still has the 1/2" overhang on it so there is a 1/2" gap below the top surface of the desk. I'm really new to working on stuff like this. I simply put a 1/2" thick shim between the two desks and ran a screw through to connect the two. Only difference between the two desk is one is missing a leg where my chair/feet would be in the corner which also does away with the cross-brace across the bottom. Nothing fancy, but it did the trick and it's still holding up just fine!"
ReplyDeleteI am new to this kind of thing. But is there any thing to take into consideration if I would like to build this a bit longer, say like 72 inches (six feet)?
ReplyDeleteNope! Adding a foot wouldn't change anything structurally for this desk. I'd love to see how it turns out. Have fun! :)
DeleteWhat about if I made one 78 inches long, still no extra support needed?
DeleteDo we have to get special permission to sell items we make using any of these patterns?
ReplyDeleteNope, go for it! If you could just mention the plans are from my blog that would be great! :)
Deletenice post
ReplyDeleteThis comment has been removed by a blog administrator.
ReplyDeleteThank you for posting these plans. I modified them a bit and came up with: http://imgur.com/a/iH7lO.
ReplyDeleteIt looks great! Love all the extra features you added. Thanks for sharing!
DeleteSooo I'll admit I'm a newbie here. Let's just start there.
ReplyDeleteI'd also rather not spend $100 on a pocket hole jig for a DIY project when a desk from wal-mart costs the same. (pro tip everyone - there are $20 and $30 options.)
I'm stuck on this step - "or by drilling through the legs into the supports with 4" screws and glue (you need long screws to get all the way through the legs!)."
I'm failing to understand how one would drill through a 4" 2x4 with a 4" screw. Without the pocket hole jig, no matter what you're eventually going to need something longer than 4" to connect these pieces. So now I have a basement full of cut work. Thaaaanks.
Well, a 2x4 is only 3.5" wide, plus when you countersink your screws you'll gain another 1/8-1/4" of reach with your screws. It will only reach 5/8-3/4" into the support boards, but that should do it for this project since you'll be reinforcing that hold with the top supports and tabletop boards.
DeleteBut I've also put another option up in the plans that you might like better.
You're weeeeelcome. ;)
I REALLY want to try this and I'd like to use a Kreg Jig system but I don't know that I can swing $100... would this pocket
ReplyDeleteKreg do the job https://www.amazon.com/dp/B000J43A7W/ref=psdc_552488_t1_B001DYFISG ? Thank you!
Yes! You'll just need a good clamp to make sure it can't slip while you drill. :)
DeleteCan someone make measurements for this desk but for 60" wide 30" high and 30" deep
ReplyDeleteHi! You could increase the depth by adding more 2x4s to the top - adding two would give you 28", or adding three would give you 31.5". Then you would just need to increase the length of all your side boards by the same amount.
DeleteSo if you add two top boards, you'll be adding 7" of depth, so you'll need to cut the side supports 20" and top supports 24"
For three boards you're adding 10.5" so you'd cut the side supports 23.5" and the top supports 27.5"
I built the desk /same dimensions, I used the Kreg unit to attached boards, Attached my top boards to make a solid plank of 2x4’s. I stain the bottom separate from the top. I stain and applied a spray polyurethane to the top (top side only as I would never see the underside). It turns out that when I attached the top to the bottom using the kreg screws on underside that the desk developed a twist as to make the desk rock by about ¼” to ½” inch. I have set weights on hoping it would level out but no luck yet and suggestion to how to correct the issue?
ReplyDeleteI’m trying to figure out what cuts to make for the 8 foot 2x4. The sides and top supports?
ReplyDeleteNice
ReplyDeleteHello! I'm helping my husband make a very big work bench (desk). He has never built anything ever, and my only experience was shop class long ago, but I have common sense and think I can do it. I was looking at this plan for ideas on how to structure the supports. I know about the "real" dimensions of 2x4s, and I'm trying to figure out all the measurements, but it's complicated.
ReplyDeleteIF you can help, that would be great. I actually need 2 separate desks. It is going to serve as an L shape, but the inner corner is not for sitting in, so it can have all the legs on both pieces. It will just be 2 desks that happen to make an L.
The big one needs to be 9' long and 4' deep, heighth of 40". The smaller one will be 5' long and around 2'10" deep, also 40" high. He wants the table top to be just plywood.
"Overhang" is not necessary. I will most likely not have the kreg tool, but 4" screws would be possible. I'm trying to determine supply list and measurements. Wondering if 9' length would require extra leg Midway or something?
Advice appreciated, but if not, this site still has been a great help. Thanks.
I'm so glad the site was helpful!! And you are right - you can totally do this. I'd love to hear how it turns out! :)
DeleteI used your plans and it worked perfectly exactly as you described screws and all. I found a nicer table top from an old desk and I modified mine so the table top has hinges on the back, then attached 1/8 inch particle board underneath the table onto the bottom of the 2/4's so now I have secret storage inside the table. Would attach some pics but can't see how on this page. THANK YOU!
ReplyDeleteJust to add, did not need Kreg thingy, just pilot some holes with 3/8 or 1/4 inch bit about half-way into 2x4s then drill 1/8 inch pilot holes into the ends you are connecting, line it up and works just fine
DeleteFor complete beginners you really shouldnt just say "use a jig", you should show a diagram on how to use a jig , where to drill, what to use, etc... Giving this a thumbs down for that. Not beginner friendly at all. Also with the finish section.
ReplyDeleteOtherwise, all this is is a diagram on how to place 2x4s together
DeleteThis is strictly a building plan - so yes just a diagram for putting boards together. :) But now that you mention it, I'm sure a new post covering basic processes for beginner builders would be a super helpful thing to have as a resource for you guys. I'll work on creating something like that so I can link it on the plan pages. Thanks for the idea!
DeleteHi, do you think you could nail gun the pieces together instead of using a jig and screws? Thanks
ReplyDeleteHey! I prefer screws for projects like this because they seem to hold tighter and are less likely to start to wobble over time, but you could definitely get by with nails if they are long enough (and be sure to use wood glue). :)
DeleteManaged to get a Trend pocket hole jig in the UK, the screws are a little tricky to find but hoping that won't be the case forever. Great little tool!
DeleteSo glad you were able to find one! It's one of my favorite tools!
DeleteI just completed it now I gotta pretty it up
ReplyDeleteThat's my favorite part! :) Have fun!
DeleteNewbie:
ReplyDeleteWhat I'm doing wrong because when I price the wood I'm not coming up with $22.00? I'm using HD website. I have kreg but I'm not sure where to put the holes
Hi! That was the price at my local store when I wrote these plans 8 years ago. Prices can vary by location and have also gone up since then! When I price it out now it's closer to $50. :)
DeleteHere is a quick rundown of the pocket holes:
legs - just the top end
side supports - both ends
back/front supports - both ends
top supports - both ends AND along the top edge
table top - along one long side of each board (you'll attach them together side-by-side to for a solid top before attaching it to the base)
Hope that helps!
Can you please help with the dimensions for the desk that Lee Ann built?
ReplyDeleteSorry, I don't have specific measurements for that. You can easily adjust the plans to whatever size you need just by changing the length of the top boards and front/back supports (for example you can reduce the length of all of those boards by 12" to get a desk that is only 4' long instead of 5' long). Whatever size you need, just make sure you adjust them all by the same amount and it will still work out. Hope that helps! :)
DeleteWhy won’t any of the images pop up for this project?
ReplyDeleteI must say, that corner desk you showcased is quite impressive. The craftsmanship and design truly caught my eye. However, I find myself curious about a couple of details that I hope you can help me with.
ReplyDeleteThank you for sharing this wonderful piece of furniture with us.
Your attention to detail and craftsmanship truly shine through, and I look forward to learning more about the construction techniques and design choices behind this corner desk.