

Good gravy, guys. Only two days left! You can see links to the complete series here, and get details about my Lowe's gift card giveaway here. In this series, we're seeing what we can make out of 2x4's. I want to keep it cheap, keep it easy, and keep it totally doable for anyone. Today's project is super handy for all you crafty people - it's a Craft table!
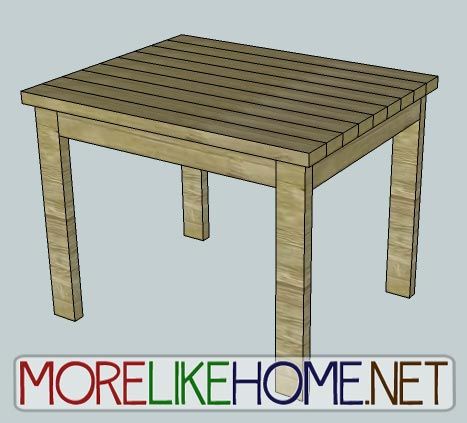
This table has a great workspace to spread out for all your crafty endeavors. Whether it's sewing, scrap booking, or painting, I'm sure you could use a little more room to spread out! I sized it to fit a space in my home, and you can easily adjust the measurements to fit whatever space you need. Not too crafty? This would also be a great dining table for small spaces, or you could tuck a chair under it for a great desk! Let's build it!
Shopping List:
7 - 2x4s @ 10' long
1 - 2x4 @ 8' long
Tools:
Saw
Drill
2 1/2” screws (or Kreg Jig & 2 1/2" self tapping screws)
4" screws (or Kreg Jig & 2 1/2" self tapping screws)
Wood glue
Wood filler
2x4 Cut List:
(A) - 4 @ 28 1/2" (legs)
(B) - 2 @ 30" (front/back)
(C) - 3 @ 26 1/2" (sides/support)
(D) - 9 @ 39" (top)
Dimensions: 39" wide x 30" tall x 31 1/2" deep

Please read all the directions before beginning, and cut your pieces as you go, measuring before each cut. Use 2 1/2” screws or pocket holes with 2 1/2" pocket screws unless otherwise indicated. Always use glue. Pre-drill and countersink your screws. I have not built from these exact plans, so measure lots to make sure things work out!
Step 1: Build the Base
Start by using one front/back board (B) to connect two legs (A) as shown below. The front/back board should be flush with the top of the legs. Attach it using a Kreg Jig, or by drilling through the legs into front/back boards with 4" screws. Use glue. Repeat to connect the other set of legs.

Now use the side/support boards (C) to connect the two leg sections you just built. One side board should be flush with each end of the leg sections, and the third board should be centered in between with 16 1/4" of space on either side. All these boards should be flush with the top of the leg sections. Attach them with a Kreg Jig and pocket hole screws, or by drilling through the legs & front/back boards into each support board with 2 1/2" screws. Use glue.

Step 2: The Top
Now you can install the top boards (check for square first by measuring corner-to-corner in both directions. The measurements will be the same if the table is square). Lay the top boards side-by-side, centered on top of the table base with a 1" overhang on all sides. Once the boards are in place, drill down through each board into the supports and legs below with 2 1/2" screws and glue.

Step 3: Finishing
Start by filling any holes and sanding everything smooth. Then finish it off with paint or stain and polyurethane. Be creative and have fun! Want a few ideas? Well, I always love a rustic stain finish.
You could do a two-tone look by staining the top and painting the legs a crisp white.

Or you could also paint the top in another fun color. Maybe a pale blue or green?

Add a fun punch of color by going bold with the whole table. Try a deep navy or sunny yellow. Have fun with it!

Project 2x4 Cost:
$22.40 - 7 2x4s @ 10' long ($3.20 each)
$2.50 - 1 2x4 @ 8' long ($2.50 each)
$24.90 Total
See giveaway winners here.

Share on Facebook

I could definitely use some crafting space!
ReplyDeleteCrafty
ReplyDeleteThanks for the contest!
ReplyDeleteScrews aren't free
ReplyDeletewhere can you buy 4" screws?
ReplyDeleteamazon
Delete^Thank you! :)
Delete4 inch screws are too short.
ReplyDeleteWe strongly encourage a Kreg Jig for all the 2x4 projects! So much easier than trying to get these long screws through.
Delete4" screws are listed as an alternative for those who don't have/can't afford the Kreg Jig. Since you countersink the screws you'll get over 1/2" into the front/back boards. Once you add glue and attach the top boards that should further hold everything together. And of course, you're welcome to just buy longer screws if you prefer. :) Thanks for visiting!
This comment has been removed by the author.
ReplyDeleteI finally decided to do this project as a dining room table with the help of my best friend!
ReplyDeleteDo you glue first then screw?, how long do you wait between glue drying, staining and finish coat?, to me this looks like a 3 day project since all directions say to way 10 to 24 hours for individual parts of the process to dry....
Glue first then screw, yes! You should check the instructions on your items because there is a pretty wide range of drying times. I think glue is generally 4-8 hours to dry (but I'm sure we've stained immediately after sanding at least twice. we didn't have problems but I can't guarantee it). Most of the stains & polys we've used have been 10-12 hours to dry between coats, with a longer wait after the last coat (24 -48 hours) to let it cure so it won't be scratched easily. So yes, it usually ends up being a couple days start to finish which is I know is frustrating when you're excited to get it done! But it's worth it. Have fun!
DeleteAnd I would love to see a pic when you are done! :)
DeleteLooking at a few different Kreg-jigs on-line; price is an issue for me... Would the pocket jig work for this? I believe their HD jig might be my cheapest decent option, but i'm not sure. Your site is absolutely inspirational; I stare at it every day, saving up for materials and I can't wait to get started!!!
ReplyDeleteWHAT TYPE OF WOOD WOULD YOU USE OR DID YOU USE IN PARTICULAR? I LIKE TO MAKE THIS AS A DINNER TABLE, BUT WOULD LIKE IT TO BE STURDY, YET NOT BREAK MY LIL PIGGY BANK.
ReplyDeleteDo you think this could hold 200 lbs?
ReplyDeleteI haven't weight tested this so I can't make any guarantees, but I would expect it to hold that much. You could add an extra support board for good measure. :)
Delete