

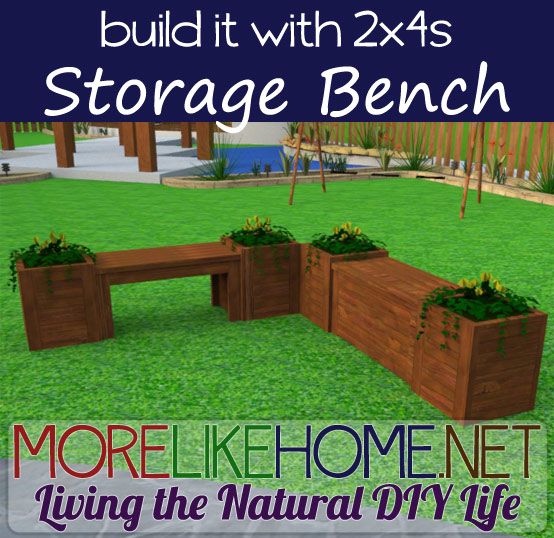
I hope you found a fun way to use yesterday's project! You can see links to the complete series here, and enter my Lowe's gift card giveaway here. In this series, we're seeing what we can make out of 2x4s. I want to keep it cheap, keep it easy, and keep it totally doable for anyone. Today's project goes along with yesterday's post - we're building an outdoor storage bench!
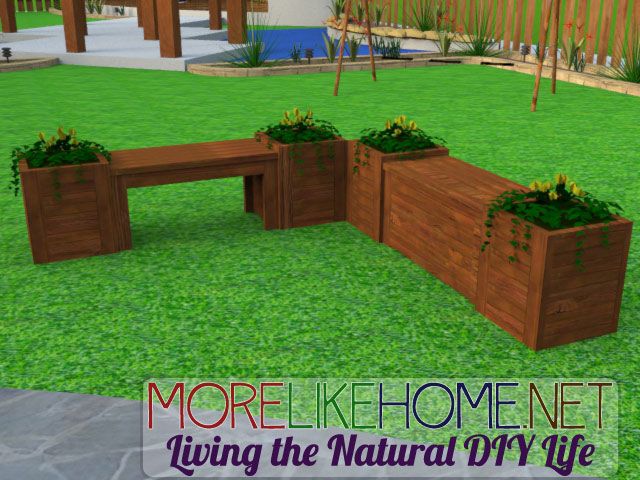
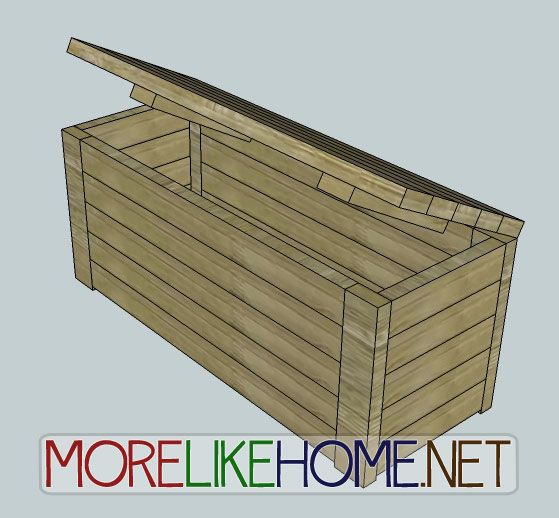
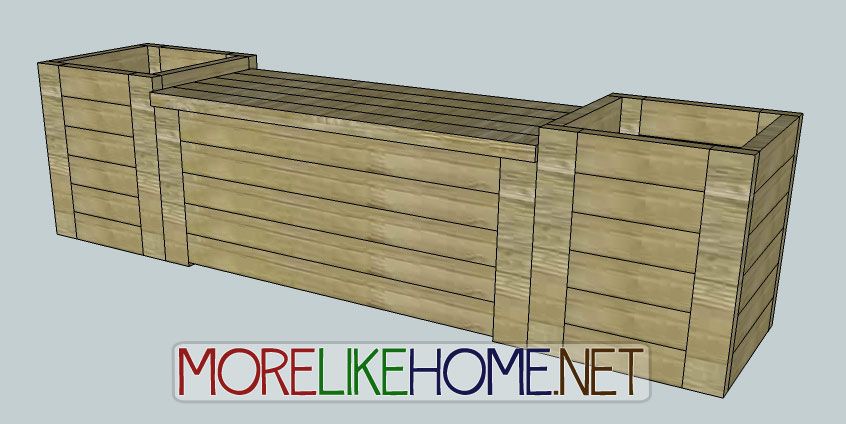
This bench has a hinged lid so you can easily tuck away extra toys or gardening supplies. Plus it's the perfect size to pair with the bench & planters we built yesterday! But it would also be great as a toy box or for extra storage in the entryway. Ready to build one?
Shopping List:
8 - 2x4s @ 10' long 1 - 2x4 @ 8' long
2-3 hinges
Tools:
Saw
Drill
2 1/2” screws (or Kreg Jig & 2 1/2" self tapping screws)
4" screws (or Kreg Jig & 2 1/2" self tapping screws)
Wood glue
Wood filler
2x4 Cut List:
(A) - 4 @ 18" (legs)
(B) - 10 @ 38" (front/back)
(C) - 10 @ 14" (sides)
(D) - 2 @ 13" (top supports)
(E) - 5 @ 45" (top)
(F) - 12 @ 14" (bottom)
Dimensions: 45" wide x 19 1/2" tall x 17" deep

Please read all the directions before beginning, and cut your pieces as you go, measuring before each cut. Use 2 1/2” screws or pocket holes with 2 1/2" screws unless otherwise indicated. Always use glue. Pre-drill and countersink your screws. I have not built from these exact plans, so measure lots to make sure things work out!
Step 1: Build the Front & Back
Start by using 5 front boards (B) to connect two of the legs (A) as shown below. The front boards should be flush with the top edge of the legs and have a 1/2" gap at the bottom of the legs (to allow for circulation and such. if you want more space you can make the legs a little longer, or omit the bottom front board and leave 4" of space at the bottom.). Attach the front boards using a Kreg Jig and 2 1/2" pocket hole screws, or by drilling through the legs into the front boards with 4" screws and glue. Repeat to build the back side. **note: the legs are actually 18" long, not 17 1/2" as pictured**

Step 2: Sides
Now use the side boards (C) to connect your front and back boards. Use 5 side boards on each end of the bench. The sides should be flush with the top and outside edges of the legs, and the bottom should be 1/2" above the bottom of the legs (if you omitted the bottom front/back boards, do the same on the sides). Attach the side boards using a Kreg Jig & 2 1/2" pocket screws or by drilling though the legs into the sides with 2 1/2" screws and glue. **note: the legs are actually 18" long, not 17 1/2" as pictured**

Step 3: The Top
Lay the top boards (E) side-by-side with the ends flush. If you have a Kreg Jig you can go ahead and attach these boards to each other to make a sturdier top. If not, it's okay!

Lay the top support boards (D) on the top pieces. You want the support boards centered depth-wise on the top with 2 1/4" of space at either end. Space them width-wise about 8" in from each end. Attach the supports by drilling down through them into each top boards with 2 1/2" screws and glue.

Step 4: The Bottom
Now turn your storage bench over and attach the bottom boards (F) as shown below. These should be flush across the bottom of the front, back, and sides. I designed this for the bottom boards to sit side by side with no gaps, but if you are worried about drainage or anything you could omit a bottom board or two and leave a narrow gap between the boards. Attach the bottom boards using a Kreg Jig & 2 1/2" pocket screws or by drilling through the front & back into each board with 2 1/2" screws and glue.

Step 5: Finishing
If you want your lid to be hinged, go ahead and attach the hinges according to the manufacturer instructions. Now you can fill any holes and sand down the whole box. Now you can finish with paint, stain, or polyurethane. If you plan to use your storage bench outside, be sure to choose a sealant/finish that is recommended for outdoor use. :)
And be sure to build a couple 2x4 planters to go with it!
Project 2x4 Cost:
$25.60 - 8 2x4s @ 10' long ($3.20 each)
$2.50 - 1 2x4 @ 8' long ($2.50 each)
$26.10 Total
See giveaway winners here.

Share on Facebook

This would be good for our pool supplies that are always in the way!
ReplyDeleteOh goodie! I can attach this to my planter bench I spent all night constructing.
ReplyDeleteThis is great!
ReplyDeleteI really need one of these! Maybe two!
ReplyDeleteI love that it is double-functional!
ReplyDeleteI made this storage bench this weekend. A lot of sweat but it turned out great!
ReplyDeleteThanks!
I'm thinking .....CEDAR 2x4's and you've got a great storage area for comforters in front of the bed....and a seat to boot.....
ReplyDeleteI love that idea!
DeleteThis is great! Any suggestions on how to waterproof the entire bench? (top, sides, etc.) Thanks!
ReplyDeleteYes! There are outdoor finishes available at most home improvement stores. For our outdoor furniture we decided on a 2-in-1 deck stain & sealer. To make sure every surface was waterproof, we actually cut all the pieces and stained the sides of each piece individually before assembly. :)
DeleteI like the plans but to leave 1/2 inch at bottom would need 18 inch legs right? 5 x 3.5 is 17.5
ReplyDeleteYes! So sorry, I marked my measurements to the bottom of the side boards instead of the bottom of the legs. I'll make a note up in the plans. Thanks for pointing that out!!
DeleteWow I love the bench seat, what a clever idea.
ReplyDeleteAny suggestion on type of hinges for the top?
ReplyDeleteHi, I would probably try a T hinge (like these http://amzn.to/1PrLAyH), but really you could get by with just about anything since it doesn't have to support hanging weight like a door. :)
DeleteHi. Love this idea but worried about trapped fingers,smacked heads from the lid being shut,any options for a slow closing lid. Uk
ReplyDeleteHi! A weight rated lid support would be a great way to protect little fingers and heads. You'll need to use regular hinges with it. Look for something like these: http://www.hardwaresource.com/hinges/specialty-hinges/chest-hinges-box-hinges-lid-supports/toy-box-lid-supports/toy-box-lid-supports-weight-rated
DeleteCost for the wood in the Uk today £54
ReplyDeleteThanks for sharing! I get a lot of questions about current prices! :)
DeleteCost today FOR 2 benches a smaller one and a long one , i'm make it a L shape FOR my small balcony with stain hinges and sealant 89$ from Home Depot but I used untreated 2x4's if u use treated the cost would be around 130 for 2 thank you for the plans!
ReplyDeleteThanks so much for the feedback!! I'd love to see your benches when you're done. Have fun!
Delete