

Day 25 - let's get started! You can see links to the complete series here, and learn about my Lowe's gift card giveaway here. In this series, we're seeing what we can make out of 2x4's. I want to keep it cheap, keep it easy, and keep it totally doable for anyone. Today's project is another favorite. We're building a simple modern nightstand!
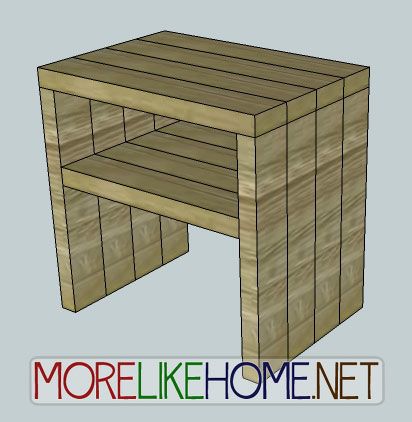
This night stand is super easy to build and had a fun chunky modern style. It has a shelf perfect for stashing a couple books or magazines out of sight. The space underneath can hold a basket for extra blankets, a garbage can, or even makes a great place to tuck away your slippers. Ready to build your own nightstand?
Shopping List:
2 - 2x4s @ 10' long 1 - 2x4 @ 8' long
Tools:
Saw
Drill
2 1/2” screws (or Kreg Jig & 2 1/2" self tapping screws)
4" screws (or Kreg Jig & 2 1/2" self tapping screws)
Wood glue
Wood filler
2x4 Cut List:
(A) - 8 @ 18 1/2" (sides)
(B) - 4 @ 17" (shelf)
(C) - 4 @ 20" (top)
Dimensions: 20" wide x 20" tall x 14" deep

Please read all the directions before beginning, and cut your pieces
as you go, measuring before each cut. Use 2 1/2” screws or pocket holes
with 2 1/2" screws unless otherwise indicated. Always use glue.
Pre-drill and countersink your screws. I have not built from these exact
plans, so measure lots to make sure things work out!
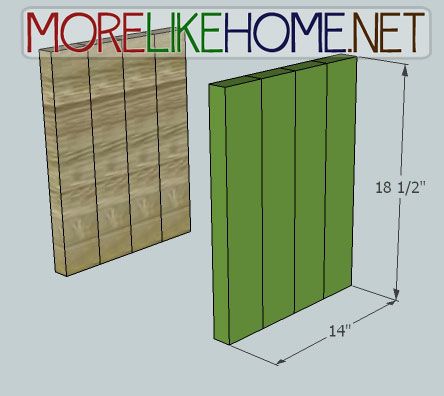
Step 1: The Sides
Start by building the sides. Attach four side boards (A) side by side as shown below. Attach them using a Kreg Jig and pocket hole screws, or by drilling through the sides of each board with 4" screws. Use glue. Repeat to build the other side. **Measure the height of your mattress. If you want the height of you nightstand to match, adjust the height of the legs.**
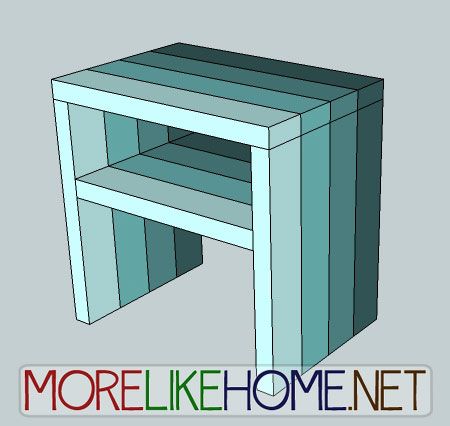
Step 2: The Shelf
Use the shelf boards (B) to connect the two sides. Start by attaching the four shelf boards to each other side-by-side using a Kreg Jig or by drilling through the sides of each board with 4" screws and glue. Once you've attached the boards to make one solid shelf piece, attach that to the side pieces. You should have 6" of space above the shelf and 11" below. **If you changed the height of your legs, these measurements will be a little different.** **Also note if you're using a Kreg Jig you will need to attach the top boards first, then do the shelf.

Step 3: The Top
Now you can attach the top. If you want you can attach the top boards together side-by-side, but as long as you attached the legs and shelf together you don't really need to do the top. The top boards should be flush across the front, back, and outside edges of the sides. Attach the top boards by drilling down through each board into the sides with 2 1/2" screws and glue.

Step 4: Finishing
Start by filling any holes and sanding everything smooth. Then finish however you like! This would look great with anything from a rustic stain to crisp white paint.
Or get creative and try a fun ombre effect with paint or stain. Have fun!

Project 2x4 Cost:
$6.40 - 2 2x4s @ 10' long ($3.20 each)
$2.50 - 1 2x4 @ 8' long ($2.50 each)
$7.90 Total
See giveaway winners here.
Check out this beautiful nightstand by Accidental Suburbanites! She has a blog post with all the details here, including how she made it without a Kreg Jig.

And a big thanks to Matt for sharing a pic of his finished night stand! Matt says it's finished with Cabot Aged Leather stain ± sealer. Great job!!


Share on Facebook

Cute and easy.
ReplyDeleteSo simple! Love the ombre!
ReplyDeleteNice.
ReplyDeleteI like it!
ReplyDeleteI want to make two!
ReplyDeleteThe ombre art is fun with 2x4's.
ReplyDeleteI actually made one today. But unless you already have the screws, glue, sandpaper, and paint it costs a lot more then $8.
ReplyDeleteTrue. At least now you won't have to buy them for your next project! :) I'd love to see pics if you have some!
DeleteI know this is my second comment in two days but I made the bar stool from your plans and wanted to share this one I completed tonight with you too. I kept this one rustic looking by not filling the holes and staining/poly. It was for a different area. It came out quite nice thanks to your plans! Thank you again! Here is the link: https://docs.google.com/file/d/0B3gzCJwNfqXSa0FLU18zT0Y5UXM/edit?usp=sharing
ReplyDeleteWow! Another great build! I'd love to share the pic, too, if you don't mind! LOVE the rustic finish you used.
DeleteAbsolutely you can share. The finish was Cabot Aged Leather stain ± sealer.
DeleteBeautiful job on the nightstand Matt!
ReplyDeleteThat's a great finish.
Thanks, Val!
DeleteWhere could I find the plans for the bed frame that was pictured with these night stands and headboard on previous day?
ReplyDeleteSorry, could you link the page with the picture you're talking about? It's been a couple years since I posted these and I can't remember this :)
DeleteJust built this one today, just need to sand and stain it yet. I used the Kreg jig for the entire thing but note if you do that instead of drilling down through all boards for the top that you need to attach the top before you attach the shelf or you wont have room to fit the drill in to attach it. This is the 2nd project I've done now from your plans, thanks!
ReplyDeleteThanks for the tip about doing the top first! I'll add a note up in the plans. Glad you're enjoying them! :)
DeleteI made this nightstand based on your plans.
ReplyDeletehttps://1drv.ms/u/s!AnF0ANnt_JdPr1A8NfMHEZFNSmvQ
This looks great! Love the extra shelf you added. :) Thanks for sharing!
Delete