

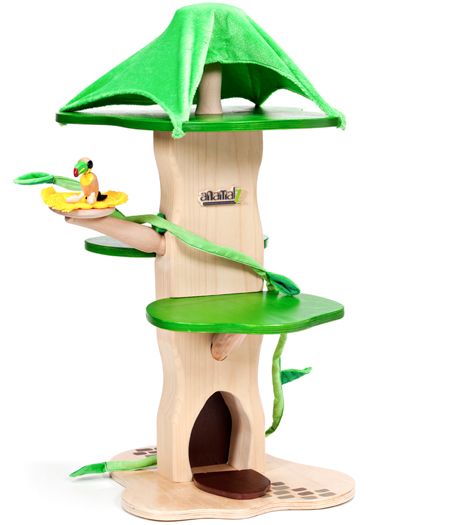
Our treehouse has lots of features like canopy at the top. Big Brother calls it the tent.

The perfect size for our little Anamalz bear (co-ops can be hit and miss to find them - you can buy the animals on Amazon but I can't find anywhere selling the treehouse right now).

He's also nice and cozy in the archway at the base of the tree.

There are two leafy green layers and a vine in case you have any monkeys in the jungle!

It stands just about two feet tall with lots of levels, including a little bird nest.

But enough chit chat! Ready to make your own treehouse?

Here's what you need to make one (but remember we were working from scraps here so feel free to improvise however you need to!):
- one 2x4 @ 19" long
- 1" diameter dowel rod @ 4 1/2" long
- one 1/2" plywood @ 12 x 10.5" (top)
- two 1/2" plywood @ 6 x 8" (shelves)
- one 1/4" plywood @ 6 x 6" (base b)
- one 3/4" plywood @ 12 x12" (base a)
- one 2" dowel rod @ 1" long (nest)
- 1/2 yard green fleece fabric
- 1/2 yard green quilting cotton fabric
- Kreg Jig (we used it to attach the shelves, but if you're creative you can get by without it)
- screws (I think we used 1" and 2" screws and 1.25" Kreg screws for different parts)

Start by preparing the 2x4 tree trunk. Cut it 19" long and if you want to keep it super simple you can use it just like that. We cut an archway through the base of the trunk that was about 2" wide and 3 1/2" tall. I used a small cup to draw the curved top. Draw the shape onto the wood and cut it out. A band saw would probably be ideal for this but we got by with our Dremel Trio and a router bit. The router was too short so we just had to mimic the shape on the back of the board and cut from both sides to make it all the way through. If you want you can also cut the sides of the trunk a bit wavy like the pic below to make it more interesting, but we decided that was too much work and went with a straight trunk. :)

Next cut out your plywood base pieces. But lets start with the method I used for cutting out all the plywood shapes. I started by drawing a square the size I needed on the sheet of plywood (for example this is a 1' x 1' square). I wanted them to be curvy free-style looking pieces so I would freehand a shape within the bounds of the square with rounded edges and wiggy lines (this isn't a great representation.. it's hard to draws curvy lines on the computer). Then I used our router to cut out the shapes.

So for Base A I started with a 1' x 1' square (I used 3/4" plywood and would recommend no less than 1/2" for this. If you're buying new plywood I would get 1/2 - 3/4" thick and use it for all the parts). For Base B I started with a 6" x 6" square (this can be any thickness as it's just for the pretty factor).

Stack base B centered on base A and glue them together.

Once the glue dries (so the pieces don't shift and make you pull your hair out. trust me.) attach the trunk by drilling through the bottom of the base into the sides of the arches. This can be a bit tricky. The way we did it was to set the trunk on the base where we wanted it to go and trace around each edge of the archway to mark their spots. Then we took the trunk off and drilled down through the base inside each marked spot (this guaranteed we would hit the "legs" later). Then we lined the trunk back up with the marked spots (with a little glue for good measure), flipped the whole thing over, drilled down through the holes into the sides of the arch, then used 2" screws to attach it.

Next we cut out the top piece, starting with a piece of plywood that was 12 x 10.5" (I used 1/2" thick and probably wouldn't go any thinner). I cut this one in a kind of figure 8 shape because I wanted the ends to be wider for attaching the canopy later.

Then I glued the dowel rod in the middle of the piece and drilled up through the bottom to attach it with a 1" screw (you can use the same trick as the trunk to make sure you hit it just right).

After that I glued this whole top section to the top of the tree trunk and drilled down into the trunk to attach it with two 1" screws (marked in red)

Next we cut out the two shelf pieces starting with pieces of plywood that are 6 x 8". These ones are a little different because I left a lip on each one to wrap around the side of the trunk. The lip dips in about 1/2" (so it's the full 6" deep on the right side and the rest is just 4.5" deep). And the right side of the lip (that top right corner) is 2" wide. Hopefully that makes sense. And why aren't those numbers on the drawing? I do not know. Probably someone had to go potty or decided to pour his own glass of milk or tried to eat paper when I was working on it.

Attach one shelf on each side of the tree, with the lips wrapping around opposite sides. We attached one 8" from the top and one 10" from the top. You can do whatever floats your boat. Or fits your animals. You can even add another shelf if you want! We attached them with the Kreg Jig by drilling pocket holes in the bottom of the shelf (plus some glue for good measure). Your other option would be to cut small triangles of wood to use as braces on the bottom of the shelves to attach them (and I actually plan to go back and add that myself to reinforce the shelves).

This didn't make the sketch, but the last part I built was a nest. I cut a 1" piece from a large dowl rod and drilled through the side to attach it to the tree trunk. Just to warn you - you can still see the screw head, and the dowel split a bit across one side. But we were okay with it for a cute nest so we just added some extra glue along the crack and pressed on.

Now the wood work is done and you can finish the piece however you like. If you leave the natural wood for any of it like I did, you'll want to at least do a coat of clear polyurethane on it to seal it (make it easier to wipe dust off and prevent stains if the kids spill on it). I used a combination of stain on the trunk, green paint on the shelves, and poly all over. Definitely go for a no-VOC paint & poly if you can since the kids will be all over it! You can get creative and do any colors/combinations you want.

The next job was making the canopy. I started by prewashing and drying the fabrics (mostly just to get rid of any nasties from the manufacturing or transportation). Then I actually draped a piece of the fleece over the top and and just cut and trimmed it until I like how it fit, making sure to leave extra for seam allowances (if you want a no-sew canopy you could skip the quilting cotton and just use one or two layers of fleece). It ended up being about this size:

I cut a matching piece from the quilting cotton and stacked them with right sides together. Then I sewed around the edges with a 1/2" seam allowance leaving a couple inches open for turning. I clipped the curved areas, flipped it right side out and tucked in the fabric at the opening. Then I topstitched around the whole thing with a 1/4" seam allowance. Once that was done I centered it on the top pole and wrapped the tails around to the bottom of the platform and stapled them in place. Like I said, you can skip the sewing and just go with a layer or two of fleece stapled in place. I added the quilting cotton to stabilize the fleece a bit since it is stretchy.

Next I used the extra quilting cotton to make a vine. And I have no pictures. Sorry! I'll try to explain how I did it.... I cut a strip 42" long by 1.25" wide. I folded it in half lengthwise and stitched along the long edge and across one end with a 1/4" seam allowance. Then I used a wooden skewer to slowly and painstakingly turn the tube right side out. I cut out a few leaf shapes and stitched them on here and there along the length of the vine. When the vine was done I stapled the raw end by the top pole and wrapped the vine around the pole a couple times to help anchor it. You know, so it will be a little harder for the monkeys to pull it off (you can see it in the pic above). You can add more vines or extra fabric "leaves" around the shelves if you like. Get creative and make it great!

And then I was done! Hello, little treehouse. Like I said, we dug through our scrap pile for all the wood so the only thing I actually bought for this project was the fabric. The quilting cotton was the cheapest they had and was about $0.75 with a coupon, and the fleece was from the remnant bin for about $1.25. So this treehouse only cost us about $2.00! Of course it will be more if you have to buy wood or screws too, but even then you will will come in well under $70!
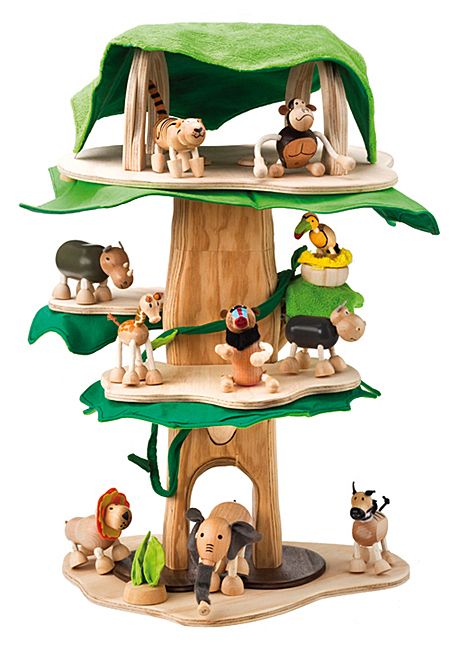
If you aren't able to find a deal on the Anamalz, don't sweat it! This treehouse works great with any animal toys or even dolls or action figures! We've found it's perfect for the animals from our Little People Noah's Ark.

And don't forget, this is Big Brother's reaction when he saw it Christmas morning:


So far he's really been enjoying it!

Does anyone else get nervous about making toys? I'd love to hear about any toys you've made or any favorite homemade gifts ideas for kids!

No comments:
Post a Comment