

I named it Shirley myself. If you need help naming your children just let me know. I'm obviously a REALLY good namer. And I make my own verbs. Yep, I'm a full package.
Now, down to business!
Please read all the directions before
beginning, and cut your pieces as you go, measuring before each cut. Use
2” screws or pocket holes with 1 1/4" screws unless otherwise indicated. Always use glue. Pre-drill and
countersink your screws. I typed these plans after building my piece and tried to double check all my numbers, but please watch out for typos. Measure lots to make sure things work out!
And don’t forget to
check out Ana White's tip's and suggestions for getting started!
Shopping List:
- 11 - 1x2's @ 8' long
- 1 - 1x3 @ 8' long
- 1 - 1x3 @ 10' long
- 1 - 1x4 @ 8' long
- 1 - 1x6 @ 8' long
- 1 - 1x10 @ 6' long
- 2x2 scraps
- 2 scrap plywood @ 10 5/8" x 16 1/4"
- 2 sets 16" corner-mount drawer slides
- 2 knobs or pulls
- 2" screws
- 1 1/4" pocket screws (optional, only if you have a Kreg Jig)
- 1 1/4" screws
- 1 1/4" finishing nails
- wood glue
Cut List:
- (A) 4 - 1x3 @ 33 3/4" (leg front)
- (B) 4 - 1x2 @ 33 3/4" (leg side)
- (C) 6 - 1x2 @ 18" (side rails)
- (D) 6 - 1x2 @ 29 3/4" (front & back rails)
- (E) 9 - 1x2 @ 16 1/2" (shelf slats)
- (F) 1 - 1x6 @ 27 3/4" (back panel)
- (G) 2 - 1x2 @ 27 3/4" (back trim)
- (H) 2 - 1x6 @ 15" (side panel)
- (I) 4 - 1x2 @ 15" (side trim)
- (J) 2 - 1x2 @ 27 3/4" (front trim)
- (K) 1 - 2x2 @ 5 3/4" (drawer divider)
- (L) 2 - 1x2 @ 18 3/4" (side drawer supports)
- (M) 1 - 2x2 @ 18 3/4" (middle drawer support)
- (N) 2 - 1x4 @ 10 5/8" (drawer back)
- (O) 2 - plywood scraps @ 10 5/8" x 15 1/2" (drawer bottom)
- (P) 4 - 1x4 @ 16 1/4" (drawer sides)
- (Q) 2 - 1x6 @ 12 1/8" (drawer front)
- (R) 2 - 1x10 @ 34 3/4" (table top)
- (S) 1 - 1x3 @ 34 3/4" (table top)
Dimensions:

(like I mentioned, I built this to fit snug-as-a-bug in a specific space. that's why none of my measurements are nice round numbers.)
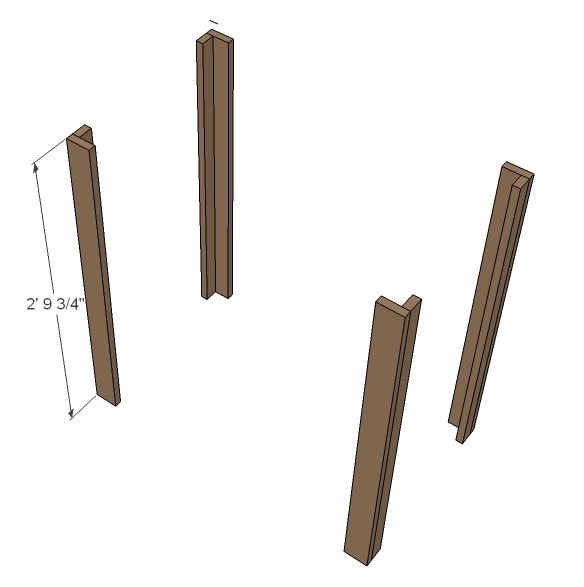
Step 1: Assemble the legs.
Attack the leg fronts (A) to the leg sides (B) to assemble all four legs. I did this by drilling through the leg front into the the leg side and attaching the pieces with 2" nails and glue.
Step 2: Attach the side rails.
Drill through the side rails (C) into the leg sides and attach with 1 1/4" nails & glue. The first rail should be flush with the top edge of the legs, the second should be spaced 5 1/2" down from there, and the last should be 17 3/4" down from there (which leaves 6" underneath).

Step 3: Attach front and back rails.
Drill through the front & back rails (D) into the leg fronts and attach with 1 1/4" screws and glue. Put the top rail flush with the top of the legs. Line up the bottom rails and second back rail with the side rails you attached in step 2. The second rail ON THE FRONT should be down 5 3/4", NOT 5 1/2" like the side rails. This will allow room for your drawer fronts.

Step 4: Shelf slats
Install the shelf slats (E) between the bottom set of front & back rails. You will have about 2" between each slat. Use glue and either screw or nail through the rails and into then ends of each slat, or use a kreg jig to attach the slats from below.

Step 5: Back Panel & Trim
There are two ways you can do the back. The way I did it was to first attach the back panel (F) to the back trim (G) pieces using a Kreg Jig to create one solid back piece. Then I screwed through the back rails into the back piece and attached it with glue & 1 1/4" screws. If you don't have a Kreg Jig, you could instead cut a piece of plywood to 27 34" x 8 1/2" and use the one piece in place of the panel & trim. (note: the back panel is 5 1/2", not the 5 3/4" that is shown)

Step 6: Side panels & trim
Next attach the side panels (H) & trim (I) in the same way as the back panel & trim in step 5. Again, you can use the three pieces as I've drawn or replace it with a single piece of plywood cut to 15 x 8 1/2". Repeat for the other side. (note: the side panel is 5 1/2", not the 5 3/4" that is shown)

Step 7: Front trim & drawer divider
Next attach the front top & bottom trim (J) by drilling through the front rails into the trim. Use glue & 1 1/4" nails. Then attach the drawer divider (K) using a Kreg Jig, or by drilling down through the trim & rails and using glue & 2" nails. The divider should be centered, with 13 1/8" on each side.
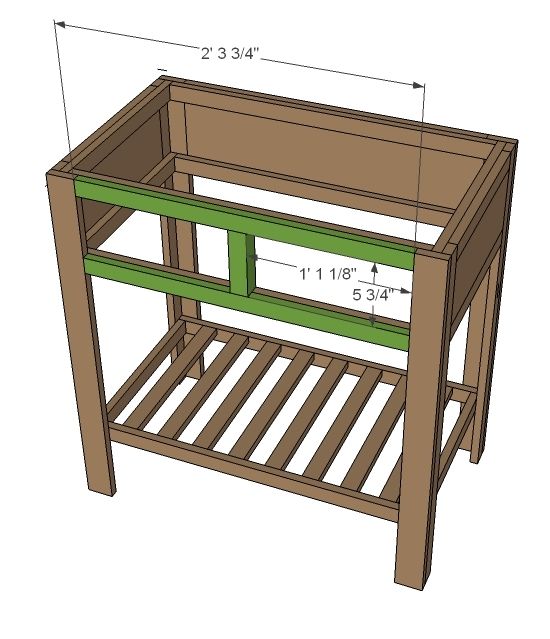
Step 8: Drawer supports
Next install your drawer supports. The side supports (L) should be attached flush with the inside edges of the legs in front & back, near the bottom of the drawer opening. Since our drawer boxes are shorter than the opening, you have have a good amount of wiggle room. Just make sure all your supports are at the same height. The middle support (M) should be at the same height and run from the drawer divider to the back of the unit. Measure to make sure the divider runs straight, it should have 13 1/8" on each side. You can attach all the supports using a Kreg Jig, or by drilling through from the outside with 2" nails and glue.

Step 9: Drawer boxes
First measure your drawer openings to be sure they are 13 1/8" wide. It is important that your drawer boxes be 1" narrower than the opening for your drawer slides to fit so adjust the drawer measurements if necessary. To assemble your box, start by attaching the drawer back (N) to the drawer bottom (O) using a kreg jig or screws & glue. Then attach the drawer sides (P) in the same way. Your box will look like this:

Step 10: Drawer slides
These drawers are designed to work with slides that mound on the bottom corners of the drawer box. Follow the package instructions to install them. (it shows the top in this picture, but it's much easier to do this before the top is installed so you can see what you are working with) Once your box is installed properly, you can attach the drawer front (Q). The drawer front should be 12 1/8" wide OR 1/4" smaller than the opening. Double check your opening size and size your drawer front as necessary. I put glue on the front edges of the drawer box, center the drawer front in the opening, and then nail through the front into the box. (you will have 1/8" gap all around the drawer)

Step 11: Install the top
If you have a Kreg Jig, start by connecting your table top boards (R) & (S) as show below to create one solid top piece. If you don't have a Kreg Jig, just set the pieces on as shown below without attaching them together. Align the top on your table - you'll have 1" overhang on each side, 1" in front, and 1/2" in back. Use glue and nail or screw down through the top into the legs and sides of the table.

Step 12 - Finishing
Fill in any holes and let dry, then sand everything smooth. Finish with paint or stain and polyurethane. Add hardware and you are done!

I don't have any pictures of it in place at the church yet, so these will have to do for now....


This was my first time doing drawer slides. It took a few attempts, but they eventually turned out pretty good. :)

This project cost me about $85 including finishing supplies.

Enjoy, and let me know if you give these plans a try!

Shirley turned out great!! I love the finish and knobs you used, too! :) Thanks for sharing your notes.
ReplyDeleteI love it! What color stain is that?? Thanks for sharing!
ReplyDeleteThanks! The stain is Minwax Dark Walnut. I put it on really heavy to get such dark saturation - actually didn't wipe any off like the directions on the can say to. It was an experiment, but I'm really happy with how it turned out!
DeleteI just wanted to say first I don't have an access to pallets just yet but I'm trying to find one. Second thing is I've never met anyone who was as close to me as you are. Your husband must be busy 24/7. I don't have one so I do it all myself. I live in Michigan and just as soon as it begins to warm up enough for me to go to the garage I have to put together my 2x4 raised garden beds I have 4 to make. This is my first winter in Michigan and I spent all summer gathering supplies at auctions. I'm on Medicare disability so it takes me longer but I can get it done. For the first time I have found that all the ex boyfriends I dated came into a good use they each taught me something so I can do these types of projects by myself. I like everything you have made and keep the ideas coming.
ReplyDeleteDebbie
Thanks so much Debbie! Good luck with your garden beds! :)
DeleteHello, I am having a hard time understanding what type of drawer slides I need. I did a search on corner slides and it came up with nothing. It is side mount, center mount or under mount side slides? Sorry for the trouble.
ReplyDeleteThanks. Greg Brimer
Hi! They are also called European drawer slides. Maybe that will help your searching? But you can use any kind of side mount as well, as long as they are still 1/2" wide. We've also recently used a side-mount that had a super smooth glide, plus full extension and it might be our new favorite! Hope that helps! :)
DeleteThank you!
DeleteI got mine done but can't figure out how to let you see it. Thank you for the plans. My future wife loved the piece.
ReplyDeleteI would love to see it! You can post photos on my facebook page or email them to me at MoreLikeHome (at) gmail (dot) com! :)
DeleteDrawer bottom is 161/4 deep on the cut list but I think it should be 15 1/2 deep as per the drawer illustration. Typo? Or am I messing up
ReplyDeleteI just had the same confusion this weekend! So maybe you're on to something :-) Luckily I just had to trim that piece down rather than cutting a whole new piece
DeleteYou're both right! It should definitely be 15 1/2". Thanks so much for pointing that out. I'll fix it now! :)
Delete