

Welcome back! You can see links to the complete series here, and get details about my Lowe's gift card giveaway here. In this series, we're seeing what we can make out of 2x4's. I want to keep it cheap, keep it easy, and keep it totally doable for anyone. Today project is yet another of my favorites in the series. We're going to build a Coffee Table with 2x4s!

This is a great chunky table with simple farmhouse flare! The 2x4 construction makes it super sturdy, too. And we'll be looking at a simple tweak to give you two different design options for the bottom section. Ready to get started?
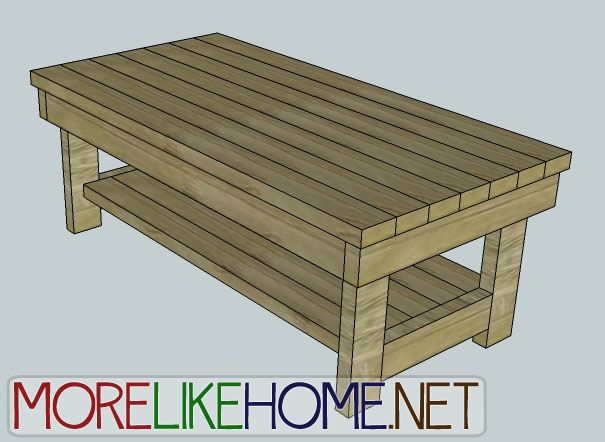
Design option #1 has a shelf on bottom for extra storage.
Design option #2 has a simple stretcher across the bottom instead.

Shopping List:
7 - 2x4s @ 10' long
1 - 2x4 @ 8' long
Tools:
Saw
Drill
2 1/2” screws (or Kreg Jig & 2 1/2" self tapping screws)
4" screws (or Kreg Jig & 2 1/2" self tapping screws)
Wood glue
Wood filler
2x4 Cut List:
(A) - 4 @ 16 1/2" (legs)
(B) - 2 @ 13 1/2" (sides)
(C) - 5 @ 41" (shelf) OR 1 @ 41" (stretcher)
(D) - 2 @ 44" (front/back supports)
(E) - 2 @ 23 1/2" (top side supports)
(F) - 1 @ 20 1/2" (center support)
(G) - 7 @ 48" (table top)
Dimensions: 48" wide x 18" tall x 24 1/2" deep

Please read all the directions before beginning, and cut your pieces as you go, measuring before each cut. Use 2 1/2” screws or pocket holes with 2 1/2" screws unless otherwise indicated. Always use glue. Pre-drill and countersink your screws. I have not built from these exact plans, so measure lots to make sure things work out!
Step 1: Build the Sides
Start by using a side (B) to connect two legs (A). The side should be set 2" up from the bottom of the legs and flush on the sides. Attach the support using your Kreg Jig & 2 1/2" pocket screws, or by drilling through the legs into the sides with 4" screws and glue. Repeat to build the second side section.

Step 2: Add the Shelf or Stretcher
Now attach the shelf boards (C) between the two side sections you just built. If you have a Kreg Jig, you can start by attaching all the shelf boards together side by side to create a solid shelf piece then attach the whole piece to the sides using your Kreg Jig. If not, just attach the boards one at a time by drilling through the sides and legs into the shelf boards using 2 1/2" screws and glue. The shelf should be centered on the side pieces with 1 1/2" of space on each side, and the top should be flush with the top edges of the table sides (with 4" of space below).

If you want the stretcher style, instead of doing the shelf just install a single stretcher board centered on the side boards (5" of space between the sides of the stretcher and inside of each leg).

Step 3: Supports
Start by attaching the top supports (D) to the front and back of the table as shown below. They should be flush with the top and outside edges of the legs. Drill through the supports and into the legs with 2 1/2" screws and glue.

Now you can do the end supports (E). These should be flush with the top and outside edges of the front and back support boards. Attach them by drilling through the side supports, into the legs and front/back supports with 2 1/2 nails and glue.

Next is the center support (F). This support runs between the front/back supports and is centered with 21 1/4" of space on either side. Attach it using your Kreg Jig, or by drilling through the front/back supports into the center support with 2 1/2" screws and glue.

Step 4: The Table Top
The table top boards (G) should be installed on the table with 1/2" of overhang on all sides. Once you have them all lined up and centered, you can attach them by drilling down through the table top boards into all the supports with 2 1/2" nails and glue.

Step 5: Finishing
Start by filling any holes and sanding everything down. Now you can use whatever paint/stain/poly you want to finish your table. Try a distressed or antiqued finish for a farmhouse feel.
Or maybe a bright coat of paint for a more modern twist! Be creative and find a finish you love.

Project 2x4 Cost:
$22.40 - 7 2x4s @ 10' long ($3.20 each)
$2.50 - 1 2x4 @ 8' long ($2.50 each)
$24.90 Total
See giveaway winners here.

Share on Facebook

Jeffrey will make it while we get Abby's ears pierced!
ReplyDeleteNice touch with the Hitchhiker's Guide! And nice table, too!
ReplyDeleteHa ha, my husband will be so glad someone noticed! It's his favorite book. :)
DeleteI don't like wimpy coffee tables. Someone invariably sits on them and breaks them. This one can handle what happens at my house.
ReplyDeleteThat does not look DIY--it's gorgeous!
ReplyDeleteI followed these instructions and made this. I added a few inches of height and added baskets underneath. It is absolutely perfect and sturdy! It only took one day. Thanks for the plans.
ReplyDeleteOh Vivian, I would LOVE to see a picture! If you have one to share you can post a link here, share it on our facebook page, or email me at morelikehome (at) gmail (dot) com. And let me know if you would like it added at the end of the plans! Thanks for commenting! :)
DeleteNewWW Where do you put your screws?
ReplyDeleteAre you planning on using a Kreg Jig?
DeleteHijacking this: what if you don't have a Kreg jig?
DeletePretty much wherever you can put them. :) For example, when you put on the top you'll screw down through each top board into the end supports and center support. When you install the shelf you'll want to drill through the sides and legs into the ends of each shelf board. For this method you'll want to pre-drill the holes with a countersink bit to sink the head of the screw into the board. This will leave an indent you can fill with wood filler to hide the screws when you are done. Hope that helps! Let me know if there are any specific parts you were wondering about!
Deletegreat project and plans; updated cost in 2024 is about $55
ReplyDelete