

Welcome to day 24! You can see links to the complete series here, and learn about my Lowe's gift card giveaway here. In this series, we're seeing what we can make out of 2x4's. I want to keep it cheap, keep it easy, and keep it totally doable for anyone. Today's project is an easy one that you can have LOTS of fun with - we're making art!

This is a easy (and cheap!) way to make a big thick "canvas" for your home.You can easily adjust the sizes to fit any space you need to fill. The finished product is super versatile and fun to make your own! Ready to make some cheap and easy art?
Shopping List:
2 - 2x4s @ 10' long
1 - 2x4 @ 8' long
Tools:
Saw
Drill
2 1/2” screws (or Kreg Jig & 2 1/2" self tapping screws)
4" screws (or Kreg Jig & 2 1/2" self tapping screws)
Wood glue
Wood filler
2x4 Cut List:
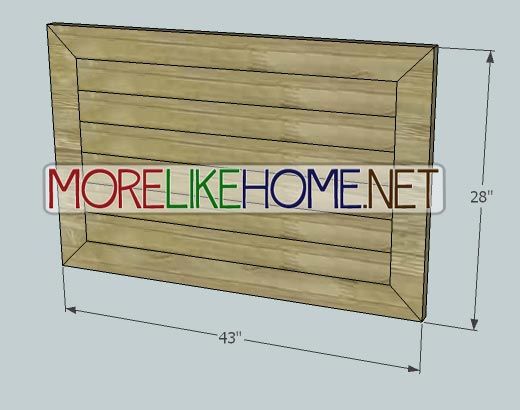
(A) - 6 @ 36" (center panels)
(B) - 2 @ 43" (top/bottom frame)
(C) - 2 @ 28" (side frame)
Dimensions: 43" wide x 28" tall x 1 1/2" deep
Please read all the directions before beginning, and cut your pieces as you go, measuring before each cut. Use 2 1/2” screws or pocket holes with 2 1/2" screws unless otherwise indicated. Always use glue. Pre-drill and countersink your screws. I have not built from these exact plans, so measure lots to make sure things work out!
Step 1: Make the Center Panel
Start by attaching all the center panel boards (A) side by side as shown below. Use a Kreg Jig to join them on the back, or drill through the sides to connect them with 4" screws. Use glue. **you can easily change the size of you canvas by adjusting the length and number of center panel boards here. Make them any size you like, then just adjust the frame pieces to fit!**

Step 2: Frame it
Start by cutting the ends of all the frame pieces at a 45 degree angle as shown below (the ends shouldn't be parallel). Then start attaching the frame pieces. The easiest way to go about it would be to start at one corner. Attach the top frame (B) and one side frame (C) as shown below. Make sure the corner fits nice and snug. Attach them to the center panel using a Kreg Jig or by drilling through the top/sides of the frame into the center panel with 4" screws. Use glue.

Now attach the remaining two frame pieces in the same way.

Step 3: Finishing
Start by filling any holes and sanding everything smooth... if you want to. Remember this is art, so if you want a rougher finish - go for it! Then finish it off however you like. Want some fun ideas?...
Paint the boards different colors for a fun graphic effect. Try an ombre effect!

These ideas are all via pinterest. If you want to pin them, please open them to pinterest and re-pin from there. I don't want to get credit for ideas that aren't mine! :)


Okay, we'll go ahead and stop here. There are just SO many possibilities for this project! Be creative and get some art on those walls!
Project 2x4 Cost:
$6.40 - 2 2x4s @ 10' long ($3.20 each)
$2.50 - 2x4 @ 8' long ($2.50 each)
$8.90 Total
See giveaway winners here.

Share on Facebook

This could be fun.
ReplyDeletethis project has lots of potential
ReplyDeleteI would have never thought of doing this.
ReplyDeleteSo many things that you could do!
ReplyDeleteIt looks good. I like the photo transfer.
ReplyDeleteVery cool ways to transfer photos!
ReplyDelete