

Welcome back! You can see links to the complete series here, and learn about my Lowe's gift card giveaway here. In this series, we're seeing what we can make out of 2x4's. I want to keep it cheap, keep it easy, and keep it totally doable for anyone. Today's project is probably the cheapest, easiest one in the series. We're building a little Step Stool!
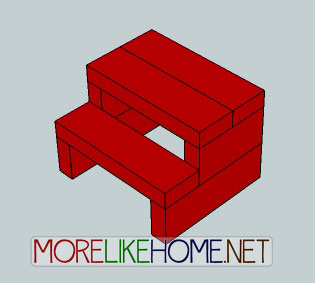
Great for helping little hands reach the sink, or little moms reach the top shelf of the cupboard - trust me, I know. :) Ready to build a step stool?
Shopping List:1 - 2x4 @ 8' long
Tools:
Saw
Drill
2 1/2” screws (or Kreg Jig & 2 1/2" self tapping screws)
4" screws (or Kreg Jig & 2 1/2" self tapping screws)
Wood glue
Wood filler
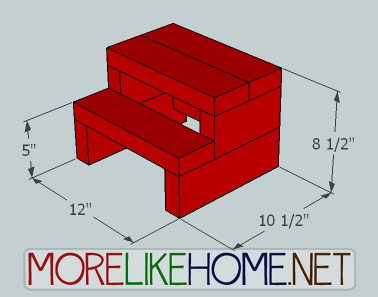
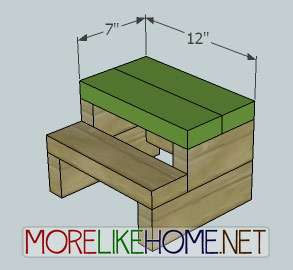
2x4 Cut List:
(A) - 2 @ 10 1/2" (bottom)
(B) - 2 @ 7" (top)
(C) - 3 @ 12" (steps)
(D) - 1 @ 9" (back)
Dimensions: 12" wide x 8 1/2" tall x 10 1/2" deep
Please read all the directions before beginning, and cut your pieces as you go, measuring before each cut. Use 2 1/2” screws or pocket holes with 2 1/2" screws unless otherwise indicated. Always use glue. Pre-drill and countersink your screws. I have not built from these exact plans, so measure lots to make sure things work out!
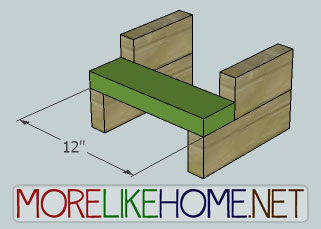
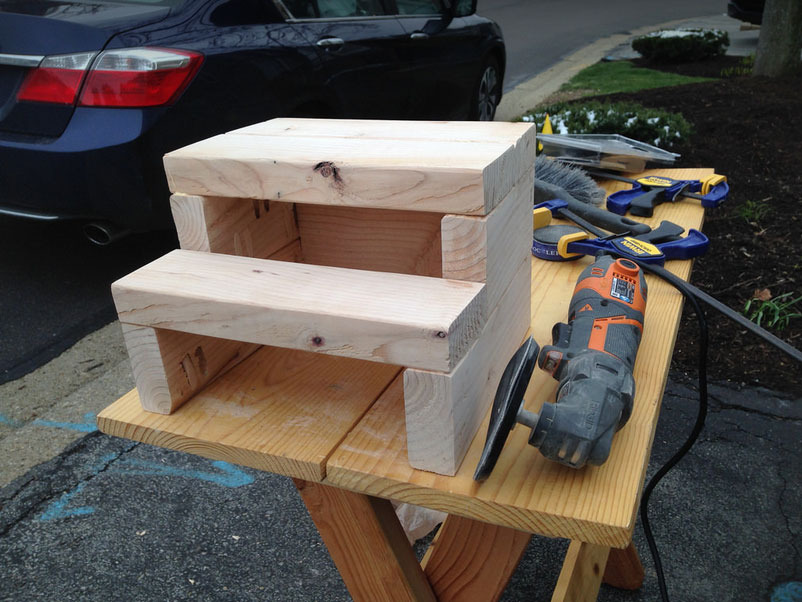
Step 1: Build the Sides
Start by attaching a front step (B) on top of a bottom step (A). The back edges should be flush, with 3 1/2" of space in the front. Attach them using a Kreg Jig or by drilling down through the top of the top step into the bottom step with 4" screws. Use glue!

Step 2: The Steps!
Attach the first step board across the top of the bottom boards. The front edge should be flush with the front of the bottom boards. Drill down through the step into the bottom boards with 2 1/2" screws and glue.
Now use the back board (D) to connect the back end of the side boards as shown below. Drill through each side board into the ends of the back board with 2 1/2" screws and glue.
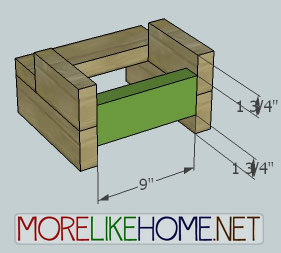
Next attach the remaining two step boards across the top of the stool. It should be flush around all sides. Drill down through the steps into the side boards with 2 1/2" screws and glue.
Step 3: Finishing
Start by filling any holes and sanding everything smooth. Then finish with paint or stain! If you don't want it to draw attention, paint it the same color as your cabinets or floor. Or use it as a fun accent with a bright coat of paint!
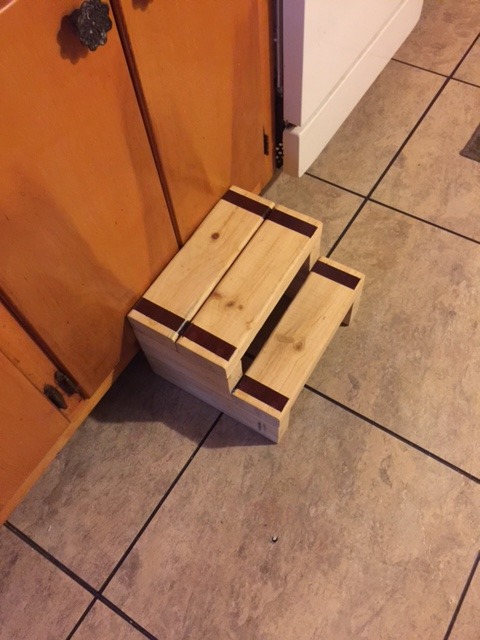
A big thanks to Louis for sending in our first finished step stool photo! It looks so pretty with Kreg Jig pocket holes hiding all the screws. Great job!
I love the accent Rogers added to his step stool!
Project 2x4 Cost:
$2.50 - 1 2x4 @ 8' long ($2.50 each)
$2.50 Total
See giveaway winners here.

Share on Facebook

This is great for little ones.
ReplyDeleteTry with 2x6 for a little bigger.
DeleteSimple, practical, and a perfect size for a little boost. However, mine won't be red. Maybe purple!
ReplyDeleteGreat boost for the whole family!
ReplyDeleteWho couldn't use one of these?
ReplyDeleteI actually love it in red. So fun!
ReplyDeleteSo cute!
ReplyDeleteStained mine with three coats of poly. Very nice indeed.
ReplyDeletewhat does it look like? I cant see any pictures.
ReplyDeleteHi! I just added a finished photo. :)
DeleteThanks for the plans! I used this project as my first project using Kreg pocket holes. Here is a picture https://www.flickr.com/photos/lugerla/26078344240/in/datetaken-public/
ReplyDeleteIt looks great! Would you mind if I share your photo up in the post?
DeleteThanks for the plans guys , it was so easy and didn't take long at all , ,, we bought a new washer and dryer , their awesome , but there's one problem , both washer and dryer all a little taller than the average, so the wife was having a very tough time getting the clothes out of the washer since the washers door it's on the top , she had to jump and the climb on the washer to be able to reach the clothes ... lol lol
ReplyDeleteand I had a 2 x 4 left from a project I did a year ago , so I was thinking how can I build a little stool with out having to buy more wood ... Well problem solved
It was easy and it only took me a couple of hours , because my little boy was helping ,, my wife loves it , no more problems getting the clothes out of the washer , lol lol
Thank you ,,,,
That's great! I'm glad you like it. And I love that you're building with your son! :)
DeleteBuilt this about a month ago out of some scrap 2x4 pieces I had around. I love it about as much as my 6 year old does using it to brush her teeth every day. It's very solid as I'm 6'5'' and almost 300lbs and I use it from time to time. I built mine without using the Kreg jig but just purchased one last night to build some other projects on here.
ReplyDeleteThat's great! Glad you're both enjoying it. :) And have fun with the Kreg Jig, it's a great tool to have around.
DeleteIt would be just as easy to create a little bit bigger one probably right? I would be using it for my old pup to get onto the bed, since lifting him every time is starting to weigh on my back. I'm not the most inclined at carpentry but this looks easiest enough.
ReplyDeleteYep, it's pretty easy to modify. You can make it wider and add more steps if you need to!
DeleteThis was really easy and turned out great! I added an extra step because we have high counters. To do this all you have to do is cut one more 12 inch board and two 14 inch boards for the bottom.
ReplyDeleteI'm so glad you liked the plans. And good call on the extra step. Thanks for the feedback!
DeleteThank you for the plans, this stool looks very nice and with a coat of minwax stain looks very professional. I just laughed though, I think there's a little typo with the overall dimensions: Dimensions: 36" wide x 73 1/2" tall x 17 1/2" deep ;-)
ReplyDeleteOh boy. That's a pretty big typo! Thanks for pointing it out! I'll get it fixed. :)
Deletecan someone tell me if these exact plans do work?
ReplyDeleteHi! If you scroll up through the comments several people have built this plan already. Hope that helps! :)
DeleteWondering if you can explain "Always use glue" and "Drill down ... with 2 1/2" screws and glue." Does that mean coating the screws with glue before screwing them in?
ReplyDeleteThanks for the plans. I look forward to trying them tomorrow.
In my experience it is using glue on the wood. So, coat your two pieces you are to connect with a thin layer of wood glue (elmer's works if you don't have wood glue), then screw them together. This helps to secure the wood more, and prevent any wiggling. The pre drilling before you screw is just to help prevent the wood from splitting. You take a drill bit that is just a tad smaller than the width of the screw, then you drill down just about a 1/2 inch or so before the length of the screw, so this would be about 2 inches if you are using a 2 1/2 inch screw. This just gives room for the screw, but still allows for the screw to really anchor in the last bit without pushing out and splitting the wood. I also just helps to guide the screw in the right path. If you don't pre drill you might end up with a screw angling out the side of the wood instead.
Delete^^That's it exactly! Thank you! :)
DeleteHi was wondering what I would have to do to modify this to have a third step? My niece is tiny and our counters are a little tall. Thank you so much! I am so excited to try this!
ReplyDeleteThank you!
Hi! I was wondering what you would do to modify this to have a third step? I can not wait to try this! Thank you!
ReplyDeleteHi! I was wondering what you would do to modify this to have a third step? I can not wait to try this! Thank you!
ReplyDeleteHi! To add a third step you’ll need to cut the bottom board 17 ½” long, the top board 14” long (it will now be a middle board) and cut a new top board that is 7” long. Stack them up and add the steps (you’ll need two extra step boards for the third step), and you’ll definitely want to add a second back board to stabilize it! Hope that helps! 😊
Deletelove this so much im doing this for a school project and this is amazing thx guys for this. One then the wood that is 9" it says it is (c) and there is two (c) but i don't care just thought i would let you know
ReplyDeletesup dude
Deletethis is perfect for my basic ag mech project thank you
ReplyDelete