
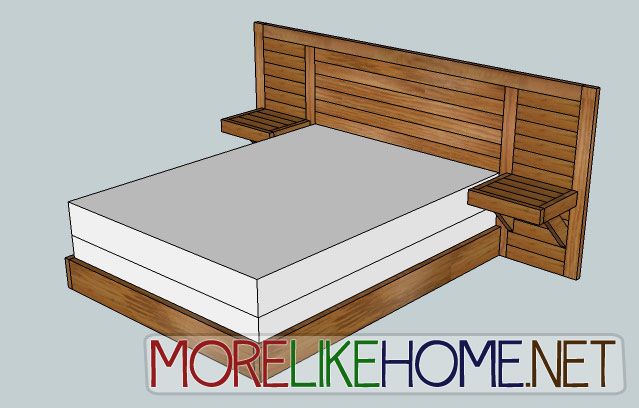
Today we're going to finish the bed we started yesterday (see the headboard plans here). You can see links to the complete series here, and get details about my Lowe's gift card giveaway here. In this series, we're seeing what we can make out of 2x4s. I want to keep it cheap, keep it easy, and keep it totally doable for anyone. Today's plans are for the nightstands and bed frame for the Simple Modern Bed.
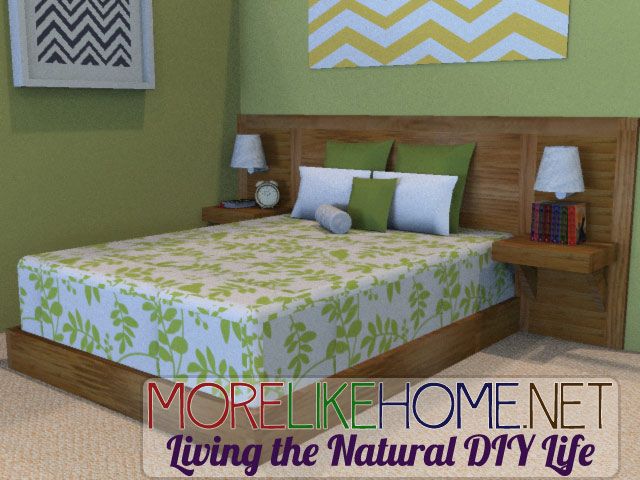
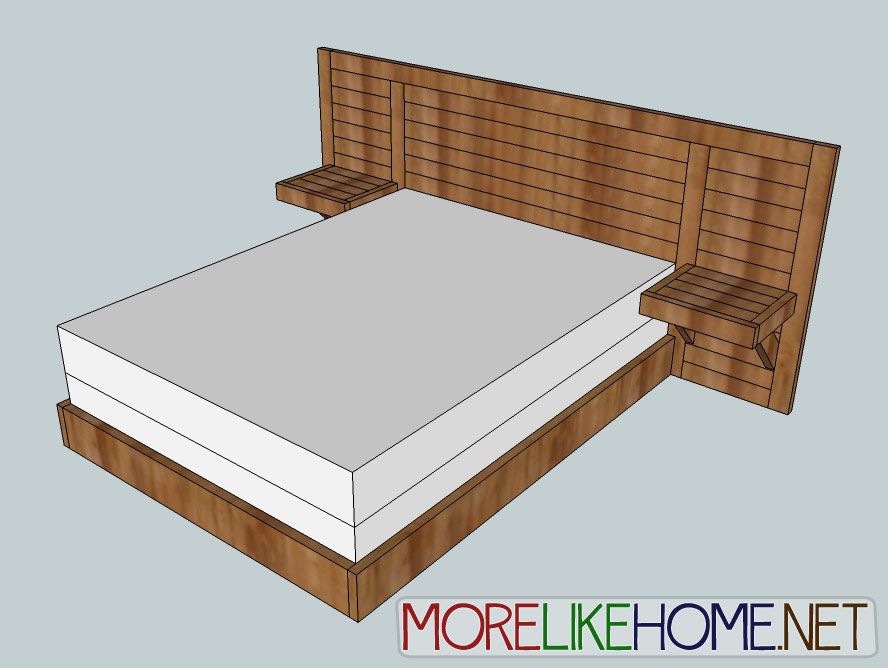
This simple, modern style bed has a unique long & low headboard with built-in nightstands. The plans are for a queen size bed, but could easily be adapted to other sizes. Like I mentioned yesterday, this headboard would make a statement in any room, but if you adjust the measurements to fill an entire wall in your bedroom it would be a show stopping feature! Let's get started!
Shopping List:
6 - 2x4s @ 10'
long
2 - 2x4s @ 8' long
3 - 2x8s @ 8' long
17 - 1x3s @ 8' long (or 9 @ 10' long if you can get them)
Tools:
Saw
Drill
2 1/2” screws (or Kreg Jig
& 2 1/2" self tapping screws)
4" screws (or Kreg Jig
& 2 1/2" self tapping screws)
Wood glue
Wood filler
2x4 Cut List:
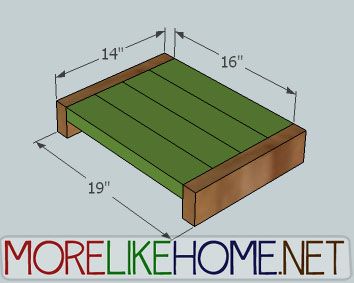
(A) - 4 @ 14"
(nightstand sides)
(B) - 8 @
16" (nightstand top)
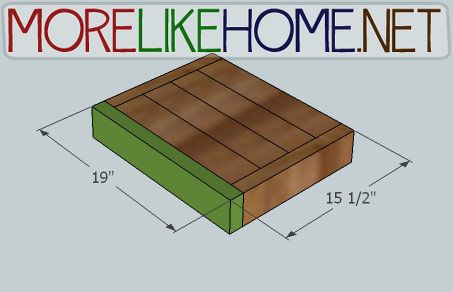
(C) - 2 @ 19" (nightstand front)
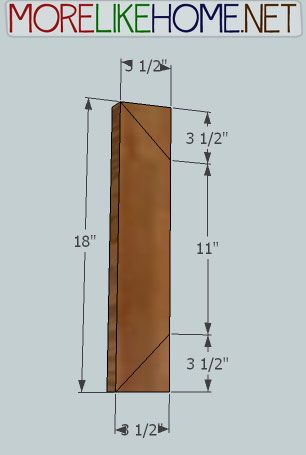
(D) - 2 @
18" (nightstand supports)
(E) - 3 @ 80" (bed supports)
2x8 Cut List
(F) - 2 @ 81 1/2"
(bed sides)
(G) - 1 @ 60" (bed end)
1x3 Cut List
(H) - 17 @ 60" (bed end)
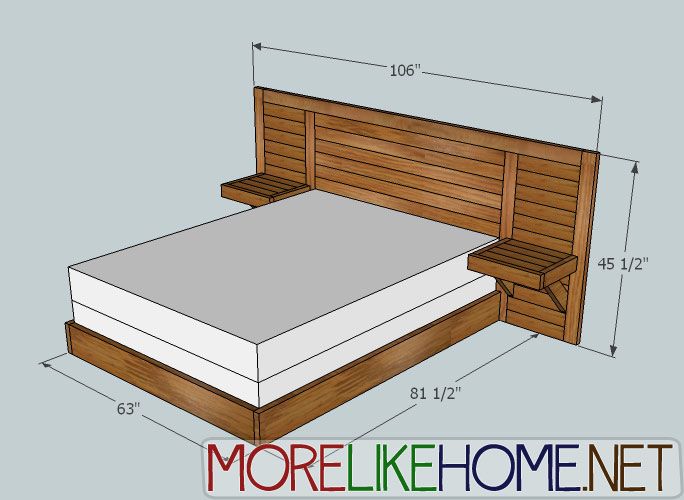
Dimensions: 106" wide x 45 1/2" tall x 83" deep
Please read all the directions
before beginning, and cut your pieces as you go, measuring before each cut. Use
2 1/2” screws or pocket holes with 2 1/2" screws unless otherwise
indicated. Always use glue. Pre-drill and countersink your screws. I
have not built from these exact plans, so measure lots to make sure things work
out!
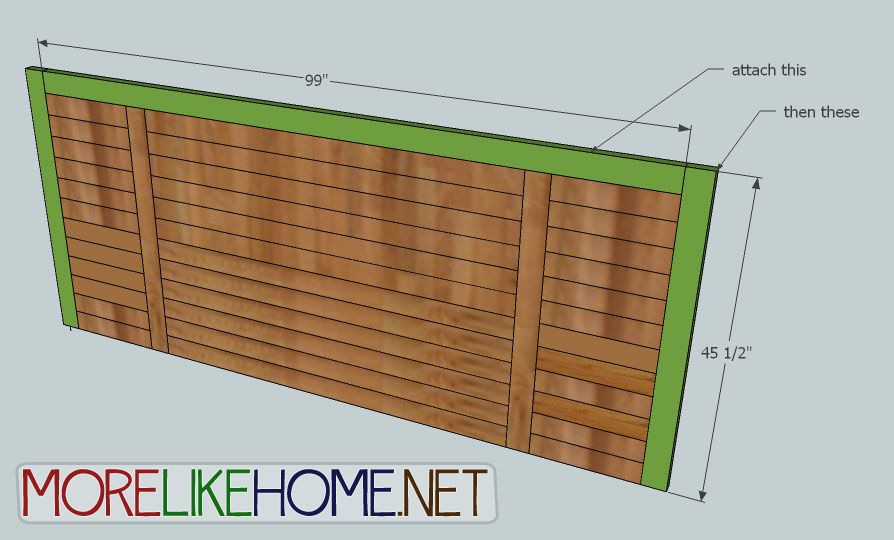
This is where we left off yesterday, see the complete headboard plans here.
Step 2: Build the Nightstand
Now we can start building the nightstands. Start by using four nightstand top boards (B) to connect 2 nightstand side boards (A) as shown below. Everything should be flush across the top. Connect these boards using your Kreg Jig and pocket screws, or by drilling through the sides and into the top with 2 1/2" screws and glue.
Then attach the nightstand front (C) in the same way, keeping all the edges flush.
If you don't plan to put anything heavy on your nightstand and want an even more simplified look, you could probably get by attaching the nightstand at this point. However, if plan to keep books or something else heavy on the nightstand you'll want to make these extra supports. You need to cut the ends of your supports (D) at 45 degree angles like this:
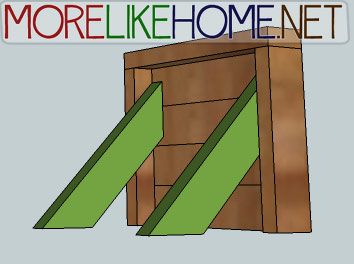
Then attach the supports to the nightstand top. Working on a level surface, stand the nightstand top up on its backside. Then set your supports in place, making sure the ends sit flat against the nightstand and flat against your work surface. Setting them up in this position will help make sure the pieces all line up straight when you attach this to the headboard. Once they are lined up, drill through the supports and into the table sides and attach with 2 1/2" nails and glue. Repeat to build the second nightstand.
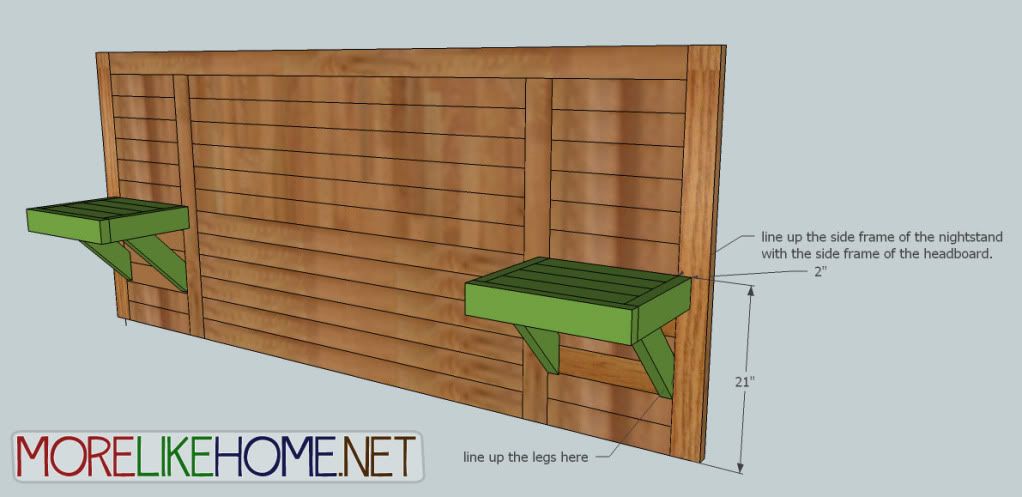
Step 3: Attach the nightstands to the headboard.
Before you attach the headboard, check how high off the floor your mattress/box springs will be. Based on the the thickness of my mattress & box springs I set the tops of my nightstands at 21" from the floor. If you don't have a box spring you will need to set yours lower, and if you are using a taller bed frame you will need to set them higher. To attach the nightstands, center them on the side panels of the headboard. Then drill in from the back of the headboard and attach with 2 1/2" (or longer) screws and glue.
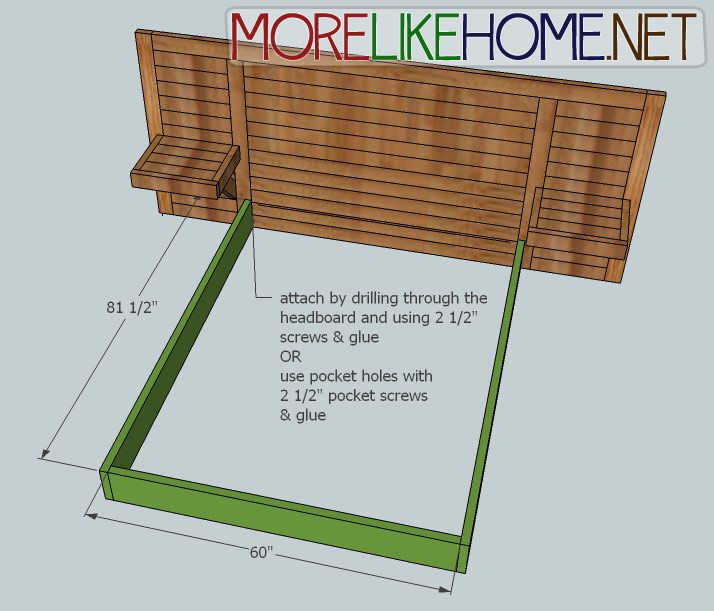
Step 4: Build the Bed Frame
Now we're going to build the bed frame. I used 2x8s sitting right on the floor for a low, modern look (and because it will be very easy to build). If you want your bed a little higher, you can construct this part with 2x10s or 2x12s instead (adjust your nightstand height accordingly). You'll probably need to do this assembly in the room since you won't be able to move it all together. Be sure to anchor your headboard to the wall!
Start by attaching the bed sides (F) to the the bed end (G). Use your Kreg Jig or 2 1/2" screws and glue. Then attach this frame to the headboard in the same way. The inside edges of the bed sides should line up with the inside edges of the center posts on the headboard (see pic below).
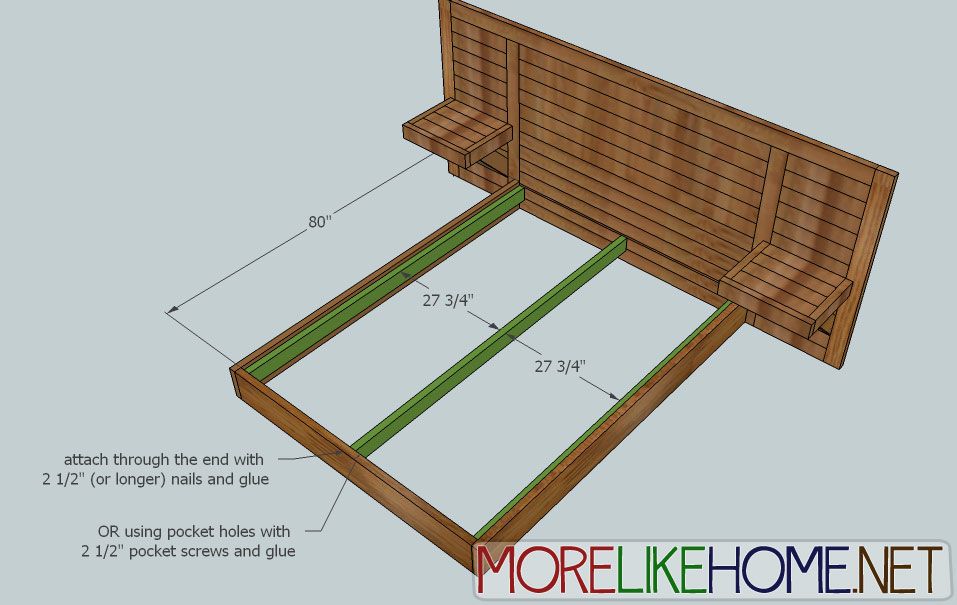
Now you can add the bed supports (E). Attach one support against each bed side using 2 1/2" (or longer) screws and glue. They should bed set down 1" from the top of the bed sides. Attach the third support along the middle of the bed, also set down 1" from the top edge of the bed sides and end. This will leave 27 3/4" of space between each support.
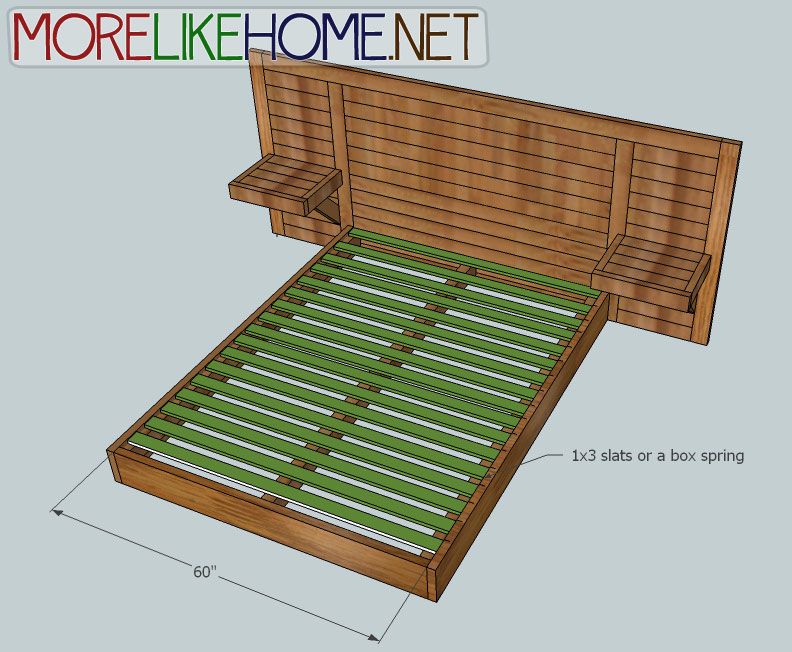
If you have a box spring it can sit right on these supports. If you just have a mattress, you'll need to add some slats (H) across the supports. Lay the slats on and just space them so they look pretty even. Drill down through the slats to attach them to the supports. Use glue.
Step 5: Finishing
Now you can finish your bed. Start by filling any holes and sanding everything down. Then spiff it up with any paint/stain/polyurethane you like! When you install the bed, be sure to anchor the headboard securely to the wall.
You can do all kinds of fun things with this big headboard. Like to read at night? Try installing some sconces right into the headboard. Or maybe hanging some family pictures above the nightstands. Be creative and find something you love!
Project 2x4 Cost:
$19.20 - 6 2x4s @
10' long ($3.20 each)
$5.00 - 2
2x4s @ 8' long ($2.50 each)
$19.50 - 3 2x8s @ 8' long ($6.50 each)
$25.16 - 17 1x3s @ 8' long ($1.48 each)
$68.86 Total
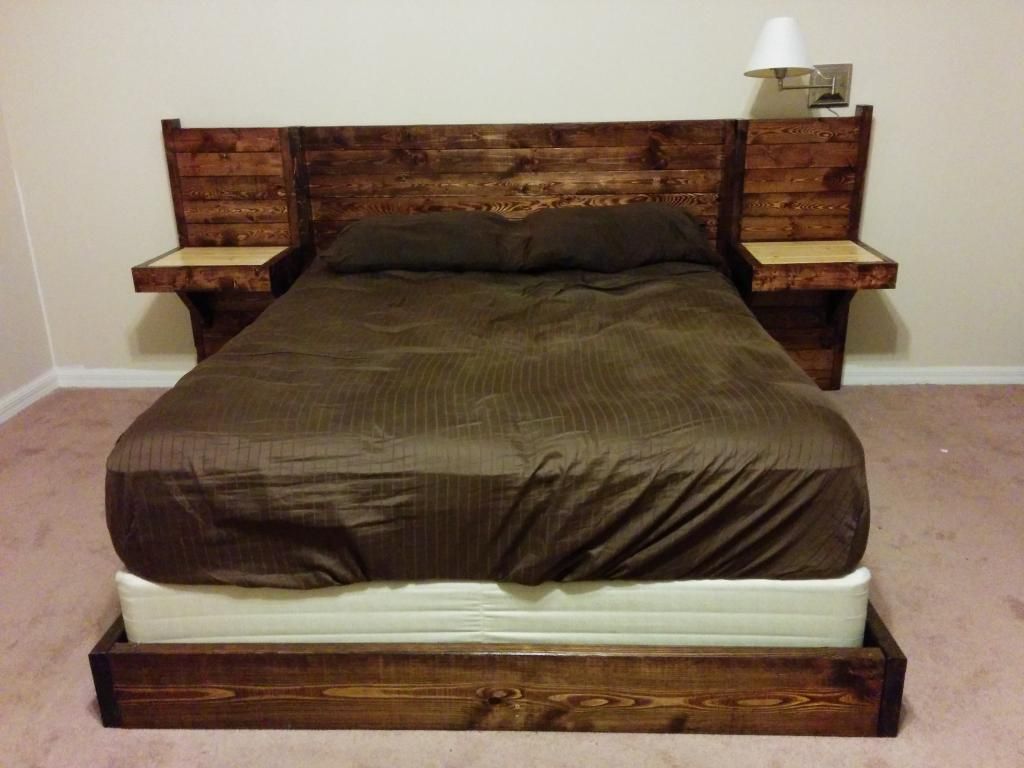
Thanks to one of our readers for submitting this photo of a completed bed! They modified it to be built without a Kreg Jig which left space behind the side boards for outlets, and I love the two-tone finish on the nightstands! You can see the full album here, including how they added lighting under the top edge. Thanks again!
Thanks to one of our readers for submitting this photo of a completed bed! They modified it to be built without a Kreg Jig which left space behind the side boards for outlets, and I love the two-tone finish on the nightstands! You can see the full album here, including how they added lighting under the top edge. Thanks again!
See giveaway winners here.

Share on Facebook

Thanks for giving instructions on how to finish off this project.
ReplyDeleteI think that I might have to do some math and adapt this to a king bed!
ReplyDeleteDid you figure out for king what u need as l would love to make this for king bed also
DeleteThis concept is really creative. I am planning to make a king bed frame, I like the design for the support under the box springs. Great Job!
ReplyDeleteI want to make myself a pallet bed soooo bad
ReplyDeleteIt looks like an IKEA bed--fun!
ReplyDeleteI am gonna send you some pics, using a Kreg. So that you can post some pics. Never could imagine it could be so heavy. I am just about done with the headboard piece.
ReplyDeleteThat would be WONDERFUL! I can't wait to see it! You can email me pics at MoreLikeHome at gmail dot com. :) I would love to add some pics to the post. :) And yes, 2x4's are heavy! I was surprised even at how much the bar stools weigh!
DeleteDo you happen to have the measurements for a cali king size mattress?
ReplyDeleteFor a cali king you need to adjust the wide of the center section of the headboard (http://www.morelikehome.net/2012/10/day-5-build-simple-modern-headboard.html) to 72" instead of 60" and do the same with the bed end (G). You'll also need to adjust the bed sides (F) to 85 1/2" instead of 81 1/2". You'll probably want to run some extra supports for the wider size, too. Hope this helps! :)
DeleteWhat if you need to take apart the bed frame? (For moving purposes) what do suggest so it doesn't get messed up during deconstruction?
ReplyDeleteThanks!
I would say definitely get a Kreg Jig! That way you can connect everything on the back, and you can just pop the screws out to take it apart into sections for easier moving. You could take the bed frame apart to move it and even break the headboard down into smaller sections. You would be able to pop it right back together, and the front should be unaffected since all the screws are hidden on the back. :)
DeleteSo in the interest of just using 2x4's could you put together 2 boards to make the 2x8's? It would cut down my cost( for some reason 2x8's are expensive here) and I could put them together with my kreg. Or would that mess with the stability and strength of the base?
ReplyDeleteStacking two 2 x 4's to make a 2 x 8 would work if you have clean edges and use glue in addition to the Kreg screws. If you carefully select your dimensional lumber from the big box store you can find those clean edges. I started build furniture from that type of stock but actually saved money by locating a good used planer and jointer then buying less expensive raw stock.
ReplyDeleteThanks for the tips! :)
DeleteWe made the full sized version of this bed. While it was around that price for the lumber. If you don't have the paint brushes, dust cloth, sanding paper, wood glue, filler, stain and poly. It is closer to $120. But still well worth it. It turned out great. We did not do the sides tables on the headboard either. We just did the part that covers the back of the bed and the base.
ReplyDeleteThanks for sharing! I generally only estimate for wood, so it's nice to hear a more complete cost for anyone starting from scratch. I would love to see pictures if you get a chance to take some! :)
DeleteHello! Has anyone made this bed in a normal king size? What were the measurements? I dont know if I am doing this right. Thank You!!!
ReplyDeleteHopefully you've found the answer, and sorry for the slow response! If not a king size mattress is 76" wide (a queen is 60") so you just need to add 16" to the bed end and slats (and all the boards in the center section of the headboard). Hope that helps! :)
Deleteam I blind or was there no PDF file for the plans? If I am blind please let me know I want to print out the instructions and PDF is so much easier to print :)
ReplyDeleteThe bad news is I don't offer PDF for any of my plans at this time. The good news is you're not blind! :)
DeleteWhat type of wood would you recommend?
ReplyDeleteWe usually go for basic stud lumber (which is usually pine) just because it's cheaper and easy to work with. And cheaper. Did I say that already? :) We've built most of our furniture with either pine or what Lowe's calls "whiteboard" and have been very happy with it, so we haven't dabbled with much else. Hope that helps!
DeleteThank you for these designs, I (as an amateur) was able to build my first bed frame. I found it very helpful to model the frame in Sketchup (https://www.dropbox.com/s/w7l3ipf4jwtth13/combined.skp?dl=0) and was able to make measurements and really visualize the final product.
ReplyDeleteI had to make a few changes since I did not have a kreg jig, but I'm very happy with my mods because it leaves space behind the sideboards for outlets.
Final product album: http://imgur.com/a/VeoxH#0
It looks great! Would you mind if I add one of your photos at the end of the plans? Thanks for sharing!
DeleteBy all means, please feel free
DeleteAdded above, thanks again!
DeleteHas anyone made this beautiful bed/headboard in a twin size yet? We're moving and I'd like to build this for my teen daughter's new room, but she only has a twin. Any adjusted measurements anyone may have would be very helpful before I try to map it out myself! Thank you!
ReplyDeleteHi, I don't know of anyone making a twin but I can help you with the measurements. A twin bed is only 39" wide and 75" long (a queen is 60 x 80") so you'll need to make a few simple changes.
DeleteThe slats, the end of the bed frame (footboard), and the boards in center section of the headboard need to be cut to 39" (instead of 60"). The long board across the top of the headboard needs to be 78".
For the length of the bed (this if for a standard twin. an XL twin is still 80" long so no changes are needed for the length), the sides of the bed frame need to be just 76 1/2" long and the bed support need to be 75".
Hope that helps! :)
I feel like this is going to be VERY heavy? is there a reasonable way to lighten the overall weight? Ive never built anything in my life, so i wanna start with this project. I feel as though i could use 1x8's for the center of the headboard, rather than 2x4's. Would that be lighter? I dont even know if a 1x8 is a thing or not... Any ideas to make this lighter?
ReplyDeleteYes, it is HEAVY. 1x8's (or 1x4's) would be a great way to lighten the load. They wouldn't work out exactly the same as 1x4's since their actual sizes are different than their named sizes: 1x4=.75x3.5, 1x8=.75x7.5 but you can just adjust the height of the legs to fit whatever you go with.
DeleteIf you want it even lighter you could leave a gap between each of the horizontal slats as well, which would give it a different but very cool look. Use an extra 1x4 turned on it's side as a spacer when you attach the slats to get an even 3/4" gap between each board. Have fun!
how do you think is possible to cover a spring box?
ReplyDeleteMy wife wants a bed frame for a queen mattress and a spring box, is it possible to build a bed frame with a side rails concealing a spring box????
How tall is your box spring? I'll see what I can come up with. :)
DeleteI would just build this plan without the middle support and slats. Then just put the box spring on the floor.
DeleteHi, I've always heard you shouldn't put mattress directly on the floor because they need airflow below to prevent mold and mildew. I was assuming the same would be true for box springs, but it may not be since they probably have better ventilation than something as dense as a mattress? If so that would definitely work! :)
DeleteA mattress yes it has to breathe but a box spring is made of wood & really has no springs ..mine doesn`t . I took apart a box spring & it was just a frame with lots of padding on top.
DeleteI thought about this also, you have some options depending on how high you want your mattress to be. My build has the box spring sitting on the cross members. If you want to keep that height, yet simply conceal the box spring, I would basically build another 2x8 box bed and place it on top of the lower assembly. Essentially making the bed box 2x16, but the supports would be on the lower assembly. From there you can raise or lower the box spring/mattress combo to your desired height by raising/lowering the side supports.
DeleteGood thoughts! Thanks, Paul! :)
DeleteThis headboard is for a queen, right???
ReplyDeleteYes it's a queen size.
DeleteWhat wood do I need to get if I don't want to build the bed frame
ReplyDeletePlans for the headboard are here: http://www.morelikehome.net/2012/10/day-5-build-simple-modern-headboard.html
DeleteThis comment has been removed by the author.
ReplyDeleteI built one of these as a king. My plans differ, in that I dropped the box spring into the frame, added a footboard, and raised the bed up 3" off the ground. Pictures at http://mrjoshuah.blogspot.com/2016/12/made-this-for-my-wife.html
ReplyDeleteI love the footboard! Great job, I hope your wife loved it. :)
DeleteTurns out, somehow the bed is much more comfortable - could be the height difference, or the fact that the squeaky metal frame is gone now. I'll be updating with the completed shelves in a few days once the stain / poly are set. I decided on the floating side tables - but used 3.5 x 1 1/8" pine plank for the top instead of the 2x4 framing lumber I put on the rest of the bed. By the time I bonded and sanded, the top displays as one solid piece. I reinforced the back with a short 2x4 blocks under the top which I will use Kreg pocket holes to affix to the side panels. This should offer the strength needed without the support boards.
DeleteThat's great! Thanks so much for the feedback. I can't wait to see it finished!
Deleteany idea how much this will weigh?
ReplyDeleteI can tell you it will be VERY HEAVY. But I don't know the specific weight. Sorry!
DeleteI recently completed this project. I made the base separate from the headboard. I didn't have a kreg jig so I made diy pocket holes.
DeleteWay to go! DIY pocket holes are next level! :)
DeleteIm not sure if this has been asked or not but could I add legs onto this some how before attaching the frame to the headboard? This is so beautiful and the instructions are written so good!! I plan on making this over the following week and weekend!
ReplyDeleteDefinitely! The easiest way would probably be to add a 4x4 post inside each corner of the frame. You can make them whatever height you need and drill through the side and end boards to attach them. Hope that helps! :)
Delete