Showing posts with label design notebook. Show all posts

Thursday, January 25

DIY Renovation - What To Do Yourself vs. What To Hire Out

I've had a few questions about what we do ourselves vs. what we hire out, so I thought it might be helpful to go into that more in-depth today and talk about not just what we personally hire out, but also how we make those decisions (and I'll walk you through how to make those decisions for yourself as well). It's always a good to have an idea of what you really can (and want to) do yourself before you begin any kind of remodeling project!  I addressed this briefly in my post about installing the recessed lighting in our kitchen if you want to check that out as well.

When it comes to home renovation, you're not only deciding how much you want to pay, but also what you want to pay. Because doing things yourself involves a different kind of cost than paying a contractor. While DIY does save money, it costs time instead. Nathan once spent a whole Saturday installing flooring in our dining room with help from a friend and they only got about 75% done. So while we saved a lot of money over having it professionally installed, it cost him a couple days of time instead. See what I mean? 

So for every part of your renovation, you need to evaluate your unique needs and decide exactly what you're willing to pay. Find the balance that works for you, your home, and your family. Today I have several tips to help you think through these decisions and I put together a free printable workbook to help you as you work through that thought process! You can get it here:

DIY Renovation Planning Workbook

Friday, January 12

Installing Can Lights in our DIY Kitchen Reno

Lighting is so important to a functional kitchen. I'll admit I'm no lighting expert, but I did plan all the lighting for our DIY kitchen remodel myself and I know that you can do it, too! So today I'll share the lighting choices we made for our kitchen (and why we made them) which should at least be a good starting point for you to jump into your own kitchen lighting project!

Tuesday, October 18

DIY Kitchen Reno Plan

We've decided to make a big change in our old farmhouse. We're swapping the kitchen and dining room! The current dining room is much bigger than the kitchen, and with baby #6 on the way we're feeling more crowded than ever in our smaller kitchen. Will we get it done before the baby comes in December? No idea! 

Thursday, February 6

The MLH Creed

My towels don't match.

I mean, I did find four green ones for our open shelving, which gives the impression that I have things more "together" than I do. But I just feel like you need to know that. I don't want you guys to get the wrong idea. It's easy online and in pictures for things to look just right. Crop out the clutter. Angle high so we don't see the floor. Everything in place, everything matching, everything perfect. But that's not life. At least not in the MLH house.

My four almost matching towels.

Don't get me wrong, I love beautiful spaces. I love when my house looks cute and at least somewhat put together. I get bored and want to mix things up. I like to decorate and paint. I like everything to have it's own place and fit perfectly and be always tidy. I like order and neatness. So that's the stuff I blog about. But whatever you read from me, I hope you take what I say with this grain of salt:

It's okay if it's not. And it's okay if you don't.

It's okay if you don't do everything, if it's all not perfect, if your towels don't match. It's okay if you don't have a new couch, if you never replace that tile you don't care for. It's okay to be okay with the way things are. Even if it's a little less than perfect.

Life is so much more than pictures of pretty houses. 

Monday, November 5

Updating Second-Hand Chairs with Spray Paint

I finally did it. I finally picked a color and painted our dining chairs.

There's nothing like impending winter to kick me into gear, and this was one project I knew I needed to get done before the cold! So this is the story of how I painted them, and the silly, indecisive journey that made the process take so long. But after 30 years, I know indecisive is the way I work so I'm just rolling with the (very slow) punches over here.

Whether you're indecisive or not, painting is always a great way to freshen things up on a low budget, and dining chairs are no exception! This is a perfect project for spray paint because you don't have to worry about streaks, drips, or getting a brush around all those spindles and nooks. 

But before can paint, you need some chairs. Obviously *said in my best Prof. Snape voice*. For me, that meant starting with a hunt for a new set of chairs. We had a set of DIY industrial chairs from our last house, but they just weren't fitting my style any more. Ever since we moved in and built our extra-wide farmhouse table, I'd been dreaming of a set that better fit the style of our new table and new house.

For more chair-painting goodness, check out my $3 yard sale chairs and my industrial chair makeover!

I did a little poking around sites like wayfair and overstock, but deep down I knew that my thrifty roots couldn't abide new chairs when there were so many second-hand options out there for a fraction of the price. You know what they say: "Buy used and save the difference!" So I put most of my efforts into Craigslist and fb marketplace. I knew I wanted something simple, not too formal, with a classic style. And I didn't want to spend a fortune. During my long search for chairs, I also looked at tons of dining room inspirations on pinterest (part of the reason my search was so long was because I couldn't lock down quite exactly what I wanted) and, at long last, I started to hope for a classic Windsor-style chair. The one day, these guys popped up:


Saturday, March 10

Gallery Wall: 6 Curating Tips and Tricks!

Guys, it's starting to look like someone actually lives here. We have art up in the dining room. And curtains. And there are plants. Thank goodness for nesting. So today I just wanted to take you on a quick tour of our new gallery and share a few tips for curating your own gallery wall. It's easier than you might think!


The chandelier is a Craigslist upcycle (read about it here),
we built the huge farmhouse table last year (get the plans here)
and the chairs were a happy yard sale find a few years ago.

Now, I definitely don't believe a gallery needs to be themed. I'm also a big believer in "things I like and want to hang up together" galleries. In fact our "adventure theme" was more of a happy accident when I realized I'd collected several pieces that fit perfectly with our "Adventure is Out There" centerpiece. But I do love how our theme turned out. And once I found a direction, it was so much easier to round up pieces to finish the grouping.

 So if you're trying to fill a wall but feeling a little stuck (whether you're after a themed gallery or not), these tips can help get you back on track and charging forward!


1. Start with the things you love. Have a painting from your grandma? A favorite photo? Old wallpaper you found in the attic? A life quote? If you want to love your finished gallery, you need to start with pieces that you love. Fill in the gaps to make your favorite pieces work together, but make sure they are your priority and let everything else work around them.


Curtains peeking in on the right!


2. Find an anchor. We've had this large wooden sign hanging here for over a year. It was looking pretty lonely. But I knew it would be the perfect thing to anchor a gallery wall, and I knew that I loved it. So we put it up and waited for the rest to happen. It turns out, having one large piece in the center makes it easier to find balance when you hang up the little guys.


I made this sign during one of our sister craft nights. If you check out this post, you can learn how to easily make a template to create any kind of sign! Seriously, you can print out anything you want - phrases, pictures, whatever - and turn it into a beautiful wooden sign.


Thursday, February 15

Nesting Questions: Living Room Edition

Warning: I'm about to throw a whole tornado of nesting at you. You have been warned.

I shared some living room ideas and questions in my insta-stories a couple weeks ago, but thought this would be a good chance to get a little more visual aid going on plus a better way to gauge your feedback. And... ask even MORE questions because I feel like there is so much to do in here. SO...


We haven't touched the living room besides painting it when we moved in. Furniture is pretty much where we dropped it, and I hadn't hung a single thing on the walls (not even curtains) except the star above the fireplace... which I put on a nail that was already there. But now I'm nesting and IT'S TIME. So here's the rundown (I'd love to hear any thoughts in the comments!)

Let's start with a little layout to get our bearings. If you're facing the fireplace there are built-ins on the left with the tv:


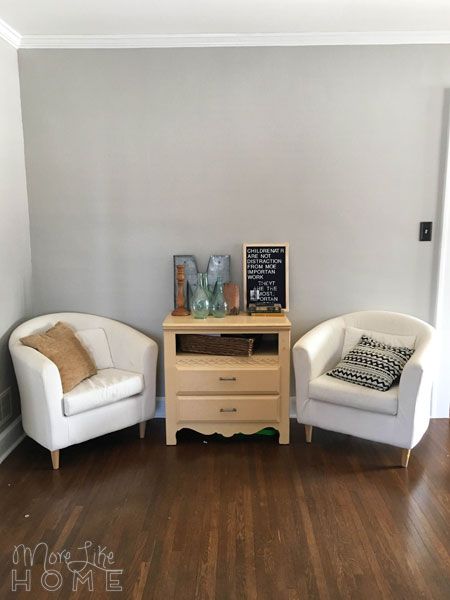
And this is the wall to the right. A yard sale dresser and two nine-year old ikea chairs. Plus a bunch of random decor looking for homes.


Then we have the couch and recliner, and a long window seat under the windows to the right.

This couch was our first purchase for our first home. And it was the cheapest one Big Lots had to offer!

It's nice blank slate at the moment, but I'm ready to cozy it up! So here's the deal:

1. This dresser.
We use it as an end table and it's full of diapers and wipes. But it's in dire need of a pick-me-up coat of paint. Right now I'm thinking about black or white (neutral, and goes with everything so we can move it around the house if we want), or a deep green (to get some color in this gray room!).


I'm thinking something in this family, using leftover paint from the forest mural we painted in the boys' room.

http://one-thousandoaks.com/2016/11/10/little-explorer-boys-bedroom-reveal/

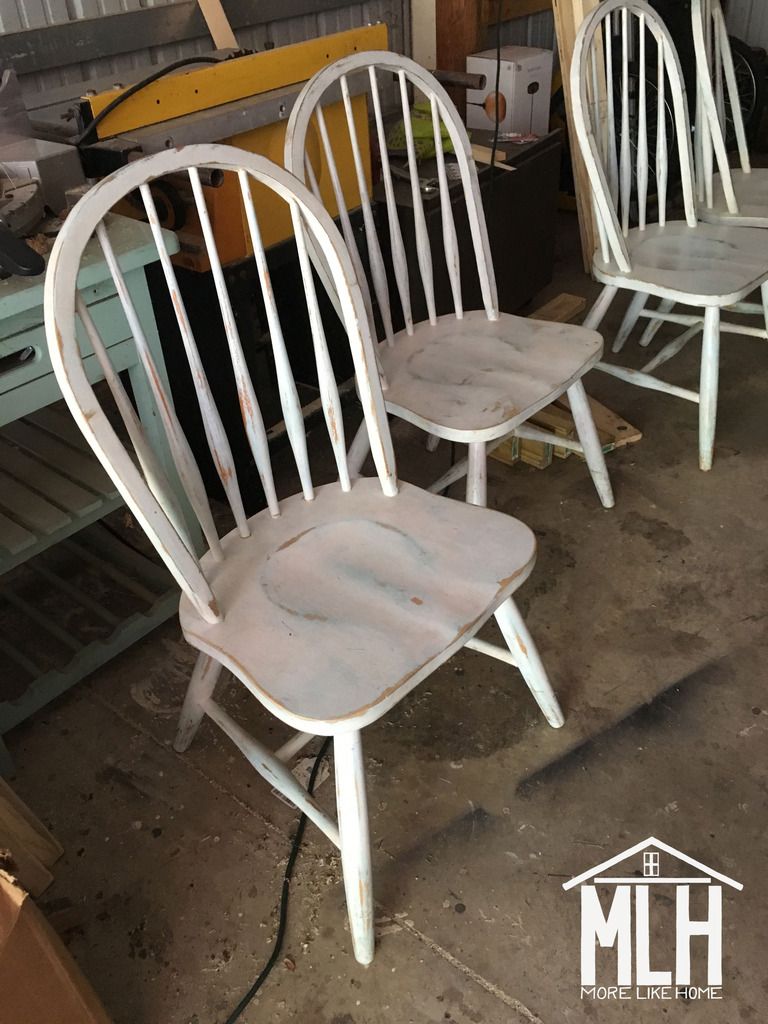
But wait, there's more! We have a pair of white Ikea chairs by the dresser that I'm considering recovering with this fabric. So take this into consideration. But don't answer yet, we also have curtains down at #5 that might totally clash with this. Whoops! And I use the word "white" loosely. They were white before we had three boys.
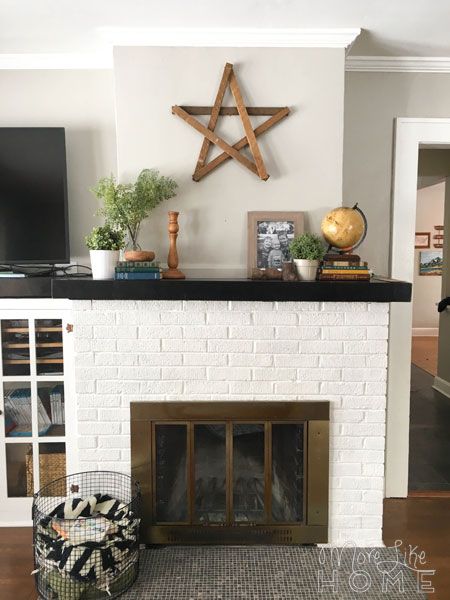

2. The Fireplace.
First, the mantle was already painted black when we bought the house, and it hasn't grown on me. It has a few chips where we can see that it's also been painted beige and blue at some point! So I'm thinking of wrapping it with stained wood to warm up this gray space.

Fireplace part-the-second, I want to wrap the top of the fireplace with shiplap to add a little texture and interest and Joanna.

And finally, husband wants to swap out the brass doors for black, but I don't hate the brass? I'm taking a friend's advice and withholding judgement on that one until the mantle is done, but I'd love to hear your thoughts!


3. The Seating.
This is long-term goal, but we're trying to plan for it now. We have a three seat couch and a recliner, plus a window seat and the two ikea chairs we can pull in when we need to. Which gives us four comfortable/handy seats everyday, plus a handful of extras when we need them. But we're a family of five-going-on-six. Math says we're already over our best-seating limit. We want our family to all plop down comfortably together, which has me thinking about a sectional. Maybe something like this Vimle sectional from Ikea:


But we still have some measuring and layout planning to mess around with. It's a good size room, but I don't want to make it feel small. And the recliner stays forever. I'd even love to add some throw pillows to the window seat and a couple floor cushions.... but I also know I'll have to pick them all up every.single.night. Because small boys. Guys, balancing kids vs. home decor is hard.

P.S. My husband and brother-in-law took the liberty of coming up with their own solution to the seating crisis:


4. The Lighting.
No ceiling lights. And without the Christmas tree it's basically a cave in here at night. And before you say it, I already asked and Husband says we can't leave the tree up all year. Party pooper. So I've had my eye on a couple floor lamps that could work over behind the ikea chairs:


...but I'm also thinking directional lamps like these might not do a whole lot to brighten the room, pretty as they may be, and I'm having a hard time finding an option I like with a shade. Anybody have one you love?

5. The Curtains.
Turns out I'm super curtain-picky. Which is probably why I still don't have curtains in most of the house. But I did hang an old set in the dining room that I've had since we were first married (you can see a pic of them from our first house here). I still love them, and I have one more set stashed away that I could use behind the couch. They are the leafy ones on the right. More earth toned and relaxed.

INGMARIE ikea curtains VS. old discontinued ikea curtains

But I also have new ikea love to hang in my bedroom. They're the floral pattern on the left that's a little brighter and more fun. All I know for sure is these are the only two curtains I like so I'm using one of them again. Don't try to stop me. (unless, like, you have a set of curtains you think I'll love. then go ahead and try.) You guys seem to favor the one on the right (thanks for getting involved with our posts!!) especially saying it would be nice to have the living room match the dining room. But here's the thing. I have no qualms about buying another set of the floral curtains to make the dining room match the living room if that's the better choice. So think about it, peeps.

6. A Rug
Like, should we have a rug? It sounds nice for the winter. But it also sounds harder to clean than wood floors. Here, again, is that darn children/decor balance. I'm also super rug-picky and currently have no contenders. I just know it can't be white and it can't be too modern. And I like wool.

7. The Walls
I have this print from GraceLaced framed and ready to hang behind the couch. And I have a couple ideas for above the dresser/ikea chairs:
  1. a small gallery with a DIY macrame wall hanging (from this tutorial by My French Twist), a letter board, and... something else? Maybe a pic of the kids? 
  2. OR one larger item, like this canvas map from Hobby Lobby:

Now someone tell me what to do. My nesting instinct to get this house ready (whatever that means) collides perfectly with my already indecisive tendencies. So I'm a flurry of needing to get things done but not being able to decide what to do. In the meantime I've cleaned out our entire basement.

Keep in mind my keyword here is cozy. I just want to make a warm and inviting home - one my kids love to come home to and where visitors feel welcome. But it has to have light gray walls and not be dark like a cave.

P.S. I have a great little helper who loves to pitch in. He even made me breakfast this morning.


Let me know what you think! Thanks, peeps! Here's a quick recap:
  1. The Dresser - black, white, green, or something else?
  2. The Fireplace - wood mantle? shiplap at the top? replace the cover?
  3. The Seating - sectional: yay or nay?
  4. The Lighting - black lamp, gold lamp, or keep looking for one with a shade? And I'm just going to throw this out there... Christmas lights???
  5. The Curtains - floral like the bedroom, or leaves like the dining room? Or go floral in the dining room, too?
  6. The Rug - ummm?
  7. The Walls - simple gallery or a statement piece?

Monday, May 16

Colored Window Frames - What's your take?

I have a page I pulled out of a magazine that I keep going back too. I love the eclectic but natural feel of the room, and mid century modern dressers just might be my jam. But last week I noticed something I had kind of glanced over in the past. The blue window.


The frames and the muntins are all blue. Not the trim, mind you. The actual window frame. And I think I like it. Then I remembered another picture. This one I pulled specifically because I liked the fresh green window.


I flipped a few more pages and came across one of my favorite porches... and noticed black frames on both the windows and doors.

And just like that, I found a theme through the pages I've pulled from several magazines. Apparently colored trim tickles my fancy. Like this bright teal set against a rustic entryway.


Or this deep sea blue as a backdrop to fresh flowers.


Apparently I've been pulling colored windows for quite a while now, without consciously connecting the dots. I'm not sure it's something I actually want to commit to in my house (painting those muntins is not a fun job). But we do have original wood windows in our new house... so the thing is... I could.

And here's my question... if you could, would YOU? Let me know in this just-for-fun poll!


Brave enough to go with a color? Let me know which color you'd choose in the comments!

Monday, September 29

Basement Laundry Room

I have an itty bitty laundry board on pinterest. It only has four pins on it. Why only four? Because they so perfectly pin down just exactly what I dream of for a laundry room. This is my single favorite laundry room in all of time and space (and I'm pretty sure it was one of the very first things I pinned):

 image via pinterest

The whiteness, the wood countertops, the plants, the natural light, the oversize pendants... this is my laundry room love. Followed by this close second (yep. basically exactly the same thing):

 image via pinterest

But let's hop out of pinterest for a moment and into my actual laundry room dungeon basement.

Thursday, April 3

Backyard Brainstorming

This is that time of year when summer is so close I can almost feel the heat. Almost. So it's the time of year I start hashing out big (some husbands might say unreasonable) plans for how fantastic our backyard is going to be! Granted, several of these things were also on my first plan from 2012 but there are some fun new ideas, too (thank you pinterest). And they definitely will not all happen this year so lets all put on our patient pants before we get started. Got 'em on? Ready to dream big? Good. Here's what I'm thinking:


Over on the top/middle left we have our existing garden. Last year it was totally neglected and used for digging with dump trucks. But this year we already have seeds started to make it better than ever! Our section of strawberries & asparagus will stay the same (but we may finish boxing it in, that never got done last year) but the rest of our garden will need to be expanded to fit more goodies. I'm thinking adding a few more raised beds somewhere in the yard might be our best bet. The right side of our yard is shaded by a big tree so it would have to be back by the driveway or up where we have the random bush of uselessness (and the fruit trees I drew in, but it turns out we have power lines running over there so these would be better suited back where I drew the garden beds. oops.) Besides our new array of veggies, we're also going to need to step up the design to keep the critters out. Our first time around most of our plant were eaten by furry little scavengers. We definitely want to keep some of that food for ourselves this time! We haven't decided on an exact plan but we have a few ideas. One option is to build a removable frame like in the book Square Foot Gardening. The seem fairly easy and cheap to make, the only thing is that I would have to drag them off to get to the foodie goodness. Which led me to the idea of a totally fenced in garden so we can just open the gate to come and go.


I love the simple open look of that one and would be great for keeping out bunnies. However. Oh, however. We have an insane number of squirrels and I'm suspicious that they do far more damage that the few little bunnies hopping around. And a fence like that would not do much to stop them. Boo. So if we did a fenced in garden it would have to be something could have a roof, more like this:

Although there are probably some kind of city ordinances or nonsense against that? Hmm. While we think about that, I'm starting on a much easier & cheaper attempt to keep the critters at bay. I've read that animals aren't too crazy about the smell of marigolds. I have no idea if this is true. But 200 marigold seeds were only $0.99 from SeedsNow so I have a bunch of those guys sprouting in the office, hoping we can plant them all around the garden.

This next idea isn't drawn in the layout, but I also would love to have some kind of greenhouse for year-round veggies. I love these cool window greenhouses, but I'm thinking of doing something more practical like covered boxes along the south side of the house (you can read more about it in Four-Season Harvest). The other ideas I want to keep in mind for our garden are space-saving trellises for viney plants and I want to try newspaper instead of landscaping fabric under our raised beds.

Wednesday, May 22

A Room for a Bigger Boy

Well guys, I think it's time to admit it. B is growing up. For reals. He's gone from our tiny, squishy newborn to running jumping blur of a toddler. Not to mention the fact he'll be a big brother before we know it! So we think it's time to upgrade to a big boy room. We converted his crib to a toddler bed a couple months ago (and want to get him out of it before Baby #2 moves in and needs the crib) and has done great with it, so he should be good to go with a twin bed! And of course switching out the bed leads to a whole room makeover. :) But let's start at the beginning.


We started with a nice light, neutral nursery since B's gender was a surprise (baby #2 will be a surprise as well). We've done a few small things since then to try to make things more BOY, but I think the time has come for a new, more boyish, more grown-up kind of color scheme. Something that can work for him now, but that he can also grow into. I came across this color card at Lowe's and I think it might be just the thing for a big boy room. And no, there is nothing wrong with using pre-selected color cards. :)


We don't necessarily want to repaint the walls since the neutrals are so easy to work with (and we might be adding a baby girl at some point!) so we're planning to use the colors on things like furniture, curtains and bedding. So there will definitely be some furniture painting involved, and maybe a little sewing too...


Moving up to a twin bed is going to affect the layout a bit too. Here's the current room:

Saturday, April 6

Basement Planning Update

You guys know we tend to hop around from project to project. And we're at the point in the cycle when we start thinking about the basement again! What's that? You forgot we even had a basement? Yeah... it's been a while since we've touched anything down there. Partly because we decided to focus on some of the big kitchen projects first, and partly because winter hit and we couldn't go out to use the saws and what-not. But now that spring is on the horizon, we're ready to jump back in. Let's peek at where we left off:

Last year we started working on our plans for the bar area. We got as far as installing cabinets, running water lines to the sink, and we even have the countertop bases all in place now. But that's where things slowed down.


Our next step is installing the tile countertop (we already have all the slate and grout ready to go!) but we're missing one important thing - a wet saw. By the time we started thinking about tiling it was already too cold to think about sitting outside and getting wet anyway, but we did a little research and found out Menards rents them out (I think it was $30 for 3 hours, but that was last year so we'll have to check again). And let's be honest, that's not a lot of time pull off a whole countertop and we don't want to pay an extra 30 if we can avoid it. So we're going to try to do some planning ahead of time and see just how many tiles we'll have to cut. That way as soon as the weather is warm enough we can git 'er done. I'd really, really like to get it finished before #2 makes an appearance. We'll see. :)

We also made some tentative plans for using the rest of the space. The bar area is really all we've touched so far, but we're planning to make it a fun, liveable space that can double as an extra guest room when the whole family comes. And of course there needs to be lot's of storage.


Now that I'm really itching to tackle this part of the house again, I'm looking for some style and design inspirations for the space. So far we've been working on lots of functional aspects, but we definitely want it to look pretty too. I'm still trying to decide on what direction we'll go, but here are a few of my favorite inspirations from pinterest.

You may not have noticed, but the cement floor is currently red. And scratched. And really really ugly. So we definitely plan to re-paint it. Now I'm just trying to decide if we should keep it simple with a solid color or try something a little more fun like stripes or a stencil.

painted floor via pinterest

I would LOVE to pull off this feel. Exposed wood, metal work, muted colors, just really comfortable and casual. I don't know if it's something we'll be able to do with shorter ceilings, less natural light, concrete floors, and no metal to speak of. But I'm keeping my eyes open for ways to get them same vibe.

basement via pinterest

I know I shared this picture before, but this is still my favorite idea for the laundry space. I want to dress it up bright and simple so I can leave it open to the rest of the basement.

laundry room via pinterest

We're still planning to section off the storage area since it probably won't be pretty. Right now I'm thinking we'll either do some white flowy curtains like in the pic above, or bring in the wood aspect with an up-cycled pallet wall like this.

pallet wall via pinterest

Apart from the countertop, most of the work is going to be cosmetic. You know, the fun part. :) Plus lots of cleaning. Boo. But I really feel like we should be able to pull off a good part of it this spring. So this me starting the timer before baby #2 gets here in July. Game on, husband.

Wednesday, August 29

Bar Stool Dilema

More big news on the kitchen front! Or at least big plans. :) We are about to finish up the drawers and my parents are coming up this weekend  to help us... pour the countertops! So exciting! We're even hoping to squeeze in a little painting while the concrete cures. I've been doing some planning today and started thinking about the new bar area and especially the bar stools we'll need. And I've got a question for you. :)


 Here is the bar area so far. The countertop will overhang farther than the plywood is now (about 10" total) and is marked by the blue tape on the floor. So this kind of gives you an idea of how much space there is. So on to the question...

Wednesday, August 22

Stripe Love

I need stripes. Somewhere - anywhere - in my house. Big, thick horizontal stripes to be specific. I LOVE what they can do to a space, they way the add interest, color, boldness. Just ask my husband. This is the conversation that has started almost every room we've painted:

Husband: "What color were you thinking?"
Me: "I was thinking maybe stripes."
Husband: "That's not a color."
Me: "Well, how about green stripes?
Husband: "I don't think we should do stripes."
Me: "What about gray stripes?"
Husband: "I don't think that's a good idea. You'll regret it and just want to paint over it."
Me: "Or maybe yellow stripes?"
Husband: "We're not doing stripes."

Shot down. But the jokes on him, because NOW I want to paint over everything to add stripes! I know, hardcore plot twist. I think it started with the nursery where I wanted to do either gray or teal stripes (it ended up beige). Then when we painted the office I wanted some nice moody gray stripes again (it is gray, but not stripey). Then I moved to the living room, which we actually painted first over a year ago, and asked if we could go back and add some stripes to the green-ish walls. This brings us to today, where I would happily take any of the aforementioned options, but I'm also about to spring kitchen stripes on him (surprise!). I'm thinking some nice, pale green stripes to complement the green living room, but make things a little sassy. While we wait for my stripes to make an appearance, please feast your eyes on a little stripey love from the wonderful world of pinterest....

Did I say bold horizontal stripes? Well, this might be a little too bold for me to bring home, but what a statement! I'm LOVING the black & white contrast. And the frame collage? Be still my heart.


This is what I wanted in our nursery! So simple, and so fun. And the light colors would be great for such a small room.


Just loving the subtle grays, especially with white trim.

Monday, August 20

Base Cabinets - DIY Style

Sometimes taking a project really slow turns out to be a good thing. Saturday night we (once again) had a change of plans for our kitchen! If you want to follow the evolution of our kitchen plans you can see my original inspiration post here:


My original design plan here:

And my most recent plans here:

The footprint hasn't changed, but we did tweak one thing. The space under the window on the right wall was going to be left open for a stool - mostly because the window goes below the cabinet line and because there is a vent there. But after a quick brainstorming session, we quickly decided we couldn't miss the opportunity to add some more storage (and value!). We drew up a plan that would make the most of the space with one large cabinet and one set of drawers, and got to busy that very night.


 We definitely don't have the budget for anything as drastic as moving the window up, but we did find a way to work around the obstacles. We didn't wast to mess with the window trim - it is original and matches the rest of the house, we want it to still be there if we (or the next owners) ever want to open things back up - so we made our new cabinets shallower than standard so they could sit in front of the window and trim. You can find basic cabinet building instruction here, we just modified them to be only 22" deep which left 2" of space behind the cabinet. Here is a basic sketch of the layout:


A couple things to note here:
  1. The space behind the cabinet - it allows it to sit in front of the window frame.
  2. The spacers in the corner - anytime you have a corner in cabinetry (unless it's something like a lazy Susan, of course) you need to have spacers. If you don't your cabinet doors and drawers won't open properly because the knobs will be in the way of each other.
  3. We built our cabinet units first - then we measure the openings before making our doors & drawers to make sure we get a perfect fit.

So this is where the new layout put us. Can you believe how much storage that added? Really, we would have been crazy not to do it. And if you're worried about the window, we only blocked the bottom few inches so plenty of light still comes in and we can still slide it open. To keep things looking pretty from outside, we painted the back of the cabinets white (so no bare plywood is visible).


 My sister S tested out the new peninsula layout by mixing up the best cheesecake ever. Seriously. There is cookie dough in it. And we all agreed the peninsula was a keeper. It added so much work space without feeling too big or crowded.


 Once we got the cabinet built (see how-to build basic cabinets here) we made the face frames. We found it was easiest to assemble them on the floor like this...


 ... and then attach it to the cabinet. It kept things looking more even and tidy.


For our door openings, we just framed the cabinet with 1x2's and will make doors to match later. For the drawers we wanted to be a little more precise. We plan to use 1x6s for the drawer fronts (which are actually 5 1/2" wide) so we framed our drawer openings about 5 3/4" wide, which will inset the drawers and leave about 1/8" of space above and below. We're still working on the drawers, but I'll add a post with more details about that once they are finished!


So this is where we're at. Everything is built and trimmed out! We are working on drawers and doors, and have plans to do countertops during a long weekend next month. I'll keep you posted! :)


This is definitely the kind of project that reminds us DIY isn't all fun and games. I have made so many mistakes already - mostly involving measuring and math. Including making every.single.drawer the wrong size on my first try. Major fail. But fortunately my level headed husband is always there to fix my problems and keep us moving forward! And, you know, do math stuff. And he's cute so that's a bonus. :)


Anybody else tackling some long overdue projects this weekend?
Subscribe