Showing posts with label design tips. Show all posts

Friday, January 12

Installing Can Lights in our DIY Kitchen Reno

Lighting is so important to a functional kitchen. I'll admit I'm no lighting expert, but I did plan all the lighting for our DIY kitchen remodel myself and I know that you can do it, too! So today I'll share the lighting choices we made for our kitchen (and why we made them) which should at least be a good starting point for you to jump into your own kitchen lighting project!

Friday, February 28

My 6 Favorite (Easy!) Houseplants

I loooove a good houseplant. I can hardly walk past the plants at Lowe's without bringing one home.
But, believe it or not, I didn't always feel this way! In fact, a few years ago I killed every plant I touched. You know how greenery is supposed to liven up your home? Well my home was a graveyard for shriveled plant dreams. But somehow, one by one, I've found a few hearty houseplants that even I can't kill. And now I have plants in nearly every corner of my home!

Check out how I propagate those plants to get more plants for free here. 
And how to make a DIY macrame plant hanger here.


So today I want to share my top 6 favorite houseplants that are super easy to care for - and a great place to start if you struggle to find your "green thumb" like I did. I'll also share a few of my favorite tips on caring for and displaying your plants - and hopefully hear some of your favorites, too!

I mixed fake plants in with my house plants on the mantle before I decided to simplify the space. No shame in the fake plant game!

There are a few important things to consider when you're choosing houseplants, but probably the most important detail is how much light the plant needs. You need plants that will do well in your home environment and many rooms don't get a ton of natural light, so you need to choose low-light plants that can thrive there! A full-sun plant in a dim corner just doesn't stand a chance. Luckily, I've got you covered with plants for just about anywhere. 

Thursday, February 6

The MLH Creed

My towels don't match.

I mean, I did find four green ones for our open shelving, which gives the impression that I have things more "together" than I do. But I just feel like you need to know that. I don't want you guys to get the wrong idea. It's easy online and in pictures for things to look just right. Crop out the clutter. Angle high so we don't see the floor. Everything in place, everything matching, everything perfect. But that's not life. At least not in the MLH house.

My four almost matching towels.

Don't get me wrong, I love beautiful spaces. I love when my house looks cute and at least somewhat put together. I get bored and want to mix things up. I like to decorate and paint. I like everything to have it's own place and fit perfectly and be always tidy. I like order and neatness. So that's the stuff I blog about. But whatever you read from me, I hope you take what I say with this grain of salt:

It's okay if it's not. And it's okay if you don't.

It's okay if you don't do everything, if it's all not perfect, if your towels don't match. It's okay if you don't have a new couch, if you never replace that tile you don't care for. It's okay to be okay with the way things are. Even if it's a little less than perfect.

Life is so much more than pictures of pretty houses. 

Tuesday, June 19

DIY Shiplap Fireplace

Sometimes I just need a little kick in the pants to get a project done. Or a little bun in the oven. I've wanted to update our fireplace ever since we moved in (two years ago) but it wasn't until this spring when I was in full pregnancy nesting mode that I finally decided "I AM DOING THIS. RIGHT NOW." Naturally the "I" translated to "husband" because we were in the late-pregnancy stage of nesting. And he isn't one to let his round wife balance on a chair with a nail gun. He's a keeper.

And so, with a little help, we managed to check it off my nesting to-do list just in time before our newest guy was born. (you can see my entire living room nesting to-do list here, and how we wrapped the mantle here) One of my favorite details is the faux shiplap we installed above the fireplace.


I love the texture and charm it adds to the living room. I've always dreamed of a casual, cozy space for our family to gather, and I feel like this was a step in the right direction.


Here's a little "before" action. Just drywall painted the same gray as our walls.


Now it's even lighter, brighter, and totally beautiful. And I really need a full-fireplace photo. Not gonna lie, I probably shot close up because the floor was a hot mess. But I don't really remember. Because newborns don't sleep. It's all a blur.


The best part is the whole project only cost about $15 for wood! We also had to buy nails for our nail gun (I lost that price in the newborn-blur). But we saved a few dollars on paint by using the leftover from our cabinets... which doesn't quite match exactly, but that's a problem for another pregnancy.

Wednesday, March 21

Picture Trick

I learned a new picture hanging trick the other day and decided to give it a try in our office/guest room. I started with these 3 picture frames from a Dick Blick outlet. It turns out there is a Dick Blick outlet near my parents' house and I was introduced to it for the first time recently. And I'm hooked. There is a whole back room of as-is merchandise and I found a bunch of goodies! Including these bad boys for only $5 each. With their deep, clean lines they are just what I was looking for to fill an empty wall in this room. If you look closely you can see on the bottom frame why they were marked down. They are a kind of banged up, but the serious damage is all hidden on the back. There are a few scratches on the front, but I'm planning to give them all a matching coat of paint that should hide any flaws.


These frames didn't have any mounting hardware so I used a picture hanging kit (from Dollar Tree) to attach some eye hooks and wire to the back. That's why these frames are perfect for my new trick. The wire on each one ended up at a different height because I didn't do any kind of measuring. But don't worry, it will all work out!


Down to picture-hanging-business: I started by driving a nail halfway through a scrap piece of plywood (but I'm sure you could use scrap anything).


Then I hooked the wire of the first frame over the head of the nail.


Then I hoisted it up into position, letting the frame hang on the nail. This is great if you don't know exactly where you want your picture to hang because you can move it around without commitment.


 Keeping the nail firmly in place, I took down the picture and grabbed my hammer (with a great display of agility. not really, my husband handed it to me.). I gave the nail a quick tap on the head just enough to leave a mark on the wall.


 That's the start of my little hole. It marks exactly where my nail needs to go for this frame.


 So in goes the nail. I like to angle them down toward the wall (so the head is sticking up) just a little to make sure my frames don't slip off the end of the nail. If I was hanging something heavy I would use a screw & anchor instead, but these guys are super lightweight.


 After the first frame, I repeated this process for the second. I used a level to line up the tops of my two frames before marking my hole. I did measure the space between the two so I could equally space my third frame.


Of course, no project is complete without a little help from Baby B....

He likes to hold things up to his ear like a phone. Any things. And if he doesn't have something in his hand, he'll just put his hand up...

...and say "ehh-o!" It means "hello. :)

I repeated the process again to hang my third frame. After they were hung I marked the "left" "middle" and "right" so I can be sure to hang them in the right spots (so they will be level) after I paint them. I'm really happy with how this trick worked for this kind of project. I feel like it was the easiest way to get these level!


Now I just need to paint them and add some art. Baby steps.


Have you learned any new tricks lately?

Friday, March 9

Curtain Master

Here is the final post in a week full of curtains. You can see my tips for hanging curtain rods here, and for making your own curtains with drop cloths here. Today is just another example of homemade curtains, this time in my master bedroom. After living here a year and a half we finally have curtains up and it makes such a difference!

We started by putting up a curtain rod, just like in the office. I already love the contrast of the dark hardware against the light walls.


For the actual curtains I had a few thrift store sheet to choose from. I decided on a soft, pretty floral one that I bought for $3, which is great for a set of curtains! I cut it in half and hemmed just like I did with the office curtains. Then clipped it up with my ring clips. It turned out so pretty and was a really easy way to get unique curtains.


Then I slid the furniture back into place to finish it off. And wowza, it really looks more like home now!


Although I think I'll go with the rocker here instead. But a slip cover may be in order. :)


Here is the best shot I have of the color of the curtains. You can also see how well they work together with the colors of the walls and wood. 


And that's all I have for our last curtains day. Just a little inspiration to keep your eyes open because you never know what could be your perfect curtains!


Final thought for today - I got this new toy on craigslist, and I am so. excited. Now, who wants to thread it for me and show me how to use it? :) I'm thinking about making my own cloth diaper once I get it running!

Wednesday, March 7

Drop Cloth Curtains

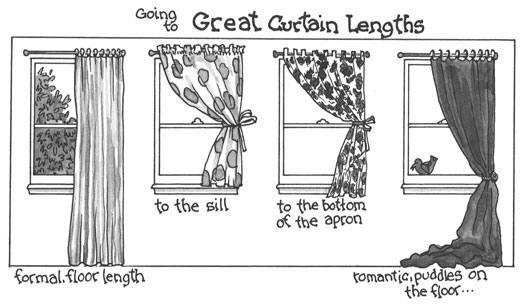
Time for more curtain fun! Today we'll be looking at some easy ways to make your own curtains, and be sure to check out my post about how to hang curtain rods as well. Let's start with a look at curtain lengths. I usually prefer floor length curtains, but if you want something shorter your curtains should end either at the sill or apron of the window, as shown in this illustration. Try to avoid stopping in the space between the wall and the floor. It will give you a cleaner, more professional look when you stop at a clean visual line.


Once you decide what length you want your curtains to be, you can go ahead and hem them if they are pre-made or make some curtains of your own. That's what I did in the office recently. I actually bought some drop cloths at Lowe's as a cheap alternative to traditional curtains, but you can use these instructions to make curtains out of just about anything. I bought two 6x9' cloths (one for each window) for about $15 apiece. I plan to cut each cloth in half in order to have two panels for each window, but you could put it up as one panel to cut out some steps if you want.


I started by washing my drop cloths to preshrink them and get rid of the funky Lowe's smell. Depending on the size of your drop cloths, they could be ready to to put straight up with ring clips. However, mine need to be cut up and hemmed so I had some work to do. I started by cutting along the seam that ran down the middle of my drop cloths to split it into two even panels.


Then I cut the middle seam off the the other panel too because it was just too bulky.


I folded the unfinished long sides in about 1/4", then 1/2" and sewed close to the fold to finish them. I also did this on the on the other long sides to make them match.


Then I was ready to hem them. I started by cutting off the thick seam at the bottom of the curtain. you don't have to do this but it was too bulky for me. You can leave the top seam if you are putting your curtain up with ring clips.


Then I hung the panel backwards so I could hem the length. You can see how much slack is at the bottom to be hemmed. Since I hung it backwards I could fold them bottom up towards me and pin it in place to mark the length. I folded it up to just above the floor, about 1/2 - 1", because I find that curtains will stretch over time and if you make them all the way to the floor they will start to drag. I find it's easiest to start by pinning the hem on each side and then work on the middle. It also helps to put your pins at the top of the folded fabric instead of near the bottom.


I didn't get a picture of this while they were hanging, but here you can see the hem folded up.


Next I folded the raw edge under to create the hem. I like to leave a tall hem at the bottom because I think it looks really spiffy, and also because I'm cheap and if I ever want to use it again somewhere else I will have plenty of room to let out the length instead of having to buy new curtains and start over. I also like it to match on all my curtains, so I measure up 6 inches from the bottom and fold the raw edge under that far.


Then I sew close to the folded edge.


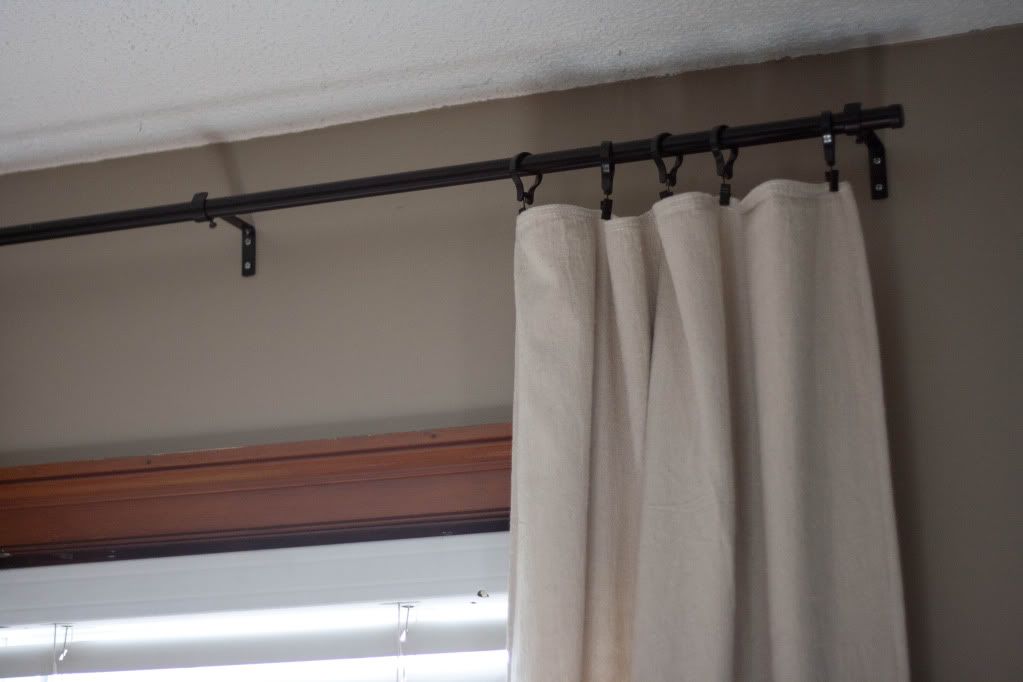
That's it for the sewing. Before you hang them iron your curtains, at least along the bottom to get a nice crisp edge. This will help your curtain hang better. Then you can clip them up with ring clips (you can get them anywhere, mine are from Ikea and my rods are too). I like the ring clips because they are easy, they are safe for Baby B (if he pulls on them they should unclip instead of pulling down the rod), and because I think the dark rings and rod look really sharp against the wall. I'm actually thinking about converting all of my curtains to ring clips!


Now stand back and admire your work! Drop cloths were a great, affordable way for me to get the simple, off-white curtains I wanted in here. And it's a bonus that they are made of a heavy canvas with lots of texture. I have a plan to dress them up a little that will hopefully happen soon!


I did the same thing for the other window, too. I find it's easiest to do it assembly line style when I have several panels to make. First do all the cutting, then finish all the edges, then do all the hemming.


If you don't like to sew, you could complete this whole project using iron-on hem tape instead. Baby B "organized" my while I worked on these. So helpful. ;)


Do you ever make your own curtains?

Monday, March 5

Hanging Curtain Rods

I'm working on (finally) getting some curtains up in the office so I thought I'd do a quick "how-to" post about placing the rods.

But first, a disclaimer. I've had a couple people ask me how I find time to do these things because, through the wonder of the internet, projects pop up all done and written about in a nice a concise way. But this is not how they go down. This is a perfect example. A timeline of my curtain hanging endeavor:

Early November: buy curtain rods from Ikea
Late November: buy drop cloths from Lowe's
December: trip over curtain rods laying in front of windows waiting to be put up
Early January: put up curtain rods
Mid January: wash drop cloths
End of January: cut up drop cloths to make curtains
February: hem sides of curtains 
End of February: hang curtains, hem curtains, rehang curtains, DONE.

And there you have it. The cold hard truth of a "simple" curtain hanging project 4 months in the making. For the record, I could have easily had this all done in one day... if I didn't have a baby and take naps and play on pinterest and work on other projects and change diapers and watch the entire series of Psych on Netflix and whatever else occupies my days. And just so you know - this is typical. Most of my projects are drawn out over months because I work on them so sporadically (um, kitchen progress? anyone?....no). And I generally have about 5 things going on at any given time so I hop around from one to the other instead of finishing what I start. It's just how I am. And it's okay.

So, if you are up to month 3 of hanging your curtains, here's the run down of how we do it. This is just the way that has been easiest for us (and there is a fair amount of "close enough" and very little exactness) so if you know a better way please let me know! :) Also keep in mind this method works if you are planning to hem your curtains later. If you curtains are a fixed length (or too short to hang high) you need to measure up from the floor instead to get the right height.

1. Measure and mark how far out from the frame you want your rod to reach. I like to have mine out far enough that when I open the curtains they don't block any of the window or glorious sunlight. The curtains in this room are narrow & lightweight so they bunch up pretty tightly (plus I'll be using ring clips to hang them. curtains that use a pocket won't bunch up as compact.) so I marked out 8" from the frame, which was more than enough. (My living room curtains are much bulkier so I went out a whole foot in there. If in doubt, go ahead and scrunch the top of your curtain together to get an idea of how much space you'll need.)

2. Measure down from the ceiling how far you want the rod to sit. (I like to hang them well above the window to make the room seem taller and the window seem bigger. I usually hang them about 2" down, but this time I decided to give 4" a try to see how I like it with a little more breathing room above. I like it.)

Repeat steps 1 & 2 for the other side of the window. If you have a center bracket, find the center of the window and mark 4" down from the ceiling as well. Check these marks with a level and adjust as necessary.


3. Line your brackets up with your measurements and mark the screw holes.

4. Drill holes where you marked. I like to use anchors when I hang curtains. You can find packs of anchors and screws at Lowe's or Walmart or just about anywhere. It will say on the package what size of drill bit to use.
Pop in the anchors. You might need a hammer.

5. Use the screws to put up the brackets.

6. Set the rod in the brackets, and you're done!

Unless you have more windows. Then you have to do it all over again. ;) If you're using ring clips, you can go ahead and put those on too.

Now go take a nap to recover from your strenuous endeavors.

Later this week we'll look at making and hemming curtains, so stay tuned! We're well on our way to getting our windows dressed up. Do you have any rooms that could use a curtain facelift?
Subscribe